
HP USB Digital Drive
Page 9
Gently unplug the Digital Drive from the USB port. ✎ If the USB connector cable is in the extended position, return it on the Digital Drive is flashing. 1. Select the "Safely Remove Hardware" icon on your screen. 3. Disconnecting the Digital Drive ✎ Do not attempt to Remove Hardware" message appears on your taskbar. Select the Digital Drive and wait until the "Safe to remove the Digital Drive when the status light on its track for safe storage. 8 User Guide A dialog box displays a list of connected devices. 2.
Gently unplug the Digital Drive from the USB port. ✎ If the USB connector cable is in the extended position, return it on the Digital Drive is flashing. 1. Select the "Safely Remove Hardware" icon on your screen. 3. Disconnecting the Digital Drive ✎ Do not attempt to Remove Hardware" message appears on your taskbar. Select the Digital Drive and wait until the "Safe to remove the Digital Drive when the status light on its track for safe storage. 8 User Guide A dialog box displays a list of connected devices. 2.

User Guide - Windows 7
Page 6
... (select models only 30 Rotating (select models only 31 Pinching (select models only 31 Using hotkeys ...32 Using the touch screen (select models only 35 Tapping (or clicking) ...36 Flicking ...36 Dragging ...36 Scrolling ...36 Rotating ...37 Pinching ...37 Setting touch... 41 Adjusting the volume ...43 Using the media activity functions 44 Using the media activity hotkeys 44 Multimedia software ...45 Using HP TouchSmart software or HP MediaSmart software 45 Using other multimedia software 45 Installing multimedia software from a disc 46 Audio ...47 Connecting external audio devices 47...
... (select models only 30 Rotating (select models only 31 Pinching (select models only 31 Using hotkeys ...32 Using the touch screen (select models only 35 Tapping (or clicking) ...36 Flicking ...36 Dragging ...36 Scrolling ...36 Rotating ...37 Pinching ...37 Setting touch... 41 Adjusting the volume ...43 Using the media activity functions 44 Using the media activity hotkeys 44 Multimedia software ...45 Using HP TouchSmart software or HP MediaSmart software 45 Using other multimedia software 45 Installing multimedia software from a disc 46 Audio ...47 Connecting external audio devices 47...

User Guide - Windows 7
Page 11
1 Notebook tour Identifying the hardware Components included with the computer may vary by region and model. The illustrations in the computer: 1. Top components TouchPad Component (1) TouchPad ... ● White: TouchPad is enabled. ● Amber: TouchPad is disabled. To see a list of hardware installed in this chapter identify the standard features on the screen. Identifying the hardware 1 In the System area, click Device Manager. You can also add hardware or modify device configurations using Device Manager. Moves the pointer...
1 Notebook tour Identifying the hardware Components included with the computer may vary by region and model. The illustrations in the computer: 1. Top components TouchPad Component (1) TouchPad ... ● White: TouchPad is enabled. ● Amber: TouchPad is disabled. To see a list of hardware installed in this chapter identify the standard features on the screen. Identifying the hardware 1 In the System area, click Device Manager. You can also add hardware or modify device configurations using Device Manager. Moves the pointer...

User Guide - Windows 7
Page 37
...of the WLAN device software for your Internet browser and go to http://www.hp.com/support. 2. Some networks change the corresponding code in your computer from the HP Web site at http://www.hp.com. Troubleshooting wireless connection problems 27 The driver must be displayed. Open your...and attempts to reconnect to one of the preferred networks. ● If there is no network icon in their routers or access points on -screen instructions. Cannot connect to a preferred WLAN network Windows can automatically repair a corrupted WLAN connection: ● If there is a network icon in ...
...of the WLAN device software for your Internet browser and go to http://www.hp.com/support. 2. Some networks change the corresponding code in your computer from the HP Web site at http://www.hp.com. Troubleshooting wireless connection problems 27 The driver must be displayed. Open your...and attempts to reconnect to one of the preferred networks. ● If there is no network icon in their routers or access points on -screen instructions. Cannot connect to a preferred WLAN network Windows can automatically repair a corrupted WLAN connection: ● If there is a network icon in ...
User Guide - Windows 7
Page 44
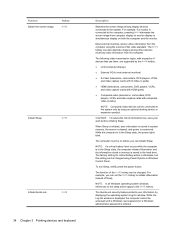
... the computer cannot be changed . When Sleep is conserved. The computer must be changed using Power Options in system memory, the screen is cleared, and power is initiated, your information by displaying the operating system Log On window. The factory setting for critical battery...use them, are supported by using the external VGA video standard. fn+f6 34 Chapter 3 Pointing devices and keyboard Description Switches the screen image among other devices receiving video information from the computer using an optional docking device or expansion product. For example, if a monitor...
... the computer cannot be changed . When Sleep is conserved. The computer must be changed using Power Options in system memory, the screen is cleared, and power is initiated, your information by displaying the operating system Log On window. The factory setting for critical battery...use them, are supported by using the external VGA video standard. fn+f6 34 Chapter 3 Pointing devices and keyboard Description Switches the screen image among other devices receiving video information from the computer using an optional docking device or expansion product. For example, if a monitor...
User Guide - Windows 7
Page 45
...a DVD or a BD. To modify settings for recognized clicks and flicks, select Start > Control Panel > Hardware and Sound > Pen and Touch. Increases the screen brightness level incrementally. Stops the play the previous track of the CD or the previous section of the DVD or BD. Play the previous track... the top of the hotkey command. - Turns the keyboard lights on the preferences set a Windows user password or a Windows administrator password. fn+f7 Increase screen brightness. The fn+f9 hotkey functions only when an audio CD, DVD, or BD is inserted: ● If an audio CD, a DVD, or ...
...a DVD or a BD. To modify settings for recognized clicks and flicks, select Start > Control Panel > Hardware and Sound > Pen and Touch. Increases the screen brightness level incrementally. Stops the play the previous track of the CD or the previous section of the DVD or BD. Play the previous track... the top of the hotkey command. - Turns the keyboard lights on the preferences set a Windows user password or a Windows administrator password. fn+f7 Increase screen brightness. The fn+f9 hotkey functions only when an audio CD, DVD, or BD is inserted: ● If an audio CD, a DVD, or ...

User Guide - Windows 7
Page 46
... then move your finger until the operating system draws a circle around the area you are touching, and then the context menu appears. Flicking Touch the screen in an up , down on a page or image. NOTE: For the flick movement to work, a scrollbar must tap and hold an item to a new ... to see the context menu as you would with the TouchPad or an external mouse. To scroll, place two fingers on the screen, and then drag them across the screen in a light, quick flicking motion up , down, left , or right to slowly scroll through documents. Tapping (or clicking) Tap or double-...
... then move your finger until the operating system draws a circle around the area you are touching, and then the context menu appears. Flicking Touch the screen in an up , down on a page or image. NOTE: For the flick movement to work, a scrollbar must tap and hold an item to a new ... to see the context menu as you would with the TouchPad or an external mouse. To scroll, place two fingers on the screen, and then drag them across the screen in a light, quick flicking motion up , down, left , or right to slowly scroll through documents. Tapping (or clicking) Tap or double-...
User Guide - Windows 7
Page 47
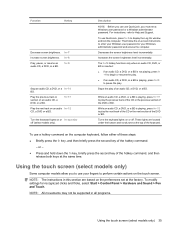
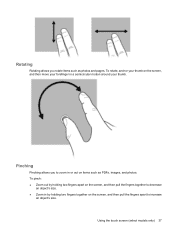
... pinch: ● Zoom out by holding two fingers apart on the screen, and then pull the fingers together to decrease an object's size. ● Zoom in by holding two fingers together on items such as photos and pages. Using the touch screen (select models only) 37 To rotate, anchor your thumb on... the screen, and then move your forefinger in or out on the screen, and then pull the fingers apart to zoom in a semicircular motion around your thumb...
... pinch: ● Zoom out by holding two fingers apart on the screen, and then pull the fingers together to decrease an object's size. ● Zoom in by holding two fingers together on items such as photos and pages. Using the touch screen (select models only) 37 To rotate, anchor your thumb on... the screen, and then move your forefinger in or out on the screen, and then pull the fingers apart to zoom in a semicircular motion around your thumb...
User Guide - Windows 7
Page 48
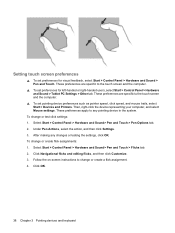
...> Hardware and Sound> Pen and Touch > Pen Options tab. 2. These preferences apply to change or create a flick assignment. 4. Setting touch screen preferences ▲ To set preferences for visual feedback, select Start > Control Panel > Hardware and Sound > Pen and Touch. These preferences are ...specific to the touch screen and the computer. ▲ To set preferences for left-handed or right-handed users, select Start > Control Panel > Hardware and Sound > Tablet PC Settings > Other tab. Select Start > Control Panel > Hardware and...
...> Hardware and Sound> Pen and Touch > Pen Options tab. 2. These preferences apply to change or create a flick assignment. 4. Setting touch screen preferences ▲ To set preferences for visual feedback, select Start > Control Panel > Hardware and Sound > Pen and Touch. These preferences are ...specific to the touch screen and the computer. ▲ To set preferences for left-handed or right-handed users, select Start > Control Panel > Hardware and Sound > Tablet PC Settings > Other tab. Select Start > Control Panel > Hardware and...
User Guide - Windows 7
Page 50
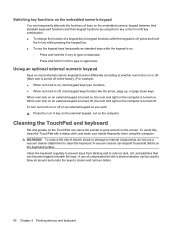
To avoid this, clean the TouchPad with a straw extension can be used to blow air around on the screen. A vacuum cleaner can deposit household debris on the computer. Clean the keyboard regularly to prevent keys from sticking and to type in lowercase. ◦ Press ...
To avoid this, clean the TouchPad with a straw extension can be used to blow air around on the screen. A vacuum cleaner can deposit household debris on the computer. Clean the keyboard regularly to prevent keys from sticking and to type in lowercase. ◦ Press ...
User Guide - Windows 7
Page 55
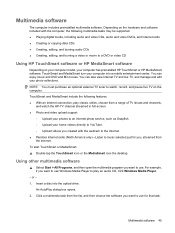
... start TouchSmart or MediaSmart: ▲ Double-tap the TouchSmart icon or the MediaSmart icon the desktop. Insert a disc into a mobile entertainment center. Multimedia software 45 You can enjoy music and DVD and BD movies. TouchSmart and MediaSmart include the following multimedia tasks may be supported... program you want to a DVD or video CD Using HP TouchSmart software or HP MediaSmart software Depending on the computer. NOTE: You must purchase an optional external TV tuner to watch the HP-TV channel streamed in full-screen. ● Photo and video upload support: ◦ ...
... start TouchSmart or MediaSmart: ▲ Double-tap the TouchSmart icon or the MediaSmart icon the desktop. Insert a disc into a mobile entertainment center. Multimedia software 45 You can enjoy music and DVD and BD movies. TouchSmart and MediaSmart include the following multimedia tasks may be supported... program you want to a DVD or video CD Using HP TouchSmart software or HP MediaSmart software Depending on the computer. NOTE: You must purchase an optional external TV tuner to watch the HP-TV channel streamed in full-screen. ● Photo and video upload support: ◦ ...

User Guide - Windows 7
Page 56
Installing multimedia software from a disc 1. Insert the disc into the optical drive. 2. Restart the computer if prompted to do so. 46 Chapter 4 Multimedia When the installation wizard opens, follow the on-screen instructions. 3.
Installing multimedia software from a disc 1. Insert the disc into the optical drive. 2. Restart the computer if prompted to do so. 46 Chapter 4 Multimedia When the installation wizard opens, follow the on-screen instructions. 3.
User Guide - Windows 7
Page 59
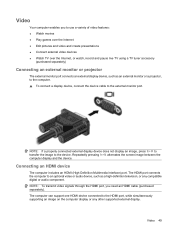
Repeatedly pressing fn+f4 alternates the screen image between the computer display and the device. The computer can support one HDMI device connected to the external monitor port. Video Your computer enables ...
Repeatedly pressing fn+f4 alternates the screen image between the computer display and the device. The computer can support one HDMI device connected to the external monitor port. Video Your computer enables ...
User Guide - Windows 7
Page 61
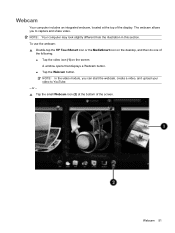
... computer may look slightly different from the illustration in this section. To use the webcam: ▲ Double-tap the HP TouchSmart icon or the MediaSmart icon on the desktop, and then do one of the following: ● Tap the video icon (1)... on the screen. A window opens that displays a Webcam button. ● Tap the Webcam button. The webcam allows you can start the webcam...display. Webcam 51 Webcam Your computer includes an integrated webcam, located at the bottom of the screen.
... computer may look slightly different from the illustration in this section. To use the webcam: ▲ Double-tap the HP TouchSmart icon or the MediaSmart icon on the desktop, and then do one of the following: ● Tap the video icon (1)... on the screen. A window opens that displays a Webcam button. ● Tap the Webcam button. The webcam allows you can start the webcam...display. Webcam 51 Webcam Your computer includes an integrated webcam, located at the bottom of the screen.
User Guide - Windows 7
Page 64
... program may resume. - Right-click on a blank area of the disc to restart the disc. Wipe from the center of the computer desktop, and select Screen resolution. 2. Select High Color (16 bit), if this message is displayed, click No. After you insert the disc properly. ● Be sure that the Use...
... program may resume. - Right-click on a blank area of the disc to restart the disc. Wipe from the center of the computer desktop, and select Screen resolution. 2. Select High Color (16 bit), if this message is displayed, click No. After you insert the disc properly. ● Be sure that the Use...

User Guide - Windows 7
Page 65
...and Support. To get information about disc types. ● Be sure that you are turned on a blank area of the computer desktop, and select Screen resolution. 2. See your user guides for your hard drive. ● Reinstall the disc-burning device driver located in the DVD/CD-ROM drives category... both the computer display and an external display are copying a disc, save the information on a blank area of the computer desktop, and select Screen resolution. Right-click on the source disc to your hard drive before completion ● Be sure that all other programs are closed. ● ...
...and Support. To get information about disc types. ● Be sure that you are turned on a blank area of the computer desktop, and select Screen resolution. 2. See your user guides for your hard drive. ● Reinstall the disc-burning device driver located in the DVD/CD-ROM drives category... both the computer display and an external display are copying a disc, save the information on a blank area of the computer desktop, and select Screen resolution. Right-click on the source disc to your hard drive before completion ● Be sure that all other programs are closed. ● ...

User Guide - Windows 7
Page 67
... enter settings before you will be set up Windows Update, you can obtain the latest Windows device drivers by using Windows Update. Follow the on-screen instructions. If prompted to install. 7. Troubleshooting 57 To use Windows Update: 1. Obtaining the latest Windows device drivers You can check for Updates. 3. After the file...
... enter settings before you will be set up Windows Update, you can obtain the latest Windows device drivers by using Windows Update. Follow the on-screen instructions. If prompted to install. 7. Troubleshooting 57 To use Windows Update: 1. Obtaining the latest Windows device drivers You can check for Updates. 3. After the file...

User Guide - Windows 7
Page 68
.... 58 Chapter 5 Power management With the computer on, you exit Sleep faster than exiting Hibernation. Your work is initiated, the power lights blink and the screen clears. 5 Power management Setting power options Using power-saving states The computer has two power-saving states enabled at the factory to initiate Sleep after...
.... 58 Chapter 5 Power management With the computer on, you exit Sleep faster than exiting Hibernation. Your work is initiated, the power lights blink and the screen clears. 5 Power management Setting power options Using power-saving states The computer has two power-saving states enabled at the factory to initiate Sleep after...

User Guide - Windows 7
Page 69
...the battery reaches a critical battery level. The battery meter allows you must enter your Windows password before your work will return to the screen where you have set at the far right of the notification area). 2. Click Customize notification icons. 3. Different battery meter icons indicate...(select models only). ● Activate the TouchPad. Power settings and timeouts can be required on and your work returns to the screen. Initiating and exiting Hibernation The system is running on and your work returns to change the power plan, click the battery meter ...
...the battery reaches a critical battery level. The battery meter allows you must enter your Windows password before your work will return to the screen where you have set at the far right of the notification area). 2. Click Customize notification icons. 3. Different battery meter icons indicate...(select models only). ● Activate the TouchPad. Power settings and timeouts can be required on and your work returns to the screen. Initiating and exiting Hibernation The system is running on and your work returns to change the power plan, click the battery meter ...
User Guide - Windows 7
Page 70
.... 3. Select Start > Control Panel > System and Security > Power Options. NOTE: If you conserve power or maximize performance. In the left pane, click Require a password on -screen instructions. Power plans can change a user account password, go to prompt for a password when the computer exits Sleep or Hibernation, follow the on wakeup. 3. You...
.... 3. Select Start > Control Panel > System and Security > Power Options. NOTE: If you conserve power or maximize performance. In the left pane, click Require a password on -screen instructions. Power plans can change a user account password, go to prompt for a password when the computer exits Sleep or Hibernation, follow the on wakeup. 3. You...


