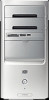
PC Basics Guide
Page 3
Table of Contents Introducing the PC 1 Protecting Your PC 2 Using a Power Surge Suppressor 2 Using Virus Protection Programs 3 Using Windows Update 3 Turning Off the PC 4 Standby Mode 4 Hibernation Mode 5 Automatic Standby or Hibernation 5 Restarting the PC 6 Using the Mouse 6 Using the Mouse Buttons 7 Scrolling 7 Autoscrolling 8 Panning 8 Switching Mouse Button Functions 8 Changing Mouse Pointer Speed 8 Using the Keyboard 9 Keyboard Shortcuts...
Table of Contents Introducing the PC 1 Protecting Your PC 2 Using a Power Surge Suppressor 2 Using Virus Protection Programs 3 Using Windows Update 3 Turning Off the PC 4 Standby Mode 4 Hibernation Mode 5 Automatic Standby or Hibernation 5 Restarting the PC 6 Using the Mouse 6 Using the Mouse Buttons 7 Scrolling 7 Autoscrolling 8 Panning 8 Switching Mouse Button Functions 8 Changing Mouse Pointer Speed 8 Using the Keyboard 9 Keyboard Shortcuts...
PC Basics Guide
Page 10
...the Start Menu" on the PC chassis. 1 Close any programs, folders, and documents that were open software programs. To close programs, click the X at the upper-right corner of each program window. 2 Click Start on the keyboard, or press the Standby button. To conserve power, you left it. The screen... display reappears just as you can set the power management timers to put the PC automatically into standby mode. 2 When you want to go through the normal startup ...
...the Start Menu" on the PC chassis. 1 Close any programs, folders, and documents that were open software programs. To close programs, click the X at the upper-right corner of each program window. 2 Click Start on the keyboard, or press the Standby button. To conserve power, you left it. The screen... display reappears just as you can set the power management timers to put the PC automatically into standby mode. 2 When you want to go through the normal startup ...
PC Basics Guide
Page 11
...click Restart. 2 Turn on the front of the PC. refer to steps 1 through 6 of "Automatic Standby or Hibernation" on page 5. 4 When you want to use the PC again after hibernation, press the On button on the PC again. If the PC does not work properly when you turn on the ...taskbar. 2 Click Turn Off Computer. 3 Click Restart. Introducing the PC 5 To put the PC into standby or hibernation mode automatically, modify the power management settings:...
...click Restart. 2 Turn on the front of the PC. refer to steps 1 through 6 of "Automatic Standby or Hibernation" on page 5. 4 When you want to use the PC again after hibernation, press the On button on the PC again. If the PC does not work properly when you turn on the ...taskbar. 2 Click Turn Off Computer. 3 Click Restart. Introducing the PC 5 To put the PC into standby or hibernation mode automatically, modify the power management settings:...

PC Basics Guide
Page 12
...Use the mouse on a glass, translucent, or reflective surface. 6 PC Basics Guide NOTE: The optical mouse cannot work , press the On button for the PC, click the time to turn on the Windows desktop. In the Power Schemes box, select a power scheme from the drop-down list. Using the Mouse Your... PC includes a mouse for directing the cursor (pointer) on automatic ...
...Use the mouse on a glass, translucent, or reflective surface. 6 PC Basics Guide NOTE: The optical mouse cannot work , press the On button for the PC, click the time to turn on the Windows desktop. In the Power Schemes box, select a power scheme from the drop-down list. Using the Mouse Your... PC includes a mouse for directing the cursor (pointer) on automatic ...
PC Basics Guide
Page 20
... Start, choose Control Panel, click Sounds, Speech, and Audio Devices, if it may be passive (no power button and no power cord) or active (power button or power cord). The Volume icon appears in the taskbar check box. Connect your PC has multi-channel audio speaker capacity (select models only), you do not see the quick setup...
... Start, choose Control Panel, click Sounds, Speech, and Audio Devices, if it may be passive (no power button and no power cord) or active (power button or power cord). The Volume icon appears in the taskbar check box. Connect your PC has multi-channel audio speaker capacity (select models only), you do not see the quick setup...
PC Basics Guide
Page 48
..., 23 M microphone adjusting volume, 16 using, 15 modem connecting, 31 setting up, 31 42 PC Basics Guide monitor changing resolution, 13 changing where desktop displays, 13 selecting, 13 mouse autoscroll feature, 8 buttons, 7 double-click, 7 left-handed, 8 optical, 6 panning feature, 8 pointer speed, adjusting... page, 33 hyperlink, defined, 33 I indicators, keyboard, 11 Internet about , 32 O Off button. floppy disk. See turning off , 4 performance improving PC, 37 pointer speed, adjusting, 8 power management settings, modifying, 5 printer using , 6 wireless, 7 multi-channel speakers, 14 Mute...
..., 23 M microphone adjusting volume, 16 using, 15 modem connecting, 31 setting up, 31 42 PC Basics Guide monitor changing resolution, 13 changing where desktop displays, 13 selecting, 13 mouse autoscroll feature, 8 buttons, 7 double-click, 7 left-handed, 8 optical, 6 panning feature, 8 pointer speed, adjusting... page, 33 hyperlink, defined, 33 I indicators, keyboard, 11 Internet about , 32 O Off button. floppy disk. See turning off , 4 performance improving PC, 37 pointer speed, adjusting, 8 power management settings, modifying, 5 printer using , 6 wireless, 7 multi-channel speakers, 14 Mute...

Upgrading and Servicing Guide
Page 5
... disconnect the modem cord from the telephone system, and then disconnect the PC from the PC. 2 Click the Start button, and then click Turn Off Computer. CAUTION: To reduce the risk of personal injury from electrical shock or hot surfaces, disconnect the power cord from the wall outlet, and allow the internal system components...
... disconnect the modem cord from the telephone system, and then disconnect the PC from the PC. 2 Click the Start button, and then click Turn Off Computer. CAUTION: To reduce the risk of personal injury from electrical shock or hot surfaces, disconnect the power cord from the wall outlet, and allow the internal system components...

InterVideo Home Theater Quick Start Guide
Page 8
... (TV) Print Picture Close current application Launch music Launch pictures Launch video clips Launch DVD / VCD or menus Mouse pad or arrow keys (see Toggle button) Back step OK or Enter Go to previous Chapter select / check / uncheck Play or pause Go to next chapter Fast rewind Stop Fast forward Volume... and down Mute audio Record Toggle: switches between mouse pad and arrow keys Number keys 0-9 Shuffle playing sequence Repeat video loop Note: Press Home Theater button to launch InterVideo Home Theater. Remote Control Features Function...
... (TV) Print Picture Close current application Launch music Launch pictures Launch video clips Launch DVD / VCD or menus Mouse pad or arrow keys (see Toggle button) Back step OK or Enter Go to previous Chapter select / check / uncheck Play or pause Go to next chapter Fast rewind Stop Fast forward Volume... and down Mute audio Record Toggle: switches between mouse pad and arrow keys Number keys 0-9 Shuffle playing sequence Repeat video loop Note: Press Home Theater button to launch InterVideo Home Theater. Remote Control Features Function...
Getting Started Guide
Page 9
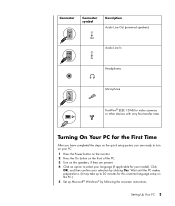
Click OK, and then confirm your model). Setting Up Your PC 3 Wait until the PC makes preparations. (It may take up Microsoft® Windows® by clicking Yes. Connector Connector symbol Description Audio Line Out (powered speakers) OUT Audio Line In IN Headphones Microphone FireWire® (IEEE 1394) for video ... have completed the steps on the quick setup poster, you are ready to turn on your PC. 1 Press the Power button on the monitor. 2 Press the On button on the front of the PC. 3 Turn on the PC.) 5 Set up to 30 minutes for this one-time language setup on the speakers, if...
Click OK, and then confirm your model). Setting Up Your PC 3 Wait until the PC makes preparations. (It may take up Microsoft® Windows® by clicking Yes. Connector Connector symbol Description Audio Line Out (powered speakers) OUT Audio Line In IN Headphones Microphone FireWire® (IEEE 1394) for video ... have completed the steps on the quick setup poster, you are ready to turn on your PC. 1 Press the Power button on the monitor. 2 Press the On button on the front of the PC. 3 Turn on the PC.) 5 Set up to 30 minutes for this one-time language setup on the speakers, if...

Getting Started Guide
Page 13
Icon Feature Standby User Description Puts PC into power-saving mode (screen is blank but PC is still on the left side of these special buttons on ). To make screen reappear, press the Esc key, or press Standby again. Opens the Help and Support Center. Can be... program. May take 10-30 seconds before screen reappears. Switches between the PC users. hp or or or or HP Help Pictures (Photos) Music Links to specific functions. Can be reconfigured. Identifying Special Keyboard Buttons There are special buttons (select models only) at the top of the keyboard. (Some models...
Icon Feature Standby User Description Puts PC into power-saving mode (screen is blank but PC is still on the left side of these special buttons on ). To make screen reappear, press the Esc key, or press Standby again. Opens the Help and Support Center. Can be... program. May take 10-30 seconds before screen reappears. Switches between the PC users. hp or or or or HP Help Pictures (Photos) Music Links to specific functions. Can be reconfigured. Identifying Special Keyboard Buttons There are special buttons (select models only) at the top of the keyboard. (Some models...

Getting Started Guide
Page 23
...4 Click Sounds and Audio Devices. 5 On the Volume tab, in the Device volume area click the Advanced button. selects the number of the circular equalizer control to use the Equalizer, click the Power button in the box. Selecting the Back Line in/Mic, Front Line in connectors for recording (6-connector) Perform these... opens and shows Line In 1 or 2 selected. However, to turn on the Equalizer. To use the mic connector on the back of the PC, click the Select check box under Microphone so a check mark appears in the center of speakers, shows the Connection Guide, and has the Speaker ...
...4 Click Sounds and Audio Devices. 5 On the Volume tab, in the Device volume area click the Advanced button. selects the number of the circular equalizer control to use the Equalizer, click the Power button in the box. Selecting the Back Line in/Mic, Front Line in connectors for recording (6-connector) Perform these... opens and shows Line In 1 or 2 selected. However, to turn on the Equalizer. To use the mic connector on the back of the PC, click the Select check box under Microphone so a check mark appears in the center of speakers, shows the Connection Guide, and has the Speaker ...
Getting Started Guide
Page 97
... 84 adding images 83 antivirus, installing program 5 appendable disc 65 audio wizard 18 automatic recording options setting 72 B burning CDs 57 buttons customizing 9 E-Mail 8 Help 7 HP 7 Mute 8 On 3 Power 3 Search 8 special keys 7 Standby 7 user 7 C cable tunnel 20, 24 cables, for connecting a TV 33 camera docking...speakers 6-connectors 15 connectors cable tunnel 20, 24 PC back 2 symbols on chassis 2 converting recorded TV 86 copying a DVD or CD 66 country/region codes 54 creating CDs 57 creating labels 47 customizing keyboard buttons 9 D desktop 6 digital images, managing 45 digital picture 29,...
... 84 adding images 83 antivirus, installing program 5 appendable disc 65 audio wizard 18 automatic recording options setting 72 B burning CDs 57 buttons customizing 9 E-Mail 8 Help 7 HP 7 Mute 8 On 3 Power 3 Search 8 special keys 7 Standby 7 user 7 C cable tunnel 20, 24 cables, for connecting a TV 33 camera docking...speakers 6-connectors 15 connectors cable tunnel 20, 24 PC back 2 symbols on chassis 2 converting recorded TV 86 copying a DVD or CD 66 country/region codes 54 creating CDs 57 creating labels 47 customizing keyboard buttons 9 D desktop 6 digital images, managing 45 digital picture 29,...

Getting Started Guide
Page 98
... disk drive connecting an HP Personal Media Drive to the PC 40 Help onscreen Help and Support 88 Help and Support 88 Help and Support Center 5 Help button 7 HP Image Zone Plus 45 gallery 46 tab definitions 46 HP Instant Support 88 HP keyboard button 7 HP Organize 6 HP Personal Media Drive 39 activity and power lights 41 automatic on and...
... disk drive connecting an HP Personal Media Drive to the PC 40 Help onscreen Help and Support 88 Help and Support 88 Help and Support Center 5 Help button 7 HP Image Zone Plus 45 gallery 46 tab definitions 46 HP Instant Support 88 HP keyboard button 7 HP Organize 6 HP Personal Media Drive 39 activity and power lights 41 automatic on and...


