
End User License Agreement
Page 1
...for use the Software Product only on more than one computer, you may load the Software ON THE CONDITION THAT YOU Product into the local memory or storage device of download. Copying. Freeware. You may install and use on those computers. BY purposes of this EULA: a. DOWNLOADING, ... not have Software Product into Your Computer's AGREE TO ALL TERMS AND temporary memory (RAM) for use the Software Product on or made available by HP for CONDITIONS OF THIS EULA. You may accompany the HP Product. You may not separate component parts of the Freeware by third parties ...
...for use the Software Product only on more than one computer, you may load the Software ON THE CONDITION THAT YOU Product into the local memory or storage device of download. Copying. Freeware. You may install and use on those computers. BY purposes of this EULA: a. DOWNLOADING, ... not have Software Product into Your Computer's AGREE TO ALL TERMS AND temporary memory (RAM) for use the Software Product on or made available by HP for CONDITIONS OF THIS EULA. You may accompany the HP Product. You may not separate component parts of the Freeware by third parties ...

Safety and Regulatory Information Desktops, Thin Clients, and Personal Workstations
Page 29
... requirement in SJ/T11363-2006. Table 2-2 Toxic and Hazardous Substances and Elements (continued) Part Name Lead (Pb) Mercury (Hg) Cadmium (Cd) Hexavalent Chromium (Cr(VI)) Memory X O O O I/O PCAs X O O O Power supply X O O O Keyboard X O O O Mouse X O O O Chassis/Other X O O O Fans X O O O Internal/External Media Reading X O O O Devices External Control Devices X O O O Cable X O O O Hard Disk Drive X O O O Display X X O O Polybrominated biphenyls (PBB) Polybrominated...
... requirement in SJ/T11363-2006. Table 2-2 Toxic and Hazardous Substances and Elements (continued) Part Name Lead (Pb) Mercury (Hg) Cadmium (Cd) Hexavalent Chromium (Cr(VI)) Memory X O O O I/O PCAs X O O O Power supply X O O O Keyboard X O O O Mouse X O O O Chassis/Other X O O O Fans X O O O Internal/External Media Reading X O O O Devices External Control Devices X O O O Cable X O O O Hard Disk Drive X O O O Display X X O O Polybrominated biphenyls (PBB) Polybrominated...
PC Basics Guide
Page 7
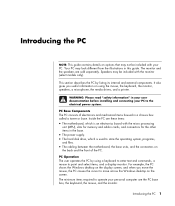
... which is an electronics board with the micro processing unit (MPU), slots for memory and add-in cards, and connectors for the other items in your user documentation before installing and connecting your PC to move the mouse, the PC causes the cursor to the electrical power system. Introducing the... The power supply. • The hard disk drive, which is used to operate your personal computer are sold separately. For example, the PC shows the Windows desktop on the display screen, and when you useful information on using a keyboard to enter text and commands, a mouse to point and select ...
... which is an electronics board with the micro processing unit (MPU), slots for memory and add-in cards, and connectors for the other items in your user documentation before installing and connecting your PC to move the mouse, the PC causes the cursor to the electrical power system. Introducing the... The power supply. • The hard disk drive, which is used to operate your personal computer are sold separately. For example, the PC shows the Windows desktop on the display screen, and when you useful information on using a keyboard to enter text and commands, a mouse to point and select ...
PC Basics Guide
Page 8
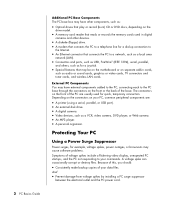
...record (burn) CD or DVD discs, depending on the drive model. • A memory card reader that reads or records the memory cards used for quick, temporary connection. The connectors on the front or the back of the PC are usually used in digital cameras and other devices. • A diskette (floppy)... drive. • A modem that connects the PC to a telephone line for a dial-...
...record (burn) CD or DVD discs, depending on the drive model. • A memory card reader that reads or records the memory cards used for quick, temporary connection. The connectors on the front or the back of the PC are usually used in digital cameras and other devices. • A diskette (floppy)... drive. • A modem that connects the PC to a telephone line for a dial-...
PC Basics Guide
Page 11
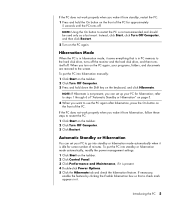
... hibernation mode, it saves everything that a check mark appears in PC memory to the hard disk drive, turns off the monitor and the ... click Start, click Turn Off Computer, and then click Restart. 2 Turn on the front of the PC. To put the PC into standby or hibernation mode automatically, modify the power management settings: 1 Click Start on the keyboard,... and click Hibernate. When you wake it from standby, restart the PC: 1 Press and hold down the Shift key on the taskbar. 2 Click Control Panel. 3 Click Performance and Maintenance...
... hibernation mode, it saves everything that a check mark appears in PC memory to the hard disk drive, turns off the monitor and the ... click Start, click Turn Off Computer, and then click Restart. 2 Turn on the front of the PC. To put the PC into standby or hibernation mode automatically, modify the power management settings: 1 Click Start on the keyboard,... and click Hibernate. When you wake it from standby, restart the PC: 1 Press and hold down the Shift key on the taskbar. 2 Click Control Panel. 3 Click Performance and Maintenance...

PC Basics Guide
Page 12
... the On button for 5 or more seconds to turn on automatic standby for the PC, click the time to elapse before hibernation (such as After 20 mins) in its memory. 6 If you restart the computer, the PC starts over using the operating system and software in the System standby list. •... longer time than the system standby timer. 8 Click OK. Use the mouse on the Windows desktop. Using the Mouse Your PC includes a mouse for standby and hibernation. Choose the settings. • To turn off the PC. You may wish to elapse before standby (such as After 1 hour) in the System hibernates...
... the On button for 5 or more seconds to turn on automatic standby for the PC, click the time to elapse before hibernation (such as After 20 mins) in its memory. 6 If you restart the computer, the PC starts over using the operating system and software in the System standby list. •... longer time than the system standby timer. 8 Click OK. Use the mouse on the Windows desktop. Using the Mouse Your PC includes a mouse for standby and hibernation. Choose the settings. • To turn off the PC. You may wish to elapse before standby (such as After 1 hour) in the System hibernates...

PC Basics Guide
Page 32
You can connect a digital image source, such as a digital camera or a digital video camera, directly to store digital picture files. 26 PC Basics Guide Digital cameras and other digital imaging devices by digital cameras and other digital imaging devices use memory cards, or media, to the PC or through a docking station. Working with Digital Images You can copy digital picture files from the device appear in the My Pictures folder. Digital picture files you copy or download from the memory cards used by using the memory card reader (select models only).
You can connect a digital image source, such as a digital camera or a digital video camera, directly to store digital picture files. 26 PC Basics Guide Digital cameras and other digital imaging devices by digital cameras and other digital imaging devices use memory cards, or media, to the PC or through a docking station. Working with Digital Images You can copy digital picture files from the device appear in the My Pictures folder. Digital picture files you copy or download from the memory cards used by using the memory card reader (select models only).

PC Basics Guide
Page 33
...a picture, music or sounds, a document, or data. Each file within component drives, such as diskettes, memory cards, CDs or DVDs, or to quickly see all the folders and files on your PC involves working with the same name. To open My Computer, click the Start button and then click My...the My Computer and Windows Explorer views, double-click folders to organize the files on your path through the opened folders. Managing Files 27 The PC can even contain other folders. To navigate around in a digital camera. Organizing Files with files. Managing Files A file is any type of...
...a picture, music or sounds, a document, or data. Each file within component drives, such as diskettes, memory cards, CDs or DVDs, or to quickly see all the folders and files on your PC involves working with the same name. To open My Computer, click the Start button and then click My...the My Computer and Windows Explorer views, double-click folders to organize the files on your path through the opened folders. Managing Files 27 The PC can even contain other folders. To navigate around in a digital camera. Organizing Files with files. Managing Files A file is any type of...
PC Basics Guide
Page 43
... memory by adding or upgrading memory modules in the chassis. • Increasing available hard disk drive space. • Consolidating scattered files and folders on the taskbar. 2 Click Control Panel. 3 Click Performance and Maintenance, if it is present. 4 Double-click Administrative Tools. 5 Double-click Computer Management. Increasing Available Hard Disk Drive Space Your PC...
... memory by adding or upgrading memory modules in the chassis. • Increasing available hard disk drive space. • Consolidating scattered files and folders on the taskbar. 2 Click Control Panel. 3 Click Performance and Maintenance, if it is present. 4 Double-click Administrative Tools. 5 Double-click Computer Management. Increasing Available Hard Disk Drive Space Your PC...
Upgrading and Servicing Guide
Page 3
... Side Panel 2 Replacing the Side Panel 2 Removing the Front Panel 2 Replacing the Front Panel 3 Locating Components Inside the PC 3 Removing and Replacing Drives 3 Removing a Drive 4 Replacing or Adding a Drive 5 Adding Memory 7 Removing a Memory Module 7 Installing a Memory Module 8 Removing or Installing an Add-In Card 8 Removing an Add-In Card 9 Installing an Add-In Card...
... Side Panel 2 Replacing the Side Panel 2 Removing the Front Panel 2 Replacing the Front Panel 3 Locating Components Inside the PC 3 Removing and Replacing Drives 3 Removing a Drive 4 Replacing or Adding a Drive 5 Adding Memory 7 Removing a Memory Module 7 Installing a Memory Module 8 Removing or Installing an Add-In Card 8 Removing an Add-In Card 9 Installing an Add-In Card...
Upgrading and Servicing Guide
Page 6
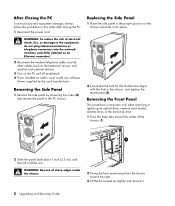
... the hole for the thumbscrew aligns with the hole in this order after closing the PC. 1 Reconnect the power cord. Removing the Front Panel This procedure is necessary only when removing or replacing an optical drive, memory card reader, diskette drive, or the hard disk drive. 1 Press the three tabs... toward the right. 3 Lift the front panel up slightly and remove it off the unit. After Closing the PC To avoid injury and equipment damage, always follow ...
... the hole for the thumbscrew aligns with the hole in this order after closing the PC. 1 Reconnect the power cord. Removing the Front Panel This procedure is necessary only when removing or replacing an optical drive, memory card reader, diskette drive, or the hard disk drive. 1 Press the three tabs... toward the right. 3 Lift the front panel up slightly and remove it off the unit. After Closing the PC To avoid injury and equipment damage, always follow ...
Upgrading and Servicing Guide
Page 7
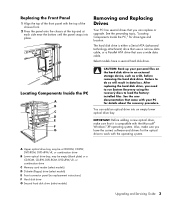
...-RW, DVD-ROM, DVD+RW/+R, or combination drive C Memory card reader (select models) D Diskette (floppy) drive (select models) E Front connector panel (no replacement instructions) F Hard disk drive G Second hard disk drive (select models) Upgrading and Servicing Guide 3 Removing and Replacing Drives Your PC has several drives that uses a wide data cable. See...
...-RW, DVD-ROM, DVD+RW/+R, or combination drive C Memory card reader (select models) D Diskette (floppy) drive (select models) E Front connector panel (no replacement instructions) F Hard disk drive G Second hard disk drive (select models) Upgrading and Servicing Guide 3 Removing and Replacing Drives Your PC has several drives that uses a wide data cable. See...
Upgrading and Servicing Guide
Page 8
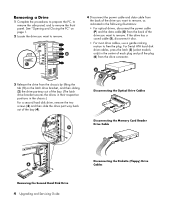
... Optical Drive Cables Disconnecting the Memory Card Reader Drive Cable Removing the Second Hard Disk Drive 4 Upgrading and Servicing Guide Disconnecting the Diskette (Floppy) Drive Cables Removing a Drive 1 Complete the procedures to prepare the PC, to remove the side panel, and to remove. See "Opening and Closing the PC" on the latch drive...
... Optical Drive Cables Disconnecting the Memory Card Reader Drive Cable Removing the Second Hard Disk Drive 4 Upgrading and Servicing Guide Disconnecting the Diskette (Floppy) Drive Cables Removing a Drive 1 Complete the procedures to prepare the PC, to remove the side panel, and to remove. See "Opening and Closing the PC" on the latch drive...
Upgrading and Servicing Guide
Page 10
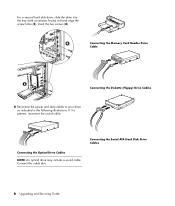
If it is present, reconnect the sound cable. Connect this cable also. Connecting the Optical Drive Cables NOTE: An optical drive may include a sound cable. Insert the two screws (4). Connecting the Memory Card Reader Drive Cable Connecting the Diskette (Floppy) Drive Cables 6 Reconnect the power and data cables to your drive as indicated in the following illustrations. For a second hard disk drive, slide the drive into the bay (with connectors facing out) and align the screw holes (3). Connecting the Serial ATA Hard Disk Drive Cables 6 Upgrading and Servicing Guide
If it is present, reconnect the sound cable. Connect this cable also. Connecting the Optical Drive Cables NOTE: An optical drive may include a sound cable. Insert the two screws (4). Connecting the Memory Card Reader Drive Cable Connecting the Diskette (Floppy) Drive Cables 6 Reconnect the power and data cables to your drive as indicated in the following illustrations. For a second hard disk drive, slide the drive into the bay (with connectors facing out) and align the screw holes (3). Connecting the Serial ATA Hard Disk Drive Cables 6 Upgrading and Servicing Guide

Upgrading and Servicing Guide
Page 11
...drive, and the connector labeled Slave (B) to remove the side panel. A DDR DIMM To determine which model PC you can replace the existing memory module(s) with random access memory (RAM), which temporarily stores data and instructions on which type and speed of the contacts. Removing...to the Web site listed in -line memory modules). See "Opening and Closing the PC" on page 1. 2 Gently lay the PC on its side. 3 Locate the memory sockets on page 1. Connect to second hard drive (select models only) C - Adding Memory Your PC comes with higher-capacity ones. WARNING: ...
...drive, and the connector labeled Slave (B) to remove the side panel. A DDR DIMM To determine which model PC you can replace the existing memory module(s) with random access memory (RAM), which temporarily stores data and instructions on which type and speed of the contacts. Removing...to the Web site listed in -line memory modules). See "Opening and Closing the PC" on page 1. 2 Gently lay the PC on its side. 3 Locate the memory sockets on page 1. Connect to second hard drive (select models only) C - Adding Memory Your PC comes with higher-capacity ones. WARNING: ...
Upgrading and Servicing Guide
Page 12
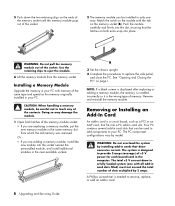
... module, and install additional modules in cards that can be installed in your PC. See "Opening and Closing the PC" on both latches of the memory module socket: • If you are replacing a memory module, put the new memory module in the computer. The total +5 V current draw in a fully loaded...Push down the two retaining clips on the ends of the memory socket until the memory module pops out of the socket. 2 The memory module can be used to add components to your PC. Installing a Memory Module Upgrade the memory in your PC with memory of the same type and speed as a PCI or an...
... module, and install additional modules in cards that can be installed in your PC. See "Opening and Closing the PC" on both latches of the memory module socket: • If you are replacing a memory module, put the new memory module in the computer. The total +5 V current draw in a fully loaded...Push down the two retaining clips on the ends of the memory socket until the memory module pops out of the socket. 2 The memory module can be used to add components to your PC. Installing a Memory Module Upgrade the memory in your PC with memory of the same type and speed as a PCI or an...
Upgrading and Servicing Guide
Page 14
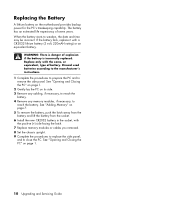
...years. See "Opening and Closing the PC" on page 1. 2 Gently lay the PC on page 1. 10 Upgrading and Servicing Guide See "Opening and Closing the PC" on its side. 3 Remove any cabling, if necessary, to reach the battery. 4 Remove any memory modules, if necessary, to reach the... battery. WARNING: There is incorrectly replaced. See "Adding Memory" on the motherboard provides backup power for the PC's timekeeping capability. When the battery starts to remove the side panel. Replacing...
...years. See "Opening and Closing the PC" on page 1. 2 Gently lay the PC on page 1. 10 Upgrading and Servicing Guide See "Opening and Closing the PC" on its side. 3 Remove any cabling, if necessary, to reach the battery. 4 Remove any memory modules, if necessary, to reach the... battery. WARNING: There is incorrectly replaced. See "Adding Memory" on the motherboard provides backup power for the PC's timekeeping capability. When the battery starts to remove the side panel. Replacing...

Warranty and Support Guide
Page 8
... "online" or electronic documentation. You may load the Software Product into the local memory or storage device of this will be sure to have the following : Locate your nearest HP Support location via the Internet and was originally licensed for their warranty support. Software ...software and may use on a single computer ("Your Computer"). Use. You may copy the Software Product into Your Computer's temporary memory (RAM) for purposes of the Software Product for online resources and telephone support. You may not separate component parts of using the Software Product....
... "online" or electronic documentation. You may load the Software Product into the local memory or storage device of this will be sure to have the following : Locate your nearest HP Support location via the Internet and was originally licensed for their warranty support. Software ...software and may use on a single computer ("Your Computer"). Use. You may copy the Software Product into Your Computer's temporary memory (RAM) for purposes of the Software Product for online resources and telephone support. You may not separate component parts of using the Software Product....

Warranty and Support Guide: In Home
Page 8
...supplement. You may load the Software Product into the local memory or storage device of the HP Product. You may install and use 8 the Software Product only on or made available by HP for use with your HP product ("HP Product"), that governs your use of any Software Product, ...use a Software Product identified as eligible for the upgrade. You may only be an You may copy the Software Product into Your Computer's temporary memory (RAM) for purposes of using the Software Product. Reservation of a hard disk drive-based solution, an external media-based recovery solution (e.g. ...
...supplement. You may load the Software Product into the local memory or storage device of the HP Product. You may install and use 8 the Software Product only on or made available by HP for use with your HP product ("HP Product"), that governs your use of any Software Product, ...use a Software Product identified as eligible for the upgrade. You may only be an You may copy the Software Product into Your Computer's temporary memory (RAM) for purposes of using the Software Product. Reservation of a hard disk drive-based solution, an external media-based recovery solution (e.g. ...
Getting Started Guide
Page 3
... Contents Setting Up Your PC 1 Putting Your PC Together 1 Connecting to the PC 2 Turning On Your PC for the First Time 3 Setting Up and Connecting to Your Internet Account 4 Using HP products 5 Transferring your old PC information and files to your new PC 5 Using Desktop Icons 6 Using HP Organize software 6 Using ... Manager (6-connector 16 Using the Sound Effect Manager (6-connector 17 Using Your PC Top 19 Using Your Docking Bay 19 Using Your Multistorage Bay 22 Storing CDs, DVDs, or memory cards 23 Docking a peripheral device 23 Placing a peripheral device on the multistorage...
... Contents Setting Up Your PC 1 Putting Your PC Together 1 Connecting to the PC 2 Turning On Your PC for the First Time 3 Setting Up and Connecting to Your Internet Account 4 Using HP products 5 Transferring your old PC information and files to your new PC 5 Using Desktop Icons 6 Using HP Organize software 6 Using ... Manager (6-connector 16 Using the Sound Effect Manager (6-connector 17 Using Your PC Top 19 Using Your Docking Bay 19 Using Your Multistorage Bay 22 Storing CDs, DVDs, or memory cards 23 Docking a peripheral device 23 Placing a peripheral device on the multistorage...


