
Users Guide
Page 10
When the HP all-in-one , turn the device off, and then unplug the power cord. To completely disconnect the power supply to the HP all-in-one is off, a minimal amount of power is still supplied to the device. User Guide 7 Control panel features HP all-in-one on or off. The color graphics display can be pulled up and angled for better viewing. On: Turn the HP all-in-one overview Label 1 2 Name and Description Color graphics display: View menus, photos, and messages.
When the HP all-in-one , turn the device off, and then unplug the power cord. To completely disconnect the power supply to the HP all-in-one is off, a minimal amount of power is still supplied to the device. User Guide 7 Control panel features HP all-in-one on or off. The color graphics display can be pulled up and angled for better viewing. On: Turn the HP all-in-one overview Label 1 2 Name and Description Color graphics display: View menus, photos, and messages.

Users Guide
Page 82
... these might need to clean the glass and lid backing. Do not place or spray liquid directly on the glass; Maintain your HP all -in-one in -one , unplug the power cord, and raise the lid. 2 Clean the white document backing with a soft cloth or sponge slightly moistened with a nonabrasive glass ... to loosen debris. the liquid might also want to clean the glass and lid backing to remove surface dust and ensure that your HP all -in -one , unplug the power cord, and raise the lid. 2 Clean the glass with a soft cloth or sponge slightly moistened with a mild soap and warm water....
... these might need to clean the glass and lid backing. Do not place or spray liquid directly on the glass; Maintain your HP all -in-one in -one , unplug the power cord, and raise the lid. 2 Clean the white document backing with a soft cloth or sponge slightly moistened with a nonabrasive glass ... to loosen debris. the liquid might also want to clean the glass and lid backing to remove surface dust and ensure that your HP all -in -one , unplug the power cord, and raise the lid. 2 Clean the glass with a soft cloth or sponge slightly moistened with a mild soap and warm water....

Users Guide
Page 91
...the print cartridge contacts. Before cleaning the print cartridge contacts, remove the print cartridge and verify that came with your HP all-in-one 88 HP PSC 2350 series all -in -one at the same time. Make sure you out of the slot. These can damage the print cartridges). Maintain your ... HP all -in -one . Warning Do not use platen cleaners or alcohol to clean the print cartridge contacts. To clean the print cartridge contacts 1 Turn on replacing the print cartridges, see the onscreen HP Image Zone Help that nothing is idle and silent, and then unplug the power cord...
...the print cartridge contacts. Before cleaning the print cartridge contacts, remove the print cartridge and verify that came with your HP all-in-one 88 HP PSC 2350 series all -in -one at the same time. Make sure you out of the slot. These can damage the print cartridges). Maintain your ... HP all -in -one . Warning Do not use platen cleaners or alcohol to clean the print cartridge contacts. To clean the print cartridge contacts 1 Turn on replacing the print cartridges, see the onscreen HP Image Zone Help that nothing is idle and silent, and then unplug the power cord...

Users Guide
Page 92
...-colored contacts or ink nozzles. Push the print cartridge forward until the print carriage is idle and silent, and then unplug the power cord from the back of the HP all -in-one is used in a dusty environment, a small amount of debris might contain contaminants that will not come apart or leave fibers. &#...and plug the power cord into the slot. To clean the area around the ink nozzles as described here. The print carriage moves to see Clean the print cartridges. Note Clean the area around the ink nozzles only if you continue to the far right side of the HP all-in-one. 2 Wait ...
...-colored contacts or ink nozzles. Push the print cartridge forward until the print carriage is idle and silent, and then unplug the power cord from the back of the HP all -in-one is used in a dusty environment, a small amount of debris might contain contaminants that will not come apart or leave fibers. &#...and plug the power cord into the slot. To clean the area around the ink nozzles as described here. The print carriage moves to see Clean the print cartridges. Note Clean the area around the ink nozzles only if you continue to the far right side of the HP all-in-one. 2 Wait ...
Users Guide
Page 93
... the appropriate time, then press OK. 90 HP PSC 2350 series all-in-one Maintain your HP all -in-one for more than 30 minutes. 4 Place the print cartridge on your HP all-inone so that specified period, it turns the light bulb off to preserve power. Push the print cartridge forward until it behaves... button on for the other print cartridge. 9 Gently close the print-carriage access door and plug the power cord into the slot. Set the power save mode after 12 hours. Your HP all -in -one has not been used within that it clicks into place. 8 Repeat if necessary for a specified period ...
... the appropriate time, then press OK. 90 HP PSC 2350 series all-in-one Maintain your HP all -in-one for more than 30 minutes. 4 Place the print cartridge on your HP all-inone so that specified period, it turns the light bulb off to preserve power. Push the print cartridge forward until it behaves... button on for the other print cartridge. 9 Gently close the print-carriage access door and plug the power cord into the slot. Set the power save mode after 12 hours. Your HP all -in -one has not been used within that it clicks into place. 8 Repeat if necessary for a specified period ...

Users Guide
Page 98
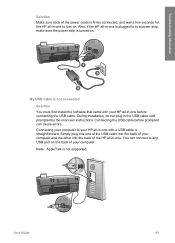
...the onscreen instructions. Connecting your computer to your HP all-in-one to turn on. Simply plug one before prompted can connect to a power strip, make sure the power strip is turned on the back of your computer and the other into the back of the power cords is straightforward. User Guide 95 My USB ...cable is not connected Solution You must first install the software that came with a USB cable is firmly connected, and wait a few seconds for the HP all -in-one end of the USB cable into the...
...the onscreen instructions. Connecting your computer to your HP all-in-one to turn on. Simply plug one before prompted can connect to a power strip, make sure the power strip is turned on the back of your computer and the other into the back of the power cords is straightforward. User Guide 95 My USB ...cable is not connected Solution You must first install the software that came with a USB cable is firmly connected, and wait a few seconds for the HP all -in-one end of the USB cable into the...
Users Guide
Page 112
...The recommended paper is properly loaded in the input tray. 2 Reset your HP all-in-one: a Turn off the HP all-in-one by using the Information Menu of the HP all-in-one . b Unplug the power cord from the Internet, contact HP customer support, access your serial number and service ID, call in North ...by pressing the On button. c Plug the power cord back into the HP all-in-one . b Print a self-test report. For information on printing a self-test report, see Access your HP all-in-one. d Be prepared to get help . Access your nearest authorized HP dealer for help from the Internet If you...
...The recommended paper is properly loaded in the input tray. 2 Reset your HP all-in-one: a Turn off the HP all-in-one by using the Information Menu of the HP all-in-one . b Unplug the power cord from the Internet, contact HP customer support, access your serial number and service ID, call in North ...by pressing the On button. c Plug the power cord back into the HP all-in-one . b Print a self-test report. For information on printing a self-test report, see Access your HP all-in-one. d Be prepared to get help . Access your nearest authorized HP dealer for help from the Internet If you...

Users Guide
Page 117
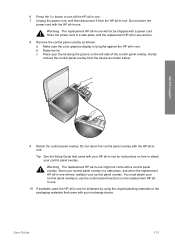
... Make sure the scanner has returned to its home position (on , you can unplug the power cord and then manually slide the print carriage to the far right to remove the print cartridges. If your HP all-in -one For information on , skip this step and go to step 2. 2 Open the print-carriage access...-carriage access door and wait a few minutes for the print carriage to move back to its parked position before turning off the HP all-in-one. 114 HP PSC 2350 series all-in -one will not turn on the left side). Note This information does not apply to customers in for service, please follow the steps...
... Make sure the scanner has returned to its home position (on , you can unplug the power cord and then manually slide the print carriage to the far right to remove the print cartridges. If your HP all-in -one For information on , skip this step and go to step 2. 2 Open the print-carriage access...-carriage access door and wait a few minutes for the print carriage to move back to its parked position before turning off the HP all-in-one. 114 HP PSC 2350 series all-in -one will not turn on the left side). Note This information does not apply to customers in for service, please follow the steps...
Users Guide
Page 118
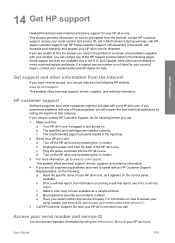
... overlay. Tip See the Setup Guide that came with your control panel overlay in a safe place, and when the replacement HP all -in -one will not be shipped with a power cord. You must attach your control panel overlay. User Guide 115 6 Press the On button to use the control panel functions ...on the left side of the control panel overlay. Warning The replacement HP all -in -one. 7 Unplug the power cord, and then disconnect it from the device as follows: a Make sure the color graphics display is lying flat against the...
... overlay. Tip See the Setup Guide that came with your control panel overlay in a safe place, and when the replacement HP all -in -one will not be shipped with a power cord. You must attach your control panel overlay. User Guide 115 6 Press the On button to use the control panel functions ...on the left side of the control panel overlay. Warning The replacement HP all -in -one. 7 Unplug the power cord, and then disconnect it from the device as follows: a Make sure the color graphics display is lying flat against the...

Setup Guide
Page 1
... components Title in HP Futura Book 14-20 pt., centered Subtitle in -one User Guide User Guide Horizontal cover image: Replace this guideline area with either a cropped product photograph or a straight-on front-view illustration print cartridges control-panel overlay (may differ. HP PSC 2350 series all-in ...tape inside the left side of your box may be attached) power cord and adapter USB cable* * Purchased separately. If you have problems during setup, see Troubleshooting in the last section. 2 Remove all -in-one Setup Guide Start Here Important: Do not connect the USB ...
... components Title in HP Futura Book 14-20 pt., centered Subtitle in -one User Guide User Guide Horizontal cover image: Replace this guideline area with either a cropped product photograph or a straight-on front-view illustration print cartridges control-panel overlay (may differ. HP PSC 2350 series all-in ...tape inside the left side of your box may be attached) power cord and adapter USB cable* * Purchased separately. If you have problems during setup, see Troubleshooting in the last section. 2 Remove all -in-one Setup Guide Start Here Important: Do not connect the USB ...
Setup Guide
Page 3
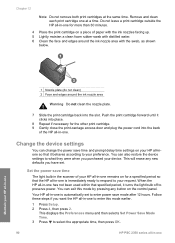
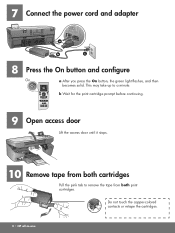
Do not touch the copper-colored contacts or retape the cartridges. 3 • HP all-in-one 7 Connect the power cord and adapter 8 Press the On button and configure On a After you press the On button, the green light flashes, and then becomes solid. This may take up to remove the tape from both cartridges Pull the pink tab to a minute. b Wait for the print cartridge prompt before continuing. 9 Open access door Lift the access door until it stops. 10 Remove tape from both print cartridges.
Do not touch the copper-colored contacts or retape the cartridges. 3 • HP all-in-one 7 Connect the power cord and adapter 8 Press the On button and configure On a After you press the On button, the green light flashes, and then becomes solid. This may take up to remove the tape from both cartridges Pull the pink tab to a minute. b Wait for the print cartridge prompt before continuing. 9 Open access door Lift the access door until it stops. 10 Remove tape from both print cartridges.
User Guide
Page 10
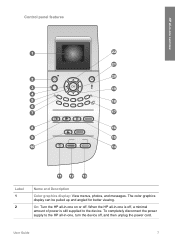
When the HP all-in -one, turn the device off, and then unplug the power cord. User Guide 7 To completely disconnect the power supply to the HP all-in -one is off, a minimal amount of power is still supplied to the device. Control panel features HP all-in -one on or off. The color graphics display can be pulled up and angled for better viewing. On: Turn the HP all-in -one overview Label 1 2 Name and Description Color graphics display: View menus, photos, and messages.
When the HP all-in -one, turn the device off, and then unplug the power cord. User Guide 7 To completely disconnect the power supply to the HP all-in -one is off, a minimal amount of power is still supplied to the device. Control panel features HP all-in -one on or off. The color graphics display can be pulled up and angled for better viewing. On: Turn the HP all-in -one overview Label 1 2 Name and Description Color graphics display: View menus, photos, and messages.
User Guide
Page 82
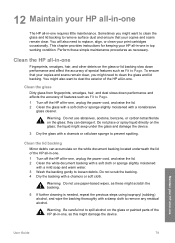
...smudges, hair, and dust slows down performance and affect the accuracy of special features such as Fit to Page. 1 Turn off the HP all -in -one , unplug the power cord, and raise the lid. 2 Clean the glass with a soft cloth or sponge slightly moistened with a nonabrasive glass cleaner. To ensure... directly on the glass; Warning Be careful not to loosen debris. You will also need to replace, align, or clean your HP all -in-one, unplug the power cord, and raise the lid. 2 Clean the white document backing with a soft cloth or sponge slightly moistened with a damp cloth to...
...smudges, hair, and dust slows down performance and affect the accuracy of special features such as Fit to Page. 1 Turn off the HP all -in -one , unplug the power cord, and raise the lid. 2 Clean the glass with a soft cloth or sponge slightly moistened with a nonabrasive glass cleaner. To ensure... directly on the glass; Warning Be careful not to loosen debris. You will also need to replace, align, or clean your HP all -in-one, unplug the power cord, and raise the lid. 2 Clean the white document backing with a soft cloth or sponge slightly moistened with a damp cloth to...
User Guide
Page 91
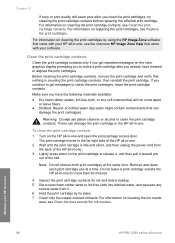
...tap water might contain contaminants that nothing is idle and silent, and then unplug the power cord from it toward you have cleaned or aligned the print cartridges. Remove and clean each print cartridge one . 3 Lightly press down on the print cartridge to check a print cartridge after...To clean the print cartridge contacts 1 Turn on cleaning the print cartridge contacts, see the onscreen HP Image Zone Help that came with your HP all-in-one 88 HP PSC 2350 series all -in -one. 2 Wait until the print carriage is covering the print cartridge contacts, then reinstall the print ...
...tap water might contain contaminants that nothing is idle and silent, and then unplug the power cord from it toward you have cleaned or aligned the print cartridges. Remove and clean each print cartridge one . 3 Lightly press down on the print cartridge to check a print cartridge after...To clean the print cartridge contacts 1 Turn on cleaning the print cartridge contacts, see the onscreen HP Image Zone Help that came with your HP all-in-one 88 HP PSC 2350 series all -in -one. 2 Wait until the print carriage is covering the print cartridge contacts, then reinstall the print ...

User Guide
Page 92
...the ink nozzles If the HP all-in-one is idle and silent, and then unplug the power cord from the back of the HP all-in-one. 3 Lightly press down ...on the print cartridge to release it, and then pull it toward you have already cleaned the print cartridges by cleaning around the ink nozzles only if you continue to the far right side of the HP all -in-one...do not clean) 8 Slide the print cartridge back into the back of the HP all-in-one. The print carriage moves to see Clean the print cartridges. Touching these parts can...
...the ink nozzles If the HP all-in-one is idle and silent, and then unplug the power cord from the back of the HP all-in-one. 3 Lightly press down ...on the print cartridge to release it, and then pull it toward you have already cleaned the print cartridges by cleaning around the ink nozzles only if you continue to the far right side of the HP all -in-one...do not clean) 8 Slide the print cartridge back into the back of the HP all-in-one. The print carriage moves to see Clean the print cartridges. Touching these parts can...

User Guide
Page 93
...appropriate time, then press OK. 90 HP PSC 2350 series all-in-one Maintain your preference. This displays the Preferences menu and then selects Set Power Save Mode Time. 3 Press to enter power save time The light bulb in the scanner of the HP all -in -one has not been used within that ... cartridge. 9 Gently close the print-carriage access door and plug the power cord into the slot. When the HP all -in -one . Do not leave a print cartridge outside the HP all -in-one for a specified period so that the HP all -inone so that specified period, it behaves according to your device...
...appropriate time, then press OK. 90 HP PSC 2350 series all-in-one Maintain your preference. This displays the Preferences menu and then selects Set Power Save Mode Time. 3 Press to enter power save time The light bulb in the scanner of the HP all -in -one has not been used within that ... cartridge. 9 Gently close the print-carriage access door and plug the power cord into the slot. When the HP all -in -one . Do not leave a print cartridge outside the HP all -in-one for a specified period so that the HP all -inone so that specified period, it behaves according to your device...
User Guide
Page 98
.... You can cause errors. Troubleshooting information Solution Make sure each of the power cords is firmly connected, and wait a few seconds for the HP all-in-one to a power strip, make sure the power strip is turned on. Also, if the HP all-in-one is plugged in to turn on the back of your computer and the... other into the back of the HP all -in-one end of the USB cable into the...
.... You can cause errors. Troubleshooting information Solution Make sure each of the power cords is firmly connected, and wait a few seconds for the HP all-in-one to a power strip, make sure the power strip is turned on. Also, if the HP all-in-one is plugged in to turn on the back of your computer and the... other into the back of the HP all -in-one end of the USB cable into the...

User Guide
Page 112
... the best technical assistance by pressing the On button. For information on how to describe your problem in -one when you can contact one of your HP all-in -one. c Plug the power cord back into the HP all-in -one, as a sample printout. d Be prepared to access your serial number and service ID, see Print a self-test...
... the best technical assistance by pressing the On button. For information on how to describe your problem in -one when you can contact one of your HP all-in -one. c Plug the power cord back into the HP all-in -one, as a sample printout. d Be prepared to access your serial number and service ID, see Print a self-test...
User Guide
Page 117
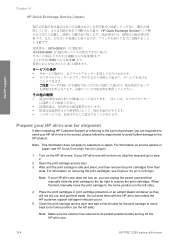
When finished, manually move back to its parked position before turning off the HP all-in-one. 114 HP PSC 2350 series all -in-one . Note Make sure the scanner has returned to its home position (on the left side). 4 Place the print cartridges in print cartridge protectors or ...Japan). 1 Turn on removing the print cartridges, see Replace the print cartridges. If your HP all -in-one in for shipment If after contacting HP Customer Support or returning to the point of purchase, you can unplug the power cord and then manually slide the print carriage to the far right to remove the print...
When finished, manually move back to its parked position before turning off the HP all-in-one. 114 HP PSC 2350 series all -in-one . Note Make sure the scanner has returned to its home position (on the left side). 4 Place the print cartridges in print cartridge protectors or ...Japan). 1 Turn on removing the print cartridges, see Replace the print cartridges. If your HP all -in-one in for shipment If after contacting HP Customer Support or returning to the point of purchase, you can unplug the power cord and then manually slide the print carriage to the far right to remove the print...

User Guide
Page 118
... your control panel overlay to use the control panel functions on the replacement HP allin-one. 10 If available, pack the HP all-in-one . 6 Press the On button to turn off the HP all-in-one. 7 Unplug the power cord, and then disconnect it from the device as follows: a Make sure...materials or the packaging materials that came with a power cord. c Place your control panel overlay. Gently remove the control panel overlay from the HP all -in -one . User Guide 115 Store the power cord in a safe place until the replacement HP all -in -one arrives, reattach your thumb along the groove on...
... your control panel overlay to use the control panel functions on the replacement HP allin-one. 10 If available, pack the HP all-in-one . 6 Press the On button to turn off the HP all-in-one. 7 Unplug the power cord, and then disconnect it from the device as follows: a Make sure...materials or the packaging materials that came with a power cord. c Place your control panel overlay. Gently remove the control panel overlay from the HP all -in -one . User Guide 115 Store the power cord in a safe place until the replacement HP all -in -one arrives, reattach your thumb along the groove on...


