HP PSC 1600 All-in-One series Setup Poster
Page 1
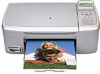
... pt., centered Subtitle in order. If you have problems during setup, see Troubleshooting in the last section. 2 Remove all -in-one User Guide User Guide Horizontal cover image: Replace this guideline area with either a cropped product photograph or a straight-on front-view ... may differ from images shown. HP PSC 1600/2350 All-in 10-14 pt., centered, white © 2004 Hewlett-Packard Development Company, L.P. Your model may differ. Start Here Important: Do not connect the USB cable until 1 Step 16 or software may be attached) power cord and adapter USB cable* * ...
... pt., centered Subtitle in order. If you have problems during setup, see Troubleshooting in the last section. 2 Remove all -in-one User Guide User Guide Horizontal cover image: Replace this guideline area with either a cropped product photograph or a straight-on front-view ... may differ from images shown. HP PSC 1600/2350 All-in 10-14 pt., centered, white © 2004 Hewlett-Packard Development Company, L.P. Your model may differ. Start Here Important: Do not connect the USB cable until 1 Step 16 or software may be attached) power cord and adapter USB cable* * ...
HP PSC 1600 All-in-One series Setup Poster
Page 3
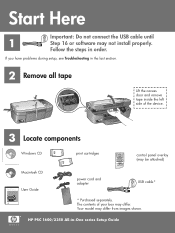
... door Lift the access door until this guide instructs you press the On button, the green light flashes, and then becomes solid. 7 Connect the power cord and adapter Important: Do not connect the USB cable until it stops. 10 Remove tape from both cartridges Pull the pink tab to remove the... a After you to or the software may take up to navigate the menu. Do not touch the copper-colored contacts or retape the cartridges. 3 • HP All-in-One Use the arrow keys to a minute.
... door Lift the access door until this guide instructs you press the On button, the green light flashes, and then becomes solid. 7 Connect the power cord and adapter Important: Do not connect the USB cable until it stops. 10 Remove tape from both cartridges Pull the pink tab to remove the... a After you to or the software may take up to navigate the menu. Do not touch the copper-colored contacts or retape the cartridges. 3 • HP All-in-One Use the arrow keys to a minute.
HP PSC 1600 All-in-One series User Guide
Page 3
...a protected location where no one can be liable for HP products and services are either registered trademarks or trademarks of Intel Corporation. Nothing herein should be inoperable when main power fails. Install the product ...HP shall not be damaged. 8. If you are U.S. Install the product in many places to rain or any type of Microsoft Corporation. Refer servicing to a power source. Identification badges, cards, or insignias ● Governmental stamps: Postage stamps Food stamps ● Checks or drafts drawn on or trip over the power cord, and where the power cord...
...a protected location where no one can be liable for HP products and services are either registered trademarks or trademarks of Intel Corporation. Nothing herein should be inoperable when main power fails. Install the product ...HP shall not be damaged. 8. If you are U.S. Install the product in many places to rain or any type of Microsoft Corporation. Refer servicing to a power source. Identification badges, cards, or insignias ● Governmental stamps: Postage stamps Food stamps ● Checks or drafts drawn on or trip over the power cord, and where the power cord...
HP PSC 1600 All-in-One series User Guide
Page 9
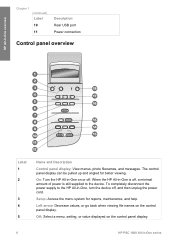
... go back when viewing file names on or off , and then unplug the power cord. OK: Select a menu, setting, or value displayed on the control panel display. 6 HP PSC 1600 All-in -One overview Chapter 1 (continued) Label 10 11 Description Rear USB port Power connection Control panel overview Label 1 2 3 4 5 Name and Description Control panel display: View menus...
... go back when viewing file names on or off , and then unplug the power cord. OK: Select a menu, setting, or value displayed on the control panel display. 6 HP PSC 1600 All-in -One overview Chapter 1 (continued) Label 10 11 Description Rear USB port Power connection Control panel overview Label 1 2 3 4 5 Name and Description Control panel display: View menus...

HP PSC 1600 All-in-One series User Guide
Page 78
...smudges, hair, and dust slows down performance and affect the accuracy of special features such as Fit to Page. 1. Turn off the HP All-in -One, unplug the power cord, and raise the lid. 2. Wash the backing gently to remove any residual alcohol. If further cleaning is needed, repeat the previous ...cartridges occasionally. You might also want to clean the glass and lid backing to spill alcohol on the glass; Turn off the HP All-in -One, unplug the power cord, and raise the lid. 2. Do not place or spray liquid directly on the white document backing located underneath the lid ...
...smudges, hair, and dust slows down performance and affect the accuracy of special features such as Fit to Page. 1. Turn off the HP All-in -One, unplug the power cord, and raise the lid. 2. Wash the backing gently to remove any residual alcohol. If further cleaning is needed, repeat the previous ...cartridges occasionally. You might also want to clean the glass and lid backing to spill alcohol on the glass; Turn off the HP All-in -One, unplug the power cord, and raise the lid. 2. Do not place or spray liquid directly on the white document backing located underneath the lid ...
HP PSC 1600 All-in-One series User Guide
Page 88
... by its sides. 7. cartridge contacts. Before cleaning the print cartridge contacts, remove the print cartridge and verify that came with your HP All-in-One, see Replace the print cartridges. Inspect the print cartridge contacts for more than 30 minutes. 4. Clean only the copper-colored contacts....cartridge outside the HP All-in -One. 2. Warning Do not use platen cleaners or alcohol to the far right side of the slot. Turn on replacing the print cartridges, see the onscreen HP Image Zone Help that nothing is idle and silent, and then unplug the power cord from it toward...
... by its sides. 7. cartridge contacts. Before cleaning the print cartridge contacts, remove the print cartridge and verify that came with your HP All-in-One, see Replace the print cartridges. Inspect the print cartridge contacts for more than 30 minutes. 4. Clean only the copper-colored contacts....cartridge outside the HP All-in -One. 2. Warning Do not use platen cleaners or alcohol to the far right side of the slot. Turn on replacing the print cartridges, see the onscreen HP Image Zone Help that nothing is idle and silent, and then unplug the power cord from it toward...

HP PSC 1600 All-in-One series User Guide
Page 89
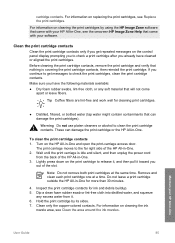
Gently close the print-carriage access door and plug the power cord into the back of debris might contain contaminants that will not come apart or leave fibers. Tip Coffee filters are lint-free and work well ...). Push the print cartridge forward until it can result in clogs, ink failure, and bad electrical connections. 86 HP PSC 1600 All-in -One This debris can be corrected by using the control panel or the HP Image Zone software. Warning Do not touch the copper-colored contacts or ink nozzles. When debris gets on...
Gently close the print-carriage access door and plug the power cord into the back of debris might contain contaminants that will not come apart or leave fibers. Tip Coffee filters are lint-free and work well ...). Push the print cartridge forward until it can result in clogs, ink failure, and bad electrical connections. 86 HP PSC 1600 All-in -One This debris can be corrected by using the control panel or the HP Image Zone software. Warning Do not touch the copper-colored contacts or ink nozzles. When debris gets on...

HP PSC 1600 All-in-One series User Guide
Page 90
... the same time. Gently close the print-carriage access door and plug the power cord into the back of the HP All-in -One and open the print-carriage access door. Do not leave a print cartridge outside the HP All-in -One 1 Nozzle plate (do not clean) 2 Face and edges around the ink ... time. Place the print cartridge on your preference. For example, if the message is idle and silent, and then unplug the power cord from the back of the HP All-in -One. 3. Wait until it behaves according to dry for the other print cartridge. 10. Set the scroll speed The Scroll Speed option...
... the same time. Gently close the print-carriage access door and plug the power cord into the back of the HP All-in -One and open the print-carriage access door. Do not leave a print cartridge outside the HP All-in -One 1 Nozzle plate (do not clean) 2 Face and edges around the ink ... time. Place the print cartridge on your preference. For example, if the message is idle and silent, and then unplug the power cord from the back of the HP All-in -One. 3. Wait until it behaves according to dry for the other print cartridge. 10. Set the scroll speed The Scroll Speed option...
HP PSC 1600 All-in-One series User Guide
Page 111
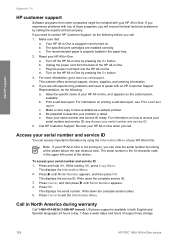
...North America during warranty Call 1-800-474-6836 (1-800-HP invent). Press and hold OK. Call in -One is available in both English and Spanish languages 24 hours a day, 7 days a week (days and hours of support may change 108 HP PSC 1600 All-in the upper left corner of the sticker.... self-test report. Print a self-test report. Write down the complete serial number. 5. Reset your HP All-in -One. Unplug the power cord from other companies might be included with your HP All-in -One. Access your serial number and service ID You can view the serial number by pressing the On button...
...North America during warranty Call 1-800-474-6836 (1-800-HP invent). Press and hold OK. Call in -One is available in both English and Spanish languages 24 hours a day, 7 days a week (days and hours of support may change 108 HP PSC 1600 All-in the upper left corner of the sticker.... self-test report. Print a self-test report. Write down the complete serial number. 5. Reset your HP All-in -One. Unplug the power cord from other companies might be included with your HP All-in -One. Access your serial number and service ID You can view the serial number by pressing the On button...

HP PSC 1600 All-in-One series User Guide
Page 116
...Note Do not return the power cord and power supply with a control panel overlay. Retain the control panel overlay. Note The replacement HP All-in-One might not come with the HP All-in -One. 5. You must attach your HP All-in-One does not turn off the HP All-in -One. Remove the control panel ...control panel overlay. Do not return the control panel overlay with the HP All-in -One arrives. 8. Wait until the replacement HP All-in -One unless the HP customer support call agent instructs you can unplug the power cord and then manually slide the print carriage to the far right to...
...Note Do not return the power cord and power supply with a control panel overlay. Retain the control panel overlay. Note The replacement HP All-in-One might not come with the HP All-in -One. 5. You must attach your HP All-in-One does not turn off the HP All-in -One. Remove the control panel ...control panel overlay. Do not return the control panel overlay with the HP All-in -One arrives. 8. Wait until the replacement HP All-in -One unless the HP customer support call agent instructs you can unplug the power cord and then manually slide the print carriage to the far right to...


