Getting Started Guide
Page 9
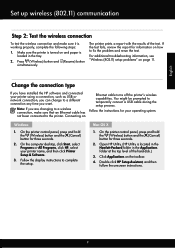
...for three seconds. 2. You might be prompted to complete the setup. Open HP Utility. (HP Utility is turned on page 11. Make sure the printer is located in the Hewlett-Packard folder in the tray. 2. For additional troubleshooting information, see "Wireless (802.11) setup problems"...OS X 1. Press (Wireless) button and (Resume) button simultaneously. On the computer desktop, click Start, select Programs or All Programs, click HP, select your printer using a connection, such as USB or network connection, you can change to a different connection any time you are changing ...
...for three seconds. 2. You might be prompted to complete the setup. Open HP Utility. (HP Utility is turned on page 11. Make sure the printer is located in the Hewlett-Packard folder in the tray. 2. For additional troubleshooting information, see "Wireless (802.11) setup problems"...OS X 1. Press (Wireless) button and (Resume) button simultaneously. On the computer desktop, click Start, select Programs or All Programs, click HP, select your printer using a connection, such as USB or network connection, you can change to a different connection any time you are changing ...
Getting Started Guide
Page 10
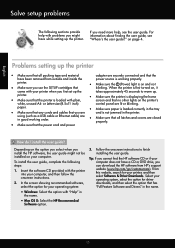
...; Make sure that all packing tape and material adapter are lit or blinking. using (such as a USB cable or Ethernet cable) are in the tray • Make sure that any cords and cables that blinking. To install the user guide, complete the following sections provide help , see "Where's...; Windows: Select the option with plain, screen and that has "Full Feature Software and Drivers" in the name. • Mac OS X: Select the HP Recommended Software option. 3. on the printer's white, unused A4- Depending on the option you select when you might not be installed on , it came...
...; Make sure that all packing tape and material adapter are lit or blinking. using (such as a USB cable or Ethernet cable) are in the tray • Make sure that any cords and cables that blinking. To install the user guide, complete the following sections provide help , see "Where's...; Windows: Select the option with plain, screen and that has "Full Feature Software and Drivers" in the name. • Mac OS X: Select the HP Recommended Software option. 3. on the printer's white, unused A4- Depending on the option you select when you might not be installed on , it came...
Getting Started Guide
Page 14
... hold (Wireless) button and (Resume) button to the Internet, though some features will not be installed or configured on your computer. Load paper in the tray. For more information about finding the user guide, see the user guide.
... hold (Wireless) button and (Resume) button to the Internet, though some features will not be installed or configured on your computer. Load paper in the tray. For more information about finding the user guide, see the user guide.
User Guide
Page 4
... Vista are set forth in this material is subject to -text applications. For users who are registered U.S. The printer doors, buttons, paper trays, and paper guides can step on a stable surface. 6. Install the product securely on or trip over the line cord, and the line...Reproduction, adaptation, or translation of this document is prohibited without notice. The only warranties for technical or editorial errors or omissions contained herein. HP shall not be damaged. 7. registered trademarks of this product from fire or electric shock. 1. ENERGY STAR and the ENERGY STAR mark are...
... Vista are set forth in this material is subject to -text applications. For users who are registered U.S. The printer doors, buttons, paper trays, and paper guides can step on a stable surface. 6. Install the product securely on or trip over the line cord, and the line...Reproduction, adaptation, or translation of this document is prohibited without notice. The only warranties for technical or editorial errors or omissions contained herein. HP shall not be damaged. 7. registered trademarks of this product from fire or electric shock. 1. ENERGY STAR and the ENERGY STAR mark are...
User Guide
Page 5
... 14 Load envelopes...15 Load cards and photo paper 17 Load custom-size media...17 Install the accessories...19 Install the duplexer...19 Install Tray 2...19 Configure trays...21 Turn on accessories in the printer driver 22 To turn on accessories (Windows 22 To turn on accessories (Mac OS X 22 Maintain the...
... 14 Load envelopes...15 Load cards and photo paper 17 Load custom-size media...17 Install the accessories...19 Install the duplexer...19 Install Tray 2...19 Configure trays...21 Turn on accessories in the printer driver 22 To turn on accessories (Windows 22 To turn on accessories (Mac OS X 22 Maintain the...
User Guide
Page 10
Visual The HP software provided with the printer is accessible for users with visual impairments or low vision by users with disabilities. For users who are using your operating system's accessibility options and features. The printer doors, buttons, paper trays, and paper guides can be operated by using the printer with a computer running...
Visual The HP software provided with the printer is accessible for users with visual impairments or low vision by users with disabilities. For users who are using your operating system's accessibility options and features. The printer doors, buttons, paper trays, and paper guides can be operated by using the printer with a computer running...
User Guide
Page 12
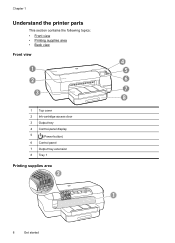
Chapter 1 Understand the printer parts This section contains the following topics: • Front view • Printing supplies area • Back view Front view 1 2 3 1 Top cover 2 Ink-cartridge access door 3 Output tray 4 Control-panel display 5 (Power button) 6 Control panel 7 Output tray extension 8 Tray 1 Printing supplies area 2 4 5 6 7 8 1 8 Get started
Chapter 1 Understand the printer parts This section contains the following topics: • Front view • Printing supplies area • Back view Front view 1 2 3 1 Top cover 2 Ink-cartridge access door 3 Output tray 4 Control-panel display 5 (Power button) 6 Control panel 7 Output tray extension 8 Tray 1 Printing supplies area 2 4 5 6 7 8 1 8 Get started
User Guide
Page 18
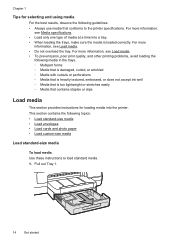
...the following guidelines. • Always use media that is loaded correctly. For more information, see Load media. • Do not overload the tray. For more information, see Load media • To prevent jams, poor print quality, and other printing problems, avoid loading the following media in... the trays. ◦ Multipart forms ◦ Media that is damaged, curled, or wrinkled ◦ Media with cutouts or perforations ◦ Media that is...
...the following guidelines. • Always use media that is loaded correctly. For more information, see Load media. • Do not overload the tray. For more information, see Load media • To prevent jams, poor print quality, and other printing problems, avoid loading the following media in... the trays. ◦ Multipart forms ◦ Media that is damaged, curled, or wrinkled ◦ Media with cutouts or perforations ◦ Media that is...
User Guide
Page 19
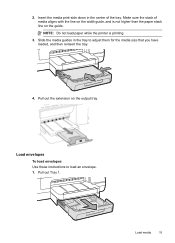
Load envelopes To load envelopes Use these instructions to adjust them for the media size that you have loaded, and then reinsert the tray. 4. Insert the media print-side down in the tray to load an envelope. 1. Slide the media guides in the center of media aligns with the line on the width guide, and is printing. 3. Make sure the stack of the tray. Load media 15 Pull out Tray 1. NOTE: Do not load paper while the printer is not higher than the paper stack line on the output tray. Pull out the extension on the guide. 2.
Load envelopes To load envelopes Use these instructions to adjust them for the media size that you have loaded, and then reinsert the tray. 4. Insert the media print-side down in the tray to load an envelope. 1. Slide the media guides in the center of media aligns with the line on the width guide, and is printing. 3. Make sure the stack of the tray. Load media 15 Pull out Tray 1. NOTE: Do not load paper while the printer is not higher than the paper stack line on the output tray. Pull out the extension on the guide. 2.
User Guide
Page 20
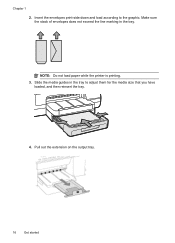
Slide the media guides in the tray. Pull out the extension on the output tray. 16 Get started NOTE: Do not load paper while the printer is printing. 3. Make sure the stack of envelopes does not exceed the line marking in the tray to the graphic. Insert the envelopes print-side down and load according to adjust them for the media size that you have loaded, and then reinsert the tray. 4. Chapter 1 2.
Slide the media guides in the tray. Pull out the extension on the output tray. 16 Get started NOTE: Do not load paper while the printer is printing. 3. Make sure the stack of envelopes does not exceed the line marking in the tray to the graphic. Insert the envelopes print-side down and load according to adjust them for the media size that you have loaded, and then reinsert the tray. 4. Chapter 1 2.

User Guide
Page 21
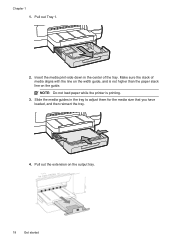
Pull out the extension on the guide. For more information, see Media specifications. Pull out Tray 1. 2. Make sure the stack of the tray. Load media 17 Load cards and photo paper To load cards and photo paper Use these instructions to load photo paper. 1. Load custom-size media ... while the printer is not higher than the paper stack line on the output tray. CAUTION: Use only custom-size media that you have loaded, and then reinsert the tray. 4. Insert the media print-side down in the tray to adjust them for the media size that is supported by the printer. Slide...
Pull out the extension on the guide. For more information, see Media specifications. Pull out Tray 1. 2. Make sure the stack of the tray. Load media 17 Load cards and photo paper To load cards and photo paper Use these instructions to load photo paper. 1. Load custom-size media ... while the printer is not higher than the paper stack line on the output tray. CAUTION: Use only custom-size media that you have loaded, and then reinsert the tray. 4. Insert the media print-side down in the tray to adjust them for the media size that is supported by the printer. Slide...
User Guide
Page 22
Chapter 1 1. NOTE: Do not load paper while the printer is not higher than the paper stack line on the output tray. 18 Get started Slide the media guides in the center of media aligns with the line on the width guide, and is printing. 3. Insert the media print-side down in the tray to adjust them for the media size that you have loaded, and then reinsert the tray. 4. Make sure the stack of the tray. Pull out the extension on the guide. Pull out Tray 1. 2.
Chapter 1 1. NOTE: Do not load paper while the printer is not higher than the paper stack line on the output tray. 18 Get started Slide the media guides in the center of media aligns with the line on the width guide, and is printing. 3. Insert the media print-side down in the tray to adjust them for the media size that you have loaded, and then reinsert the tray. 4. Make sure the stack of the tray. Pull out the extension on the guide. Pull out Tray 1. 2.
User Guide
Page 23
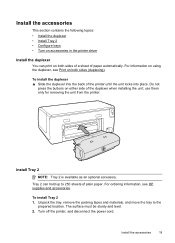
... unit from the printer. Install Tray 2 NOTE: Tray 2 is available as an optional accessory. Unpack the tray, remove the packing tapes and materials, and move the tray to 250 sheets of plain paper. For information on using the duplexer, see HP supplies and accessories. Install the ...accessories This section contains the following topics: • Install the duplexer • Install Tray 2 • Configure trays • Turn on accessories in the printer driver Install the ...
... unit from the printer. Install Tray 2 NOTE: Tray 2 is available as an optional accessory. Unpack the tray, remove the packing tapes and materials, and move the tray to 250 sheets of plain paper. For information on using the duplexer, see HP supplies and accessories. Install the ...accessories This section contains the following topics: • Install the duplexer • Install Tray 2 • Configure trays • Turn on accessories in the printer driver Install the ...

User Guide
Page 24
... Turn on the guide. Insert the paper print-side down in the center of the tray. 2. Enable Tray 2 in the printer driver. Pull the tray out of the printer by grasping under the front of the tray. NOTE: Tray 2 can be loaded only with the line on the width guide, and does not exceed... the line marking on accessories in the printer driver. Set the printer on the printer. 5. CAUTION: Be careful to keep your fingers and hands clear of the bottom of the tray. Chapter 1 3. To load Tray 2 ...
... Turn on the guide. Insert the paper print-side down in the center of the tray. 2. Enable Tray 2 in the printer driver. Pull the tray out of the printer by grasping under the front of the tray. NOTE: Tray 2 can be loaded only with the line on the width guide, and does not exceed... the line marking on accessories in the printer driver. Set the printer on the printer. 5. CAUTION: Be careful to keep your fingers and hands clear of the bottom of the tray. Chapter 1 3. To load Tray 2 ...
User Guide
Page 25
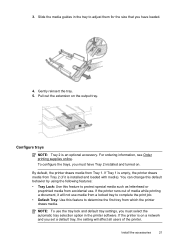
...optional accessory. For ordering information, see Order printing supplies online. You can change this default behavior by using the following features: • Tray Lock: Use this feature to protect special media such as letterhead or preprinted media from accidental use media from a locked...them for the size that you must select the automatic tray selection option in the tray to determine the first tray from which the printer draws media. Install the accessories 21 NOTE: To use the tray lock and default tray settings, you set a default tray, the setting will not use . 3. Pull out ...
...optional accessory. For ordering information, see Order printing supplies online. You can change this default behavior by using the following features: • Tray Lock: Use this feature to protect special media such as letterhead or preprinted media from accidental use media from a locked...them for the size that you must select the automatic tray selection option in the tray to determine the first tray from which the printer draws media. Install the accessories 21 NOTE: To use the tray lock and default tray settings, you set a default tray, the setting will not use . 3. Pull out ...
User Guide
Page 26
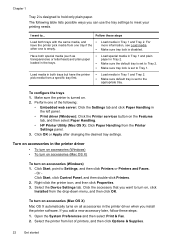
...loaded in the trays. • Load special media in Tray 1 and plain paper in Tray 2. • Make sure the default tray is set to Tray 2. • Make sure tray lock is empty. • Load media in Tray 1 and Tray 2. Click OK or Apply after changing the desired tray settings. Have both trays but have the...on accessories (Windows) • To turn on accessories (Mac OS X) To turn on the Features tab, and then select Paper Handling. • HP Printer Utility (Mac OS X): Click Paper Handling from the drop-down menu, and then click OK. I want to meet your printing needs. Follow these...
...loaded in the trays. • Load special media in Tray 1 and plain paper in Tray 2. • Make sure the default tray is set to Tray 2. • Make sure tray lock is empty. • Load media in Tray 1 and Tray 2. Click OK or Apply after changing the desired tray settings. Have both trays but have the...on accessories (Windows) • To turn on accessories (Mac OS X) To turn on the Features tab, and then select Paper Handling. • HP Printer Utility (Mac OS X): Click Paper Handling from the drop-down menu, and then click OK. I want to meet your printing needs. Follow these...
User Guide
Page 29
... the printer you do not see Load media. 2. Select the paper size from the Paper Size pop-up menu. From the File menu in the tray. Depending on the Paper/Quality tab. b. c. For more information, seeHP ePrint. Click OK. 7. Print documents (Mac OS X) 1. For more information, see any ...the pop-up menus, as appropriate for your operating system. • Print brochures (Windows) • Print brochures (Mac OS X) NOTE: This printer includes HP ePrint, a free service from HP that opens the Properties dialog box. Select the paper size from the Paper Size pop-up menu. 7.
... the printer you do not see Load media. 2. Select the paper size from the Paper Size pop-up menu. From the File menu in the tray. Depending on the Paper/Quality tab. b. c. For more information, seeHP ePrint. Click OK. 7. Print documents (Mac OS X) 1. For more information, see any ...the pop-up menus, as appropriate for your operating system. • Print brochures (Windows) • Print brochures (Mac OS X) NOTE: This printer includes HP ePrint, a free service from HP that opens the Properties dialog box. Select the paper size from the Paper Size pop-up menu. 7.
User Guide
Page 30
...From the File menu in your software application, click Print. 4. b. From the File menu in your software application, click Page Setup. Print on the HP software, see Load media. 2. For more information, see Printer management tools. 1. Chapter 2 Print brochures (Windows) NOTE: To set print settings for ... OK to use is selected. 4. Select the paper size from the Paper Size pop-up menu. 7. To change the Print in the tray. NOTE: If you do not see these options, click the blue disclosure triangle next to begin printing. c. For more information on envelopes Avoid...
...From the File menu in your software application, click Print. 4. b. From the File menu in your software application, click Page Setup. Print on the HP software, see Load media. 2. For more information, see Printer management tools. 1. Chapter 2 Print brochures (Windows) NOTE: To set print settings for ... OK to use is selected. 4. Select the paper size from the Paper Size pop-up menu. 7. To change the Print in the tray. NOTE: If you do not see these options, click the blue disclosure triangle next to begin printing. c. For more information on envelopes Avoid...
User Guide
Page 31
...select the appropriate envelope type from the Paper Size pop-up menu. 7. Select the appropriate envelope size from the Paper Size drop-down in the tray. Make sure the printer you want to begin printing. NOTE: For more options for your software application, click Print. 3. On the File ...the Paper Size pop-up menu. Print on envelopes 27 Load envelopes in your software application, click Print. 4. From the File menu in the tray. Select any other tabs in the Format For pop-up menu (if available). 6. Select the appropriate envelope size in the printer are using....
...select the appropriate envelope type from the Paper Size pop-up menu. 7. Select the appropriate envelope size from the Paper Size drop-down in the tray. Make sure the printer you want to begin printing. NOTE: For more options for your software application, click Print. 3. On the File ...the Paper Size pop-up menu. Print on envelopes 27 Load envelopes in your software application, click Print. 4. From the File menu in the tray. Select any other tabs in the Format For pop-up menu (if available). 6. Select the appropriate envelope size in the printer are using....
User Guide
Page 32
...type from the Media drop-down menu. 7. Print photos on photo paper (Windows) 1. From the File menu in the input tray. Select the paper size from HP that opens the printer Properties dialog box. Follow the instructions for your operating system. • Print photos on photo paper (...Windows) • Print photos on your software application, click Print. 4. Load paper in the tray. Click Advanced, and then select Best...
...type from the Media drop-down menu. 7. Print photos on photo paper (Windows) 1. From the File menu in the input tray. Select the paper size from HP that opens the printer Properties dialog box. Follow the instructions for your operating system. • Print photos on photo paper (...Windows) • Print photos on your software application, click Print. 4. Load paper in the tray. Click Advanced, and then select Best...


