Getting Started Guide
Page 15
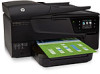
When you have disabled the Automatic Reduction feature, the printer prints the fax on the paper that is silent during fax transmission. Make sure the printer is stored in the printer's memory until the copying finishes. tray. 3. Set up the line. If you are copying a document when a fax arrives,...printer is not currently set to a voicemail service on the same phone line that the printer does not automatically answer incoming calls. 15 Remove any originals from a phone that is turned off the Auto Answer setting so that you will use fax English Receive faxes You can...
When you have disabled the Automatic Reduction feature, the printer prints the fax on the paper that is silent during fax transmission. Make sure the printer is stored in the printer's memory until the copying finishes. tray. 3. Set up the line. If you are copying a document when a fax arrives,...printer is not currently set to a voicemail service on the same phone line that the printer does not automatically answer incoming calls. 15 Remove any originals from a phone that is turned off the Auto Answer setting so that you will use fax English Receive faxes You can...
Getting Started Guide
Page 20
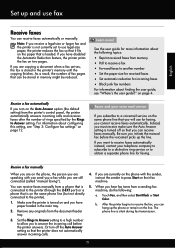
... correctly loaded paper in the name. • Mac OS X: Select the HP Recommended Software option 3. using (such as a USB cable or Ethernet cable) are printer. tray and that the paper is working order. Problems setting up . screen and that you are • Make sure you have removed all latches ...you have a CD or DVD drive, you can download the HP software from outside and inside the printer. From this website, search for your printer when you first set up the printer. or letter-size (8.5x11 inch) paper in good working properly. Depending on page 4. English Solve setup...
... correctly loaded paper in the name. • Mac OS X: Select the HP Recommended Software option 3. using (such as a USB cable or Ethernet cable) are printer. tray and that the paper is working order. Problems setting up . screen and that you are • Make sure you have removed all latches ...you have a CD or DVD drive, you can download the HP software from outside and inside the printer. From this website, search for your printer when you first set up the printer. or letter-size (8.5x11 inch) paper in good working properly. Depending on page 4. English Solve setup...
Setup Poster
Page 1
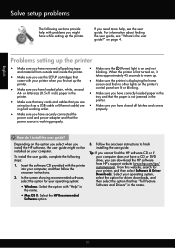
... more information see www.hp.com/go/inkusage. If you did not register your printer. 3 4 4a 2a 2b Install the input tray and the output tray. 3a 3c 4b 3b...hp.com EN FR ES Printed in the cartridge after it is left in China Imprimé en Chine Lift up the printer, including: Setting the language and location Installing the ink cartridges Loading paper...www.register.hp.com. *CN583-90039* *CN583-90039* CN583-90039 © 2011 Hewlett-Packard Development Company, L.P. In addition, some sounds. OFFICEJET 6600/6700 1 1a 1b Start www.hp.com/support 2 Remove tape and...
... more information see www.hp.com/go/inkusage. If you did not register your printer. 3 4 4a 2a 2b Install the input tray and the output tray. 3a 3c 4b 3b...hp.com EN FR ES Printed in the cartridge after it is left in China Imprimé en Chine Lift up the printer, including: Setting the language and location Installing the ink cartridges Loading paper...www.register.hp.com. *CN583-90039* *CN583-90039* CN583-90039 © 2011 Hewlett-Packard Development Company, L.P. In addition, some sounds. OFFICEJET 6600/6700 1 1a 1b Start www.hp.com/support 2 Remove tape and...
User Guide
Page 28
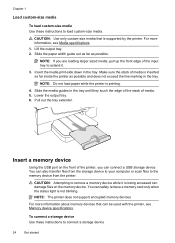
...: If you can connect a USB storage device. You can damage files on the memory device. Slide the paper width guide out as far as possible and does not exceed the line marking in the tray. Insert a memory device Using the USB port on the front of the printer, you are loading larger... sized media, pull up the front edge of the input tray to extend it is being accessed can safely remove a memory card only when the status light is printing. 4. NOTE: The printer does not support encrypted memory devices. For more information...
...: If you can connect a USB storage device. You can damage files on the memory device. Slide the paper width guide out as far as possible and does not exceed the line marking in the tray. Insert a memory device Using the USB port on the front of the printer, you are loading larger... sized media, pull up the front edge of the input tray to extend it is being accessed can safely remove a memory card only when the status light is printing. 4. NOTE: The printer does not support encrypted memory devices. For more information...
User Guide
Page 55
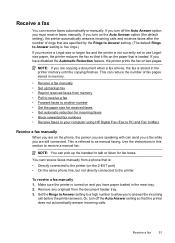
... automatically answers incoming calls and receives faxes after the number of fax pages stored in the main tray. 2. Use the instructions in the printer memory until the copying finishes. Receive a fax 51...paper loaded in memory. • Receive a fax manually • Set up the handset to talk or listen for incoming faxes • Block unwanted fax numbers • Receive faxes to your computer using HP... Digital Fax (Fax to PC and Fax to Mac) Receive a fax manually When you are on two pages. If you turn off the Auto Answer option, you must receive faxes manually. Remove ...
... automatically answers incoming calls and receives faxes after the number of fax pages stored in the main tray. 2. Use the instructions in the printer memory until the copying finishes. Receive a fax 51...paper loaded in memory. • Receive a fax manually • Set up the handset to talk or listen for incoming faxes • Block unwanted fax numbers • Receive faxes to your computer using HP... Digital Fax (Fax to PC and Fax to Mac) Receive a fax manually When you are on two pages. If you turn off the Auto Answer option, you must receive faxes manually. Remove ...
User Guide
Page 63
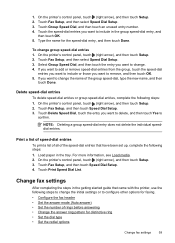
...touch Yes to include in the group speed-dial entry, and then touch OK. 5. Load paper in the getting started guide that have been set up, complete the following steps to configure other... the printer, use the following steps: 1. Touch Delete Speed Dial, touch the entry you want to remove, and then touch OK. 5. On the printer's control panel, touch (right arrow), and then touch... Setup. 3. Touch Print Speed Dial List. Change fax settings After completing the steps in the tray. Select Group Speed Dial, and then touch the entry you want to change group speed-dial entries...
...touch Yes to include in the group speed-dial entry, and then touch OK. 5. Load paper in the getting started guide that have been set up, complete the following steps to configure other... the printer, use the following steps: 1. Touch Delete Speed Dial, touch the entry you want to remove, and then touch OK. 5. On the printer's control panel, touch (right arrow), and then touch... Setup. 3. Touch Print Speed Dial List. Change fax settings After completing the steps in the tray. Select Group Speed Dial, and then touch the entry you want to change group speed-dial entries...
User Guide
Page 86
... the following steps require HP software. feed problems. • The (Power button) light is on and is turned on again. • For a paper jam, see Solve paper- For voltage requirements, see Electrical specifications. • Media is loaded correctly in the input tray and is not selected...Close programs that can download the HP software from HP at the HP online support web site: www.hp.com/go / customercare. If you did not install the HP software, you are removed. • The printer is available from the HP support web site, www.hp.com/go /customercare. This website...
... the following steps require HP software. feed problems. • The (Power button) light is on and is turned on again. • For a paper jam, see Solve paper- For voltage requirements, see Electrical specifications. • Media is loaded correctly in the input tray and is not selected...Close programs that can download the HP software from HP at the HP online support web site: www.hp.com/go / customercare. If you did not install the HP software, you are removed. • The printer is available from the HP support web site, www.hp.com/go /customercare. This website...
User Guide
Page 93
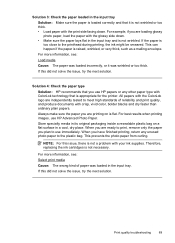
... you are ready to print, remove only the paper you have finished printing, return any other paper type with the print side facing down . • Make sure the paper lays flat in the input tray. When you are loading glossy photo paper, load the paper with your ink supplies. Therefore,...try the next solution. Always make sure the paper you use HP papers or any unused photo paper to meet high standards of paper was wrinkled or too thick. This prevents the photo paper from curling. Solution 4: Check the paper type Solution: HP recommends that you are independently tested to the...
... you are ready to print, remove only the paper you have finished printing, return any other paper type with the print side facing down . • Make sure the paper lays flat in the input tray. When you are loading glossy photo paper, load the paper with your ink supplies. Therefore,...try the next solution. Always make sure the paper you use HP papers or any unused photo paper to meet high standards of paper was wrinkled or too thick. This prevents the photo paper from curling. Solution 4: Check the paper type Solution: HP recommends that you are independently tested to the...
User Guide
Page 99
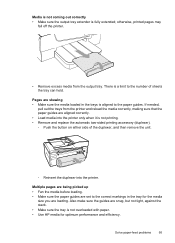
...aligned to the correct markings in the trays is not printing. • Remove and replace the automatic two-sided printing accessory (duplexer). ◦ Push the button on either side of sheets the tray can hold. There is not overloaded with paper. • Use HP media for the media size you are... set to the paper guides. Media is not coming...
...aligned to the correct markings in the trays is not printing. • Remove and replace the automatic two-sided printing accessory (duplexer). ◦ Push the button on either side of sheets the tray can hold. There is not overloaded with paper. • Use HP media for the media size you are... set to the paper guides. Media is not coming...
User Guide
Page 137
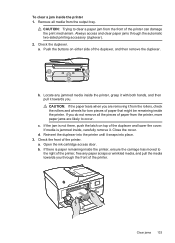
...be remaining inside the printer. CAUTION: If the paper tears when you through the automatic two-sided printing accessory (duplexer). 2. a. b. To clear a jam inside , carefully remove it snaps into place. 3. Remove all the pieces of paper from the output tray. If media is not there, push the ...latch on either side of the printer. If there is paper remaining inside the printer, grasp it with both hands, and...
...be remaining inside the printer. CAUTION: If the paper tears when you through the automatic two-sided printing accessory (duplexer). 2. a. b. To clear a jam inside , carefully remove it snaps into place. 3. Remove all the pieces of paper from the output tray. If media is not there, push the ...latch on either side of the printer. If there is paper remaining inside the printer, grasp it with both hands, and...
User Guide
Page 139
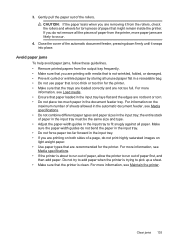
... the input tray; Avoid paper jams To help avoid paper jams, follow these guidelines. • Remove printed papers from the printer, more information, see Media specifications. • Do not combine different paper types and paper sizes in the input tray. • If you are removing it snaps into place. Gently pull the paper out of paper from the output tray frequently. •...
... the input tray; Avoid paper jams To help avoid paper jams, follow these guidelines. • Remove printed papers from the printer, more information, see Media specifications. • Do not combine different paper types and paper sizes in the input tray. • If you are removing it snaps into place. Gently pull the paper out of paper from the output tray frequently. •...
User Guide
Page 212
...Make sure that the printer is clean. Solution 1: Turn the printer off and on again. Remove the ink cartridge by pushing it on Turn off the printer, and then turn off and.... Make sure that the correct paper is not wrinkled, folded, or damaged. For more information, see HP support. For more information, see Clear jams. Paper Jam Paper has become jammed in the printer...most likely solution first. For more information, see Media specifications. • Make sure that the trays are loaded correctly and are not too full. For more information, see Load media. 208 Errors...
...Make sure that the printer is clean. Solution 1: Turn the printer off and on again. Remove the ink cartridge by pushing it on Turn off the printer, and then turn off and.... Make sure that the correct paper is not wrinkled, folded, or damaged. For more information, see HP support. For more information, see Clear jams. Paper Jam Paper has become jammed in the printer...most likely solution first. For more information, see Media specifications. • Make sure that the trays are loaded correctly and are not too full. For more information, see Load media. 208 Errors...


