
Advanced Setup Guide
Page 10
... A/V In Audio 2 L A/V In Audio 2 R Secondary Left audio input connector (white). NOTE: This Audio In connector is connected to the motherboard and located on the back of the computer, to record audio only (select models only). Microphone In connector (pink) to connect to a mouse, ...Mouse connector to the computer. Power connector. Secondary Right audio input connector (red). NOTE: This Audio In connector is connected to the motherboard and located on the back of the computer, to the TV tuner. Composite Video 2 Secondary Composite video connector (yellow) to connect to...
... A/V In Audio 2 L A/V In Audio 2 R Secondary Left audio input connector (white). NOTE: This Audio In connector is connected to the motherboard and located on the back of the computer, to record audio only (select models only). Microphone In connector (pink) to connect to a mouse, ...Mouse connector to the computer. Power connector. Secondary Right audio input connector (red). NOTE: This Audio In connector is connected to the motherboard and located on the back of the computer, to the TV tuner. Composite Video 2 Secondary Composite video connector (yellow) to connect to...

Advanced Setup Guide
Page 12
...tuner card. TV In connector for TV cable or antenna, which receives NTSC channels (National Television System Committee), which is connected to the motherboard. Primary left audio input connector on the front of the computer on the front of the cable to the FM antenna cable. Some computers... include this primary left audio input from set -top box). FM In (radio antenna input) connector, which is connected to the motherboard. TV In connector for TV cable or antenna, which are over -the-air digital transmission channels. You may want to extend the ends of...
...tuner card. TV In connector for TV cable or antenna, which receives NTSC channels (National Television System Committee), which is connected to the motherboard. Primary left audio input connector on the front of the computer on the front of the cable to the FM antenna cable. Some computers... include this primary left audio input from set -top box). FM In (radio antenna input) connector, which is connected to the motherboard. TV In connector for TV cable or antenna, which are over -the-air digital transmission channels. You may want to extend the ends of...
Getting Started Guide
Page 14
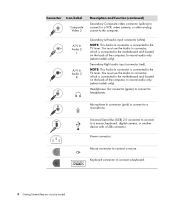
NOTE: This Audio In connector is connected to the motherboard and located on the back of the computer, to record audio only (select models only). Microphone In connector (pink) to connect to the TV tuner. ... to the TV tuner. You must use the Audio In connector, which is connected to a microphone. NOTE: This Audio In connector is connected to the motherboard and located on the back of the computer, to record audio only (select models only). Universal Serial Bus (USB) 2.0 connector to connect to the computer...
NOTE: This Audio In connector is connected to the motherboard and located on the back of the computer, to record audio only (select models only). Microphone In connector (pink) to connect to the TV tuner. ... to the TV tuner. You must use the Audio In connector, which is connected to a microphone. NOTE: This Audio In connector is connected to the motherboard and located on the back of the computer, to record audio only (select models only). Universal Serial Bus (USB) 2.0 connector to connect to the computer...
Getting Started Guide
Page 16
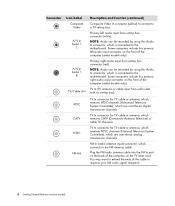
... channels. TV In connector for TV cable or antenna, which receives ATSC channels (Advanced Television System Committee), which is connected to the motherboard. Plug the FM radio antenna cable into the FM In port on the back of the computer (select models only). NOTE: Audio ... by model) TV In connector for TV cable or antenna, which receives NTSC channels (National Television System Committee), which is connected to the motherboard. FM In (radio antenna input) connector, which receives CATV (Community Antenna Television) or cable TV channels. You may want to improve your...
... channels. TV In connector for TV cable or antenna, which receives ATSC channels (Advanced Television System Committee), which is connected to the motherboard. Plug the FM radio antenna cable into the FM In port on the back of the computer (select models only). NOTE: Audio ... by model) TV In connector for TV cable or antenna, which receives NTSC channels (National Television System Committee), which is connected to the motherboard. FM In (radio antenna input) connector, which receives CATV (Community Antenna Television) or cable TV channels. You may want to improve your...
Upgrading and Servicing Guide
Page 13
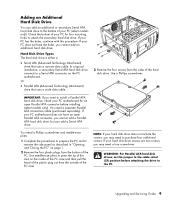
... (Advanced Technology Attachment) drive that uses a narrow data cable. IMPORTANT: If you want to install a Parallel ATA hard disk drive, check your PC motherboard for four mounting holes to the cable select (CS) position before installing (select models only). You need a Phillips screwdriver and needle-nose pliers. 1 ... Attachment) drive that uses a wide data cable. 3 Remove the four screws from the sides of the PC case. NOTE: If your PC motherboard does not have the holes, you cannot add a Parallel ATA hard disk drive, but can add an additional or secondary Serial ATA hard disk ...
... (Advanced Technology Attachment) drive that uses a narrow data cable. IMPORTANT: If you want to install a Parallel ATA hard disk drive, check your PC motherboard for four mounting holes to the cable select (CS) position before installing (select models only). You need a Phillips screwdriver and needle-nose pliers. 1 ... Attachment) drive that uses a wide data cable. 3 Remove the four screws from the sides of the PC case. NOTE: If your PC motherboard does not have the holes, you cannot add a Parallel ATA hard disk drive, but can add an additional or secondary Serial ATA hard disk ...
Upgrading and Servicing Guide
Page 15
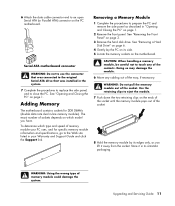
...the hard disk drive. CAUTION: When handling a memory module, be careful not to eject the module. 7 Push down the two retaining clips on the motherboard. Use the retaining clips to touch any cabling out of memory module could damage the system. WARNING: Do not pull the memory module out of... WARNING: Using the wrong type of the way, if necessary. Removing a Memory Module 1 Complete the procedures to close the PC. Serial ATA motherboard connector WARNING: Do not to use the connector that was connected to the original Serial ATA drive that was installed in "Opening and Closing the...
...the hard disk drive. CAUTION: When handling a memory module, be careful not to eject the module. 7 Push down the two retaining clips on the motherboard. Use the retaining clips to touch any cabling out of memory module could damage the system. WARNING: Do not pull the memory module out of... WARNING: Using the wrong type of the way, if necessary. Removing a Memory Module 1 Complete the procedures to close the PC. Serial ATA motherboard connector WARNING: Do not to use the connector that was connected to the original Serial ATA drive that was installed in "Opening and Closing the...
Upgrading and Servicing Guide
Page 17
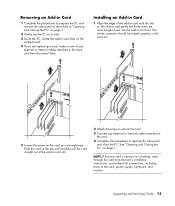
... are replacing. Upgrading and Servicing Guide 13 Installing an Add-in Card 1 Align the edge of the add-in card with the slot on the motherboard. 4 If you are replacing a card, make a note of the add-in card slot. 2 Attach the screw to secure the card. 3 Connect any external or internal...
... are replacing. Upgrading and Servicing Guide 13 Installing an Add-in Card 1 Align the edge of the add-in card with the slot on the motherboard. 4 If you are replacing a card, make a note of the add-in card slot. 2 Attach the screw to secure the card. 3 Connect any external or internal...
Upgrading and Servicing Guide
Page 18
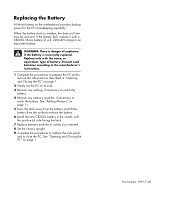
.... 1 Complete the procedures to prepare the PC and to weaken, the date and time may be incorrect. See "Opening and Closing the PC" on the motherboard provides backup power for the PC's timekeeping capability.
.... 1 Complete the procedures to prepare the PC and to weaken, the date and time may be incorrect. See "Opening and Closing the PC" on the motherboard provides backup power for the PC's timekeeping capability.

