Advanced Setup Guide
Page 21
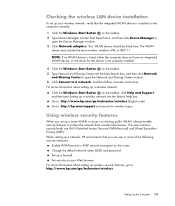
... click Device Manager to open the Network and Sharing Center window. 6 Click Connect to a network, and then follow onscreen instructions. Checking the wireless LAN device installation To set up a home WLAN or access an existing public WLAN, always enable security features to protect the network from unauthorized access. NOTE: If no WLAN device is listed, either the computer does not have an integrated WLAN device, or the driver for wireless topics. When setting up a network, HP...
... click Device Manager to open the Network and Sharing Center window. 6 Click Connect to a network, and then follow onscreen instructions. Checking the wireless LAN device installation To set up a home WLAN or access an existing public WLAN, always enable security features to protect the network from unauthorized access. NOTE: If no WLAN device is listed, either the computer does not have an integrated WLAN device, or the driver for wireless topics. When setting up a network, HP...

Warranty & Support Guide
Page 6
... for most HP-branded options (HP Options) are as set forth in your End-User License Agreement (EULA). HP's only warranty obligations with that software. Software technical support includes assistance with: • Answering your installation questions (how-to, first steps, and prerequisites). • Setting up and configuring the software (how-to and first steps). • Interpreting system error messages. • Isolating system problems to software usage problems. Software technical support does NOT...
... for most HP-branded options (HP Options) are as set forth in your End-User License Agreement (EULA). HP's only warranty obligations with that software. Software technical support includes assistance with: • Answering your installation questions (how-to, first steps, and prerequisites). • Setting up and configuring the software (how-to and first steps). • Interpreting system error messages. • Isolating system problems to software usage problems. Software technical support does NOT...

Getting Started Guide
Page 3
... Time 5 Turning Off the Computer 6 Using Shut Down 6 Using Lock ...7 Using Sleep mode 7 Using Hibernate mode 8 Automatic Sleep, Hibernate, or Away mode 9 Restarting the Computer 9 Connecting to the Internet 10 Using the Computer with Safety and Comfort 11 Setting Up User Accounts 11 Protecting the Computer 12 Using passwords 13 Using antivirus software 14 Using firewall software 14 Configuring the computer for automatic Microsoft software updates 15 Installing critical security updates 16 Guidelines for Installing Software and Hardware Devices 16...
... Time 5 Turning Off the Computer 6 Using Shut Down 6 Using Lock ...7 Using Sleep mode 7 Using Hibernate mode 8 Automatic Sleep, Hibernate, or Away mode 9 Restarting the Computer 9 Connecting to the Internet 10 Using the Computer with Safety and Comfort 11 Setting Up User Accounts 11 Protecting the Computer 12 Using passwords 13 Using antivirus software 14 Using firewall software 14 Configuring the computer for automatic Microsoft software updates 15 Installing critical security updates 16 Guidelines for Installing Software and Hardware Devices 16...
Getting Started Guide
Page 20
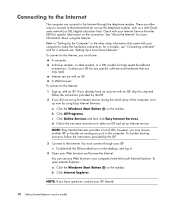
... browse the Internet. To connect to the Internet. To transfer existing accounts, follow the instructions provided by the ISP. 3 Connect to the Internet: 1 Sign up Internet service. To open Internet Explorer: a Click the Windows Start Button on the desktop, and log in the other ways to connect to the Internet through your Internet Service Provider (ISP) for high-speed broadband connections. b Click Internet Explorer. NOTE: Easy Internet Services provides a list of the computer, set up...
... browse the Internet. To connect to the Internet. To transfer existing accounts, follow the instructions provided by the ISP. 3 Connect to the Internet: 1 Sign up Internet service. To open Internet Explorer: a Click the Windows Start Button on the desktop, and log in the other ways to connect to the Internet through your Internet Service Provider (ISP) for high-speed broadband connections. b Click Internet Explorer. NOTE: Easy Internet Services provides a list of the computer, set up...
Getting Started Guide
Page 23
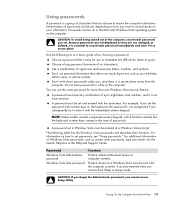
Several types of passwords can be set in the Help and Support Center. CAUTION: To avoid being locked out of the computer, record each password immediately and store it in a secure place away from Sleep or Away mode. Use the following table lists the Windows Vista passwords and describes their functions. Use a combination of six characters). You can be entered when you cannot access Setup Utility. For example, if...
Several types of passwords can be set in the Help and Support Center. CAUTION: To avoid being locked out of the computer, record each password immediately and store it in a secure place away from Sleep or Away mode. Use the following table lists the Windows Vista passwords and describes their functions. Use a combination of six characters). You can be entered when you cannot access Setup Utility. For example, if...
Getting Started Guide
Page 25
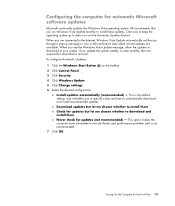
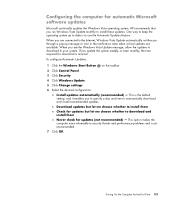
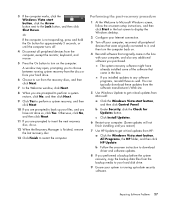
... the Internet, Windows Vista Update automatically notifies you see the Windows Vista Update message, allow the updates to download to use the Automatic Updates feature. To configure Automatic Updates: 1 Click the Windows Start Button on the taskbar. 2 Click Control Panel. 3 Click Security. 4 Click Windows Update. 5 Click Change settings. 6 Select the desired configuration: Install updates automatically (recommended) - HP recommends that you to specify a day and time to download and install them Never check for download is the default setting, and it enables you run Windows Vista...
... the Internet, Windows Vista Update automatically notifies you see the Windows Vista Update message, allow the updates to download to use the Automatic Updates feature. To configure Automatic Updates: 1 Click the Windows Start Button on the taskbar. 2 Click Control Panel. 3 Click Security. 4 Click Windows Update. 5 Click Change settings. 6 Select the desired configuration: Install updates automatically (recommended) - HP recommends that you to specify a day and time to download and install them Never check for download is the default setting, and it enables you run Windows Vista...

Getting Started Guide
Page 57
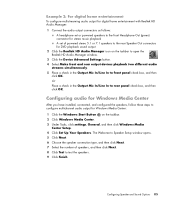
... to Speaker Setup window opens. 5 Click Next. 6 Choose the speaker connection type, and then click Next. 7 Select the number of powered stereo 5.1 or 7.1 speakers to the rear Speaker Out connectors for Windows Media Center: 1 Click the Windows Start Button on the taskbar to open the Realtek HD Audio Manager window. 3 Click the Device Advanced Settings button. 4 Select Make front and rear output devices playback two different audio streams simultaneously. 5 Place a check in the Output Mic In/Line In to rear panel check...
... to Speaker Setup window opens. 5 Click Next. 6 Choose the speaker connection type, and then click Next. 7 Select the number of powered stereo 5.1 or 7.1 speakers to the rear Speaker Out connectors for Windows Media Center: 1 Click the Windows Start Button on the taskbar to open the Realtek HD Audio Manager window. 3 Click the Device Advanced Settings button. 4 Select Make front and rear output devices playback two different audio streams simultaneously. 5 Place a check in the Output Mic In/Line In to rear panel check...
Getting Started Guide
Page 25
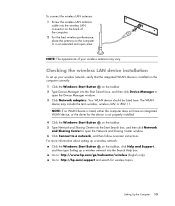
... wireless, wireless LAN, or 802.11. Checking the wireless LAN device installation To set up a wireless network into the Search Help box. To connect the wireless LAN antenna: 1 Screw the wireless LAN antenna cable into the wireless LAN connector on the back of your wireless network, verify that the integrated WLAN device is not properly installed. 4 Click the Windows Start Button on the taskbar. 2 Type Device Manager into the Start Search box, and then click Device Manager to open the Device Manager window. 3 Click Network adapters. The WLAN device...
... wireless, wireless LAN, or 802.11. Checking the wireless LAN device installation To set up a wireless network into the Search Help box. To connect the wireless LAN antenna: 1 Screw the wireless LAN antenna cable into the wireless LAN connector on the back of your wireless network, verify that the integrated WLAN device is not properly installed. 4 Click the Windows Start Button on the taskbar. 2 Type Device Manager into the Start Search box, and then click Device Manager to open the Device Manager window. 3 Click Network adapters. The WLAN device...
Getting Started Guide
Page 63
...you are connected to the Internet, Windows Vista Update automatically notifies you to specify a day and time to security threats and performance problems and is minimal. To configure Automatic Updates: 1 Click the Windows Start Button on the taskbar. 2 Click Control Panel. 3 Click Security. 4 Click Windows Update. 5 Click Change settings. 6 Select the desired configuration: Install updates automatically (recommended) - Turning On the Computer for automatic Microsoft software updates Microsoft continually updates the Windows Vista operating system. This option makes the computer...
...you are connected to the Internet, Windows Vista Update automatically notifies you to specify a day and time to security threats and performance problems and is minimal. To configure Automatic Updates: 1 Click the Windows Start Button on the taskbar. 2 Click Control Panel. 3 Click Security. 4 Click Windows Update. 5 Click Change settings. 6 Select the desired configuration: Install updates automatically (recommended) - Turning On the Computer for automatic Microsoft software updates Microsoft continually updates the Windows Vista operating system. This option makes the computer...
Getting Started Guide
Page 95
... A set of speakers, and then click Next. 8 Click Test to test the speakers. 9 Click Finish. The Welcome to Speaker Setup window opens. 5 Click Next. 6 Choose the speaker connection type, and then click Next. 7 Select the number of powered stereo 5.1 or 7.1 speakers to the rear Speaker Out connectors for Windows Media Center: 1 Click the Windows Start Button on the taskbar to open the Realtek HD Audio Manager window. 3 Click the Device Advanced Settings button. 4 Select Make front and rear output devices playback two different audio streams...
... A set of speakers, and then click Next. 8 Click Test to test the speakers. 9 Click Finish. The Welcome to Speaker Setup window opens. 5 Click Next. 6 Choose the speaker connection type, and then click Next. 7 Select the number of powered stereo 5.1 or 7.1 speakers to the rear Speaker Out connectors for Windows Media Center: 1 Click the Windows Start Button on the taskbar to open the Realtek HD Audio Manager window. 3 Click the Device Advanced Settings button. 4 Select Make front and rear output devices playback two different audio streams...
PC Troubleshooting
Page 3
... Problems 5 Audio ...5 CD and DVD Drives 7 Video...9 Display (Monitor 10 Hard Disk Drive...11 Hardware Installation 11 Internet Access ...13 Keyboard and Mouse 15 Power ...18 Performance ...19 Bluetooth Wireless Devices 20 Miscellaneous ...21 Repairing Software Problems 22 Software Repair Overview 22 Restarting Your Computer 22 Turning Off Your Computer 22 Updating Drivers 22 Microsoft System Restore 23 Software Program and Hardware Driver Reinstallation 23 System Recovery 24 Creating Recovery Discs 24 System Recovery Options 25 Starting system recovery from the hard disk drive...
... Problems 5 Audio ...5 CD and DVD Drives 7 Video...9 Display (Monitor 10 Hard Disk Drive...11 Hardware Installation 11 Internet Access ...13 Keyboard and Mouse 15 Power ...18 Performance ...19 Bluetooth Wireless Devices 20 Miscellaneous ...21 Repairing Software Problems 22 Software Repair Overview 22 Restarting Your Computer 22 Turning Off Your Computer 22 Updating Drivers 22 Microsoft System Restore 23 Software Program and Hardware Driver Reinstallation 23 System Recovery 24 Creating Recovery Discs 24 System Recovery Options 25 Starting system recovery from the hard disk drive...
PC Troubleshooting
Page 9
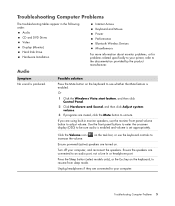
Audio Symptom No sound is enabled. Ensure powered (active) speakers are muted, click the Mute button to unmute. Possible solution Press the Mute button on the task bar, or use the monitor front panel volume button to adjust volume. If you are using built-in the following order: Audio CD and DVD Drives Video Display (Monitor) Hard Disk Drive Hardware Installation Internet Access Keyboard and Mouse Power Performance Bluetooth Wireless Devices Miscellaneous For more information about monitor problems, or for problems related specifically to your...
Audio Symptom No sound is enabled. Ensure powered (active) speakers are muted, click the Mute button to unmute. Possible solution Press the Mute button on the task bar, or use the monitor front panel volume button to adjust volume. If you are using built-in the following order: Audio CD and DVD Drives Video Display (Monitor) Hard Disk Drive Hardware Installation Internet Access Keyboard and Mouse Power Performance Bluetooth Wireless Devices Miscellaneous For more information about monitor problems, or for problems related specifically to your...
PC Troubleshooting
Page 15
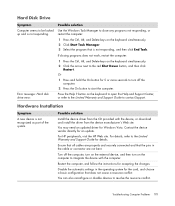
Contact the device vendor directly for accepting the changes. Turn off the computer. 2 Press the On button to start the computer. Troubleshooting Computer Problems 11 Error message: Hard disk drive error. Disable the automatic settings in the cable or connector are not bent. You can also reconfigure or disable devices to the Limited Warranty and Support Guide for the card, and choose a basic configuration that does not cause a resource conflict. A Hardware Installation Symptom A new device is not...
Contact the device vendor directly for accepting the changes. Turn off the computer. 2 Press the On button to start the computer. Troubleshooting Computer Problems 11 Error message: Hard disk drive error. Disable the automatic settings in the cable or connector are not bent. You can also reconfigure or disable devices to the Limited Warranty and Support Guide for the card, and choose a basic configuration that does not cause a resource conflict. A Hardware Installation Symptom A new device is not...
PC Troubleshooting
Page 17
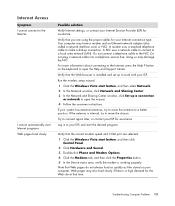
... stored on the keyboard to a better position. A modem uses a standard telephone cable to make a dial-up to open the Help and Support Center. doing so may have a modem and an Ethernet network adapter (also called a network interface card, or NIC). Run the wireless setup wizard: 1 Click the Windows Vista start button, and then select Network. 2 In the Network window, click Network and Sharing Center. 3 In the Network and Sharing Center window, click Set up a connection or network to work with your...
... stored on the keyboard to a better position. A modem uses a standard telephone cable to make a dial-up to open the Help and Support Center. doing so may have a modem and an Ethernet network adapter (also called a network interface card, or NIC). Run the wireless setup wizard: 1 Click the Windows Vista start button, and then select Network. 2 In the Network window, click Network and Sharing Center. 3 In the Network and Sharing Center window, click Set up a connection or network to work with your...
PC Troubleshooting
Page 31
..., click Yes. b Follow the onscreen instruction to download driver and software updates. 8 If you performed a backup before the system recovery, copy the backup data files from the backup media to your hard disk drive. 9 Ensure your system is running system recovery from the discs or from your computer, reconnect all peripheral devices from Microsoft: a Click the Windows Vista start button, and then click Control Panel. Otherwise, click No, and then...
..., click Yes. b Follow the onscreen instruction to download driver and software updates. 8 If you performed a backup before the system recovery, copy the backup data files from the backup media to your hard disk drive. 9 Ensure your system is running system recovery from the discs or from your computer, reconnect all peripheral devices from Microsoft: a Click the Windows Vista start button, and then click Control Panel. Otherwise, click No, and then...
Upgrading and Servicing Guide
Page 3
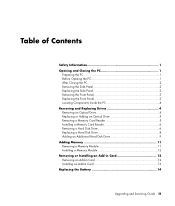
...3 Removing the Front Panel 3 Replacing the Front Panel 3 Locating Components Inside the PC 4 Removing and Replacing Drives 4 Removing an Optical Drive 4 Replacing or Adding an Optical Drive 5 Removing a Memory Card Reader 5 Installing a Memory Card Reader 6 Removing a Hard Disk Drive 6 Replacing a Hard Disk Drive 8 Adding an Additional Hard Disk Drive 9 Adding Memory 11 Removing a Memory Module 11 Installing a Memory Module 12 Removing or Installing an Add-in Card 12 Removing an Add-in Card 12 Installing an Add-in Card 13 Replacing the Battery 14 Upgrading and Servicing Guide...
...3 Removing the Front Panel 3 Replacing the Front Panel 3 Locating Components Inside the PC 4 Removing and Replacing Drives 4 Removing an Optical Drive 4 Replacing or Adding an Optical Drive 5 Removing a Memory Card Reader 5 Installing a Memory Card Reader 6 Removing a Hard Disk Drive 6 Replacing a Hard Disk Drive 8 Adding an Additional Hard Disk Drive 9 Adding Memory 11 Removing a Memory Module 11 Installing a Memory Module 12 Removing or Installing an Add-in Card 12 Removing an Add-in Card 12 Installing an Add-in Card 13 Replacing the Battery 14 Upgrading and Servicing Guide...
Upgrading and Servicing Guide
Page 9
... guide screws from HP. Some drive models may have a sound cable. See "Opening and Closing the PC" on page 3. 3 Remove the screw under the memory card reader. You need room to attach the cables. 6 Connect the power cable and data cable to remove the side panel as described in "Opening and Closing the PC" on page 1. 2 Remove the front panel. Removing a Memory Card Reader Your PC has a memory card reader above your optical drive. 5 Slide the new optical drive through the front of the drive cover...
... guide screws from HP. Some drive models may have a sound cable. See "Opening and Closing the PC" on page 3. 3 Remove the screw under the memory card reader. You need room to attach the cables. 6 Connect the power cable and data cable to remove the side panel as described in "Opening and Closing the PC" on page 1. 2 Remove the front panel. Removing a Memory Card Reader Your PC has a memory card reader above your optical drive. 5 Slide the new optical drive through the front of the drive cover...

Upgrading and Servicing Guide
Page 10
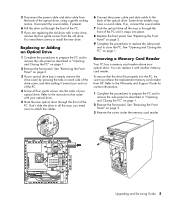
... is aligned with the system recovery partition of your PC. See "Removing the Front Panel" on page 1. 2 Remove the front panel. See "Removing the Front Panel" on page 3. 3 See "Removing a Memory Card Reader" on page 5. 4 Attach the cable to the memory card reader. 5 Slide the memory card reader inside the slot and make sure the screw hole on page 1. 6 Upgrading and Servicing Guide After replacing the hard disk drive, you remove this hard disk drive, store it in "Opening and Closing the PC" on...
... is aligned with the system recovery partition of your PC. See "Removing the Front Panel" on page 1. 2 Remove the front panel. See "Removing the Front Panel" on page 3. 3 See "Removing a Memory Card Reader" on page 5. 4 Attach the cable to the memory card reader. 5 Slide the memory card reader inside the slot and make sure the screw hole on page 1. 6 Upgrading and Servicing Guide After replacing the hard disk drive, you remove this hard disk drive, store it in "Opening and Closing the PC" on...
Upgrading and Servicing Guide
Page 13
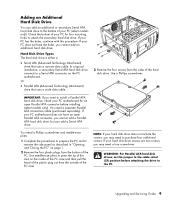
... Parallel ATA hard disk drives, set the jumper to remove the side panel as described in "Opening and Closing the PC" on page 1. 2 Remove the four plastic plugs from the sides of your hard disk drive screws are torx screws, you may need to the PC. Check the bottom of the PC. Hard Disk Drive Types The hard disk drive is either a: • Serial ATA (Advanced Technology Attachment) drive that uses a wide data cable. 3 Remove the...
... Parallel ATA hard disk drives, set the jumper to remove the side panel as described in "Opening and Closing the PC" on page 1. 2 Remove the four plastic plugs from the sides of your hard disk drive screws are torx screws, you may need to the PC. Check the bottom of the PC. Hard Disk Drive Types The hard disk drive is either a: • Serial ATA (Advanced Technology Attachment) drive that uses a wide data cable. 3 Remove the...
Upgrading and Servicing Guide
Page 17
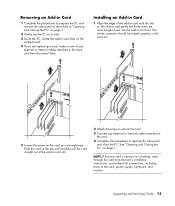
... the new card or device isn't working, read through the card manufacturer's installation instructions, and recheck all connections, including those to the card, power supply, keyboard, and monitor. Upgrading and Servicing Guide 13 Installing an Add-in Card 1 Align the edge of the add-in card with the slot on page 1. Hold the card at the top and carefully pull the card straight out of any external or internal cables attached to the card. 4 Complete the procedures to replace...
... the new card or device isn't working, read through the card manufacturer's installation instructions, and recheck all connections, including those to the card, power supply, keyboard, and monitor. Upgrading and Servicing Guide 13 Installing an Add-in Card 1 Align the edge of the add-in card with the slot on page 1. Hold the card at the top and carefully pull the card straight out of any external or internal cables attached to the card. 4 Complete the procedures to replace...


