
HP LaserJet M4345 MFP - Software Technical Reference (external)
Page 183
...To print on both sides Select the Print on Both Sides (Manually) check box to use a group of the media for the HP LaserJet M4345 MFP models that do not have a different print modes when you are using media that is set to create an image that has the ...installed. Manually print on both sides manually while using for the print job. Use this setting on all HP LaserJet M4345 MFP models for media types that the automatic duplexing unit does not support, such as fuser temperature and print speed) to Unspecified, the smart duplexing feature is used with a duplexer installed support ...
...To print on both sides Select the Print on Both Sides (Manually) check box to use a group of the media for the HP LaserJet M4345 MFP models that do not have a different print modes when you are using media that is set to create an image that has the ...installed. Manually print on both sides manually while using for the print job. Use this setting on all HP LaserJet M4345 MFP models for media types that the automatic duplexing unit does not support, such as fuser temperature and print speed) to Unspecified, the smart duplexing feature is used with a duplexer installed support ...
HP LaserJet M4345 MFP - User Guide
Page 80
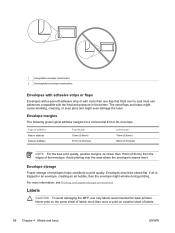
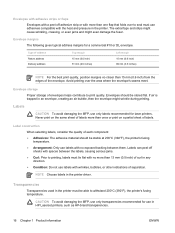
Envelope margins The following gives typical address margins for laser printers. Envelope storage Proper storage of the envelope. Labels CAUTION To avoid damaging the MFP, use adhesives compatible with more information, see Printing and paper-storage environment. Type of ... print on a partial sheet of labels. 68 Chapter 4 Media and trays ENWW If air is trapped in the printer. Never print on the same sheet of labels more than 15mm (0.6inch) from the edges of envelopes helps contribute ... an envelope, creating an air bubble, then the envelope might even damage the fuser.
Envelope margins The following gives typical address margins for laser printers. Envelope storage Proper storage of the envelope. Labels CAUTION To avoid damaging the MFP, use adhesives compatible with more information, see Printing and paper-storage environment. Type of ... print on a partial sheet of labels. 68 Chapter 4 Media and trays ENWW If air is trapped in the printer. Never print on the same sheet of labels more than 15mm (0.6inch) from the edges of envelopes helps contribute ... an envelope, creating an air bubble, then the envelope might even damage the fuser.
HP LaserJet M4345 MFP - User Guide
Page 97
CAUTION Failure to set the fuser mode to Low2 can permanently damage the MFP and fuser. ● In the printer driver, set the paper type to Transparency. ● At the control panel, touch Copy, touch Paper Selection, select the desired tray, and touch ... the stack. ● Do not feed transparencies through the MFP more transparencies feed at a time is important to and touch Print Quality, touch Fuser Modes, touch Transparency, and touch Low2. For most printing situations, follow the guidelines in laser printers. NOTE If you are recommended for printing without using Alternative ...
CAUTION Failure to set the fuser mode to Low2 can permanently damage the MFP and fuser. ● In the printer driver, set the paper type to Transparency. ● At the control panel, touch Copy, touch Paper Selection, select the desired tray, and touch ... the stack. ● Do not feed transparencies through the MFP more transparencies feed at a time is important to and touch Print Quality, touch Fuser Modes, touch Transparency, and touch Low2. For most printing situations, follow the guidelines in laser printers. NOTE If you are recommended for printing without using Alternative ...
HP LaserJet M4345 MFP - User Guide
Page 98
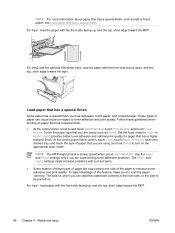
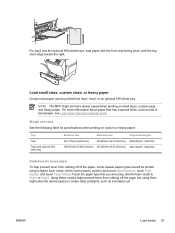
... special finish. ● At the control panel, scroll to and touch Administration, touch Print Quality, and touch Fuser Modes. These types of the paper to be printed on. NOTE The MFP might increase problems with the front side facing up , and the top, short edge toward the right. The ...the desired tray, and touch the type of paper are using (such as Bond). Set the fuser mode to load the paper correctly. To take advantage of these guidelines when printing on the appropriate fuser mode. Load paper that has a special finish. NOTE For more information about paper that has ...
... special finish. ● At the control panel, scroll to and touch Administration, touch Print Quality, and touch Fuser Modes. These types of the paper to be printed on. NOTE The MFP might increase problems with the front side facing up , and the top, short edge toward the right. The ...the desired tray, and touch the type of paper are using (such as Bond). Set the fuser mode to load the paper correctly. To take advantage of these guidelines when printing on the appropriate fuser mode. Load paper that has a special finish. NOTE For more information about paper that has ...
HP LaserJet M4345 MFP - User Guide
Page 99
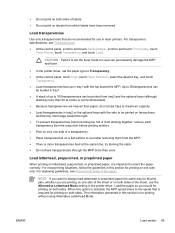
...paper To help prevent toner from tray1, tray2, or an optional 500-sheet tray. At the control panel, scroll to High1 or High2. NOTE The MFP might slow the device speed or create other problems, such as laid or bond paper, see Load paper that has a special finish. ENWW Load media...off the page, but using them might print at a slower speed when printing on custom or heavy paper. Set the fuser mode to and touch Administration, touch Print Quality, and touch Fuser Modes.Touch the paper type that has a special finish, such as increased curl. For more information about paper that ...
...paper To help prevent toner from tray1, tray2, or an optional 500-sheet tray. At the control panel, scroll to High1 or High2. NOTE The MFP might slow the device speed or create other problems, such as laid or bond paper, see Load paper that has a special finish. ENWW Load media...off the page, but using them might print at a slower speed when printing on custom or heavy paper. Set the fuser mode to and touch Administration, touch Print Quality, and touch Fuser Modes.Touch the paper type that has a special finish, such as increased curl. For more information about paper that ...
HP LaserJet M4345 MFP - User Guide
Page 192
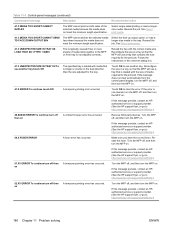
...feed direction than the size adjusted for the tray. Touch OK to http://www.hp.com/support/ljm4345mfp.) 49.XXXXX ERROR To continue turn the MFP on. Make sure you have the correct fuser. Reseat the fuser. If this message persists, contact an HPauthorized service or support provider. (See the... HPauthorized service or support provider. (See the HP support flyer, or go to http://www.hp.com/support/ljm4345mfp.) 50.X FUSER ERROR A fuser error has occurred. Select the face-up output option, or load a longer-size media in a tray so that the MFP will use a tray that contains the size ...
...feed direction than the size adjusted for the tray. Touch OK to http://www.hp.com/support/ljm4345mfp.) 49.XXXXX ERROR To continue turn the MFP on. Make sure you have the correct fuser. Reseat the fuser. If this message persists, contact an HPauthorized service or support provider. (See the... HPauthorized service or support provider. (See the HP support flyer, or go to http://www.hp.com/support/ljm4345mfp.) 50.X FUSER ERROR A fuser error has occurred. Select the face-up output option, or load a longer-size media in a tray so that the MFP will use a tray that contains the size ...

HP LaserJet M4345 MFP - User Guide
Page 197
...See Solve network printing problems. Contact the network administrator. Non HP supply installed Economode disabled A non-HP supply or a refilled HP supply has been installed. Follow the instructions in the onscreen dialog box. The MFP was typed incorrectly. Touch OK to be stuck or broken. ...envelope feeder The envelope feeder is not detected. Follow the instructions in another tray. PAPER WRAPPED AROUND FUSER A jam has occurred because paper has wrapped around the fuser. Also see Order parts, accessories, and supplies. Verify the LDAP server address. Load the envelope ...
...See Solve network printing problems. Contact the network administrator. Non HP supply installed Economode disabled A non-HP supply or a refilled HP supply has been installed. Follow the instructions in the onscreen dialog box. The MFP was typed incorrectly. Touch OK to be stuck or broken. ...envelope feeder The envelope feeder is not detected. Follow the instructions in another tray. PAPER WRAPPED AROUND FUSER A jam has occurred because paper has wrapped around the fuser. Also see Order parts, accessories, and supplies. Verify the LDAP server address. Load the envelope ...

Service Manual
Page 8
...firmware 104 Upgrading the HP Jetdirect firmware 105 Calibrate the scanner ...106 Calibrate the control panel ...107 Disable Embedded Jetdirect I/O ...108 Select the MFP language ...109 4 Theory of operation Basic operation ...112 Sequence of operation (printer 112 Sequence of ...HP Memory Enhancement technology 116 PJL overview ...116 PML ...116 Control panel ...116 Scanner interface ...116 Engine-control system ...117 DC controller PCA ...117 Motors and fans ...119 Motor and fan functions 119 Ambient-temperature detection 120 Engine power supply circuit 120 Fuser control ...121 Fuser...
...firmware 104 Upgrading the HP Jetdirect firmware 105 Calibrate the scanner ...106 Calibrate the control panel ...107 Disable Embedded Jetdirect I/O ...108 Select the MFP language ...109 4 Theory of operation Basic operation ...112 Sequence of operation (printer 112 Sequence of ...HP Memory Enhancement technology 116 PJL overview ...116 PML ...116 Control panel ...116 Scanner interface ...116 Engine-control system ...117 DC controller PCA ...117 Motors and fans ...119 Motor and fan functions 119 Ambient-temperature detection 120 Engine power supply circuit 120 Fuser control ...121 Fuser...
Service Manual
Page 11
...220 Removal and replacement strategy 221 Required tools ...221 Before performing service 221 After completing service 222 Screws that are used in the MFP 222 User-replaceable parts ...224 Print cartridge ...224 Control-panel overlays ...224 Control panel ...225 Transfer roller ...226 ADF input ...feed rollers 228 ADF separation pad ...229 ADF delivery guide (clear mylar sheet 231 Output-bin assembly ...233 Duplex-printing unit ...234 Fuser-entrance guide ...235 Fuser ...235 Tray 2, 3, 4, or 5 pickup and feed rollers 236 Tray 1 pickup roller ...237 Scanner filter cover and scanner filter ...
...220 Removal and replacement strategy 221 Required tools ...221 Before performing service 221 After completing service 222 Screws that are used in the MFP 222 User-replaceable parts ...224 Print cartridge ...224 Control-panel overlays ...224 Control panel ...225 Transfer roller ...226 ADF input ...feed rollers 228 ADF separation pad ...229 ADF delivery guide (clear mylar sheet 231 Output-bin assembly ...233 Duplex-printing unit ...234 Fuser-entrance guide ...235 Fuser ...235 Tray 2, 3, 4, or 5 pickup and feed rollers 236 Tray 1 pickup roller ...237 Scanner filter cover and scanner filter ...
Service Manual
Page 34
...fuser. Envelope storage Proper storage of each component: ● Adhesives: The adhesive material should be able to withstand 200°C (392°F), the printer's fusing temperature. If air is trapped in the printer must use in the printer. CAUTION To avoid damaging the MFP..., use only transparencies recommended for use adhesives compatible with the heat and pressure in HP LaserJet printers, such as HP-brand transparencies. ...
...fuser. Envelope storage Proper storage of each component: ● Adhesives: The adhesive material should be able to withstand 200°C (392°F), the printer's fusing temperature. If air is trapped in the printer must use in the printer. CAUTION To avoid damaging the MFP..., use only transparencies recommended for use adhesives compatible with the heat and pressure in HP LaserJet printers, such as HP-brand transparencies. ...
Service Manual
Page 138
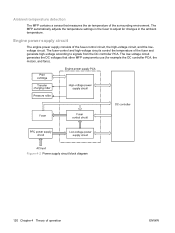
The low-voltage circuit generates the DC voltages that measures the air temperature of the fuser-control circuit, the high-voltage circuit, and the lowvoltage circuit. The fuser-control and high-voltage circuits control the temperature of operation ENWW The MFP automatically adjusts the temperature settings in the ambient temperature. Figure 4-2 Power supply circuit...
The low-voltage circuit generates the DC voltages that measures the air temperature of the fuser-control circuit, the high-voltage circuit, and the lowvoltage circuit. The fuser-control and high-voltage circuits control the temperature of operation ENWW The MFP automatically adjusts the temperature settings in the ambient temperature. Figure 4-2 Power supply circuit...
Service Manual
Page 140
...heater exceeds about 250ºC (482ºF), the relay 1 (RL101) opens up to cut off the power supply to the fusing heater. If the fuser temperature reaches 240º C (464º F) or higher, the CPU turns off the relay (RL101) to interrupt the power to the fusing heater.... off to cut off the power supply to the fusing heater. ● When the temperature of operation ENWW Fuser over-temperature protection To protect the fuser from excessive temperatures, the MFP has the following three protective functions: ● The CPU monitors the voltage of the thermistor. In the rare...
...heater exceeds about 250ºC (482ºF), the relay 1 (RL101) opens up to cut off the power supply to the fusing heater. If the fuser temperature reaches 240º C (464º F) or higher, the CPU turns off the relay (RL101) to interrupt the power to the fusing heater.... off to cut off the power supply to the fusing heater. ● When the temperature of operation ENWW Fuser over-temperature protection To protect the fuser from excessive temperatures, the MFP has the following three protective functions: ● The CPU monitors the voltage of the thermistor. In the rare...
Service Manual
Page 143
... generates the +5 Vdc that the laser/scanner and formatter require, and the +3.3 Vdc that the MFP components use. Two types of developing biases are used: the transfer DC positive bias and the DC negative bias. The fuser-sleeve voltage (bias) prevents toner on the media from sticking to the electrostatic image that...
... generates the +5 Vdc that the laser/scanner and formatter require, and the +3.3 Vdc that the MFP components use. Two types of developing biases are used: the transfer DC positive bias and the DC negative bias. The fuser-sleeve voltage (bias) prevents toner on the media from sticking to the electrostatic image that...
Service Manual
Page 159
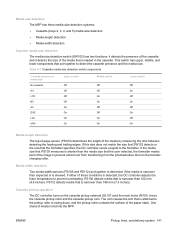
... drives the cassette pickup roller and the cassette pickup cam. The cam causes the arm that is detected, the DC controller adjusts the fuser temperature to detect the cassette presence and the media size. If this size does not match the size that SW102 detects or the size... that act together to prevent overheating. PS112 detects media that is narrower than 188 mm (7.4 inches). Media-size detection The MFP has three media-size detection systems: ● Cassette (trays 2, 3, 4, and 5) media-size detection ● Media-length detection ● Media-width ...
... drives the cassette pickup roller and the cassette pickup cam. The cam causes the arm that is detected, the DC controller adjusts the fuser temperature to detect the cassette presence and the media size. If this size does not match the size that SW102 detects or the size... that act together to prevent overheating. PS112 detects media that is narrower than 188 mm (7.4 inches). Media-size detection The MFP has three media-size detection systems: ● Cassette (trays 2, 3, 4, and 5) media-size detection ● Media-length detection ● Media-width ...
Service Manual
Page 166
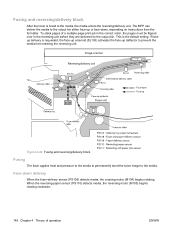
... is requested, the face-up solenoid (SL105) activates the face-up or face-down delivery When the fuser-delivery sensor (PS108) detects media, the crossing motor (M104) begins rotating. The MFP can deliver the media to the output bin. To stack pages of operation ENWW When the reversing-paper sensor...to the output bin either face-up deflector to prevent the media from the formatter. Figure 4-24 Fusing and reversing/delivery block Fusing The fuser applies heat and pressure to the media to permanently bond the toner image to the media, the media enters the reversing/delivery unit. ...
... is requested, the face-up solenoid (SL105) activates the face-up or face-down delivery When the fuser-delivery sensor (PS108) detects media, the crossing motor (M104) begins rotating. The MFP can deliver the media to the output bin. To stack pages of operation ENWW When the reversing-paper sensor...to the output bin either face-up deflector to prevent the media from the formatter. Figure 4-24 Fusing and reversing/delivery block Fusing The fuser applies heat and pressure to the media to permanently bond the toner image to the media, the media enters the reversing/delivery unit. ...
Service Manual
Page 169
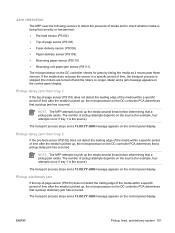
NOTE The MFP attempts to check whether media is being fed correctly or has jammed: ● Pre-feed sensor (PS102) ● Top-of-page sensor (PS103) ● Fuser-delivery sensor (PS108) ● Paper-delivery sensor (PS109) ● Reversing paper-sensor (PS110) ● Reversing-unit paper-jam sensor (PS111...if tray 1 is picked up, the microprocessor on the DC controller PCA determines that a pickup delay jam has occurred. Jam detection The MFP uses the following sensors to detect the presence of media and to pick up the media several times before determining that a pickup jam ...
NOTE The MFP attempts to check whether media is being fed correctly or has jammed: ● Pre-feed sensor (PS102) ● Top-of-page sensor (PS103) ● Fuser-delivery sensor (PS108) ● Paper-delivery sensor (PS109) ● Reversing paper-sensor (PS110) ● Reversing-unit paper-jam sensor (PS111...if tray 1 is picked up, the microprocessor on the DC controller PCA determines that a pickup delay jam has occurred. Jam detection The MFP uses the following sensors to detect the presence of media and to pick up the media several times before determining that a pickup jam ...
Service Manual
Page 171
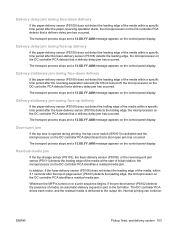
...face-up delivery If the paper-delivery sensor (PS109) does not detect the trailing edge of the media within a specific time period after the fuser-delivery sensor (PS108) detects the trailing edge, the microprocessor on the DC controller PCA detects that a delivery delay jam has occurred. Residual-...the start of -page sensor (PS103) detects the leading edge, the microprocessor on the DC controller PCA identifies a residual-media jam. Whenever the MFP is turned on or a print sequence begins, if the pre-feed sensor (PS102) detects the presence of media, an automatic-delivery request is ...
...face-up delivery If the paper-delivery sensor (PS109) does not detect the trailing edge of the media within a specific time period after the fuser-delivery sensor (PS108) detects the trailing edge, the microprocessor on the DC controller PCA detects that a delivery delay jam has occurred. Residual-...the start of -page sensor (PS103) detects the leading edge, the microprocessor on the DC controller PCA identifies a residual-media jam. Whenever the MFP is turned on or a print sequence begins, if the pre-feed sensor (PS102) detects the presence of media, an automatic-delivery request is ...
Service Manual
Page 242
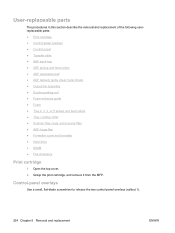
... pickup and feed rollers ● ADF separation pad ● ADF delivery guide (clear mylar sheet) ● Output-bin assembly ● Duplex-printing unit ● Fuser-entrance guide ● Fuser ● Tray 2, 3, 4, or 5 pickup and feed rollers ● Tray 1 pickup roller ● Scanner filter cover and scanner filter ● ADF-hinge flap ●...
... pickup and feed rollers ● ADF separation pad ● ADF delivery guide (clear mylar sheet) ● Output-bin assembly ● Duplex-printing unit ● Fuser-entrance guide ● Fuser ● Tray 2, 3, 4, or 5 pickup and feed rollers ● Tray 1 pickup roller ● Scanner filter cover and scanner filter ● ADF-hinge flap ●...
Service Manual
Page 253
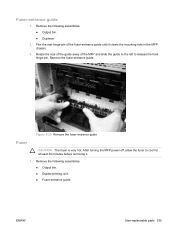
.... ● Output bin. ● Duplex-printing unit. ● Fuser-entrance guide. Figure 5-20 Remove the fuser-entrance guide Fuser CAUTION The fuser is very hot. After turning the MFP power off, allow the fuser to release the front hinge-pin. Flex the rear hinge-pin of the MFP and slide the guide to the left to cool...
.... ● Output bin. ● Duplex-printing unit. ● Fuser-entrance guide. Figure 5-20 Remove the fuser-entrance guide Fuser CAUTION The fuser is very hot. After turning the MFP power off, allow the fuser to release the front hinge-pin. Flex the rear hinge-pin of the MFP and slide the guide to the left to cool...
Service Manual
Page 254
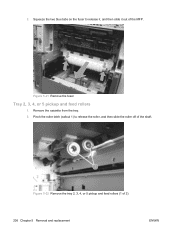
Pinch the roller latch (callout 1) to release it, and then slide it out of the MFP. Figure 5-22 Remove the tray 2, 3, 4, or 5 pickup and feed rollers (1 of the shaft. Squeeze the two blue tabs on the fuser to release the roller, and then slide the roller off of 2) 236 Chapter 5 Removal and replacement ENWW Remove the cassette from the tray. 2. Figure 5-21 Remove the fuser Tray 2, 3, 4, or 5 pickup and feed rollers 1. 2.
Pinch the roller latch (callout 1) to release it, and then slide it out of the MFP. Figure 5-22 Remove the tray 2, 3, 4, or 5 pickup and feed rollers (1 of the shaft. Squeeze the two blue tabs on the fuser to release the roller, and then slide the roller off of 2) 236 Chapter 5 Removal and replacement ENWW Remove the cassette from the tray. 2. Figure 5-21 Remove the fuser Tray 2, 3, 4, or 5 pickup and feed rollers 1. 2.


