
HP LA1751g and LA1951g LCD Monitors
Page 2
Microsoft, Windows, and Windows Vista are set forth in the United States and/or other product names mentioned herein may be construed as is" without notice. The warranties for Hewlett-Packard products ...
Microsoft, Windows, and Windows Vista are set forth in the United States and/or other product names mentioned herein may be construed as is" without notice. The warranties for Hewlett-Packard products ...

HP LA1751g and LA1951g LCD Monitors
Page 3
NOTE: Text set off in this manner indicates that failure to follow directions could result in damage to follow directions could result in this manner indicates that failure to equipment or loss of life. Text set off in this manner provides important supplemental information. ENWW iii CAUTION: Text set off in bodily harm or loss of information. About This Guide This guide provides information on setting up the monitor, installing drivers, using the on-screen display menu, troubleshooting and technical specifications. WARNING!
NOTE: Text set off in this manner indicates that failure to follow directions could result in damage to follow directions could result in this manner indicates that failure to equipment or loss of life. Text set off in this manner provides important supplemental information. ENWW iii CAUTION: Text set off in bodily harm or loss of information. About This Guide This guide provides information on setting up the monitor, installing drivers, using the on-screen display menu, troubleshooting and technical specifications. WARNING!
HP LA1751g and LA1951g LCD Monitors
Page 5
... 1 Product Features HP LCD Monitors ...1 2 Safety and Maintenance Guidelines Important Safety Information ...3 Maintenance Guidelines ...4 Cleaning the Monitor ...4 Shipping the Monitor ...4 3 Setting Up the Monitor Unfolding the Monitor Pedestal Base 5 Rear Components ...6 Connecting the Signal and Power Cables 7 Connecting USB Devices ...8 Cable Management ...8 Adjusting the Monitor ...9 Turning on the Monitor ...11 Using the Accessory Rails ...12 Removing the Monitor Pedestal Base 13...
... 1 Product Features HP LCD Monitors ...1 2 Safety and Maintenance Guidelines Important Safety Information ...3 Maintenance Guidelines ...4 Cleaning the Monitor ...4 Shipping the Monitor ...4 3 Setting Up the Monitor Unfolding the Monitor Pedestal Base 5 Rear Components ...6 Connecting the Signal and Power Cables 7 Connecting USB Devices ...8 Cable Management ...8 Adjusting the Monitor ...9 Turning on the Monitor ...11 Using the Accessory Rails ...12 Removing the Monitor Pedestal Base 13...

HP LA1751g and LA1951g LCD Monitors
Page 6
...Digital Conversion 24 Using the HP Display Assistant Utility 25 Identifying Monitor Conditions ...25 Sleep Timer Mode ...26 HP Display LiteSaver ...27 Installing the HP Display LiteSaver Software 27 sRGB...Technical Support 32 Appendix B Technical Specifications LA1751g Model ...33 LA1951g Model ...34 Recognizing Preset Display Resolutions 35 LA1751g and LA1951g Models 35 Entering User Modes ...35 Energy Saver Feature ......39 Japanese Notice ...39 Korean Notice ...39 Power Cord Set Requirements ...39 Japanese Power Cord Requirements 39 Product Environmental Notices ...40 ENERGY STAR®...
...Digital Conversion 24 Using the HP Display Assistant Utility 25 Identifying Monitor Conditions ...25 Sleep Timer Mode ...26 HP Display LiteSaver ...27 Installing the HP Display LiteSaver Software 27 sRGB...Technical Support 32 Appendix B Technical Specifications LA1751g Model ...33 LA1951g Model ...34 Recognizing Preset Display Resolutions 35 LA1751g and LA1951g Models 35 Entering User Modes ...35 Energy Saver Feature ......39 Japanese Notice ...39 Korean Notice ...39 Power Cord Set Requirements ...39 Japanese Power Cord Requirements 39 Product Environmental Notices ...40 ENERGY STAR®...
HP LA1751g and LA1951g LCD Monitors
Page 9
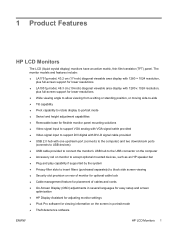
...HP LCD Monitors The LCD (liquid crystal display) monitors have an active matrix, thin-film transistor (TFT) panel. The monitor models and features include: ● LA1751g model, 43.2 cm (17-inch) diagonal viewable area display with 1280 × 1024 resolution, plus full-screen support for lower resolutions ● LA1951g... adjustments in several languages for easy setup and screen optimization ● HP Display Assistant for adjusting monitor settings ● Pivot Pro software for viewing information on the screen in portrait mode ● Theft deterrence software ENWW HP LCD Monitors 1
...HP LCD Monitors The LCD (liquid crystal display) monitors have an active matrix, thin-film transistor (TFT) panel. The monitor models and features include: ● LA1751g model, 43.2 cm (17-inch) diagonal viewable area display with 1280 × 1024 resolution, plus full-screen support for lower resolutions ● LA1951g... adjustments in several languages for easy setup and screen optimization ● HP Display Assistant for adjusting monitor settings ● Pivot Pro software for viewing information on the screen in portrait mode ● Theft deterrence software ENWW HP LCD Monitors 1
HP LA1751g and LA1951g LCD Monitors
Page 11
...electrical outlet, grasp the cord by unplugging the power cord from the product by the plug. the power strips must be specifically labeled as a monitor, printer, scanner) to the Power Cord Set Requirements on page 39 in a grounded (earthed) outlet that no one is used, use with the...the computer, connect all power cords for the computer and its peripheral devices (such as having this monitor. For information on or trip over them so that is easily accessible at http://www.hp.com/ergo and/or on the documentation CD, if one may accidentally step on the correct power...
...electrical outlet, grasp the cord by unplugging the power cord from the product by the plug. the power strips must be specifically labeled as a monitor, printer, scanner) to the Power Cord Set Requirements on page 39 in a grounded (earthed) outlet that no one is used, use with the...the computer, connect all power cords for the computer and its peripheral devices (such as having this monitor. For information on or trip over them so that is easily accessible at http://www.hp.com/ergo and/or on the documentation CD, if one may accidentally step on the correct power...
HP LA1751g and LA1951g LCD Monitors
Page 13
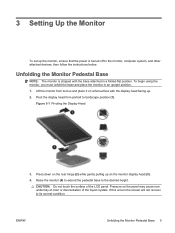
...Press down on the rear hinge (2) while gently pulling up on the panel may cause nonuniformity of color or disorientation of the LCD panel. Raise the monitor (4) to extend the pedestal base to its box and place it on a flat surface with the base attached in an upright ...position. 1. Lift the monitor from portrait to the monitor, computer system, and other attached devices, then follow the instructions below. 3 Setting Up the Monitor To set up the monitor, ensure that the power is shipped with the display head facing up. 2.
...Press down on the rear hinge (2) while gently pulling up on the panel may cause nonuniformity of color or disorientation of the LCD panel. Raise the monitor (4) to extend the pedestal base to its box and place it on a flat surface with the base attached in an upright ...position. 1. Lift the monitor from portrait to the monitor, computer system, and other attached devices, then follow the instructions below. 3 Setting Up the Monitor To set up the monitor, ensure that the power is shipped with the display head facing up. 2.
HP LA1751g and LA1951g LCD Monitors
Page 14
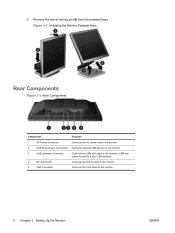
...monitor. Remove the swivel locking pin (5) from the pedestal base. Figure 3-2 Unfolding the Monitor Pedestal Base Rear Components Figure 3-3 Rear Components Component Function 1 AC Power Connector Connects the AC power cord to the monitor. 2 USB Downstream Connectors Connects optional USB devices to the monitor.... 3 USB Upstream Connector Connects the USB hub cable to the monitor's USB hub connector and to a host USB port/hub. 4 ...
...monitor. Remove the swivel locking pin (5) from the pedestal base. Figure 3-2 Unfolding the Monitor Pedestal Base Rear Components Figure 3-3 Rear Components Component Function 1 AC Power Connector Connects the AC power cord to the monitor. 2 USB Downstream Connectors Connects optional USB devices to the monitor.... 3 USB Upstream Connector Connects the USB hub cable to the monitor's USB hub connector and to a host USB port/hub. 4 ...
HP LA1751g and LA1951g LCD Monitors
Page 16
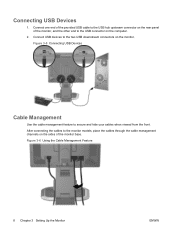
Connect USB devices to the two USB downstream connectors on the sides of the monitor, and the other end to the monitor models, place the cables through the cable management channels on the monitor. Figure 3-5 Connecting USB Devices Cable Management Use the cable management feature to the... USB hub upstream connector on the rear panel of the monitor base. Figure 3-6 Using the Cable Management Feature 8 Chapter 3 Setting Up the Monitor ENWW After connecting the cables to the USB connector on the computer. 2. Connecting USB Devices 1. ...
Connect USB devices to the two USB downstream connectors on the sides of the monitor, and the other end to the monitor models, place the cables through the cable management channels on the monitor. Figure 3-5 Connecting USB Devices Cable Management Use the cable management feature to the... USB hub upstream connector on the rear panel of the monitor base. Figure 3-6 Using the Cable Management Feature 8 Chapter 3 Setting Up the Monitor ENWW After connecting the cables to the USB connector on the computer. 2. Connecting USB Devices 1. ...

HP LA1751g and LA1951g LCD Monitors
Page 17
Figure 3-7 Tilting the Monitor 2. Swivel the monitor to a comfortable eye level. Tilt the monitor's panel forward or backward to set it to the left or right for the best viewing angle. Figure 3-8 Swiveling the Monitor ENWW Adjusting the Monitor 9 Adjusting the Monitor NOTE: Your monitor model may look different than the model in the following illustrations. 1.
Figure 3-7 Tilting the Monitor 2. Swivel the monitor to a comfortable eye level. Tilt the monitor's panel forward or backward to set it to the left or right for the best viewing angle. Figure 3-8 Swiveling the Monitor ENWW Adjusting the Monitor 9 Adjusting the Monitor NOTE: Your monitor model may look different than the model in the following illustrations. 1.
HP LA1751g and LA1951g LCD Monitors
Page 18
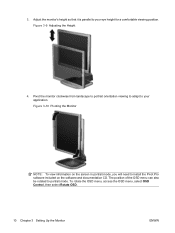
...: To view information on the software and documentation CD. 3. Adjust the monitor's height so that it is parallel to your eye height for a comfortable viewing position. Pivot the monitor clockwise from landscape to portrait orientation viewing to adapt to your application. To rotate the OSD menu, access the... OSD menu, select OSD Control, then select Rotate OSD. 10 Chapter 3 Setting Up the Monitor ENWW The position of the OSD menu can also be rotated to install the Pivot Pro software included on the screen in portrait mode...
...: To view information on the software and documentation CD. 3. Adjust the monitor's height so that it is parallel to your eye height for a comfortable viewing position. Pivot the monitor clockwise from landscape to portrait orientation viewing to adapt to your application. To rotate the OSD menu, access the... OSD menu, select OSD Control, then select Rotate OSD. 10 Chapter 3 Setting Up the Monitor ENWW The position of the OSD menu can also be rotated to install the Pivot Pro software included on the screen in portrait mode...
HP LA1751g and LA1951g LCD Monitors
Page 19
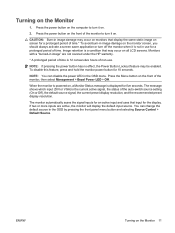
...LCD screens. The message shows which input (DVI or VGA) is a condition that may occur on the Monitor 1. Image retention is the current active signal, the status of time. The monitor...HP warranty. * A prolonged period of time is not in the OSD by pressing the front panel menu button and selecting Source Control > Default Source. ENWW Turning on , a Monitor Status message is powered on the Monitor 11 Monitors...change the default source in use . When the monitor is displayed for a prolonged period of the auto-switch source setting (On or Off), the default source signal, the...
...LCD screens. The message shows which input (DVI or VGA) is a condition that may occur on the Monitor 1. Image retention is the current active signal, the status of time. The monitor...HP warranty. * A prolonged period of time is not in the OSD by pressing the front panel menu button and selecting Source Control > Default Source. ENWW Turning on , a Monitor Status message is powered on the Monitor 11 Monitors...change the default source in use . When the monitor is displayed for a prolonged period of the auto-switch source setting (On or Off), the default source signal, the...

HP LA1751g and LA1951g LCD Monitors
Page 20
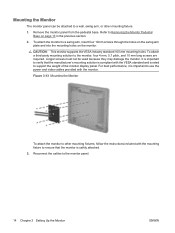
Figure 3-11 Using the Accessory Rails Feature 12 Chapter 3 Setting Up the Monitor ENWW Using the Accessory Rails The monitor features accessory rails on the rear that can be used to mount optional devices, such as the HP speaker bar, to attach to the documentation included with the optional device for detailed mounting instructions. Refer to the LCD.
Figure 3-11 Using the Accessory Rails Feature 12 Chapter 3 Setting Up the Monitor ENWW Using the Accessory Rails The monitor features accessory rails on the rear that can be used to mount optional devices, such as the HP speaker bar, to attach to the documentation included with the optional device for detailed mounting instructions. Refer to the LCD.
HP LA1751g and LA1951g LCD Monitors
Page 22
... holes on page 13 in the previous section. 2. It is important to verify that the monitor is rated to the monitor panel. 14 Chapter 3 Setting Up the Monitor ENWW Remove the monitor panel from the pedestal base. To attach the monitor to a wall, swing arm, or other mounting fixtures, follow the instructions included with the VESA...
... holes on page 13 in the previous section. 2. It is important to verify that the monitor is rated to the monitor panel. 14 Chapter 3 Setting Up the Monitor ENWW Remove the monitor panel from the pedestal base. To attach the monitor to a wall, swing arm, or other mounting fixtures, follow the instructions included with the VESA...

HP LA1751g and LA1951g LCD Monitors
Page 26
...the procedure. 3. The setup test pattern is displayed. 4. Press the ESC key or any other key on the monitor front panel to exit the test pattern. 18 Chapter 4 Operating the Monitor ENWW The CD menu is displayed. 5. Select Open Auto-Adjustment Software. Press the -/Auto button on the keyboard... the -/Auto button on page 20 in the disc drive. Refer to warm up for 20 minutes before adjusting. 2. Allow the monitor to Adjusting the Monitor Settings on the monitor front panel. ● You can also press the Menu button, then select Image Control from the OSD Main Menu. To use the...
...the procedure. 3. The setup test pattern is displayed. 4. Press the ESC key or any other key on the monitor front panel to exit the test pattern. 18 Chapter 4 Operating the Monitor ENWW The CD menu is displayed. 5. Select Open Auto-Adjustment Software. Press the -/Auto button on the keyboard... the -/Auto button on page 20 in the disc drive. Refer to warm up for 20 minutes before adjusting. 2. Allow the monitor to Adjusting the Monitor Settings on the monitor front panel. ● You can also press the Menu button, then select Image Control from the OSD Main Menu. To use the...
HP LA1751g and LA1951g LCD Monitors
Page 28
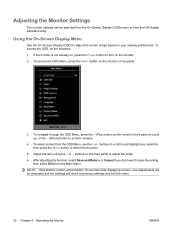
... the front panel to adjust the screen image based on the monitor. 2. To access the OSD, do the following: 1. Adjusting the Monitor Settings The monitor settings can be discarded and the settings will be adjusted from the On-Screen Display (OSD) menu or from the HP Display Assistant utility. Using the On-Screen Display Menu Use the...
... the front panel to adjust the screen image based on the monitor. 2. To access the OSD, do the following: 1. Adjusting the Monitor Settings The monitor settings can be discarded and the settings will be adjusted from the On-Screen Display (OSD) menu or from the HP Display Assistant utility. Using the On-Screen Display Menu Use the...

HP LA1751g and LA1951g LCD Monitors
Page 29
...displayed information on the screen background. modes) Clock Minimizes any vertical bars or strips visible on the monitor will also change a menu item. The factory default is 80. sRGB Sets your own blue color levels Image Control Adjusts the screen image. (VGA input only) Auto Adjustment... you change the horizontal screen image. Contrast Adjustable scale Adjusts the contrast level of the screen image up and down. ENWW Adjusting the Monitor Settings 21 image fills the entire screen and may choose to: ● Cancel-to return to the previous menu level. ● Save ...
...displayed information on the screen background. modes) Clock Minimizes any vertical bars or strips visible on the monitor will also change a menu item. The factory default is 80. sRGB Sets your own blue color levels Image Control Adjusts the screen image. (VGA input only) Auto Adjustment... you change the horizontal screen image. Contrast Adjustable scale Adjusts the contrast level of the screen image up and down. ENWW Adjusting the Monitor Settings 21 image fills the entire screen and may choose to: ● Cancel-to return to the previous menu level. ● Save ...

HP LA1751g and LA1951g LCD Monitors
Page 30
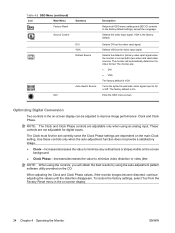
... Submenu Description Clock Phase Horizontal OSD Position Vertical OSD Position OSD Transparency Adjusts the focus of the monitor. The factory default range is 50. The factory default range is 50. OSD Timeout Rotate OSD Sets the time duration in seconds that the OSD is visible after the last button is On. Selects...
... Submenu Description Clock Phase Horizontal OSD Position Vertical OSD Position OSD Transparency Adjusts the focus of the monitor. The factory default range is 50. The factory default range is 50. OSD Timeout Rotate OSD Sets the time duration in seconds that the OSD is visible after the last button is On. Selects...
HP LA1751g and LA1951g LCD Monitors
Page 31
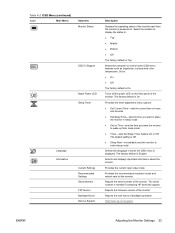
...9679; Off The factory default is needed if contacting HP technical support. Table 4-2 OSD Menu (continued) Icon Main Menu Submenu Monitor Status DDC/CI Support Bezel Power LED Sleep Timer Language Information Current Settings Recommended Settings Serial Number FW Version Backlight Hours Service Support Description... the operating status of the monitor. Allows the computer to place the monitor in which the OSD menu is On. http://www.hp.com/support ENWW Adjusting the Monitor Settings 23 The factory default is displayed. The default setting is powered on. Turns off...
...9679; Off The factory default is needed if contacting HP technical support. Table 4-2 OSD Menu (continued) Icon Main Menu Submenu Monitor Status DDC/CI Support Bezel Power LED Sleep Timer Language Information Current Settings Recommended Settings Serial Number FW Version Backlight Hours Service Support Description... the operating status of the monitor. Allows the computer to place the monitor in which the OSD menu is On. http://www.hp.com/support ENWW Adjusting the Monitor Settings 23 The factory default is displayed. The default setting is powered on. Turns off...
HP LA1751g and LA1951g LCD Monitors
Page 32
... results by using the auto-adjustment pattern software utility provided on -screen display. 24 Chapter 4 Operating the Monitor ENWW The choices are dependent on the main Clock setting. The Clock must first be adjusted to improve image performance: Clock and Clock Phase. NOTE: When using ...minimize video distortion or video jitter. Selects the default or primary video input signal when the monitor is VGA. Turns the system's automatic video signal input to the factory default settings, except the Language. Exits the OSD menu screen. Selects DVI as the video input signal....
... results by using the auto-adjustment pattern software utility provided on -screen display. 24 Chapter 4 Operating the Monitor ENWW The choices are dependent on the main Clock setting. The Clock must first be adjusted to improve image performance: Clock and Clock Phase. NOTE: When using ...minimize video distortion or video jitter. Selects the default or primary video input signal when the monitor is VGA. Turns the system's automatic video signal input to the factory default settings, except the Language. Exits the OSD menu screen. Selects DVI as the video input signal....


