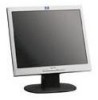
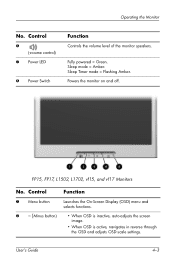
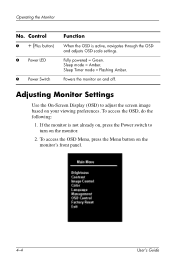
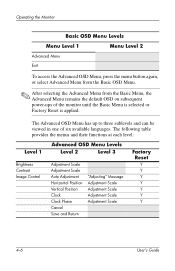
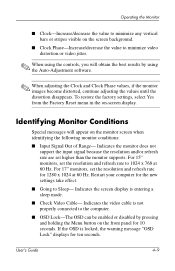
HP Flat Panel Monitors L 1702 and L 1502 - (English) User Guide
Page 3
... the Monitor 2-4 Shipping the Monitor 2-4 3 Setting Up the Monitor Installing the Monitor Pedestal 3-1 Connecting the Monitor 3-4 Removing the Monitor Base 3-7 Mounting the Monitor 3-9 4 Operating the Monitor Installing the Information Files 4-1 Front Panel Components 4-2 Adjusting Monitor Settings 4-4 Using the On-Screen Display 4-5 Adjusting Screen Quality 4-8 Optimizing Digital Conversion 4-8 Identifying Monitor Conditions 4-9 Sleep Timer Mode 4-10 sRGB Support 4-11 Changing the Color Temperature 4-12 Installing the sRGB ICM File for Microsoft Windows 98, User's Guide iii
HP Flat Panel Monitors L 1702 and L 1502 - (English) User Guide
Page 4
... A Troubleshooting Solving Common Problems A-1 Using the Worldwide Web A-2 Preparing to call Technical Support A-3 B Technical Specifications Entering User Modes B-4 Energy Saver Feature B-4 C Agency Regulatory Notices Federal Communications Commission Notice C-1 Modifications C-1 Cables C-2 Declaration of Conformity for Products Marked with FCC Logo, United States Only C-2 Canadian Notice C-3 Avis Canadien C-3 European Notice C-3 Japanese Notice C-3 Korean Notice C-4 EPA Energy Star Compliance C-4 Power Cord Set Requirements C-4 D LCD Monitor Quality...
HP Flat Panel Monitors L 1702 and L 1502 - (English) User Guide
Page 5
... FP5315 Models ■ 15-inch (38.1 cm) viewable area display. ■ 1024 x 768 resolution, plus full-screen support for lower resolutions. ■ Wide viewing angle to allow viewing from a sitting or standing position, or moving side-to-side. ■ Tilt adjustment capabilities. ■ Removable pedestal and VESA 75mm mounting holes for flexible mounting solutions. ■ Plug and play capability if supported by your system. ■ On-Screen Display (OSD) adjustments in the following six different languages: English...
HP Flat Panel Monitors L 1702 and L 1502 - (English) User Guide
Page 6
... viewing from a sitting or standing position, or moving side-to-side. ■ Tilt adjustment capabilities. ■ Removable pedestal and VESA 100mm mounting holes for flexible mounting solutions. ■ Plug and play capability if supported by your system. ■ On-Screen Display (OSD) adjustments in English, Dutch, French, German, Italian, and Spanish for ease of set-up and screen optimization. ■ Software and Reference Library CD includes an information file (INF), Image Color...
HP Flat Panel Monitors L 1702 and L 1502 - (English) User Guide
Page 9
... are covered in the operating instructions. Maintenance Guidelines To enhance the performance and extend the life of your monitor: ■ Do not open your monitor cabinet or attempt to some form of surge protection device such as a power strip or Uninterruptible Power Supply (UPS). Disconnect the monitor by pulling the cord. ■ Turn your monitor off the monitor when not in use . 2-2 User's Guide Not all power cords...
HP Flat Panel Monitors L 1702 and L 1502 - (English) User Guide
Page 11
..., clean cloth. Shipping the Monitor Keep the original packing box in a storage area. Safety and Maintenance Guidelines Cleaning the Monitor To clean the monitor, follow these steps: 1. You may damage the monitor. Turn off the monitor and the computer. 2. These chemicals may need it later if you move or ship your monitor. 2-4 User's Guide Never use benzene, thinner, ammonia, or any volatile substance to clean an LCD screen...
HP Flat Panel Monitors L 1702 and L 1502 - (English) User Guide
Page 17
Image retention is not in use for a prolonged period of time. To avoid burn-in image damage may occur on all LCD screens. 3-6 User's Guide Tilting the Monitor Ä CAUTION: Burn-in image damage on screen for your monitor screen, you should always activate a screen saver application or turn off the monitor when it is a condition that may occur on monitors that display the same static image on your comfort using the monitor's tilt adjustment capability. Adjust the monitor as needed for a prolonged period of time. Setting Up the Monitor 5.
HP Flat Panel Monitors L 1702 and L 1502 - (English) User Guide
Page 18
... before beginning the procedure. Ä CAUTION: Before beginning to disassemble the monitor, be sure the monitor is in injury to the user. Arrange them so that no one may result in the upright position. User's Guide 3-7 Attempting to remove the monitor from the electrical outlet, grasp the cord by unplugging the power cord from the base, ensure that is set to mount the monitor on a cord or cable.
HP Flat Panel Monitors L 1702 and L 1502 - (English) User Guide
Page 19
Setting Up the Monitor 1. Remove the two screws 1 as shown in the following illustration. Removing the Monitor Base Ä CAUTION: Ensure that the bottom of the monitor. 2. Remove the monitor base from the monitor. 3. Disconnect and remove the signal and power cables from the back of the monitor base is positioned over a table or desktop before removing the base from the monitor. 3-8 User's Guide
HP Flat Panel Monitors L 1702 and L 1502 - (English) User Guide
Page 22
Control Function 1 Speakers Audio feature for music, alarms, etc. (multimedia models only) 2 Connects a headphone set to the monitor. (Headphone jack) 3 Menu button 4 - (Minus button) 5 + (Plus button) Launches the On-Screen Display (OSD) menu and selects functions. • When OSD is inactive, auto-adjusts the screen image. • When OSD is active, navigates through the OSD and adjusts OSD scale settings. When the OSD is active, navigates in reverse through the OSD and adjusts OSD scale settings. 4-2 User's Guide Operating the Monitor Front Panel Components L1502m...
HP Flat Panel Monitors L 1702 and L 1502 - (English) User Guide
Page 23
... = Flashing Amber. Control 6 (Volume control) 7 Power LED 8 Power Switch Function Controls the volume level of the monitor speakers. Sleep mode = Amber. Powers the monitor on and off. FP15, FP17, L1502, L1702, vf15, and vf17 Monitors No. Fully powered = Green. Operating the Monitor No. User's Guide 4-3 Control Function 1 Menu button Launches the On-Screen Display (OSD) menu and selects functions. 2 - (Minus button) • When OSD is inactive, auto-adjusts the screen image. • When OSD is active, navigates in reverse through the OSD and adjusts OSD scale settings...
HP Flat Panel Monitors L 1702 and L 1502 - (English) User Guide
Page 24
... access the OSD Menu, press the Menu button on and off. Adjusting Monitor Settings Use the On-Screen Display (OSD) to turn on your viewing preferences. To access the OSD, do the following: 1. If the monitor is active, navigates through the OSD and adjusts OSD scale settings. Fully powered = Green. Powers the monitor on the monitor's front panel. 4-4 User's Guide Sleep mode = Amber. Sleep Timer mode = Flashing Amber. Control 3 + (Plus button) 4 Power LED 5 Power Switch Function When the OSD is not already on, press the Power switch to adjust the screen image based on the...
HP Flat Panel Monitors L 1702 and L 1502 - (English) User Guide
Page 26
... OSD Menu. ✎ After selecting the Advanced Menu from the Basic Menu, the Advanced Menu remains the default OSD on subsequent power-ups of six available languages. The following table provides the menus and their functions at each level: Level 1 Brightness Contrast Image Control Advanced OSD Menu Levels Level 2 Level 3 Adjustment Scale Adjustment Scale Auto Adjustment Horizontal Position Vertical Position Clock Clock Phase Cancel Save and Return "Adjusting" Message Adjustment Scale Adjustment Scale Adjustment Scale Adjustment Scale Factory Reset Y Y Y Y Y Y Y 4-6 User's Guide...
HP Flat Panel Monitors L 1702 and L 1502 - (English) User Guide
Page 29
.... If the OSD is entering a sleep mode. ■ Check Video Cable- Indicates the monitor does not support the input signal because the resolution and/or refresh rate are set the resolution and refresh rate for the new settings take effect. ■ Going to Sleep- For 15" monitors, set the resolution and refresh rate to the computer. ■ OSD Lock-The OSD can be enabled or disabled by using the controls, you will appear on -screen display. Indicates the video cable is not properly connected to 1024...
HP Flat Panel Monitors L 1702 and L 1502 - (English) User Guide
Page 30
... OSD is unlocked, press and hold the Menu button for 10 seconds to display the Advanced Menu. 2. Sleep Timer Mode The Sleep Timer mode is displayed in the monitor. The Sleep Timer has five settings: ■ Set Current Time ■ Set Sleep Time ■ Set On Time ■ Timer: On/Off ■ Sleep Now To set the current local time before you to set a time for the monitor to power on the monitor front panel...
HP Flat Panel Monitors L 1702 and L 1502 - (English) User Guide
Page 31
... and install the sRGB color profile (ICM) file. Press the Menu button again to Set Sleep Time hours. After setting the current time, the highlight automatically skips to enter the time for color management, which adapts to activate the Sleep Timer settings. 14. Repeat steps 6 through 9 to exit the menu. 12. User's Guide 4-11 Set the Timer mode to On to the color standards used in the image technology...
HP Flat Panel Monitors L 1702 and L 1502 - (English) User Guide
Page 32
... User's Guide Select 6500 K - Installing the sRGB ICM File for the L1502, L1502m, L1702 and L1702m models. The sRGB ICM file does not support Windows 95 and Windows NT operating systems 1. Select the Color Management tab, then click the Add button to access all options in brightness. 1. If the computer is changed to exit the menu. Press the Menu button on the front panel of the monitor...
HP Flat Panel Monitors L 1702 and L 1502 - (English) User Guide
Page 35
.../support A-2 User's Guide Using the Worldwide Web Before contacting customer services, refer to open the Basic OSD Menu, and adjust the brightness and contrast scales as needed. Troubleshooting Problem Image appears blurred, indistinct, or too dark. Restart your computer and enter Windows Safe Mode by pressing the F6 Function key when the computer starts to adjust the horizontal or vertical position of Range" is displayed on screen. Video resolution and/or refresh rate are too low. Change your monitor supports. Press the Menu button...
HP Flat Panel Monitors L 1702 and L 1502 - (English) User Guide
Page 40
Technical Specifications vf17, FP17, L1702, L1702m, f1723, and FP7317 Models 17-inch Flat Panel Monitors (Continued) Altitude: Operating Non-operating 0 to 12,000 feet 0 to 40,000 feet 0 to 3657.6 m 0 to12192 m Power Consumption
HP Flat Panel Monitors L 1702 and L 1502 - (English) User Guide
Page 41
User's Guide B-5 Technical Specifications When the monitor is a brief warm up period before the monitor returns to computers that have energy saver features. There is in the monitor's Energy Saver utility, you can also program the monitor to enter the reduced power state, the power light blinks amber. Refer to your computer manual for instructions on setting energy saver features (sometimes called power management features). ✎...