Service Guide
Page 4
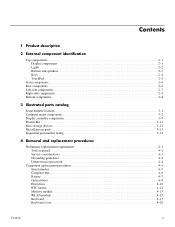
... listing 3-14 4 Removal and replacement procedures Preliminary replacement requirements 4-1 Tools required 4-1 Service considerations 4-1 Grounding guidelines 4-2 Unknown user password 4-4 Component replacement procedures 4-5 Serial number 4-5 Computer feet 4-6 Battery 4-7 Optical drive 4-8 Hard drive 4-10 RTC battery 4-12 Memory module 4-13 WLAN module 4-15 Keyboard 4-17 Keyboard cover 4-20 Contents iv
... listing 3-14 4 Removal and replacement procedures Preliminary replacement requirements 4-1 Tools required 4-1 Service considerations 4-1 Grounding guidelines 4-2 Unknown user password 4-4 Component replacement procedures 4-5 Serial number 4-5 Computer feet 4-6 Battery 4-7 Optical drive 4-8 Hard drive 4-10 RTC battery 4-12 Memory module 4-13 WLAN module 4-15 Keyboard 4-17 Keyboard cover 4-20 Contents iv
Service Guide
Page 6
... (network 9-4 Universal Serial Bus 9-5 10 Power cord set requirements Requirements for all countries and regions 10-1 Requirements for specific countries and regions 10-2 11 Recycling Battery 11-1 Display 11-1 Index Contents vi
... (network 9-4 Universal Serial Bus 9-5 10 Power cord set requirements Requirements for all countries and regions 10-1 Requirements for specific countries and regions 10-2 11 Recycling Battery 11-1 Display 11-1 Index Contents vi
Service Guide
Page 11
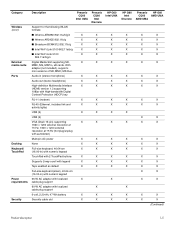
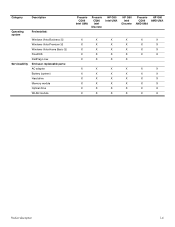
...-W AC adapter with localized cable plug support 6-cell, 2.20-Ah, 47-Wh battery X Security cable slot X Presario CQ60 Intel Discrete HP G60 Intel UMA X X X X X X X X X X X X X X X X X X X X X X X X X X X X X X X X X X X X X X X X X X X X HP G60 Intel Discrete X X X X X X X X X X X X X X X X X X X X X X Presario HP G60 CQ60 AMD UMA AMD UMA X X X X X X X X X X X X X X X X X X X X X X X X X X X X X X X X X X X X X X X X X X X X X X (Continued) Product description 1-5 With adapter (not included...
...-W AC adapter with localized cable plug support 6-cell, 2.20-Ah, 47-Wh battery X Security cable slot X Presario CQ60 Intel Discrete HP G60 Intel UMA X X X X X X X X X X X X X X X X X X X X X X X X X X X X X X X X X X X X X X X X X X X X HP G60 Intel Discrete X X X X X X X X X X X X X X X X X X X X X X Presario HP G60 CQ60 AMD UMA AMD UMA X X X X X X X X X X X X X X X X X X X X X X X X X X X X X X X X X X X X X X X X X X X X X X (Continued) Product description 1-5 With adapter (not included...
Service Guide
Page 12
... Vista Business 32 Windows Vista Premium 32 Windows Vista Home Basic 32 FreeDOS RedFlag Linux End-user replaceable parts: AC adapter Battery (system) Hard drive Memory module Optical drive WLAN module Presario CQ60 Intel UMA Presario CQ60 Intel Discrete HP G60 Intel UMA HP G60 Intel Discrete Presario HP G60 CQ60 AMD UMA AMD UMA X X X X X X X X X X X X X X X X X X X X X X X X X X X X X X X X X X X X X X X X X X X X X X X X X X X X X X X X X X X X X X X X Product description...
... Vista Business 32 Windows Vista Premium 32 Windows Vista Home Basic 32 FreeDOS RedFlag Linux End-user replaceable parts: AC adapter Battery (system) Hard drive Memory module Optical drive WLAN module Presario CQ60 Intel UMA Presario CQ60 Intel Discrete HP G60 Intel UMA HP G60 Intel Discrete Presario HP G60 CQ60 AMD UMA AMD UMA X X X X X X X X X X X X X X X X X X X X X X X X X X X X X X X X X X X X X X X X X X X X X X X X X X X X X X X X X X X X X X X X Product description...
Service Guide
Page 14
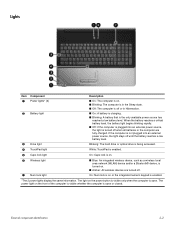
... in the Sleep state. ■ Off: The computer is off or in the computer are turned off until the battery reaches a low battery level. Lights Item Component 1 Power lights* (2) 2 Battery light 3 Drive light Description ■ On: The computer is on the front of the computer is visible whether the.... If the computer is not plugged into an external power source, the light is turned off when all batteries in Hibernation. ■ On: A battery is charging. ■ Blinking: A battery that is plugged into an external power source, the light stays off . On: Num lock is on the power button...
... in the Sleep state. ■ Off: The computer is off or in the computer are turned off until the battery reaches a low battery level. Lights Item Component 1 Power lights* (2) 2 Battery light 3 Drive light Description ■ On: The computer is on the front of the computer is visible whether the.... If the computer is not plugged into an external power source, the light is turned off when all batteries in Hibernation. ■ On: A battery is charging. ■ Blinking: A battery that is plugged into an external power source, the light stays off . On: Num lock is on the power button...

Service Guide
Page 18
...up automatically to optional powered stereo speakers, headphones, ear buds, a headset, or television audio. Front components Item Component 1 Power light 2 Battery light 3 Drive light 4 Audio-in (microphone) jack 5 Audio-out (headphone) jack Rear components Component Vents (2) Description ■ On..., or monaural microphone. It is turned off when all batteries in Hibernation. ■ On: A battery is charging. ■ Blinking: A battery that is being accessed. When the battery reaches a critical battery level, the battery light begins blinking rapidly. ■ Off: If the computer...
...up automatically to optional powered stereo speakers, headphones, ear buds, a headset, or television audio. Front components Item Component 1 Power light 2 Battery light 3 Drive light 4 Audio-in (microphone) jack 5 Audio-out (headphone) jack Rear components Component Vents (2) Description ■ On..., or monaural microphone. It is turned off when all batteries in Hibernation. ■ On: A battery is charging. ■ Blinking: A battery that is being accessed. When the battery reaches a critical battery level, the battery light begins blinking rapidly. ■ Off: If the computer...
Service Guide
Page 20
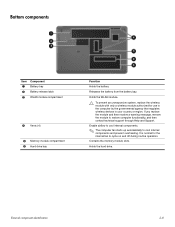
... latch 3 WLAN module compartment 4 Vents (4) 5 Memory module compartment 6 Hard drive bay Function Holds the battery. Releases the battery from the battery bay. Holds the hard drive. It is normal for use in the computer by the governmental agency that regulates wireless devices in your country or ...
... latch 3 WLAN module compartment 4 Vents (4) 5 Memory module compartment 6 Hard drive bay Function Holds the battery. Releases the battery from the battery bay. Holds the hard drive. It is normal for use in the computer by the governmental agency that regulates wireless devices in your country or ...
Service Guide
Page 26
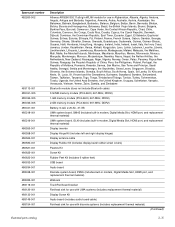
... For use only with computer models equipped with a built-in modem, HDMI port, without Digital Media Slot Rubber Feet Kit (not illustrated, includes 6 rubber feet) Battery, 6-cell, 2.20-Ah, 47-Wh Hard drive (includes hard drive bracket and connector) 320-GB, 5400-rpm 250-GB, 5400-rpm 200-GB, 5400-rpm... 160-GB, 5400-rpm 120-GB, 5400-rpm Hard Drive Hardware Kit (not illustrated, includes connector, bracket, and screws) RTC battery Memory modules PC2-6400, 667-MHz, DDR2 2-GB 1-GB 512-MB PC2-5300, 667-MHz, DDR2 2-GB 1-GB 512-MB Spare Part Number 496835-0001...
... For use only with computer models equipped with a built-in modem, HDMI port, without Digital Media Slot Rubber Feet Kit (not illustrated, includes 6 rubber feet) Battery, 6-cell, 2.20-Ah, 47-Wh Hard drive (includes hard drive bracket and connector) 320-GB, 5400-rpm 250-GB, 5400-rpm 200-GB, 5400-rpm... 160-GB, 5400-rpm 120-GB, 5400-rpm Hard Drive Hardware Kit (not illustrated, includes connector, bracket, and screws) RTC battery Memory modules PC2-6400, 667-MHz, DDR2 2-GB 1-GB 512-MB PC2-5300, 667-MHz, DDR2 2-GB 1-GB 512-MB Spare Part Number 496835-0001...
Service Guide
Page 35
...) 512-MB memory module (PC2-6400, 667-MHz, DDR2) 1-GB memory module (PC2-6400, 667-MHz, DDR2) 2-GB memory module (PC2-6400, 667-MHz, DDR2) Battery, 6-cell, 2.20-Ah, 47-Wh UMA system board, GM45 (includes built-in modem, Digital Media Slot, HDMI port, and replacement thermal material) UMA system board...
...) 512-MB memory module (PC2-6400, 667-MHz, DDR2) 1-GB memory module (PC2-6400, 667-MHz, DDR2) 2-GB memory module (PC2-6400, 667-MHz, DDR2) Battery, 6-cell, 2.20-Ah, 47-Wh UMA system board, GM45 (includes built-in modem, Digital Media Slot, HDMI port, and replacement thermal material) UMA system board...
Service Guide
Page 39
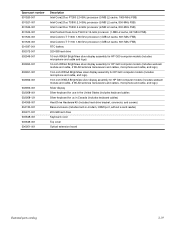
...-MHz FSB) Intel Celeron-T T1600 1.66-GHz processor (1-MB L2 cache, 667-MHz FSB) Intel Celeron-T T1700 1.86-GHz processor (1-MB L2 cache, 667-MHz FSB) RTC battery 320-GB hard drive 16-inch WXGA BrightView silver display assembly for HP G60 computer models (includes microphone and cable and... logo) 16-inch WXGA BrightView silver display assembly for HP G60 computer models (includes webcam ...
...-MHz FSB) Intel Celeron-T T1600 1.66-GHz processor (1-MB L2 cache, 667-MHz FSB) Intel Celeron-T T1700 1.86-GHz processor (1-MB L2 cache, 667-MHz FSB) RTC battery 320-GB hard drive 16-inch WXGA BrightView silver display assembly for HP G60 computer models (includes microphone and cable and... logo) 16-inch WXGA BrightView silver display assembly for HP G60 computer models (includes webcam ...
Service Guide
Page 43
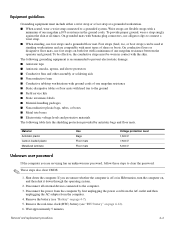
...1,500 V 7,500 V 5,000 V Unknown user password If the computer you are compatible with a minimum of shoes or boots. Remove the real-time clock (RTC) battery (see "Battery" on both feet with hard ties to the ground ■ Field service kits ■ Static awareness labels ■ Material-handling packages ■ Nonconductive plastic bags...a grounded workstation. ■ When seated, wear a wrist strap connected to connect a wrist strap. ■ When standing, use foot straps and a grounded floor mat. Remove the battery (see "RTC battery" on , and then shut it down the computer.
...1,500 V 7,500 V 5,000 V Unknown user password If the computer you are compatible with a minimum of shoes or boots. Remove the real-time clock (RTC) battery (see "Battery" on both feet with hard ties to the ground ■ Field service kits ■ Static awareness labels ■ Material-handling packages ■ Nonconductive plastic bags...a grounded workstation. ■ When seated, wear a wrist strap connected to connect a wrist strap. ■ When standing, use foot straps and a grounded floor mat. Remove the battery (see "RTC battery" on , and then shut it down the computer.
Service Guide
Page 44
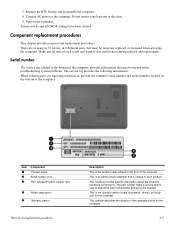
... to locate documents, drivers, and support for the computer. 4-5 All passwords and all CMOS settings have been cleared. Replace the RTC battery and reassemble the computer. 8. Make special note of the warranty period for the computer. This is the product name affixed to determine ...that may be removed, replaced, or loosened when servicing the computer. This number describes the duration of each product. Do not reinsert any batteries at this time. 9. The part number helps a service technician to the front of the computer. 7. Serial number The service tag, affixed...
... to locate documents, drivers, and support for the computer. 4-5 All passwords and all CMOS settings have been cleared. Replace the RTC battery and reassemble the computer. 8. Make special note of the warranty period for the computer. This is the product name affixed to determine ...that may be removed, replaced, or loosened when servicing the computer. This number describes the duration of each product. Do not reinsert any batteries at this time. 9. The part number helps a service technician to the front of the computer. 7. Serial number The service tag, affixed...
Service Guide
Page 46
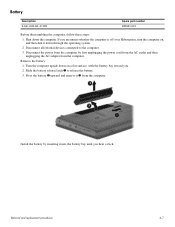
...to the computer. 3. Removal and replacement procedures 4-7 If you . 2. Turn the computer upside down on a flat surface, with the battery bay toward you are unsure whether the computer is off or in Hibernation, turn the computer on, and then shut it down the computer...power from the computer by inserting it 3 from the computer. Pivot the battery 2 upward and remove it into the battery bay until you hear a click. Shut down through the operating system. 2. Remove the battery: 1. Install the battery by first unplugging the power cord from the AC outlet and then unplugging ...
...to the computer. 3. Removal and replacement procedures 4-7 If you . 2. Turn the computer upside down on a flat surface, with the battery bay toward you are unsure whether the computer is off or in Hibernation, turn the computer on, and then shut it down the computer...power from the computer by inserting it 3 from the computer. Pivot the battery 2 upward and remove it into the battery bay until you hear a click. Shut down through the operating system. 2. Remove the battery: 1. Install the battery by first unplugging the power cord from the AC outlet and then unplugging ...
Service Guide
Page 47
... power from the computer by first unplugging the power cord from the AC outlet and then unplugging the AC adapter from the computer. 4. Remove the battery (see"Battery" on , and then shut it down the computer.
... power from the computer by first unplugging the power cord from the AC outlet and then unplugging the AC adapter from the computer. 4. Remove the battery (see"Battery" on , and then shut it down the computer.
Service Guide
Page 49
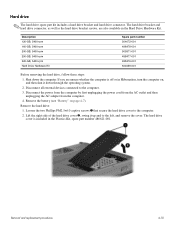
... hard drive connector. Disconnect all external devices connected to the computer. 2. If you are also available in Hibernation, turn the computer on page 4-7). Remove the battery (see "Battery" on , and then shut it up and to the left, and remove the cover. Removal and replacement procedures 4-10 Description 120-GB, 5400-rpm...
... hard drive connector. Disconnect all external devices connected to the computer. 2. If you are also available in Hibernation, turn the computer on page 4-7). Remove the battery (see "Battery" on , and then shut it up and to the left, and remove the cover. Removal and replacement procedures 4-10 Description 120-GB, 5400-rpm...
Service Guide
Page 51
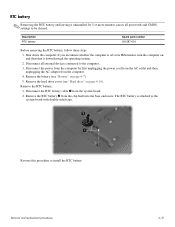
... these steps: 1. Reverse this procedure to the system board with double-sided tape. Remove the battery (see "Hard drive" on page 4-10). The RTC battery is off or in Hibernation, turn the computer on page 4-7). 5. Disconnect the power from the computer by first ...adapter from the clip built into the base enclosure. Removal and replacement procedures 4-12 Remove the RTC battery 2 from the computer. 4. Shut down through the operating system. 2. Remove the RTC battery: 1. Disconnect all passwords and CMOS settings to the computer. 3. Remove the hard drive cover (see...
... these steps: 1. Reverse this procedure to the system board with double-sided tape. Remove the battery (see "Hard drive" on page 4-10). The RTC battery is off or in Hibernation, turn the computer on page 4-7). 5. Disconnect the power from the computer by first ...adapter from the clip built into the base enclosure. Removal and replacement procedures 4-12 Remove the RTC battery 2 from the computer. 4. Shut down through the operating system. 2. Remove the RTC battery: 1. Disconnect all passwords and CMOS settings to the computer. 3. Remove the hard drive cover (see...
Service Guide
Page 52
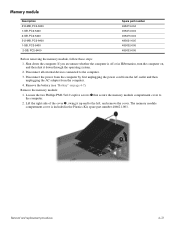
...-005 485032-005 485033-005 Before removing the memory module, follow these steps: 1. Remove the memory module: 1. Removal and replacement procedures 4-13 Remove the battery (see "Battery" on , and then shut it up and to the computer. 2. The memory module compartment cover is off or in the Plastics Kit, spare part number...
...-005 485032-005 485033-005 Before removing the memory module, follow these steps: 1. Remove the memory module: 1. Removal and replacement procedures 4-13 Remove the battery (see "Battery" on , and then shut it up and to the computer. 2. The memory module compartment cover is off or in the Plastics Kit, spare part number...
Service Guide
Page 54
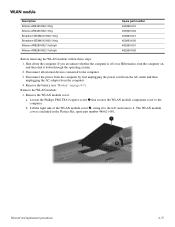
... 482260-001 482260-002 Before removing the WLAN module, follow these steps: 1. Shut down through the operating system. 2. Remove the WLAN module cover: a. Remove the battery (see "Battery" on , and then shut it . b. Lift the right side of the WLAN module cover 2, swing it to the left, and remove it down the...
... 482260-001 482260-002 Before removing the WLAN module, follow these steps: 1. Shut down through the operating system. 2. Remove the WLAN module cover: a. Remove the battery (see "Battery" on , and then shut it . b. Lift the right side of the WLAN module cover 2, swing it to the left, and remove it down the...
Service Guide
Page 57
... or in Hibernation, turn the computer on page 4-7). If you . 2. Before removing the keyboard, follow these steps: 1. Shut down through the operating system. 2. Remove the battery (see "Battery" on , and then shut it down the computer.
... or in Hibernation, turn the computer on page 4-7). If you . 2. Before removing the keyboard, follow these steps: 1. Shut down through the operating system. 2. Remove the battery (see "Battery" on , and then shut it down the computer.

Service Guide
Page 59
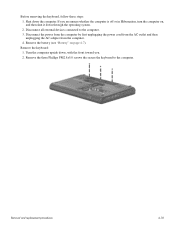
... first unplugging the power cord from the AC outlet and then unplugging the AC adapter from the computer by a triangle icon. Remove the keyboard (see "Battery" on page 4-7). 5. The keyboard cover screws are unsure whether the computer is off or in the... battery bay that secure the keyboard cover to the computer. 3. Remove the battery (see "Keyboard" on , and then shut it down the computer. Remove the 2 Phillips PM2.5x9.0 screws 1 at the corners and the 2 Phillips PM2.0x4...
... first unplugging the power cord from the AC outlet and then unplugging the AC adapter from the computer by a triangle icon. Remove the keyboard (see "Battery" on page 4-7). 5. The keyboard cover screws are unsure whether the computer is off or in the... battery bay that secure the keyboard cover to the computer. 3. Remove the battery (see "Keyboard" on , and then shut it down the computer. Remove the 2 Phillips PM2.5x9.0 screws 1 at the corners and the 2 Phillips PM2.0x4...


