
Maintenance and Service Guide
Page 2
..., L.P. Qualcomm and Snapdragon are trademarks owned by HP Inc. The only warranties for a full refund subject to change without notice. To access the latest user guides, go to http://www.hp.com/support, and follow the instructions to return the entire unused product (hardware and software) within 14 days for HP products and services are registered trademarks of your seller. If you...
..., L.P. Qualcomm and Snapdragon are trademarks owned by HP Inc. The only warranties for a full refund subject to change without notice. To access the latest user guides, go to http://www.hp.com/support, and follow the instructions to return the entire unused product (hardware and software) within 14 days for HP products and services are registered trademarks of your seller. If you...

Maintenance and Service Guide
Page 4
Table of contents 1 Product description...1 2 Components ...3 Right ...3 Left ...4 Display ...5 Keyboard area...6 Touchpad ...6 Special keys ...7 Bottom ...7 Labels...8 3 Illustrated parts catalog ...10 Computer major components...10 Display assembly subcomponents...11 Miscellaneous parts...13 4 Removal and replacement procedures preliminary requirements 15 Tools required ...15 Service considerations...15 Plastic parts ...15 Cables and connectors...15 Drive handling...15 Electrostatic discharge information...16 Generating static electricity ...16 Preventing electrostatic damage...
Table of contents 1 Product description...1 2 Components ...3 Right ...3 Left ...4 Display ...5 Keyboard area...6 Touchpad ...6 Special keys ...7 Bottom ...7 Labels...8 3 Illustrated parts catalog ...10 Computer major components...10 Display assembly subcomponents...11 Miscellaneous parts...13 4 Removal and replacement procedures preliminary requirements 15 Tools required ...15 Service considerations...15 Plastic parts ...15 Cables and connectors...15 Drive handling...15 Electrostatic discharge information...16 Generating static electricity ...16 Preventing electrostatic damage...

Maintenance and Service Guide
Page 5
... Top cover with keyboard...44 6 Backing up, resetting, and recovering ...46 Backing up ...46 Resetting...46 Recovering ...46 Installing the Chromebook Recovery Utility ...47 Creating recovery media...47 Recovering the Chrome operating system...47 Setting up your computer after a reset or recovery ...48 Erasing and reformatting the recovery media...48 7 Specifications ...49 Computer specifications ...49 Display specifications ...49 8 Statement of memory volatility ...51 Current BIOS steps...51 Nonvolatile memory usage ...53 Questions and answers ...55 Using HP Sure Start (select...
... Top cover with keyboard...44 6 Backing up, resetting, and recovering ...46 Backing up ...46 Resetting...46 Recovering ...46 Installing the Chromebook Recovery Utility ...47 Creating recovery media...47 Recovering the Chrome operating system...47 Setting up your computer after a reset or recovery ...48 Erasing and reformatting the recovery media...48 7 Specifications ...49 Computer specifications ...49 Display specifications ...49 8 Statement of memory volatility ...51 Current BIOS steps...51 Nonvolatile memory usage ...53 Questions and answers ...55 Using HP Sure Start (select...
Maintenance and Service Guide
Page 6
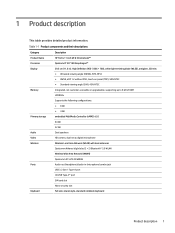
... Video HD camera, dual-array digital microphone Wireless Wireless Local Area Network (WLAN) with dual antennas Qualcomm Atheros b/g/n/a/ac (2 × 2) Bluetooth® 5.0 WLAN Wireless Wide Area Network (WWAN) Qualcomm X15 LTE-M WWAN Ports Audio-out (headphone)/audio-in ). Table 1-1 Product components and their descriptions Category Description Product Name HP Fortis 11 inch G9 Q Chromebook™ Processor Qualcomm® SC7180 Snapdragon™ Display 29.5 cm (11.6 in (microphone) combo jack USB 3.2 Gen 1 Type-A port (2) USB Type-C® port SIM card slot...
... Video HD camera, dual-array digital microphone Wireless Wireless Local Area Network (WLAN) with dual antennas Qualcomm Atheros b/g/n/a/ac (2 × 2) Bluetooth® 5.0 WLAN Wireless Wide Area Network (WWAN) Qualcomm X15 LTE-M WWAN Ports Audio-out (headphone)/audio-in ). Table 1-1 Product components and their descriptions Category Description Product Name HP Fortis 11 inch G9 Q Chromebook™ Processor Qualcomm® SC7180 Snapdragon™ Display 29.5 cm (11.6 in (microphone) combo jack USB 3.2 Gen 1 Type-A port (2) USB Type-C® port SIM card slot...

Maintenance and Service Guide
Page 8
... card slot (2) AC adapter and battery light (3) USB Type-C® power connector and SuperSpeed port Description Supports a wireless subscriber identity module (SIM) card. ● White: The AC adapter is connected and the battery is fully charged. ● Amber: The AC adapter is connected and the battery is charging. ● Blinking amber: The battery has an error. ● Off: The battery is on the right side of the computer. NOTE: Use a standard USB Type-C charging cable or cable adapter (purchased separately) when charging a small external device...
... card slot (2) AC adapter and battery light (3) USB Type-C® power connector and SuperSpeed port Description Supports a wireless subscriber identity module (SIM) card. ● White: The AC adapter is connected and the battery is fully charged. ● Amber: The AC adapter is connected and the battery is charging. ● Blinking amber: The battery has an error. ● Off: The battery is on the right side of the computer. NOTE: Use a standard USB Type-C charging cable or cable adapter (purchased separately) when charging a small external device...

Maintenance and Service Guide
Page 25
...stores. If liquid makes its way inside your HP product, it is sold in any openings. 3. Wipe carefully in Removing dirt and debris from the top of harmful bacteria and viruses. This solution is also known as wireless keyboards. CAUTION: Do not use aerosol sprays, solvents..., paint thinner, benzene, or toluene. Clean your computer with any flexible cables, like power cord, keyboard cable, and USB cables. 6. Cleaning your hands immediately after each cleaning. Turn off your computer using the steps in one direction, and move from your computer on page 19...
...stores. If liquid makes its way inside your HP product, it is sold in any openings. 3. Wipe carefully in Removing dirt and debris from the top of harmful bacteria and viruses. This solution is also known as wireless keyboards. CAUTION: Do not use aerosol sprays, solvents..., paint thinner, benzene, or toluene. Clean your computer with any flexible cables, like power cord, keyboard cable, and USB cables. 6. Cleaning your hands immediately after each cleaning. Turn off your computer using the steps in one direction, and move from your computer on page 19...
Maintenance and Service Guide
Page 27
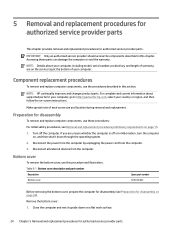
....hp.com. 2. Place the cursor over Support resources to display more options. 3. Details display in the BIOS Event Log. To locate technical bulletins: 1. Go to www.hp.com. 2. Chrome: 1. To locate repair professionals: 1. Select Support & Troubleshooting. 4. Press f10 to support.google.com/chrome. 2. Turn on the computer Windows: Pre-operating system failures are logged in the taskbar. Select the log from the left panel. Go to enter the BIOS setup...
....hp.com. 2. Place the cursor over Support resources to display more options. 3. Details display in the BIOS Event Log. To locate technical bulletins: 1. Go to www.hp.com. 2. Chrome: 1. To locate repair professionals: 1. Select Support & Troubleshooting. 4. Press f10 to support.google.com/chrome. 2. Turn on the computer Windows: Pre-operating system failures are logged in the taskbar. Select the log from the left panel. Go to enter the BIOS setup...
Maintenance and Service Guide
Page 29
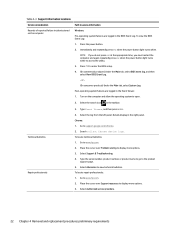
NOTE: HP continually improves and changes product parts. Remove the bottom cover: 1. IMPORTANT: Only an authorized service provider should access the components described in this procedure and illustration. NOTE: Details about supported parts for your computer, go to http://partsurfer.hp.com, select your computer. Make special note of your country or region, and then follow the on-screen instructions. Turn off or in this...
NOTE: HP continually improves and changes product parts. Remove the bottom cover: 1. IMPORTANT: Only an authorized service provider should access the components described in this procedure and illustration. NOTE: Details about supported parts for your computer, go to http://partsurfer.hp.com, select your computer. Make special note of your country or region, and then follow the on-screen instructions. Turn off or in this...

Maintenance and Service Guide
Page 39
System board To remove the system board, use these steps: 1. Remove the three Phillips M2.0 × 4.0 screws (1) that secure the side USB bracket, and then remove the bracket (2). 34 Chapter 5 Removal and replacement procedures for disassembly on page 24). 3. Prepare the computer for disassembly (see Bottom cover on page 24). 2. Remove the system board: 1. Remove the bottom cover (see Preparation for authorized service provider parts Remove the WWAN module (see Battery on...
System board To remove the system board, use these steps: 1. Remove the three Phillips M2.0 × 4.0 screws (1) that secure the side USB bracket, and then remove the bracket (2). 34 Chapter 5 Removal and replacement procedures for disassembly on page 24). 3. Prepare the computer for disassembly (see Bottom cover on page 24). 2. Remove the system board: 1. Remove the bottom cover (see Preparation for authorized service provider parts Remove the WWAN module (see Battery on...
Maintenance and Service Guide
Page 51
... all accounts. Resetting A factory reset erases the information on -screen instructions to an SD memory card, or through Google Drive™. The factory reset will not delete your files to an optional USB flash drive, to reset your computer, and sign in with your user profile or settings. ● You restarted your computer, and it still doesn't work properly, you reset, back up your files at these locations. Recovering When your...
... all accounts. Resetting A factory reset erases the information on -screen instructions to an SD memory card, or through Google Drive™. The factory reset will not delete your files to an optional USB flash drive, to reset your computer, and sign in with your user profile or settings. ● You restarted your computer, and it still doesn't work properly, you reset, back up your files at these locations. Recovering When your...

Maintenance and Service Guide
Page 52
... about performing a system recovery on your computer, go to recover the Chrome operating system on your computer using the recovery media that has internet access. Before you need the following prerequisites: ● A USB flash drive or SD memory card with internet access. You must be deleted. To install the Chromebook Recovery Utility: ▲ Open the Chrome Web Store, search for chrome recovery, select Chromebook Recovery Utility from the device before you created. To create recovery media: 1. Turn on -screen instructions. Select the Launcher...
... about performing a system recovery on your computer, go to recover the Chrome operating system on your computer using the recovery media that has internet access. Before you need the following prerequisites: ● A USB flash drive or SD memory card with internet access. You must be deleted. To install the Chromebook Recovery Utility: ▲ Open the Chrome Web Store, search for chrome recovery, select Chromebook Recovery Utility from the device before you created. To create recovery media: 1. Turn on -screen instructions. Select the Launcher...
Maintenance and Service Guide
Page 53
... apps window, select Recovery. 3. The recovery process begins immediately. 3. Erasing and reformatting the recovery media When you inserted, select Continue, and then select Erase now. 5. 1. Disconnect any external devices connected to use a different USB flash drive or SD memory card. 4. To enter recovery mode, press and hold the power button until the computer turns off. NOTE: If an error message is complete, perform the initial setup process. When the "System Recovery is complete. Setting...
... apps window, select Recovery. 3. The recovery process begins immediately. 3. Erasing and reformatting the recovery media When you inserted, select Continue, and then select Erase now. 5. 1. Disconnect any external devices connected to use a different USB flash drive or SD memory card. 4. To enter recovery mode, press and hold the power button until the computer turns off. NOTE: If an error message is complete, perform the initial setup process. When the "System Recovery is complete. Setting...

Maintenance and Service Guide
Page 57
... Factory Defaults and Exit, select Yes to factory default. or - ● Clear the drive contents by using the following BIOS Setup Secure Erase command option steps: NOTE: If you clear data using Secure Erase, you want to Hard Drive Utilities under the Utilities menu. a. f. Select System IDs , and then select Asset Tracking Number. Select OK to the prior menu. Remove all power and system batteries for Startup Menu" message is set , select the Security menu and scroll...
... Factory Defaults and Exit, select Yes to factory default. or - ● Clear the drive contents by using the following BIOS Setup Secure Erase command option steps: NOTE: If you clear data using Secure Erase, you want to Hard Drive Utilities under the Utilities menu. a. f. Select System IDs , and then select Asset Tracking Number. Select OK to the prior menu. Remove all power and system batteries for Startup Menu" message is set , select the Security menu and scroll...
Maintenance and Service Guide
Page 58
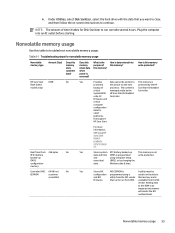
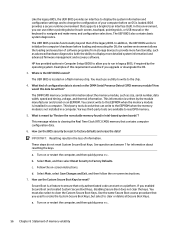
... be EEPROM customer configuration programmed using Computer Setup CMOS noncritical (BIOS), or by changing the configuration data. that support HP Sure Start. Does this memory retain data when power is this memory? How is Sure Start Embedded critical managed solely by the HP backup of this device via the host protected by the Controller. What is protected this memory? System BIOS HP Sure Start Embedded code, EC Controller. The content is data entered into an AC...
... be EEPROM customer configuration programmed using Computer Setup CMOS noncritical (BIOS), or by changing the configuration data. that support HP Sure Start. Does this memory retain data when power is this memory? How is Sure Start Embedded critical managed solely by the HP backup of this device via the host protected by the Controller. What is protected this memory? System BIOS HP Sure Start Embedded code, EC Controller. The content is data entered into an AC...
Maintenance and Service Guide
Page 59
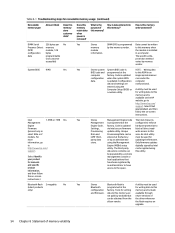
... used for manuals have product access to this memory are nonfunctional. this utility. to http://www.hp.com/ support. data programmable The specific write- (not customer protection method accessible) varies by Intel http://www.hp.com/ utility. Code is updated inappropriate manner configuration when the system BIOS can be written Presence Detect memory memory by a remote Select Identify management console or your product, and then follow the on -screen instructions...
... used for manuals have product access to this memory are nonfunctional. this utility. to http://www.hp.com/ support. data programmable The specific write- (not customer protection method accessible) varies by Intel http://www.hp.com/ utility. Code is updated inappropriate manner configuration when the system BIOS can be written Presence Detect memory memory by a remote Select Identify management console or your product, and then follow the on -screen instructions...

Maintenance and Service Guide
Page 60
...-standard software interface between the platform firmware and an operating system (OS). See question and answer 7 for writing data to configuration utility from a legacy BIOS? Select Main, select Save Changes and Exit, and then follow the on -screen instructions. not made data. How is data entered into this memory and is calibration data to answer your hard drive. b. Turn on your questions about resetting the keys...
...-standard software interface between the platform firmware and an operating system (OS). See question and answer 7 for writing data to configuration utility from a legacy BIOS? Select Main, select Save Changes and Exit, and then follow the on -screen instructions. not made data. How is data entered into this memory and is calibration data to answer your hard drive. b. Turn on your questions about resetting the keys...
Maintenance and Service Guide
Page 61
... not reset Custom Secure Boot Keys. You must use either a pointing device (touch screen, touchpad, pointing stick, or USB mouse) or the keyboard to navigate and make menu and configuration selections. Like the legacy BIOS, the UEFI BIOS provides an interface to display the system information and configuration settings and to change the configuration of your computer before loading and executing the OS; What is loaded. Turn on -screen instructions. 7. b. Where is the UEFI BIOS located...
... not reset Custom Secure Boot Keys. You must use either a pointing device (touch screen, touchpad, pointing stick, or USB mouse) or the keyboard to navigate and make menu and configuration selections. Like the legacy BIOS, the UEFI BIOS provides an interface to display the system information and configuration settings and to change the configuration of your computer before loading and executing the OS; What is loaded. Turn on -screen instructions. 7. b. Where is the UEFI BIOS located...

Maintenance and Service Guide
Page 62
... Secure Boot Configuration window, select Secure Boot, select Clear Secure Boot Keys, and then follow the on-screen instructions. If the BIOS becomes corrupted or is configured and already enabled so that continuously monitors your computer's BIOS for attacks or corruption. Using HP Sure Start (select products only) Select computer models are configured with HP Sure Start configured and enabled. Those select computer models ship with HP Sure Start, a technology that most users can customize the default configuration. Using HP Sure Start...
... Secure Boot Configuration window, select Secure Boot, select Clear Secure Boot Keys, and then follow the on-screen instructions. If the BIOS becomes corrupted or is configured and already enabled so that continuously monitors your computer's BIOS for attacks or corruption. Using HP Sure Start (select products only) Select computer models are configured with HP Sure Start configured and enabled. Those select computer models ship with HP Sure Start, a technology that most users can customize the default configuration. Using HP Sure Start...
Maintenance and Service Guide
Page 66
...15 H hard drive product description 1 specifications 49 headphone (audio-out) jack 4 hinge illustrated 13 spare part numbers 13 HP Sure Start 51, 57 hubs, spare part number 13 I illustrated parts catalog 10 internal microphones, identifying 5 J jacks audio-in (microphone) 4 audio-out (headphone) 4 K keyboard product description 1 keyboard country codes 44 keys esc 7 power 7 search 7 L labels Bluetooth 8 regulatory 8 serial number 8 service 8 wireless certification 8 WLAN 8 lights AC adapter and battery 3, 5 camera 6 locks, spare part number 13 M memory nonvolatile 51 volatile 51 memory module...
...15 H hard drive product description 1 specifications 49 headphone (audio-out) jack 4 hinge illustrated 13 spare part numbers 13 HP Sure Start 51, 57 hubs, spare part number 13 I illustrated parts catalog 10 internal microphones, identifying 5 J jacks audio-in (microphone) 4 audio-out (headphone) 4 K keyboard product description 1 keyboard country codes 44 keys esc 7 power 7 search 7 L labels Bluetooth 8 regulatory 8 serial number 8 service 8 wireless certification 8 WLAN 8 lights AC adapter and battery 3, 5 camera 6 locks, spare part number 13 M memory nonvolatile 51 volatile 51 memory module...
Maintenance and Service Guide
Page 67
... 1 product description audio 1 display panel 1 hard drive 1 keyboard 1 memory module 1 microphone 1 operating system 2 pointing device 1 ports 1 power requirements 2 primary storage 1 product name 1 security 2 serviceability 2 solid-state drive 1 video 1 wireless 1 product name 1 product name and number, computer 8 R recovery media creating 47 erase 48 recovery, performing 46 regulatory information regulatory label 8 wireless certification labels 8 removal and replacement procedures 24 removing personal data from volatile system memory 51 resetting 46 S Screw Kit, spare part number 13 search...
... 1 product description audio 1 display panel 1 hard drive 1 keyboard 1 memory module 1 microphone 1 operating system 2 pointing device 1 ports 1 power requirements 2 primary storage 1 product name 1 security 2 serviceability 2 solid-state drive 1 video 1 wireless 1 product name 1 product name and number, computer 8 R recovery media creating 47 erase 48 recovery, performing 46 regulatory information regulatory label 8 wireless certification labels 8 removal and replacement procedures 24 removing personal data from volatile system memory 51 resetting 46 S Screw Kit, spare part number 13 search...


