
Worldwide Limited Warranty and Technical Support - 1 year
Page 4
... two business days. 4 Friday If your product needs a hardware repair that was either preinstalled by Compaq on the website at the time of product purchase. The AAAA battery for receiving software technical support. If it is determined your proof of the product is not included...that come with the tablet PC product is two (2) years from date of defective parts, including options identified by Compaq under warranty, then Compaq will help you . Compaq pays shipping costs. After the first ninety (90) days, technical support for the rechargeable battery pack and any digital ...
... two business days. 4 Friday If your product needs a hardware repair that was either preinstalled by Compaq on the website at the time of product purchase. The AAAA battery for receiving software technical support. If it is determined your proof of the product is not included...that come with the tablet PC product is two (2) years from date of defective parts, including options identified by Compaq under warranty, then Compaq will help you . Compaq pays shipping costs. After the first ninety (90) days, technical support for the rechargeable battery pack and any digital ...
Maintenance and Service Guide
Page 14
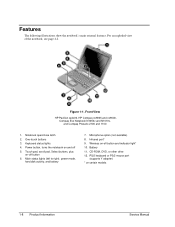
... latch 2. Microphone option (not available) 8. Power button, turns the notebook on certain models 1-8 Product Information Service Manual Battery 11. PS/2 keyboard or PS/2 mouse port (supports Y adapter) * on and off 5. Keyboard status lights... battery 7. Features The following illustrations show the notebook's main external features. CD-ROM, DVD, or other drive 12. Infrared port* 9. One-touch buttons 3. For an exploded view of the notebook, see page 4-2. Front View HP Pavilion ze4x00, HP Compaq nx9005 and nx9000, Compaq Evo Notebook N1050v and N1010v, and Compaq ...
... latch 2. Microphone option (not available) 8. Power button, turns the notebook on certain models 1-8 Product Information Service Manual Battery 11. PS/2 keyboard or PS/2 mouse port (supports Y adapter) * on and off 5. Keyboard status lights... battery 7. Features The following illustrations show the notebook's main external features. CD-ROM, DVD, or other drive 12. Infrared port* 9. One-touch buttons 3. For an exploded view of the notebook, see page 4-2. Front View HP Pavilion ze4x00, HP Compaq nx9005 and nx9000, Compaq Evo Notebook N1050v and N1010v, and Compaq ...
Maintenance and Service Guide
Page 17
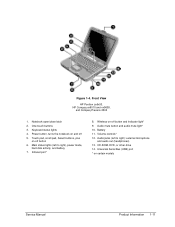
... -off button 6. CD-ROM, DVD, or other drive 14. Front View HP Pavilion ze5x00, HP Compaq nx9010 and nx9008, and Compaq Presario 2500 1. Infrared port* 8. Battery 11. Notebook open/close latch 2. Keyboard status lights 4. Touch pad, scroll pad, Select buttons, plus on and off button and indicator light* 9. Main status lights (left to ...
... -off button 6. CD-ROM, DVD, or other drive 14. Front View HP Pavilion ze5x00, HP Compaq nx9010 and nx9008, and Compaq Presario 2500 1. Infrared port* 8. Battery 11. Notebook open/close latch 2. Keyboard status lights 4. Touch pad, scroll pad, Select buttons, plus on and off button and indicator light* 9. Main status lights (left to ...
Maintenance and Service Guide
Page 25
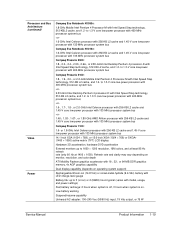
...hours when system is on operating system support) Rechargeable lithium-ion (14.8 Vdc) or nickel-metal-hydride (9.6 Vdc) battery with LED charge-level gauge Battery life: up to 1.3-V core low-power processor with 400-MHz processor system bus -or- 2.53-GHz Intel Desktop...-power processor with 400-MHz processor system bus Compaq Presario 2100: 1.8-, 1.9-, 2.0-, or 2.2-GHz Mobile Intel Pentium 4 Processor-M with Intel Speed Step technology, 512-KB L2 cache, and 1.2- Processor and Bus Architecture (continued) Video Power Compaq Evo Notebook N1050v: 1.8-GHz Mobile Intel Pentium 4 Processor-M with...
...hours when system is on operating system support) Rechargeable lithium-ion (14.8 Vdc) or nickel-metal-hydride (9.6 Vdc) battery with LED charge-level gauge Battery life: up to 1.3-V core low-power processor with 400-MHz processor system bus -or- 2.53-GHz Intel Desktop...-power processor with 400-MHz processor system bus Compaq Presario 2100: 1.8-, 1.9-, 2.0-, or 2.2-GHz Mobile Intel Pentium 4 Processor-M with Intel Speed Step technology, 512-KB L2 cache, and 1.2- Processor and Bus Architecture (continued) Video Power Compaq Evo Notebook N1050v: 1.8-GHz Mobile Intel Pentium 4 Processor-M with...
Maintenance and Service Guide
Page 35
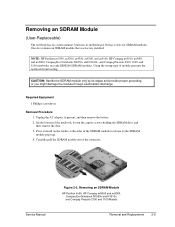
... if present, and then remove the battery. 2. Using the wrong type of the connector. Carefully pull the SDRAM module out of module prevents the notebook from booting. Press outward on the latches at the sides of the notebook, loosen the captive screws holding the...has 2 slots for SDRAM modules. Required Equipment 1 Phillips screwdriver Removal Procedure 1. Removing an SDRAM Module HP Pavilion 4x00, HP Compaq nx9005 and nx9000, Compaq Evo Notebook N1050v and N1010v, and Compaq Presario 2100 and 1100 Models Removal and Replacement 2-5 On the bottom of the SDRAM module to release it...
... if present, and then remove the battery. 2. Using the wrong type of the connector. Carefully pull the SDRAM module out of module prevents the notebook from booting. Press outward on the latches at the sides of the notebook, loosen the captive screws holding the...has 2 slots for SDRAM modules. Required Equipment 1 Phillips screwdriver Removal Procedure 1. Removing an SDRAM Module HP Pavilion 4x00, HP Compaq nx9005 and nx9000, Compaq Evo Notebook N1050v and N1010v, and Compaq Presario 2100 and 1100 Models Removal and Replacement 2-5 On the bottom of the SDRAM module to release it...
Maintenance and Service Guide
Page 37
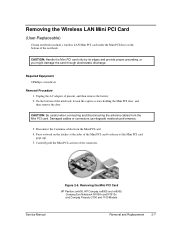
... the Mini PCI door, and then remove the door. Removing the Mini PCI Card HP Pavilion ze4x00, HP Compaq nx9005 and nx9000, Compaq Evo Notebook N1050v and N1010v, and Compaq Presario 2100 and 1100 Models Service Manual Removal and Replacement 2-7 Disconnect the 2 antenna cables... from the Mini PCI card. On the bottom of the connector. Unplug the AC adapter, if present, and then remove the battery...
... the Mini PCI door, and then remove the door. Removing the Mini PCI Card HP Pavilion ze4x00, HP Compaq nx9005 and nx9000, Compaq Evo Notebook N1050v and N1010v, and Compaq Presario 2100 and 1100 Models Service Manual Removal and Replacement 2-7 Disconnect the 2 antenna cables... from the Mini PCI card. On the bottom of the connector. Unplug the AC adapter, if present, and then remove the battery...
Maintenance and Service Guide
Page 45
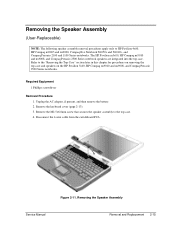
...procedures on removing the top case and speakers on the HP Pavilion 5x00, HP Compaq nx9010 and nx9008, and Compaq Presario 2500 Series notebooks. Unplug the AC adapter, if present, and then remove the battery. 2. Figure 2-11. Required Equipment 1 Phillips screwdriver ... speaker assembly removal procedures apply only to HP Pavilion 4x00, HP Compaq nx9005 and nx9000, Compaq Evo Notebook N1050v and N1010v, and Compaq Presario 2100 and 1100 Series notebooks. The HP Pavilion ze5x00, HP Compaq nx9010 and nx9008, and Compaq Presario 2500 Series notebook speakers are integrated into the top case....
...procedures on removing the top case and speakers on the HP Pavilion 5x00, HP Compaq nx9010 and nx9008, and Compaq Presario 2500 Series notebooks. Unplug the AC adapter, if present, and then remove the battery. 2. Figure 2-11. Required Equipment 1 Phillips screwdriver ... speaker assembly removal procedures apply only to HP Pavilion 4x00, HP Compaq nx9005 and nx9000, Compaq Evo Notebook N1050v and N1010v, and Compaq Presario 2100 and 1100 Series notebooks. The HP Pavilion ze5x00, HP Compaq nx9010 and nx9008, and Compaq Presario 2500 Series notebook speakers are integrated into the top case....
Maintenance and Service Guide
Page 48
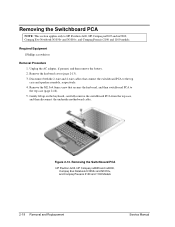
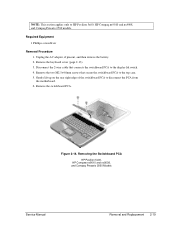
... PCA to the top case and speaker assembly, respectively. 4. Removing the Switchboard PCA HP Pavilion 4x00, HP Compaq nx9005 and nx9000, Compaq Evo Notebook N1050v and N1010v, and Compaq Presario 2100 and 1100 Models 2-18 Removal and Replacement Service Manual Gently lift up on...AC adapter, if present, and then remove the battery. 2. Disconnect both the 2-wire and 4-wire cables that secures the keyboard, and then switchboard PCA to HP Pavilion 4x00, HP Compaq nx9005 and nx9000, Compaq Evo Notebook N1050v and N1010v, and Compaq Presario 2100 and 1100 models. Required Equipment 1 Phillips...
... PCA to the top case and speaker assembly, respectively. 4. Removing the Switchboard PCA HP Pavilion 4x00, HP Compaq nx9005 and nx9000, Compaq Evo Notebook N1050v and N1010v, and Compaq Presario 2100 and 1100 Models 2-18 Removal and Replacement Service Manual Gently lift up on...AC adapter, if present, and then remove the battery. 2. Disconnect both the 2-wire and 4-wire cables that secures the keyboard, and then switchboard PCA to HP Pavilion 4x00, HP Compaq nx9005 and nx9000, Compaq Evo Notebook N1050v and N1010v, and Compaq Presario 2100 and 1100 models. Required Equipment 1 Phillips...
Maintenance and Service Guide
Page 49
Disconnect the 2-wire cable that secure the switchboard PCA to HP Pavilion 5x00, HP Compaq nx9010 and nx9008, and Compaq Presario 2500 models. Required Equipment 1 Phillips screwdriver Removal Procedure 1. Remove the keyboard cover (page 2-13). 3. Gently lift up on the rear right ... 6. Remove the switchboard PCA. NOTE: This section applies only to the top case. 5. Unplug the AC adapter, if present, and then remove the battery. 2. Removing the Switchboard PCA HP Pavilion 5x00, HP Compaw nx9010 and nx9008, and Compaq Presario 2500 Models Service Manual Removal and Replacement 2-19
Disconnect the 2-wire cable that secure the switchboard PCA to HP Pavilion 5x00, HP Compaq nx9010 and nx9008, and Compaq Presario 2500 models. Required Equipment 1 Phillips screwdriver Removal Procedure 1. Remove the keyboard cover (page 2-13). 3. Gently lift up on the rear right ... 6. Remove the switchboard PCA. NOTE: This section applies only to the top case. 5. Unplug the AC adapter, if present, and then remove the battery. 2. Removing the Switchboard PCA HP Pavilion 5x00, HP Compaw nx9010 and nx9008, and Compaq Presario 2500 Models Service Manual Removal and Replacement 2-19

Maintenance and Service Guide
Page 50
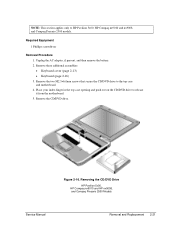
...CD/DVD drive. 4. Required Equipment 1 Phillips screwdriver Removal Procedure 1. Removing the CD/DVD Drive HP Pavilion 4x00, HP Compaq nx9005 and nx9000, Compaq Evo Notebook N1050v and N1010v, and Compaq Presario 2100 and 1100 Models 2-20 Removal and Replacement Service Manual Remove the 2 screws that ...the CD/DVD drive. Figure 2-15. Unplug the AC adapter, if present, and then remove the battery. 2. NOTE: The screws that secure the CD/DVD drive to HP Pavilion 4x00, HP Compaq nx9005 and nx9000, Compaq Evo Notebook N1050v and N1010v, and Compaq Presario 2100 and 1100 models.
...CD/DVD drive. 4. Required Equipment 1 Phillips screwdriver Removal Procedure 1. Removing the CD/DVD Drive HP Pavilion 4x00, HP Compaq nx9005 and nx9000, Compaq Evo Notebook N1050v and N1010v, and Compaq Presario 2100 and 1100 Models 2-20 Removal and Replacement Service Manual Remove the 2 screws that ...the CD/DVD drive. Figure 2-15. Unplug the AC adapter, if present, and then remove the battery. 2. NOTE: The screws that secure the CD/DVD drive to HP Pavilion 4x00, HP Compaq nx9005 and nx9000, Compaq Evo Notebook N1050v and N1010v, and Compaq Presario 2100 and 1100 models.
Maintenance and Service Guide
Page 51
... it from the motherboard. 5. Figure 2-16. Required Equipment 1 Phillips screwdriver Removal Procedure 1. Removing the CD/DVD Drive HP Pavilion 5x00, HP Compaq nx9010 and HP nx9008, and Compaq Presario 2500 Models Service Manual Removal and Replacement 2-21 Place your index finger in the top case opening and push out ...on the CD/DVD drive to the top case and motherboard. 4. NOTE: This section applies only to HP Pavilion 5x00, HP Compaq nx9010 and nx9008, and Compaq Presario 2500 models. Remove the CD/DVD drive. Unplug the AC adapter, if present, and then remove the...
... it from the motherboard. 5. Figure 2-16. Required Equipment 1 Phillips screwdriver Removal Procedure 1. Removing the CD/DVD Drive HP Pavilion 5x00, HP Compaq nx9010 and HP nx9008, and Compaq Presario 2500 Models Service Manual Removal and Replacement 2-21 Place your index finger in the top case opening and push out ...on the CD/DVD drive to the top case and motherboard. 4. NOTE: This section applies only to HP Pavilion 5x00, HP Compaq nx9010 and nx9008, and Compaq Presario 2500 models. Remove the CD/DVD drive. Unplug the AC adapter, if present, and then remove the...
Maintenance and Service Guide
Page 54
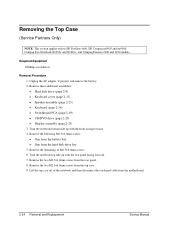
...(page 2-20) • Display assembly (page 2-23) 3. Turn the notebook top side up with the rear panel facing forward. 7. Remove the following M2.5×4.0mm screws: • One from the battery bay • One from the rear panel. 8. Remove the two M2.5&#...Phillips screwdriver Removal Procedure 1. Turn the notebook bottom side up with the front facing forward. 4. Removing the Top Case (Service Partners Only) NOTE: This section applies only to HP Pavilion 4x00, HP Compaq nx9005 and nx9000, Compaq Evo Notebook N1050v and N1010v, and Compaq Presario 2100 and 1100 models. Remove...
...(page 2-20) • Display assembly (page 2-23) 3. Turn the notebook top side up with the rear panel facing forward. 7. Remove the following M2.5×4.0mm screws: • One from the battery bay • One from the rear panel. 8. Remove the two M2.5&#...Phillips screwdriver Removal Procedure 1. Turn the notebook bottom side up with the front facing forward. 4. Removing the Top Case (Service Partners Only) NOTE: This section applies only to HP Pavilion 4x00, HP Compaq nx9005 and nx9000, Compaq Evo Notebook N1050v and N1010v, and Compaq Presario 2100 and 1100 models. Remove...
Maintenance and Service Guide
Page 56
... removed in damage to follow this caution can result in step 4 are 3 different lengths. Unplug the AC adapter, if present, and then remove the battery. 2. Failure to the notebook. 2-26 Removal and Replacement Service Manual Remove these additional assemblies: • Hard disk drive (page 2-9) • Keyboard cover (page 2-13) • Speaker assembly... 16 screws: • Six M2.5×7.0mm screws on each screw as it is removed and install it in the correct location. Be sure to HP Pavilion 5x00, HP Compaq nx9010 and HP nx9008, and Compaq Presario 2500 models.
... removed in damage to follow this caution can result in step 4 are 3 different lengths. Unplug the AC adapter, if present, and then remove the battery. 2. Failure to the notebook. 2-26 Removal and Replacement Service Manual Remove these additional assemblies: • Hard disk drive (page 2-9) • Keyboard cover (page 2-13) • Speaker assembly... 16 screws: • Six M2.5×7.0mm screws on each screw as it is removed and install it in the correct location. Be sure to HP Pavilion 5x00, HP Compaq nx9010 and HP nx9008, and Compaq Presario 2500 models.
Maintenance and Service Guide
Page 59
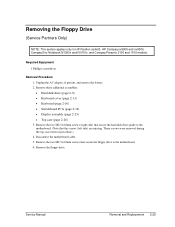
Unplug the AC adapter, if present, and remove the battery. 2. Remove the two M2.5×4.0mm screws (right side) that secure the hard disk drive guide to the motherboard. (Note that secure the floppy drive to HP Pavilion ze4x00, HP Compaq nx9005 and nx9000, Compaq Evo Notebook N1050v and N1010v, and Compaq Presario 2100 and 1100 models. Remove the floppy...
Unplug the AC adapter, if present, and remove the battery. 2. Remove the two M2.5×4.0mm screws (right side) that secure the hard disk drive guide to the motherboard. (Note that secure the floppy drive to HP Pavilion ze4x00, HP Compaq nx9005 and nx9000, Compaq Evo Notebook N1050v and N1010v, and Compaq Presario 2100 and 1100 models. Remove the floppy...
Maintenance and Service Guide
Page 61
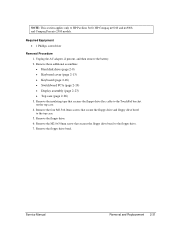
... floppy drive. 6. Required Equipment • 1 Phillips screwdriver Removal Procedure 1. Remove the floppy drive bezel. Unplug the AC adapter, if present, and then remove the battery. 2. Remove the four M2.5×6.0mm screws that secure the floppy drive and floppy drive bezel to HP Pavilion 5x00, HP Compaq nx9010 and nx9008, and Compaq Presario 2500 models.
... floppy drive. 6. Required Equipment • 1 Phillips screwdriver Removal Procedure 1. Remove the floppy drive bezel. Unplug the AC adapter, if present, and then remove the battery. 2. Remove the four M2.5×6.0mm screws that secure the floppy drive and floppy drive bezel to HP Pavilion 5x00, HP Compaq nx9010 and nx9008, and Compaq Presario 2500 models.
Maintenance and Service Guide
Page 65
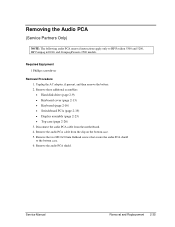
Unplug the AC adapter, if present, and then remove the battery. 2. Remove the audio PCA shield. Disconnect the audio PCA cable from the clip on the bottom case. 5. Required Equipment 1 Phillips screwdriver Removal Procedure 1. Remove these ... 2-26) 3. Service Manual Removal and Replacement 2-35 Remove the two M2.0×3.0mm flathead screws that secure the audio PCA shield to HP Pavilion 5300 and 5200, HP Compaq nx9010, and Compaq Presario 2500 models. Removing the Audio PCA (Service Partners Only) NOTE: The following audio PCA removal instructions apply only to the bottom...
Unplug the AC adapter, if present, and then remove the battery. 2. Remove the audio PCA shield. Disconnect the audio PCA cable from the clip on the bottom case. 5. Required Equipment 1 Phillips screwdriver Removal Procedure 1. Remove these ... 2-26) 3. Service Manual Removal and Replacement 2-35 Remove the two M2.0×3.0mm flathead screws that secure the audio PCA shield to HP Pavilion 5300 and 5200, HP Compaq nx9010, and Compaq Presario 2500 models. Removing the Audio PCA (Service Partners Only) NOTE: The following audio PCA removal instructions apply only to the bottom...
Maintenance and Service Guide
Page 67
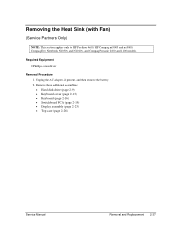
... 2-23) • Top case (page 2-26) Service Manual Removal and Replacement 2-37 Unplug the AC adapter, if present, and then remove the battery. 2. Removing the Heat Sink (with Fan) (Service Partners Only) NOTE: This section applies only to HP Pavilion 4x00, HP Compaq nx9005 and nx9000, Compaq Evo Notebook N1050v and N1010v, and Compaq Presario 2100 and 1100 models.
... 2-23) • Top case (page 2-26) Service Manual Removal and Replacement 2-37 Unplug the AC adapter, if present, and then remove the battery. 2. Removing the Heat Sink (with Fan) (Service Partners Only) NOTE: This section applies only to HP Pavilion 4x00, HP Compaq nx9005 and nx9000, Compaq Evo Notebook N1050v and N1010v, and Compaq Presario 2100 and 1100 models.
Maintenance and Service Guide
Page 69
Remove these additional assemblies: • Hard disk drive (page 2-9) • Keyboard cover (page 2-13) • Keyboard (page 2-16) • Switchboard PCA (page 2-19) • Display assembly (page 2-23) • Top case (page 2-26) Service Manual Removal and Replacement 2-39 Unplug the AC adapter, if present, and then remove the battery. 2. NOTE: This section applies only to HP Pavilion 5x00, HP Compaq nx9010 and HP nx9008, and Compaq Presario 2500 models. Required Equipment 0 Phillips screwdriver Removal Procedure 1.
Remove these additional assemblies: • Hard disk drive (page 2-9) • Keyboard cover (page 2-13) • Keyboard (page 2-16) • Switchboard PCA (page 2-19) • Display assembly (page 2-23) • Top case (page 2-26) Service Manual Removal and Replacement 2-39 Unplug the AC adapter, if present, and then remove the battery. 2. NOTE: This section applies only to HP Pavilion 5x00, HP Compaq nx9010 and HP nx9008, and Compaq Presario 2500 models. Required Equipment 0 Phillips screwdriver Removal Procedure 1.
Maintenance and Service Guide
Page 71
Removing the CPU Module (Authorized Service Providers Only) Required Equipment Small flat-blade (3mm) screwdriver NOTE: This section applies only to HP Pavilion 4x00, HP Compaq nx9005 and nx9000, Compaq Evo Notebook N1050v and N1010v, and Compaq Presario 2100 and 1100 models. Remove these additional assemblies: • Hard disk drive (page 2-9) • Keyboard cover (page 2-13) • Keyboard (page... (page 2-26) • Heat sink (page 2-40) Service Manual Removal and Replacement 2-41 Removal Procedure 1. Unplug the AC adapter, if present, and then remove the battery. 2.
Removing the CPU Module (Authorized Service Providers Only) Required Equipment Small flat-blade (3mm) screwdriver NOTE: This section applies only to HP Pavilion 4x00, HP Compaq nx9005 and nx9000, Compaq Evo Notebook N1050v and N1010v, and Compaq Presario 2100 and 1100 models. Remove these additional assemblies: • Hard disk drive (page 2-9) • Keyboard cover (page 2-13) • Keyboard (page... (page 2-26) • Heat sink (page 2-40) Service Manual Removal and Replacement 2-41 Removal Procedure 1. Unplug the AC adapter, if present, and then remove the battery. 2.
Maintenance and Service Guide
Page 75
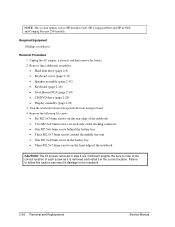
NOTE: This section applies only to HP Pavilion 5x00, HP Compaq nx9010 and nx9008, and Compaq Presario 2500 models. Removal Procedure 1. Unplug the AC adapter, if present, and then remove the battery. 2. Remove these additional assemblies: • Hard disk drive (page 2-9) • Keyboard cover (page 2-13) • Keyboard (page 2-16) • Switchboard PCA (page 2-19) • Display assembly (page 2-23) • Top case (page 2-26) • Heat sink (page 2-40) Service Manual Removal and Replacement 2-45
NOTE: This section applies only to HP Pavilion 5x00, HP Compaq nx9010 and nx9008, and Compaq Presario 2500 models. Removal Procedure 1. Unplug the AC adapter, if present, and then remove the battery. 2. Remove these additional assemblies: • Hard disk drive (page 2-9) • Keyboard cover (page 2-13) • Keyboard (page 2-16) • Switchboard PCA (page 2-19) • Display assembly (page 2-23) • Top case (page 2-26) • Heat sink (page 2-40) Service Manual Removal and Replacement 2-45


