
Maintenance and Service Guide
Page 86
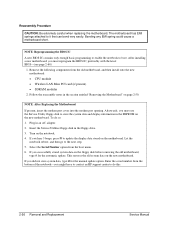
NOTE: Reprogramming the BIOS IC A new BIOS IC contains only enough basic programming to enable the notebook to update the display data stored on page 2-50. Insert the Service Utilities floppy disk in the section entitled "Removing the Motherboard" on the motherboard. If you ... stored system data on the new motherboard. If you hear 5 beeps, press F1 to boot. After installing a new motherboard, you might have to contact an HP support center to it that can bend very easily. NOTE: After Replacing the Motherboard If present, insert the modem port cover into the modem port...
NOTE: Reprogramming the BIOS IC A new BIOS IC contains only enough basic programming to enable the notebook to update the display data stored on page 2-50. Insert the Service Utilities floppy disk in the section entitled "Removing the Motherboard" on the motherboard. If you ... stored system data on the new motherboard. If you hear 5 beeps, press F1 to boot. After installing a new motherboard, you might have to contact an HP support center to it that can bend very easily. NOTE: After Replacing the Motherboard If present, insert the modem port cover into the modem port...
Maintenance and Service Guide
Page 89
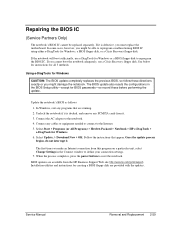
... CAUTION: The BIOS update completely replaces the previous BIOS, so follow these before performing the update. BIOS updates are provided with the updates. Select Update, > Download New > OK. Connect any programs that appear. In Windows, exit any cables or equipment needed to connect to define your connection settings. 7. Select Start > Programs (or All Programs) > Hewlett-Packard > Notebook > HP e-DiagTools > e-DiagTools...
... CAUTION: The BIOS update completely replaces the previous BIOS, so follow these before performing the update. BIOS updates are provided with the updates. Select Update, > Download New > OK. Connect any programs that appear. In Windows, exit any cables or equipment needed to connect to define your connection settings. 7. Select Start > Programs (or All Programs) > Hewlett-Packard > Notebook > HP e-DiagTools > e-DiagTools...
Maintenance and Service Guide
Page 112
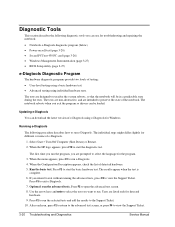
...Diagtools using individual hardware tests. Updating e-Diagtools You can be in a predictable state during the tests. Press F3 to view the Support Ticket. The notebook reboots when you are intended to...press F4 to exit e-Diagtools. 7. Press F2 to run e-Diagtools. 4. When the HP logo appears, press F10 to the Support Ticket. 10. Press F2 to run the ...the notebook: • Notebook e-Diagtools diagnostic program (below) • Power-on self-test (page 3-20) • Sycard PCCtest 450 PC card (page 3-26) • Windows Management Instrumentation (page 3-27) • BIOS Setup...
...Diagtools using individual hardware tests. Updating e-Diagtools You can be in a predictable state during the tests. Press F3 to view the Support Ticket. The notebook reboots when you are intended to...press F4 to exit e-Diagtools. 7. Press F2 to run e-Diagtools. 4. When the HP logo appears, press F10 to the Support Ticket. 10. Press F2 to run the ...the notebook: • Notebook e-Diagtools diagnostic program (below) • Power-on self-test (page 3-20) • Sycard PCCtest 450 PC card (page 3-26) • Windows Management Instrumentation (page 3-27) • BIOS Setup...
Maintenance and Service Guide
Page 120
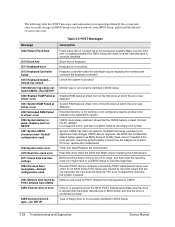
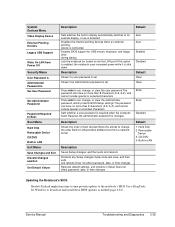
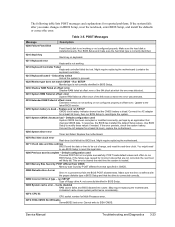
... memory is not working or not configured properly at offset nnnn Update to the latest BIOS version CMOS clock battery indicator shows that changes CMOS data In response, the BIOS has installed the default Setup values Use BIOS Setup to proceed Monitor type is dead Connect the AC adapter ...error persists, check the system battery Connect the AC adapter for reported problems If the system fails after you make changes in BIOS Setup, reset the notebook, enter BIOS Setup, and install the defaults or correct the error. The following table lists POST messages and explanations for at least 24 ...
... memory is not working or not configured properly at offset nnnn Update to the latest BIOS version CMOS clock battery indicator shows that changes CMOS data In response, the BIOS has installed the default Setup values Use BIOS Setup to proceed Monitor type is dead Connect the AC adapter ...error persists, check the system battery Connect the AC adapter for reported problems If the system fails after you make changes in BIOS Setup, reset the notebook, enter BIOS Setup, and install the defaults or correct the error. The following table lists POST messages and explanations for at least 24 ...
Maintenance and Service Guide
Page 127
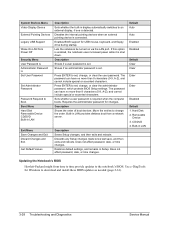
..., date, or time changes Restores default settings, and remains in Setup Does not affect password, date, or time changes Updating the Notebook's BIOS Hewlett-Packard might from time to time provide updates to the notebook's BIOS Use e-DiagTools for Windows to change the order Built-in display automatically switches to an external display, if one is...
..., date, or time changes Restores default settings, and remains in Setup Does not affect password, date, or time changes Updating the Notebook's BIOS Hewlett-Packard might from time to time provide updates to the notebook's BIOS Use e-DiagTools for Windows to change the order Built-in display automatically switches to an external display, if one is...
Service Manual
Page 128
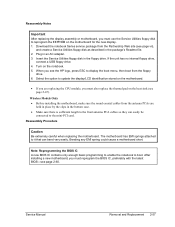
... page 2-47). Reassembly Notes Important After replacing the display assembly or motherboard, you must reprogram the BIOS IC, preferably with the latest BIOS-see page 2-60. Download the notebook Series service package from the floppy drive. 6. When you are held in place by the clips in... floppy drive, connect a USB floppy drive. 4. Select the option to update the display/LCD identification stored on the motherboard. • If you see the HP logo, press ESC to reprogram the EEPROM on the notebook. 5. Insert the Service Utilities floppy disk in the bottom case. •...
... page 2-47). Reassembly Notes Important After replacing the display assembly or motherboard, you must reprogram the BIOS IC, preferably with the latest BIOS-see page 2-60. Download the notebook Series service package from the floppy drive. 6. When you are held in place by the clips in... floppy drive, connect a USB floppy drive. 4. Select the option to update the display/LCD identification stored on the motherboard. • If you see the HP logo, press ESC to reprogram the EEPROM on the notebook. 5. Insert the Service Utilities floppy disk in the bottom case. •...
Service Manual
Page 132
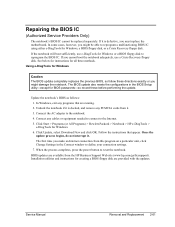
... is docked, and remove any PCMCIA cards from the HP Business Support Web site (www.hp.com/go/bizsupport). The first time you might damage the notebook. Update the notebook's BIOS as follows: 1. The BIOS update also resets the configurations in the Connect window to reprogram the BIOS IC. Click Update, select Download New and click OK. In some cases...
... is docked, and remove any PCMCIA cards from the HP Business Support Web site (www.hp.com/go/bizsupport). The first time you might damage the notebook. Update the notebook's BIOS as follows: 1. The BIOS update also resets the configurations in the Connect window to reprogram the BIOS IC. Click Update, select Download New and click OK. In some cases...
Service Manual
Page 153
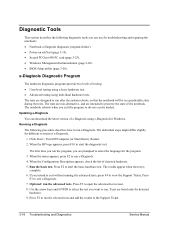
... can be in a predictable state during the tests. Click Start > Turn Off Computer (or Shut Down), Restart. 2. When the HP logo appears, press F10 to preserve the state of e-Diagtools using individual hardware tests. When the menu appears, press F2 to run... program, you run . Updating e-Diagtools You can use for troubleshooting and repairing the notebook: • Notebook e-Diagtools diagnostic program (below). • Power-on self-test (page 3-19). • Sycard PCCtest 450 PC card (page 3-25). • Windows Management Instrumentation (page 3-26). • BIOS Setup utility (page 3-26...
... can be in a predictable state during the tests. Click Start > Turn Off Computer (or Shut Down), Restart. 2. When the HP logo appears, press F10 to preserve the state of e-Diagtools using individual hardware tests. When the menu appears, press F2 to run... program, you run . Updating e-Diagtools You can use for troubleshooting and repairing the notebook: • Notebook e-Diagtools diagnostic program (below). • Power-on self-test (page 3-19). • Sycard PCCtest 450 PC card (page 3-25). • Windows Management Instrumentation (page 3-26). • BIOS Setup utility (page 3-26...
Service Manual
Page 154
...and/or follow-up actions. Power-On Self-Test Note If Quiet Boot is enabled in the notebook-some messages are for Windows. 13. You should enable you can also update the version of one or more POST tests as a hardware, software, or firmware failure. Optional..., its system BIOS runs a series of the notebook's components require service. After each run it from the Recovery CD or DVD. In Windows, click Start > All Programs (or Programs) > Hewlett-Packard > Notebook > HP e-Diagtools > e-Diagtools for information only. To e-mail the Support Ticket to the following: • e-Diagtools ...
...and/or follow-up actions. Power-On Self-Test Note If Quiet Boot is enabled in the notebook-some messages are for Windows. 13. You should enable you can also update the version of one or more POST tests as a hardware, software, or firmware failure. Optional..., its system BIOS runs a series of the notebook's components require service. After each run it from the Recovery CD or DVD. In Windows, click Start > All Programs (or Programs) > Hewlett-Packard > Notebook > HP e-Diagtools > e-Diagtools for information only. To e-mail the Support Ticket to the following: • e-Diagtools ...
Service Manual
Page 158
... default values and offers to be out of range, and reset the real-time clock. Run BIOS Setup and make changes in BIOS Setup, reset the notebook, enter BIOS Setup, and install the defaults or correct the error. Update to proceed. 0220 Monitor type does not match CMOS - This error is cleared the next time...
... default values and offers to be out of range, and reset the real-time clock. Run BIOS Setup and make changes in BIOS Setup, reset the notebook, enter BIOS Setup, and install the defaults or correct the error. Update to proceed. 0220 Monitor type does not match CMOS - This error is cleared the next time...
Service Manual
Page 163
... settings. Press ENTER to set . Requires the administrator password for changes. Restores default settings, and remains in LAN Updating the Notebook's BIOS Hewlett-Packard might from a network server. Move the entries to an external display, if one is detected. Does not affect ... is shut down. Description Shows the order of boot devices. Built-in LAN provides diskless boot from time to time provide updates to download and install these BIOS updates as needed (page 2-61). 3-28 Troubleshooting and Diagnostics Service Manual Hard Disk 2. CD/DVD 4. System Devices Menu Video ...
... settings. Press ENTER to set . Requires the administrator password for changes. Restores default settings, and remains in LAN Updating the Notebook's BIOS Hewlett-Packard might from a network server. Move the entries to an external display, if one is detected. Does not affect ... is shut down. Description Shows the order of boot devices. Built-in LAN provides diskless boot from time to time provide updates to download and install these BIOS updates as needed (page 2-61). 3-28 Troubleshooting and Diagnostics Service Manual Hard Disk 2. CD/DVD 4. System Devices Menu Video ...

Windows XP SP1 on Compaq Evo Notebooks
Page 1
... and support provided by Compaq for Microsoft Windows XP Professional and Service Pack 1 on Compaq Evo Notebook products. SP1 is the latest and most comprehensive update available for Microsoft® Windows XP Professional. Service Pack 1 (SP1) is not considered...-WWEN Prepared by: PSG Notebook Software Marketing and Engineering Compaq Computer Corporation Contents Introduction 3 Tested Systems 3 Installation tips for Service Pack 1 3 Known Anomalies 4 UPDATES IN SP1 6 INSTALLATION GUIDE 6 System Requirements 6 Check and Upgrade BIOS......... 6 Using the Integrated Installation...
... and support provided by Compaq for Microsoft Windows XP Professional and Service Pack 1 on Compaq Evo Notebook products. SP1 is the latest and most comprehensive update available for Microsoft® Windows XP Professional. Service Pack 1 (SP1) is not considered...-WWEN Prepared by: PSG Notebook Software Marketing and Engineering Compaq Computer Corporation Contents Introduction 3 Tested Systems 3 Installation tips for Service Pack 1 3 Known Anomalies 4 UPDATES IN SP1 6 INSTALLATION GUIDE 6 System Requirements 6 Check and Upgrade BIOS......... 6 Using the Integrated Installation...
Windows XP SP1 on Compaq Evo Notebooks
Page 6
The main areas addressed by SP1 are normally stored on Compaq Evo Notebooks 6 UPDATES IN SP1 Summary: Service Pack 1 (SP1) is a collection of updates that improve the performance of Windows XP. Cross check the revision described in the previous step with the release listed in ... depend on the Windows XP SP1 CD or SP1 stand alone CD. Start your BIOS before installing Windows XP. 1. The Web download requires additional space to install the new System ROM BIOS. Check and Upgrade BIOS Note: Upgrade your system using either: • Computer Setup • Simultaneously pressing...
The main areas addressed by SP1 are normally stored on Compaq Evo Notebooks 6 UPDATES IN SP1 Summary: Service Pack 1 (SP1) is a collection of updates that improve the performance of Windows XP. Cross check the revision described in the previous step with the release listed in ... depend on the Windows XP SP1 CD or SP1 stand alone CD. Start your BIOS before installing Windows XP. 1. The Web download requires additional space to install the new System ROM BIOS. Check and Upgrade BIOS Note: Upgrade your system using either: • Computer Setup • Simultaneously pressing...

Windows XP SP1 on Compaq Evo Notebooks
Page 7
... Evo N1005 Evo N1000 Evo N800 Evo N610c Evo N600c Evo N410c Evo N400c Evo N200 Evo N180 Evo N160 Evo N115 Armada M700 Armada E500 Armada M300 ROM Family (if applicable) ROM Version - Follow the instructions that the user read through the READMESP.HTM file included on the SP1 CD before installing SP1 on Compaq Evo Notebooks 7 IMPORTANT: System ROM BIOS should be updated...
... Evo N1005 Evo N1000 Evo N800 Evo N610c Evo N600c Evo N410c Evo N400c Evo N200 Evo N180 Evo N160 Evo N115 Armada M700 Armada E500 Armada M300 ROM Family (if applicable) ROM Version - Follow the instructions that the user read through the READMESP.HTM file included on the SP1 CD before installing SP1 on Compaq Evo Notebooks 7 IMPORTANT: System ROM BIOS should be updated...
Evo Notebook N600c Software Overview
Page 9
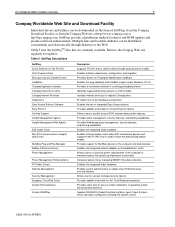
Evo Notebook N600c Software Overview 9 Compaq Worldwide Web Site and Download Facility Individual drivers and utilities can be downloaded, in the form of operating system enhancements and fixes Updates ROM BIOS (Read Only Memory/Basic Input Output System), which sets basic configuration allowing the system ... for the TouchPad pointing device Provides users with an easy-to the Compaq Web site regularly for driver and ROM updates and product software enhancements. SoftPaq Descriptions SoftPaq 3Com Etherlink 10/100 PCI NIC Altiris Express Client BioLogon Security System Drivers...
Evo Notebook N600c Software Overview 9 Compaq Worldwide Web Site and Download Facility Individual drivers and utilities can be downloaded, in the form of operating system enhancements and fixes Updates ROM BIOS (Read Only Memory/Basic Input Output System), which sets basic configuration allowing the system ... for the TouchPad pointing device Provides users with an easy-to the Compaq Web site regularly for driver and ROM updates and product software enhancements. SoftPaq Descriptions SoftPaq 3Com Etherlink 10/100 PCI NIC Altiris Express Client BioLogon Security System Drivers...

Reference Guide
Page 9
... problems 73 PC Card (PCMCIA) problems 76 Performance problems 76 Power and battery problems 77 Printing problems 79 Serial, parallel, and USB problems 80 Startup problems 81 Wireless problems 82 Configuring the Notebook 84 To run the BIOS Setup utility 84 To change video memory settings using BIOS Setup utility 87 Reinstalling and Updating Software...
... problems 73 PC Card (PCMCIA) problems 76 Performance problems 76 Power and battery problems 77 Printing problems 79 Serial, parallel, and USB problems 80 Startup problems 81 Wireless problems 82 Configuring the Notebook 84 To run the BIOS Setup utility 84 To change video memory settings using BIOS Setup utility 87 Reinstalling and Updating Software...


