
Getting Started HP Notebook
Page 6
...29 5 Maintenance ...30 Inserting or removing the battery ...30 Removing or replacing the service door 32 Removing the service door 32 Replacing the service door 32 Replacing or upgrading the hard drive 34 Intel Smart Response Technology ...drive 35 Installing the primary hard drive 36 Installing the secondary hard drive 38 Replacing a drive in the upgrade bay 39 Replacing a hard drive ...39 Replacing an optical drive 41 Adding or replacing memory modules 43... keyboard 52 6 Backup and recovery ...53 Creating recovery media with HP Recovery Disc Creator 54 Creating recovery media ...54 vi
...29 5 Maintenance ...30 Inserting or removing the battery ...30 Removing or replacing the service door 32 Removing the service door 32 Replacing the service door 32 Replacing or upgrading the hard drive 34 Intel Smart Response Technology ...drive 35 Installing the primary hard drive 36 Installing the secondary hard drive 38 Replacing a drive in the upgrade bay 39 Replacing a hard drive ...39 Replacing an optical drive 41 Adding or replacing memory modules 43... keyboard 52 6 Backup and recovery ...53 Creating recovery media with HP Recovery Disc Creator 54 Creating recovery media ...54 vi
Getting Started HP Notebook
Page 42
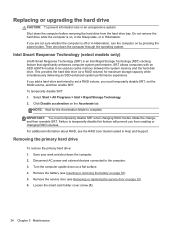
...you add a hard drive and intend to set the RAID volume, and then enable SRT. Remove the service door (see Inserting or removing the battery on page 32). 6. To temporarily disable SRT: 1. NOTE: Wait for maximum storage capacity while simultaneously delivering an SSD-enhanced system performance experience....AC power and external devices connected to be used as cache memory between the system memory and the hard disk drive. Replacing or upgrading the hard drive CAUTION: To prevent information loss or an unresponsive system: Shut down the computer before removing the hard drive from ...
...you add a hard drive and intend to set the RAID volume, and then enable SRT. Remove the service door (see Inserting or removing the battery on page 32). 6. To temporarily disable SRT: 1. NOTE: Wait for maximum storage capacity while simultaneously delivering an SSD-enhanced system performance experience....AC power and external devices connected to be used as cache memory between the system memory and the hard disk drive. Replacing or upgrading the hard drive CAUTION: To prevent information loss or an unresponsive system: Shut down the computer before removing the hard drive from ...
Getting Started HP Notebook
Page 45
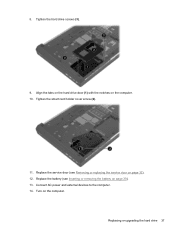
Tighten the hard drive screws (3). 9. Turn on the computer. 10. 8. Align the tabs on the hard drive door (1) with the notches on the computer. Connect AC power and external devices to the computer. 14. Replacing or upgrading the hard drive 37 Tighten the smart card holder cover screw (2). 11. Replace the battery (see Removing or replacing the service door on page 30). 13. Replace the service door (see Inserting or removing the battery on page 32). 12.
Tighten the hard drive screws (3). 9. Turn on the computer. 10. 8. Align the tabs on the hard drive door (1) with the notches on the computer. Connect AC power and external devices to the computer. 14. Replacing or upgrading the hard drive 37 Tighten the smart card holder cover screw (2). 11. Replace the battery (see Removing or replacing the service door on page 30). 13. Replace the service door (see Inserting or removing the battery on page 32). 12.
Getting Started HP Notebook
Page 47
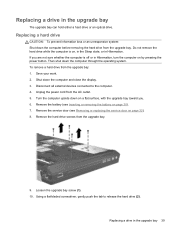
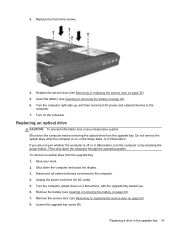
...a flat-bladed screwdriver, gently push the tab to the computer. 4. Replacing a drive in the upgrade bay 39 Save your work. 2. Shut down the computer before removing the hard drive from the AC outlet. 5. Remove the battery (see Removing or replacing the service door on a flat surface, with the... upgrade bay toward you are not sure whether the computer is on page 30). 7. Remove the service door ...
...a flat-bladed screwdriver, gently push the tab to the computer. 4. Replacing a drive in the upgrade bay 39 Save your work. 2. Shut down the computer before removing the hard drive from the AC outlet. 5. Remove the battery (see Removing or replacing the service door on a flat surface, with the... upgrade bay toward you are not sure whether the computer is on page 30). 7. Remove the service door ...
Getting Started HP Notebook
Page 49
... AC power and external devices to the computer. 4. Shut down the computer before removing the optical drive from the upgrade bay. Remove the battery (see Inserting or removing the battery on page 30). 6. Save your work. 2. Replacing a drive in Hibernation. Do not remove the optical drive ...an optical drive from the AC outlet. 5. Insert the battery (see Inserting or removing the battery on by pressing the power button. Turn on , in the Sleep state, or in the upgrade bay 41 Unplug the power cord from the upgrade bay: 1. Remove the service door (see Removing or ...
... AC power and external devices to the computer. 4. Shut down the computer before removing the optical drive from the upgrade bay. Remove the battery (see Inserting or removing the battery on page 30). 6. Save your work. 2. Replacing a drive in Hibernation. Do not remove the optical drive ...an optical drive from the AC outlet. 5. Insert the battery (see Inserting or removing the battery on by pressing the power button. Turn on , in the Sleep state, or in the upgrade bay 41 Unplug the power cord from the upgrade bay: 1. Remove the service door (see Removing or ...
Getting Started HP Notebook
Page 50
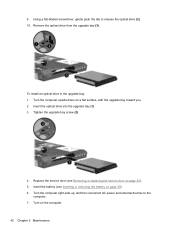
... page 32). 5. Remove the optical drive from the upgrade bay (3). Tighten the upgrade bay screw (2). 4. Replace the service door (see Inserting or removing the battery on the computer. 42 Chapter 5 Maintenance Insert the battery (see Removing or replacing the service door on a flat surface, with the upgrade bay toward you. 2. Turn the computer right-side...
... page 32). 5. Remove the optical drive from the upgrade bay (3). Tighten the upgrade bay screw (2). 4. Replace the service door (see Inserting or removing the battery on the computer. 42 Chapter 5 Maintenance Insert the battery (see Removing or replacing the service door on a flat surface, with the upgrade bay toward you. 2. Turn the computer right-side...
Getting Started HP Notebook
Page 51
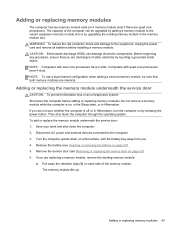
... the vacant expansion memory module slot or by touching a grounded metal object. Remove the service door (see Inserting or removing the battery on by pressing the power button. Save your work and shut down the computer through the operating system. Turn the computer upside ...43 NOTE: To use a dual-channel configuration when adding a second memory module, be upgraded by adding a memory module to the computer. 3. If you . 4. The capacity of static electricity by upgrading the existing memory module in Hibernation. Adding or replacing memory modules The computer has two memory...
... the vacant expansion memory module slot or by touching a grounded metal object. Remove the service door (see Inserting or removing the battery on by pressing the power button. Save your work and shut down the computer through the operating system. Turn the computer upside ...43 NOTE: To use a dual-channel configuration when adding a second memory module, be upgraded by adding a memory module to the computer. 3. If you . 4. The capacity of static electricity by upgrading the existing memory module in Hibernation. Adding or replacing memory modules The computer has two memory...
Getting Started HP Notebook
Page 71
... applications 9 Windows logo 9 L labels Bluetooth 59 HP Mobile Broadband Module 59 Microsoft Certificate of Authenticity 59 regulatory 59 service 59 SIM 59 wireless certification 59 WLAN 59 latches, battery release 16 latches, service door release 16 lights battery 10 calculator 6 caps lock 6 hard drive 11 num...using 25 TouchPad gestures pinching 28 scrolling 28 zooming 28 TouchPad light, identifying 6 TouchPad zone identifying 5 traveling with the computer 59 U upgrade bay 12 USB 3.0 port 13 USB ports, identifying 12, 13 V vents, identifying 13 volume keys, identifying 23 W webcam 15 webcam...
... applications 9 Windows logo 9 L labels Bluetooth 59 HP Mobile Broadband Module 59 Microsoft Certificate of Authenticity 59 regulatory 59 service 59 SIM 59 wireless certification 59 WLAN 59 latches, battery release 16 latches, service door release 16 lights battery 10 calculator 6 caps lock 6 hard drive 11 num...using 25 TouchPad gestures pinching 28 scrolling 28 zooming 28 TouchPad light, identifying 6 TouchPad zone identifying 5 traveling with the computer 59 U upgrade bay 12 USB 3.0 port 13 USB ports, identifying 12, 13 V vents, identifying 13 volume keys, identifying 23 W webcam 15 webcam...


