HP Notebook Hard Drives & Solid State Drives Identifying, Preventing, Diagnosing and Recovering from Drive Failures Care and Ma
Page 3
...an incomplete write to your HDD manufacturer for low-level format utilities or download the HP File Sanitizer for HP ProtectTools, located at the following website: http://h20000.www2.hp.com/bizsupport/TechSupport/SoftwareDescription.jsp?lang=en&cc=us&pro dTypeId=321957&prodSeriesId=4138624&...next read errors. S.M.A.R.T. For more information on S.M.A.R.T attribute checking, refer to the "Client Management Software" section in this area as blue screens, application lockups, and other occurrences are caused by a number of major hard drive manufacturers to the hard drive on the hard drive....
...an incomplete write to your HDD manufacturer for low-level format utilities or download the HP File Sanitizer for HP ProtectTools, located at the following website: http://h20000.www2.hp.com/bizsupport/TechSupport/SoftwareDescription.jsp?lang=en&cc=us&pro dTypeId=321957&prodSeriesId=4138624&...next read errors. S.M.A.R.T. For more information on S.M.A.R.T attribute checking, refer to the "Client Management Software" section in this area as blue screens, application lockups, and other occurrences are caused by a number of major hard drive manufacturers to the hard drive on the hard drive....
HP Notebook Reference Guide
Page 26
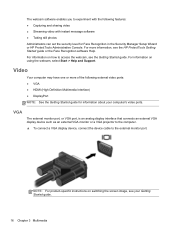
Video Your computer may have one or more information, see the HP ProtectTools Getting Started guide or the Face Recognition software Help. For more of the following features: ● Capturing and sharing video ● Streaming video ... Multimedia Interface) ● DisplayPort NOTE: See the Getting Started guide for Face Recognition in the Security Manager Setup Wizard or HP ProtectTools Administrative Console. For information on switching the screen image, see the Getting Started guide. For information on how to the external monitor port. The webcam software enables you to...
Video Your computer may have one or more information, see the HP ProtectTools Getting Started guide or the Face Recognition software Help. For more of the following features: ● Capturing and sharing video ● Streaming video ... Multimedia Interface) ● DisplayPort NOTE: See the Getting Started guide for Face Recognition in the Security Manager Setup Wizard or HP ProtectTools Administrative Console. For information on switching the screen image, see the Getting Started guide. For information on how to the external monitor port. The webcam software enables you to...
HP Notebook Reference Guide
Page 27
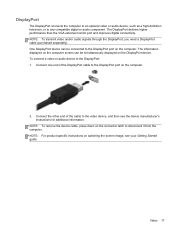
... cable to disconnect it from the computer. NOTE: For product-specific instructions on the DisplayPort device. The information displayed on the computer screen can be simultaneously displayed on switching the screen image, see the device manufacturer's instructions for additional information. Video 17 The DisplayPort delivers higher performance than the VGA external monitor...
... cable to disconnect it from the computer. NOTE: For product-specific instructions on the DisplayPort device. The information displayed on the computer screen can be simultaneously displayed on switching the screen image, see the device manufacturer's instructions for additional information. Video 17 The DisplayPort delivers higher performance than the VGA external monitor...
HP Notebook Reference Guide
Page 28
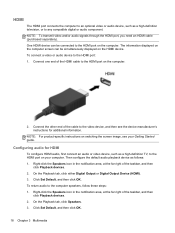
...default audio playback device as a high-definition TV, to the HDMI port on your Getting Started guide. The information displayed on the computer screen can be simultaneously displayed on the computer. Click Set Default, and then click OK. Connect one end of the cable to the HDMI port... on switching the screen image, see the device manufacturer's instructions for HDMI To configure HDMI audio, first connect an audio or video device, such as follows: 1. ...
...default audio playback device as a high-definition TV, to the HDMI port on your Getting Started guide. The information displayed on the computer screen can be simultaneously displayed on the computer. Click Set Default, and then click OK. Connect one end of the cable to the HDMI port... on switching the screen image, see the device manufacturer's instructions for HDMI To configure HDMI audio, first connect an audio or video device, such as follows: 1. ...
HP Notebook Reference Guide
Page 30
... before shutdown is in the Sleep state or in the sequence provided: ● Press ctrl+alt+delete, and then click the Power button on the screen. ● Press and hold the power button on the computer for at least 5 seconds. ● Disconnect the computer from external power. ● On models with...
... before shutdown is in the Sleep state or in the sequence provided: ● Press ctrl+alt+delete, and then click the Power button on the screen. ● Press and hold the power button on the computer for at least 5 seconds. ● Disconnect the computer from external power. ● On models with...
HP Notebook Reference Guide
Page 31
... on the hard drive and the computer turns off. Power settings and timeouts can be changed in Hibernation. If the computer is saved to the screen as it was before your work will return to a hibernation file on external power, or when the battery reaches a critical battery level. When ... down button, and then click Sleep. To exit Sleep: ● Briefly press the power button. ● If the display is saved to the screen. CAUTION: To reduce the risk of possible audio and video degradation, loss of audio or video playback functionality, or loss of inactivity when running on...
... on the hard drive and the computer turns off. Power settings and timeouts can be changed in Hibernation. If the computer is saved to the screen as it was before your work will return to a hibernation file on external power, or when the battery reaches a critical battery level. When ... down button, and then click Sleep. To exit Sleep: ● Briefly press the power button. ● If the display is saved to the screen. CAUTION: To reduce the risk of possible audio and video degradation, loss of audio or video playback functionality, or loss of inactivity when running on...
HP Notebook Reference Guide
Page 32
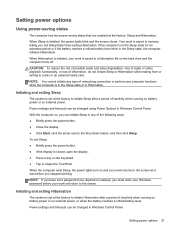
... Security > Power Options. 2. Using power plans A power plan is running on wakeup, you must enter your Windows password before your work will return to the screen. Viewing the current power plan Use any of system settings that manages how the computer uses power. Customizing power plans 1. NOTE: If you have set... also displays a message if the battery has reached a low or critical battery level. To initiate Hibernation: ▲ Click Start, click the arrow next to the screen where you conserve power or maximize performance.
... Security > Power Options. 2. Using power plans A power plan is running on wakeup, you must enter your Windows password before your work will return to the screen. Viewing the current power plan Use any of system settings that manages how the computer uses power. Customizing power plans 1. NOTE: If you have set... also displays a message if the battery has reached a low or critical battery level. To initiate Hibernation: ▲ Click Start, click the arrow next to the screen where you conserve power or maximize performance.
HP Notebook Reference Guide
Page 36
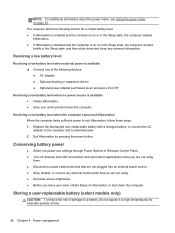
...and exit modem applications when you are not using them. ● Disconnect unused external devices that you are not using. ● Decrease screen brightness. ● Before you leave your work , initiate Sleep or Hibernation, or shut down and loses any external media cards that ...computer takes the following devices: ● AC adapter ● Optional docking or expansion device ● Optional power adapter purchased as an accessory from HP Resolving a low battery level when no power source is on page 22. Storing a user-replaceable battery (select models only) CAUTION: To reduce...
...and exit modem applications when you are not using them. ● Disconnect unused external devices that you are not using. ● Decrease screen brightness. ● Before you leave your work , initiate Sleep or Hibernation, or shut down and loses any external media cards that ...computer takes the following devices: ● AC adapter ● Optional docking or expansion device ● Optional power adapter purchased as an accessory from HP Resolving a low battery level when no power source is on page 22. Storing a user-replaceable battery (select models only) CAUTION: To reduce...
HP Notebook Reference Guide
Page 39
... select Switchable Graphics. NOTE: For more added Graphics Processing Units (GPUs)), you to either switchable graphics or dual graphics. ● Switchable graphics-Supported by full-screen applications that use DirectX version 10 or 11. AMD Trinity series A4 APUs do not support dual graphics. You can switch between Performance mode and...
... select Switchable Graphics. NOTE: For more added Graphics Processing Units (GPUs)), you to either switchable graphics or dual graphics. ● Switchable graphics-Supported by full-screen applications that use DirectX version 10 or 11. AMD Trinity series A4 APUs do not support dual graphics. You can switch between Performance mode and...

HP Notebook Reference Guide
Page 40
.... NOTE: Dual graphics systems only support automatic selection based on power requirements (Dynamic scheme), and automatically assign Performance mode or Power Saving mode for full-screen applications that use DirectX version 10 or 11. NOTE: For more information about DirectX, see the AMD software Help. 30 Chapter 4 Power management For more...
.... NOTE: Dual graphics systems only support automatic selection based on power requirements (Dynamic scheme), and automatically assign Performance mode or Power Saving mode for full-screen applications that use DirectX version 10 or 11. NOTE: For more information about DirectX, see the AMD software Help. 30 Chapter 4 Power management For more...
HP Notebook Reference Guide
Page 42
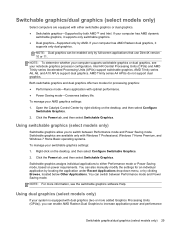
... card. 2. Like standard PC Cards, ExpressCards are supplied by the ExpressCard manufacturer to safely remove the digital card. 1. Click the remove hardware icon in on -screen instructions. 3. Removing a digital card CAUTION: To reduce the risk of loss of the taskbar. Save your operating system. ● Do not install additional software, such...
... card. 2. Like standard PC Cards, ExpressCards are supplied by the ExpressCard manufacturer to safely remove the digital card. 1. Click the remove hardware icon in on -screen instructions. 3. Removing a digital card CAUTION: To reduce the risk of loss of the taskbar. Save your operating system. ● Do not install additional software, such...

HP Notebook Reference Guide
Page 44
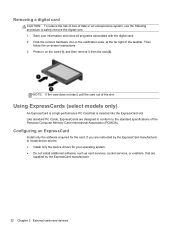
... reduce the risk of loss of the taskbar, and then follow the on the ExpressCard (1) to unlock it. Click the remove hardware icon in on -screen instructions. 3. A smart card is needed to gain access to safely remove the ExpressCard. 1. Release and remove the ExpressCard: a. Pull the ExpressCard out of the microchip...
... reduce the risk of loss of the taskbar, and then follow the on the ExpressCard (1) to unlock it. Click the remove hardware icon in on -screen instructions. 3. A smart card is needed to gain access to safely remove the ExpressCard. 1. Release and remove the ExpressCard: a. Pull the ExpressCard out of the microchip...
HP Notebook Reference Guide
Page 45
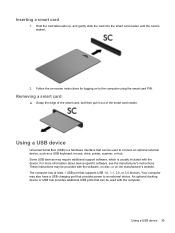
... card reader. Using a USB device Universal Serial Bus (USB) is a hardware interface that provides power to an external device. Inserting a smart card 1. Follow the on-screen instructions for logging on the manufacturer's website. For more information about device-specific software, see the manufacturer's instructions. Your computer may also have a USB charging...
... card reader. Using a USB device Universal Serial Bus (USB) is a hardware interface that provides power to an external device. Inserting a smart card 1. Follow the on-screen instructions for logging on the manufacturer's website. For more information about device-specific software, see the manufacturer's instructions. Your computer may also have a USB charging...
HP Notebook Reference Guide
Page 46
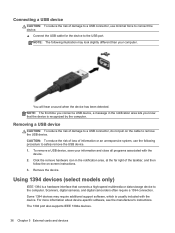
Removing a USB device CAUTION: To reduce the risk of damage to a USB connector, do not pull on -screen instructions. 3. To remove a USB device, save your computer. You will hear a sound when the device has been detected. NOTE: The first time you connect a USB ...
Removing a USB device CAUTION: To reduce the risk of damage to a USB connector, do not pull on -screen instructions. 3. To remove a USB device, save your computer. You will hear a sound when the device has been detected. NOTE: The first time you connect a USB ...
HP Notebook Reference Guide
Page 47
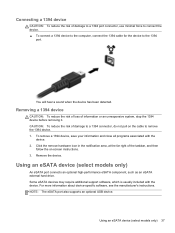
... software, which is usually included with the device. 2. Remove the device. CAUTION: To reduce the risk of damage to a 1394 connector, do not pull on -screen instructions. 3. You will hear a sound when the device has been detected.
... software, which is usually included with the device. 2. Remove the device. CAUTION: To reduce the risk of damage to a 1394 connector, do not pull on -screen instructions. 3. You will hear a sound when the device has been detected.
HP Notebook Reference Guide
Page 48
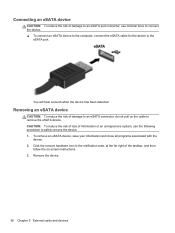
... procedure to safely remove the device. 1. Connecting an eSATA device CAUTION: To reduce the risk of damage to an eSATA connector, do not pull on -screen instructions. 3. CAUTION: To reduce the risk of loss of the taskbar, and then follow the on the cable to the eSATA port. Remove the device...
... procedure to safely remove the device. 1. Connecting an eSATA device CAUTION: To reduce the risk of damage to an eSATA connector, do not pull on -screen instructions. 3. CAUTION: To reduce the risk of loss of the taskbar, and then follow the on the cable to the eSATA port. Remove the device...
HP Notebook Reference Guide
Page 52
... a drive carefully; Observe these precautions: ● Before you are unsure whether the computer is connected to an external hard drive, initiate Sleep and allow the screen to liquids. The write process is sensitive to vibration. ● When the battery is writing to magnetic fields. Do not spray the drive with cleaning...
... a drive carefully; Observe these precautions: ● Before you are unsure whether the computer is connected to an external hard drive, initiate Sleep and allow the screen to liquids. The write process is sensitive to vibration. ● When the battery is writing to magnetic fields. Do not spray the drive with cleaning...
HP Notebook Reference Guide
Page 53
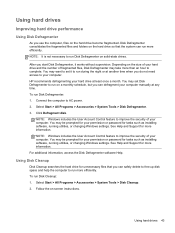
... hard drive so that you do not need access to AC power. 2. To run Disk Cleanup: 1. For additional information, access the Disk Defragmenter software Help. HP recommends defragmenting your computer. Select Start > All Programs > Accessories > System Tools > Disk Defragmenter. 3. NOTE: Windows includes the User Account Control feature to complete. See Help... space and help the computer to run more information. See Help and Support for more efficiently. Disk Defragmenter consolidates the fragmented files and folders on -screen instructions.
... hard drive so that you do not need access to AC power. 2. To run Disk Cleanup: 1. For additional information, access the Disk Defragmenter software Help. HP recommends defragmenting your computer. Select Start > All Programs > Accessories > System Tools > Disk Defragmenter. 3. NOTE: Windows includes the User Account Control feature to complete. See Help... space and help the computer to run more information. See Help and Support for more efficiently. Disk Defragmenter consolidates the fragmented files and folders on -screen instructions.
HP Notebook Reference Guide
Page 63
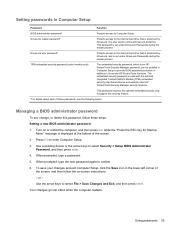
... password (select models only) The embedded security password, which is set , change, or delete this security feature. *For details about each of the screen. 2. This password is an HP ProtectTools Security Manager password, can be enabled in Computer Setup to provide BIOS password protection in addition to Computer Setup. Managing a BIOS administrator...
... password (select models only) The embedded security password, which is set , change, or delete this security feature. *For details about each of the screen. 2. This password is an HP ProtectTools Security Manager password, can be enabled in Computer Setup to provide BIOS password protection in addition to Computer Setup. Managing a BIOS administrator...
HP Notebook Reference Guide
Page 64
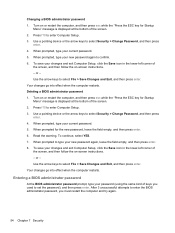
...press enter. 4. When prompted, type your changes and exit Computer Setup, click the Save icon in the lower-left corner of the screen, and then follow the on -screen instructions. - or - Use the arrow keys to confirm. 6. Use the arrow keys to enter Computer Setup. 3. Changing a BIOS... At the BIOS administrator password prompt, type your changes and exit Computer Setup, click the Save icon in the lower-left corner of the screen. 2. After 3 unsuccessful attempts to enter the BIOS administrator password, you used to set the password), and then press enter. Deleting a ...
...press enter. 4. When prompted, type your changes and exit Computer Setup, click the Save icon in the lower-left corner of the screen, and then follow the on -screen instructions. - or - Use the arrow keys to confirm. 6. Use the arrow keys to enter Computer Setup. 3. Changing a BIOS... At the BIOS administrator password prompt, type your changes and exit Computer Setup, click the Save icon in the lower-left corner of the screen. 2. After 3 unsuccessful attempts to enter the BIOS administrator password, you used to set the password), and then press enter. Deleting a ...


