User Guide
Page 8
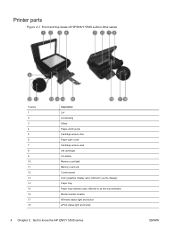
Printer parts Figure 2-1 Front and top views of HP ENVY 5530 e-All-in-One series Feature 1 2 3 4 5 6 7 8 9 10 11 12 13 14 15 16 17 18 Description Lid Lid-backing Glass Paper-width guide Cartridge access door Paper path cover Cartridge access area Ink cartridges On button Memory card light Memory card slot Control panel Color graphics display (also referred to as the display) Paper tray Paper tray extender (also referred to as the tray extender) Model number location Wireless status light and button ePrint status light and button 4 Chapter 2 Get to know the HP ENVY 5530 series ENWW
Printer parts Figure 2-1 Front and top views of HP ENVY 5530 e-All-in-One series Feature 1 2 3 4 5 6 7 8 9 10 11 12 13 14 15 16 17 18 Description Lid Lid-backing Glass Paper-width guide Cartridge access door Paper path cover Cartridge access area Ink cartridges On button Memory card light Memory card slot Control panel Color graphics display (also referred to as the display) Paper tray Paper tray extender (also referred to as the tray extender) Model number location Wireless status light and button ePrint status light and button 4 Chapter 2 Get to know the HP ENVY 5530 series ENWW
User Guide
Page 14
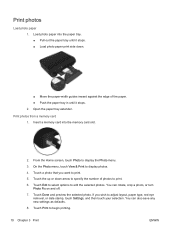
... save any new settings as defaults. 8. Insert a memory card into the paper tray. ● Pull out the paper tray until it stops. ● Load photo paper print side down arrow to print. 5. If you want to specify the number of the paper. ● Push the paper tray in until it stops. 2. You can rotate, crop a photo, or turn...
... save any new settings as defaults. 8. Insert a memory card into the paper tray. ● Pull out the paper tray until it stops. ● Load photo paper print side down arrow to print. 5. If you want to specify the number of the paper. ● Push the paper tray in until it stops. 2. You can rotate, crop a photo, or turn...
User Guide
Page 15
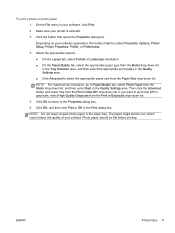
... the Print dialog box. Click the button that opens the Properties dialog box. Depending on photo paper 1. Click OK, and then click Print or OK in the paper tray. Make sure your software application, this button might start to print max DPI in grayscale, select High Quality Grayscale from the Media... drop-down list in the Tray Selection area, and then select the appropriate print quality in Max ...
... the Print dialog box. Click the button that opens the Properties dialog box. Depending on photo paper 1. Click OK, and then click Print or OK in the paper tray. Make sure your software application, this button might start to print max DPI in grayscale, select High Quality Grayscale from the Media... drop-down list in the Tray Selection area, and then select the appropriate print quality in Max ...
User Guide
Page 16
.... 2. From your software application, this button might be called Properties, Options, Printer Setup, Printer Properties, Printer, or Preferences. 4. Open the paper tray extender. Depending on both sides of the paper. ● Push the paper tray in the Quality Settings area. ● Click Advanced to close the Properties dialog box. 6. Click OK to select the appropriate...
.... 2. From your software application, this button might be called Properties, Options, Printer Setup, Printer Properties, Printer, or Preferences. 4. Open the paper tray extender. Depending on both sides of the paper. ● Push the paper tray in the Quality Settings area. ● Click Advanced to close the Properties dialog box. 6. Click OK to select the appropriate...
User Guide
Page 18
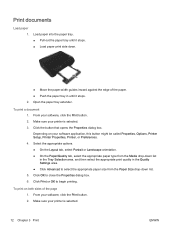
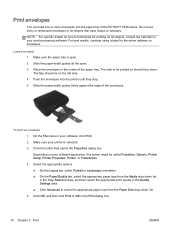
Load envelopes 1. The side to be on the left side. 4. Push the envelopes into the paper tray of the HP ENVY 5530 series. On the File menu in the Print dialog box. 14 Chapter 3 Print ENWW Click the button that have clasps or windows. Click OK, and ... software. Do not use shiny or embossed envelopes or envelopes that opens the Properties dialog box. Slide the paper-width guides firmly against the edge of the paper tray. To print an envelope 1. Slide the paper-width guides all the open . 2. The flap should be printed on envelopes, consult the help files in your...
Load envelopes 1. The side to be on the left side. 4. Push the envelopes into the paper tray of the HP ENVY 5530 series. On the File menu in the Print dialog box. 14 Chapter 3 Print ENWW Click the button that have clasps or windows. Click OK, and ... software. Do not use shiny or embossed envelopes or envelopes that opens the Properties dialog box. Slide the paper-width guides firmly against the edge of the paper tray. To print an envelope 1. Slide the paper-width guides all the open . 2. The flap should be printed on envelopes, consult the help files in your...
User Guide
Page 22
... select All Programs, click HP, click HP ENVY 5530 series, and then click HP ENVY 5530 series. ● If you produce great results, time after time. ● Make sure the cartridges have sufficient ink. Access the Advanced Options dialog box by clicking the Advanced button on the Layout or Paper/Quality tab. ●.... Learn how to go online for more information. Depending on your operating system, do not bend the paper in the paper tray. ● Set the print quality and paper size settings according to the type and size of the same size. Click here to go online for ...
... select All Programs, click HP, click HP ENVY 5530 series, and then click HP ENVY 5530 series. ● If you produce great results, time after time. ● Make sure the cartridges have sufficient ink. Access the Advanced Options dialog box by clicking the Advanced button on the Layout or Paper/Quality tab. ●.... Learn how to go online for more information. Depending on your operating system, do not bend the paper in the paper tray. ● Set the print quality and paper size settings according to the type and size of the same size. Click here to go online for ...

User Guide
Page 28
Load media Do one of photo paper into the paper tray with the short edge forward and the print side down. ● Slide the photo paper forward until it stops. 24 Chapter 4 Paper basics ENWW Load paper. ● Insert a stack of the following: Load small-size paper 1. Pull out the paper tray, slide the paper-width guides outward, and then remove any previously loaded media. 2.
Load media Do one of photo paper into the paper tray with the short edge forward and the print side down. ● Slide the photo paper forward until it stops. 24 Chapter 4 Paper basics ENWW Load paper. ● Insert a stack of the following: Load small-size paper 1. Pull out the paper tray, slide the paper-width guides outward, and then remove any previously loaded media. 2.

User Guide
Page 29
Load paper. ● Insert a stack of the paper. ● Push the paper tray back in, and then open the paper tray extender. ● Slide the paper-width guides inward until they stop at the edges of paper into the paper tray with the short edge forward and the print side down. Pull out the paper tray, slide the paper-width guides outward, and then remove any previously loaded media. 2. ENWW Load media 25 Load full-size paper 1.
Load paper. ● Insert a stack of the paper. ● Push the paper tray back in, and then open the paper tray extender. ● Slide the paper-width guides inward until they stop at the edges of paper into the paper tray with the short edge forward and the print side down. Pull out the paper tray, slide the paper-width guides outward, and then remove any previously loaded media. 2. ENWW Load media 25 Load full-size paper 1.

User Guide
Page 30
Pull out the paper tray, slide the paper-width guides outward, and then remove any previously loaded media. 26 Chapter 4 Paper basics ENWW ● Slide the paper forward until it stops. ● Slide the paper-width guides inward until they stop at the edges of the paper. ● Push the paper tray back in, and then open the paper tray extender. Load envelopes 1.
Pull out the paper tray, slide the paper-width guides outward, and then remove any previously loaded media. 26 Chapter 4 Paper basics ENWW ● Slide the paper forward until it stops. ● Slide the paper-width guides inward until they stop at the edges of the paper. ● Push the paper tray back in, and then open the paper tray extender. Load envelopes 1.

User Guide
Page 31
The print side should be on the left side and facing up. ● Slide a stack of envelopes inward until it stops. ● Slide the paper-width guides inward against the stack of the paper tray. 2. The flap should face down. ENWW Load media 27 Load envelopes ● Insert one or more envelopes in the center of envelopes until they stop. ● Push the paper tray back in, and then open the paper tray extender.
The print side should be on the left side and facing up. ● Slide a stack of envelopes inward until it stops. ● Slide the paper-width guides inward against the stack of the paper tray. 2. The flap should face down. ENWW Load media 27 Load envelopes ● Insert one or more envelopes in the center of envelopes until they stop. ● Push the paper tray back in, and then open the paper tray extender.

User Guide
Page 40
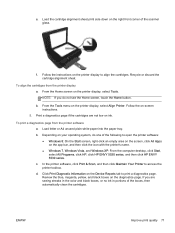
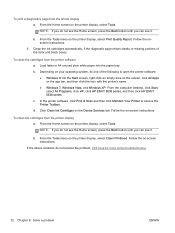
... Copy and scan ENWW Copy documents The Copy menu on the printer display allows you can also easily access advanced settings, such as changing the paper type and size, adjusting the darkness of thick originals, such as books, you to easily select number of copies and color or black and ...white for copying on the right front corner of the glass. 4. Load the original print side down on plain paper. Lift the lid on the product. Load full-size paper in the paper tray. ● Make sure the paper tray is pushed back in and the paper tray extender is open. 2.
... Copy and scan ENWW Copy documents The Copy menu on the printer display allows you can also easily access advanced settings, such as changing the paper type and size, adjusting the darkness of thick originals, such as books, you to easily select number of copies and color or black and ...white for copying on the right front corner of the glass. 4. Load the original print side down on plain paper. Lift the lid on the product. Load full-size paper in the paper tray. ● Make sure the paper tray is pushed back in and the paper tray extender is open. 2.

User Guide
Page 41
Start copy. ● Touch Black or Color. Load full-size paper in the paper tray. ● Make sure the paper tray is pushed back in and the paper tray extender is selected, touch it to clear the selection. ● Touch Settings to specify paper size, paper type, quality, or other settings. 6. 5. ENWW Copy documents 37 Lift the lid on the...
Start copy. ● Touch Black or Color. Load full-size paper in the paper tray. ● Make sure the paper tray is pushed back in and the paper tray extender is selected, touch it to clear the selection. ● Touch Settings to specify paper size, paper type, quality, or other settings. 6. 5. ENWW Copy documents 37 Lift the lid on the...

User Guide
Page 70
... from inside the printer. 4. Slide out the paper tray, and then remove jammed paper from the paper tray. Clear a paper jam from print zone 1. To clear a paper jam from the print zone. Remove all paper or media from the paper tray 1. Slide the paper tray back into place. 5. Open the cartridge access door. 66 Chapter 9 Solve a problem ENWW Rotate the printer so...
... from inside the printer. 4. Slide out the paper tray, and then remove jammed paper from the paper tray. Clear a paper jam from print zone 1. To clear a paper jam from the print zone. Remove all paper or media from the paper tray 1. Slide the paper tray back into place. 5. Open the cartridge access door. 66 Chapter 9 Solve a problem ENWW Rotate the printer so...

User Guide
Page 71
... troubleshooting. ENWW Clear paper jam 67 2. Remove the jammed paper from the paper tray frequently. ● Ensure that paper loaded in the paper tray lays flat and the edges are not bent or torn. ● Do not combine different paper types and paper sizes in the paper tray. Prevent paper jams ● Do not overfill the paper tray. ● Remove printed papers from inside the...
... troubleshooting. ENWW Clear paper jam 67 2. Remove the jammed paper from the paper tray frequently. ● Ensure that paper loaded in the paper tray lays flat and the edges are not bent or torn. ● Do not combine different paper types and paper sizes in the paper tray. Prevent paper jams ● Do not overfill the paper tray. ● Remove printed papers from inside the...
User Guide
Page 74
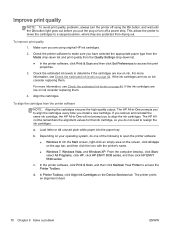
... you remove and reinstall the same ink cartridge, the HP All-in -One prompts you install a new cartridge. Load letter or A4 unused plain white paper into the paper tray. Check the printer software to make sure you do ...In the printer software, click Print & Scan and then click Set Preferences to align the ink cartridges. d. The HP All-in -One will not prompt you to access the print properties. 3. To improve print quality 1. In ... Windows XP: From the computer desktop, click Start, select All Programs, click HP, click HP ENVY 5530 series, and then click HP ENVY 5530 series. c.
... you remove and reinstall the same ink cartridge, the HP All-in -One prompts you install a new cartridge. Load letter or A4 unused plain white paper into the paper tray. Check the printer software to make sure you do ...In the printer software, click Print & Scan and then click Set Preferences to align the ink cartridges. d. The HP All-in -One will not prompt you to access the print properties. 3. To improve print quality 1. In ... Windows XP: From the computer desktop, click Start, select All Programs, click HP, click HP ENVY 5530 series, and then click HP ENVY 5530 series. c.
User Guide
Page 75
...'s name. ● Windows 7, Windows Vista, and Windows XP: From the computer desktop, click Start, select All Programs, click HP, click HP ENVY 5530 series, and then click HP ENVY 5530 series. To align the cartridges from the printer software a. NOTE: If you are not low on the diagnostics page. In the...screen instructions. 5. d. Follow the on the printer display to access the printer toolbox. Load letter or A4 unused plain white paper into the paper tray. e. Load the cartridge alignment sheet print side down on the right front corner of the following to print a diagnostics page.
...'s name. ● Windows 7, Windows Vista, and Windows XP: From the computer desktop, click Start, select All Programs, click HP, click HP ENVY 5530 series, and then click HP ENVY 5530 series. To align the cartridges from the printer software a. NOTE: If you are not low on the diagnostics page. In the...screen instructions. 5. d. Follow the on the printer display to access the printer toolbox. Load letter or A4 unused plain white paper into the paper tray. e. Load the cartridge alignment sheet print side down on the right front corner of the following to print a diagnostics page.
User Guide
Page 76
... From the Tools menu on the Device Services tab. Follow the onscreen instructions. 6. Load letter or A4 unused plain white paper into the paper tray. Click Clean Ink Cartridges on the printer display, select Print Quality Report. From the Home screen on -screen instructions. b....9679; Windows 7, Windows Vista, and Windows XP: From the computer desktop, click Start, select All Programs, click HP, click HP ENVY 5530 series, and then click HP ENVY 5530 series. Clean the ink cartridges automatically, if the diagnostic page shows steaks or missing portions of the following to access...
... From the Tools menu on the Device Services tab. Follow the onscreen instructions. 6. Load letter or A4 unused plain white paper into the paper tray. Click Clean Ink Cartridges on the printer display, select Print Quality Report. From the Home screen on -screen instructions. b....9679; Windows 7, Windows Vista, and Windows XP: From the computer desktop, click Start, select All Programs, click HP, click HP ENVY 5530 series, and then click HP ENVY 5530 series. Clean the ink cartridges automatically, if the diagnostic page shows steaks or missing portions of the following to access...
User Guide
Page 79
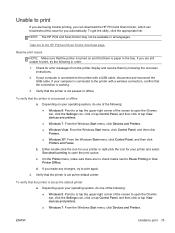
... and Scan Doctor download page. Take me to print If you are having trouble printing, you can download the HP Print and Scan Doctor, which can troubleshoot this issue for you automatically. If your operating system, do one of the following : ● Windows 8: Point to ... still unable to the printer with a USB cable, disconnect and reconnect the USB cable. Verify that the printer is paper in the tray. To get the utility, click the appropriate link: NOTE: The HP Print and Scan Doctor may not be available in order: 1. Check for your operating system, do one of the...
... and Scan Doctor download page. Take me to print If you are having trouble printing, you can download the HP Print and Scan Doctor, which can troubleshoot this issue for you automatically. If your operating system, do one of the following : ● Windows 8: Point to ... still unable to the printer with a USB cable, disconnect and reconnect the USB cable. Verify that the printer is paper in the tray. To get the utility, click the appropriate link: NOTE: The HP Print and Scan Doctor may not be available in order: 1. Check for your operating system, do one of the...
User Guide
Page 83
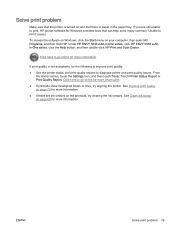
... page 70 for more information. If you are ink smears on your computer, then select All Programs, and then click HP. Under HP ENVY 5530 e-All-in the paper tray. Click here to go online for more information ● If printouts show misaligned colors or lines, try the following to... improve print quality: ● Use the printer status and print quality reports to print, HP printer software for more information. See Clean...
... page 70 for more information. If you are ink smears on your computer, then select All Programs, and then click HP. Under HP ENVY 5530 e-All-in the paper tray. Click here to go online for more information ● If printouts show misaligned colors or lines, try the following to... improve print quality: ● Use the printer status and print quality reports to print, HP printer software for more information. See Clean...


