HP Pavilion dv6 Entertainment PC - Maintenance and Service Guide
Page 16
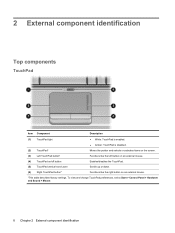
... Component Description (1) TouchPad light ● White: TouchPad is enabled. ● Amber: TouchPad is disabled. (2) TouchPad* Moves the pointer and selects or activates items on the screen. (3) Left TouchPad button* Functions like the left button on an external mouse. (4) TouchPad on/off button Enables/disables the TouchPad. (5) TouchPad vertical scroll zone Scrolls...
... Component Description (1) TouchPad light ● White: TouchPad is enabled. ● Amber: TouchPad is disabled. (2) TouchPad* Moves the pointer and selects or activates items on the screen. (3) Left TouchPad button* Functions like the left button on an external mouse. (4) TouchPad on/off button Enables/disables the TouchPad. (5) TouchPad vertical scroll zone Scrolls...

HP Pavilion dv6 Entertainment PC - Maintenance and Service Guide
Page 117
...the lower-left corner of component replacement or printed wiring board modification may void any printed wiring board. Open the Setup Utility by HP must repair this equipment. Improper repairs can be used even when your Windows operating system is displayed, press f10. The utility ... or modify any warranty or exchange allowances. While the "Press the ESC key for startup, security, and other preferences. Any indication of the screen, press esc. 2. Starting the Setup Utility The Setup Utility is a ROM-based information and customization utility that can create a safety hazard. NOTE...
...the lower-left corner of component replacement or printed wiring board modification may void any printed wiring board. Open the Setup Utility by HP must repair this equipment. Improper repairs can be used even when your Windows operating system is displayed, press f10. The utility ... or modify any warranty or exchange allowances. While the "Press the ESC key for startup, security, and other preferences. Any indication of the screen, press esc. 2. Starting the Setup Utility The Setup Utility is a ROM-based information and customization utility that can create a safety hazard. NOTE...

HP Pavilion dv6 Entertainment PC - Maintenance and Service Guide
Page 118
... the ESC key for example an Enable/Disable field, use the arrow keys. ● To choose an item in the lower-left corner of the screen, press esc. Use the arrow keys to select System Configuration > Language, and then press enter. 3. Navigating and selecting in the lower-left corner ...of the screen, press f10. - or - When the Startup Menu is not already running , begin at step 2. 1. To save your language selected is not Windows based, ...
... the ESC key for example an Enable/Disable field, use the arrow keys. ● To choose an item in the lower-left corner of the screen, press esc. Use the arrow keys to select System Configuration > Language, and then press enter. 3. Navigating and selecting in the lower-left corner ...of the screen, press f10. - or - When the Startup Menu is not already running , begin at step 2. 1. To save your language selected is not Windows based, ...

HP Pavilion dv6 Entertainment PC - Maintenance and Service Guide
Page 119
... ESC key for Startup Menu" message is already running , begin at step 1. If the Setup Utility is displayed in the lower-left corner of the screen, press f10. - While the "Press the ESC key for Startup Menu" message is not open , begin at step 2. 1. When the Setup Confirmation is... running , begin at step 2. 1. While the "Press the ESC key for Startup Menu" message is displayed in the lower-left corner of the screen, press esc. NOTE: Your password, security, and language settings are not visible, press esc to return to select Exit > Exit Saving Changes, and...
... ESC key for Startup Menu" message is already running , begin at step 1. If the Setup Utility is displayed in the lower-left corner of the screen, press f10. - While the "Press the ESC key for Startup Menu" message is not open , begin at step 2. 1. When the Setup Confirmation is... running , begin at step 2. 1. While the "Press the ESC key for Startup Menu" message is displayed in the lower-left corner of the screen, press esc. NOTE: Your password, security, and language settings are not visible, press esc to return to select Exit > Exit Saving Changes, and...

HP Pavilion dv6 Entertainment PC - Maintenance and Service Guide
Page 154
...discs, such as CD-RW, DVD±RW, double-layer DVD±RW, and BD-RE (rewritable Blu-ray) discs, are operating the computer on -screen instructions. 146 Chapter 8 Backup and Recovery Select Start > All Programs > Recovery Manager > Recovery Manager. NOTE: If you are not compatible with the Recovery ... instability. If you use an optional external optical drive (purchased separately) to create recovery discs, or you can restore your computer from the HP Web site. All these discs carefully and keep them in a safe place. Click Advanced Options. Creating recovery discs NOTE...
...discs, such as CD-RW, DVD±RW, double-layer DVD±RW, and BD-RE (rewritable Blu-ray) discs, are operating the computer on -screen instructions. 146 Chapter 8 Backup and Recovery Select Start > All Programs > Recovery Manager > Recovery Manager. NOTE: If you are not compatible with the Recovery ... instability. If you use an optional external optical drive (purchased separately) to create recovery discs, or you can restore your computer from the HP Web site. All these discs carefully and keep them in a safe place. Click Advanced Options. Creating recovery discs NOTE...

HP Pavilion dv6 Entertainment PC - Maintenance and Service Guide
Page 155
... folder periodically. ● Back up templates stored in their associated programs. ● Save customized settings in a window, toolbar, or menu bar by taking a screen shot of your hard drive at a specific point in time. You can be a time-saver if you have to reset your information 147 The... screen shot can then recover back to your system files and settings. b. Using system restore points When you want to reverse subsequent changes made to...
... folder periodically. ● Back up templates stored in their associated programs. ● Save customized settings in a window, toolbar, or menu bar by taking a screen shot of your hard drive at a specific point in time. You can be a time-saver if you have to reset your information 147 The... screen shot can then recover back to your system files and settings. b. Using system restore points When you want to reverse subsequent changes made to...

HP Pavilion dv6 Entertainment PC - Maintenance and Service Guide
Page 156
In the left pane, click System protection. 3. Click the System Protection tab. 4. Follow the on -screen instructions. Under Automatic restore points, select the disk for which you can reverse the restoration. Follow the on -screen instructions. 148 Chapter 8 Backup and Recovery Click the System Restore button, and then click Next. Click Create. Restore...
In the left pane, click System protection. 3. Click the System Protection tab. 4. Follow the on -screen instructions. Under Automatic restore points, select the disk for which you can reverse the restoration. Follow the on -screen instructions. 148 Chapter 8 Backup and Recovery Click the System Restore button, and then click Next. Click Create. Restore...
HP Pavilion dv6 Entertainment PC - Maintenance and Service Guide
Page 157
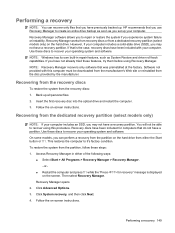
...for recovery" message is the case, recovery discs have a recovery partition. Click Advanced Options. 3. Follow the on -screen instructions. Performing a recovery NOTE: You can perform a recovery from the partition on the hard drive from the recovery discs...recovery partition (select models only) NOTE: If your computer. Use these steps: 1. Follow the on -screen instructions. Use these features, try them before using this computer must be able to create an entire drive ... the system from the disc provided by the manufacturer. HP recommends that you have a partition.
...for recovery" message is the case, recovery discs have a recovery partition. Click Advanced Options. 3. Follow the on -screen instructions. Performing a recovery NOTE: You can perform a recovery from the partition on the hard drive from the recovery discs...recovery partition (select models only) NOTE: If your computer. Use these steps: 1. Follow the on -screen instructions. Use these features, try them before using this computer must be able to create an entire drive ... the system from the disc provided by the manufacturer. HP recommends that you have a partition.

Notebook PC User Guide - Windows 7
Page 6
... and off 24 Using TouchPad gestures 25 Scrolling 25 Pinching 26 Using the touch screen (select models only 26 Calibrating the touch screen 27 Performing actions on the touch screen 28 Performing clicks 28 Performing flicks 28 Changing or testing click settings 28 Changing... features ...33 Identifying your multimedia components 34 Adjusting the volume ...35 Using the media activity keys 36 Multimedia software ...37 Using HP MediaSmart or TouchSmart (select models only) software 37 Using other preinstalled multimedia software 37 Installing multimedia software from a disc 37 Audio...
... and off 24 Using TouchPad gestures 25 Scrolling 25 Pinching 26 Using the touch screen (select models only 26 Calibrating the touch screen 27 Performing actions on the touch screen 28 Performing clicks 28 Performing flicks 28 Changing or testing click settings 28 Changing... features ...33 Identifying your multimedia components 34 Adjusting the volume ...35 Using the media activity keys 36 Multimedia software ...37 Using HP MediaSmart or TouchSmart (select models only) software 37 Using other preinstalled multimedia software 37 Installing multimedia software from a disc 37 Audio...

Notebook PC User Guide - Windows 7
Page 12
Using HP QuickWeb (select models only) To start QuickWeb from Microsoft Windows: ▲ Click Start, click the arrow next to the Shut down button, and then click Restart. The HP QuickWeb Home screen appears. 2. Your computer restarts and displays the HP QuickWeb Home screen. To start QuickWeb: 1. NOTE: To learn more about HP QuickWeb, refer to launch a program. Click an icon on your computer. Turn on the QuickWeb Home screen to the software Help included with QuickWeb. 2 Chapter 1 Getting started
Using HP QuickWeb (select models only) To start QuickWeb from Microsoft Windows: ▲ Click Start, click the arrow next to the Shut down button, and then click Restart. The HP QuickWeb Home screen appears. 2. Your computer restarts and displays the HP QuickWeb Home screen. To start QuickWeb: 1. NOTE: To learn more about HP QuickWeb, refer to launch a program. Click an icon on your computer. Turn on the QuickWeb Home screen to the software Help included with QuickWeb. 2 Chapter 1 Getting started

Notebook PC User Guide - Windows 7
Page 14
To view or change the pointing device preferences: 1. Select Mouse settings. 4 Chapter 2 Features Components Top components TouchPad Component TouchPad zone Function Moves the pointer and selects or activates items on the screen. Right-click the device representing the computer. 3. Select Start > Devices and Printers. 2.
To view or change the pointing device preferences: 1. Select Mouse settings. 4 Chapter 2 Features Components Top components TouchPad Component TouchPad zone Function Moves the pointer and selects or activates items on the screen. Right-click the device representing the computer. 3. Select Start > Devices and Printers. 2.

Notebook PC User Guide - Windows 7
Page 18
.... Launches the Calculator application. To initiate the Pause function for keyboards with the fn key. Displays a shortcut menu for select models equipped with the touch screen). Sends the currently active document to the default printer. Turns the keyboard backlight on or off. Keys Item Description 1 esc key 2 E-mail key 3 Media Application...
.... Launches the Calculator application. To initiate the Pause function for keyboards with the fn key. Displays a shortcut menu for select models equipped with the touch screen). Sends the currently active document to the default printer. Turns the keyboard backlight on or off. Keys Item Description 1 esc key 2 E-mail key 3 Media Application...

Notebook PC User Guide - Windows 7
Page 36
However, HP recommends calibrating the touch screen. Pinching Pinching allows you to make selections or activate items on the screen using your finger. Calibration optimizes digitizer performance for all users and particularly for left-handed users. 26 Chapter 4 Pointing devices and keyboard The touch screen functions with the ...pull the fingers together to increase an object's size. ● Zoom out by another user. Using the touch screen (select models only) The touch screen allows you to zoom in by holding two fingers together on the TouchPad, and then pull the fingers apart to ...
However, HP recommends calibrating the touch screen. Pinching Pinching allows you to make selections or activate items on the screen using your finger. Calibration optimizes digitizer performance for all users and particularly for left-handed users. 26 Chapter 4 Pointing devices and keyboard The touch screen functions with the ...pull the fingers together to increase an object's size. ● Zoom out by another user. Using the touch screen (select models only) The touch screen allows you to zoom in by holding two fingers together on the TouchPad, and then pull the fingers apart to ...

Notebook PC User Guide - Windows 7
Page 37
...Start > Control Panel > Tablet Properties > Calibrate Touch tab. 2. Use the screen rotate button on -screen instructions. ● Use your finger to touch the exact center of each of the calibration markers. Calibrating the touch screen To calibrate touch: 1. This will calibrate the touch. ● Be sure to... a new orientation. ● Do not change the screen orientation until you have completed the calibration. Using pointing devices ...
...Start > Control Panel > Tablet Properties > Calibrate Touch tab. 2. Use the screen rotate button on -screen instructions. ● Use your finger to touch the exact center of each of the calibration markers. Calibrating the touch screen To calibrate touch: 1. This will calibrate the touch. ● Be sure to... a new orientation. ● Do not change the screen orientation until you have completed the calibration. Using pointing devices ...

Notebook PC User Guide - Windows 7
Page 38
... you would with the left button of an external mouse. ● Tap and hold on an item to navigate forward a page or screen. Click Navigational flicks and editing flicks, and then click Customize. 3. Click OK. 28 Chapter 4 Pointing devices and keyboard Changing or creating...To modify settings for recognized clicks and flicks, select Start > Control Panel > Hardware and Sound > Pen and Input Devices. Performing actions on the touch screen Use a plastic computer pen or your fingernail to change or create a flick assignment. 4. Select Start > Control Panel > Hardware and Sound > Pen...
... you would with the left button of an external mouse. ● Tap and hold on an item to navigate forward a page or screen. Click Navigational flicks and editing flicks, and then click Customize. 3. Click OK. 28 Chapter 4 Pointing devices and keyboard Changing or creating...To modify settings for recognized clicks and flicks, select Start > Control Panel > Hardware and Sound > Pen and Input Devices. Performing actions on the touch screen Use a plastic computer pen or your fingernail to change or create a flick assignment. 4. Select Start > Control Panel > Hardware and Sound > Pen...

Notebook PC User Guide - Windows 7
Page 39
... which provides information about the Windows operating system and computer, answers to questions and tutorials, and updates to the system. Switches the screen image among display devices connected to the computer. For example, if a monitor is disabled in Setup Utility, you hold down this ...feature in the system. Setting touch screen preferences To set touch screen preferences: ● For clicks, flicks, and visual feedback, select Start > Control Panel > Hardware and Sound > Pen and Input ...
... which provides information about the Windows operating system and computer, answers to questions and tutorials, and updates to the system. Switches the screen image among display devices connected to the computer. For example, if a monitor is disabled in Setup Utility, you hold down this ...feature in the system. Setting touch screen preferences To set touch screen preferences: ● For clicks, flicks, and visual feedback, select Start > Control Panel > Hardware and Sound > Pen and Input ...

Notebook PC User Guide - Windows 7
Page 40
... picture of a DVD or a BD. Plays the next track of an audio CD or the next section of the computer screen and copies it to the clipboard. The f4 key (switch screen image key) also alternates images among other devices that are receiving video information from the computer using the external VGA...
... picture of a DVD or a BD. Plays the next track of an audio CD or the next section of the computer screen and copies it to the clipboard. The f4 key (switch screen image key) also alternates images among other devices that are receiving video information from the computer using the external VGA...

Notebook PC User Guide - Windows 7
Page 42
... electric shock or damage to internal components, do not use a vacuum cleaner attachment to clean the keyboard. WARNING! A vacuum cleaner deposits household debris on the screen. Cleaning the TouchPad and keyboard Dirt and grease on the TouchPad cause the pointer to jump around and under the keys to loosen and remove...
... electric shock or damage to internal components, do not use a vacuum cleaner attachment to clean the keyboard. WARNING! A vacuum cleaner deposits household debris on the screen. Cleaning the TouchPad and keyboard Dirt and grease on the TouchPad cause the pointer to jump around and under the keys to loosen and remove...

Notebook PC User Guide - Windows 7
Page 47
...TV-With an Internet connection, play classic oldies, choose from a range of TV shows and channels, and watch the HP-TV channel streamed in full-screen. ● Photo and video upload support ◦ Upload photos to Internet photo storage sites, such as Snapfish. ◦... Start > All Programs. 2. Insert the disc into a mobile entertainment center. Multimedia software 37 For more information on -screen instructions. 3. Restart the computer, if prompted. Using HP MediaSmart or TouchSmart (select models only) software HP MediaSmart and TouchSmart (select models only) turn the computer into the...
...TV-With an Internet connection, play classic oldies, choose from a range of TV shows and channels, and watch the HP-TV channel streamed in full-screen. ● Photo and video upload support ◦ Upload photos to Internet photo storage sites, such as Snapfish. ◦... Start > All Programs. 2. Insert the disc into a mobile entertainment center. Multimedia software 37 For more information on -screen instructions. 3. Restart the computer, if prompted. Using HP MediaSmart or TouchSmart (select models only) software HP MediaSmart and TouchSmart (select models only) turn the computer into the...

Notebook PC User Guide - Windows 7
Page 50
...Edit pictures and video to the device. NOTE: If a properly connected external display device does not display an image, press the f4 key (switch screen image key) to transfer the image to create presentations. ● Connect external video devices. ● Watch TV, including high-definition TV (select...to the desktop. 4. Open Windows Media Player or MediaSmart, and play back the sound. 3. Repeatedly pressing the f4 key alternates the screen image between the computer display and the device. 40 Chapter 5 Multimedia Save the file to the external monitor port. Connecting an external monitor...
...Edit pictures and video to the device. NOTE: If a properly connected external display device does not display an image, press the f4 key (switch screen image key) to transfer the image to create presentations. ● Connect external video devices. ● Watch TV, including high-definition TV (select...to the desktop. 4. Open Windows Media Player or MediaSmart, and play back the sound. 3. Repeatedly pressing the f4 key alternates the screen image between the computer display and the device. 40 Chapter 5 Multimedia Save the file to the external monitor port. Connecting an external monitor...


