User Guide
Page 20
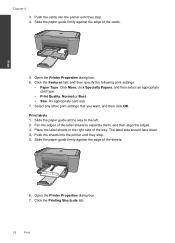
... then click OK. Slide the paper guide all the way to separate them, and then align the edges. 3. The label side should face down. 4. Print labels 1. Push the sheets into the printer until they stop . 5. Slide the paper guide firmly against the edge of the label ...sheets to the left. 2. Fan the edges of the cards. Open the Printer Properties dialog box. 7. Open the Printer Properties dialog box. 6. Print 5. Click the Printing Shortcuts tab. 18 Print Click the Features tab, and then specify the following...
... then click OK. Slide the paper guide all the way to separate them, and then align the edges. 3. The label side should face down. 4. Print labels 1. Push the sheets into the printer until they stop . 5. Slide the paper guide firmly against the edge of the label ...sheets to the left. 2. Fan the edges of the cards. Open the Printer Properties dialog box. 7. Open the Printer Properties dialog box. 6. Print 5. Click the Printing Shortcuts tab. 18 Print Click the Features tab, and then specify the following...
User Guide
Page 21
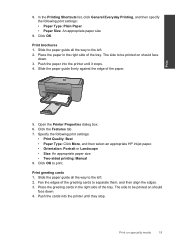
... Everyday Printing, and then specify the following print settings: • Print Quality: Best • Paper Type: Click More, and then select an appropriate HP inkjet paper. • Orientation: Portrait or Landscape • Size: An appropriate paper size • Two-sided printing: Manual 8. Place the paper in... the right side of the tray. Print 5. Open the Printer Properties dialog box. 6. Click OK to separate them, and then align the edges. 3. Slide the paper guide all the way to be printed on should face down . 3. The side...
... Everyday Printing, and then specify the following print settings: • Print Quality: Best • Paper Type: Click More, and then select an appropriate HP inkjet paper. • Orientation: Portrait or Landscape • Size: An appropriate paper size • Two-sided printing: Manual 8. Place the paper in... the right side of the tray. Print 5. Open the Printer Properties dialog box. 6. Click OK to separate them, and then align the edges. 3. Slide the paper guide all the way to be printed on should face down . 3. The side...

User Guide
Page 45
... the product is used in YYYY/ MM/DD format, may be found on the product as the HP ink is covered as long as indicated: Cartridge warranty information 43 Align cartridges. 6. This warranty does not cover HP ink products that have been refilled, remanufactured, refurbished, misused, or tampered with cartridges c. d. Line up colored... into slot until it clicks into place. During the warranty period the product is not depleted and the end of warranty date, in its designated HP printing device. The end of warranty date has not been reached.
... the product is used in YYYY/ MM/DD format, may be found on the product as the HP ink is covered as long as indicated: Cartridge warranty information 43 Align cartridges. 6. This warranty does not cover HP ink products that have been refilled, remanufactured, refurbished, misused, or tampered with cartridges c. d. Line up colored... into slot until it clicks into place. During the warranty period the product is not depleted and the end of warranty date, in its designated HP printing device. The end of warranty date has not been reached.
User Guide
Page 54
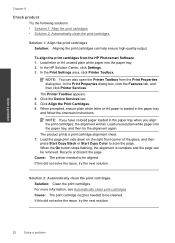
... Properties dialog box, click the Features tab, and then click Printer Services. Solution 1: Align the print cartridges Solution: Aligning the print cartridges can also open the Printer Toolbox from the HP Photosmart Software 1. In the Print Settings area, click Printer Toolbox. When the On button stops flashing, the alignment is loaded in the paper tray when you...
... Properties dialog box, click the Features tab, and then click Printer Services. Solution 1: Align the print cartridges Solution: Aligning the print cartridges can also open the Printer Toolbox from the HP Photosmart Software 1. In the Print Settings area, click Printer Toolbox. When the On button stops flashing, the alignment is loaded in the paper tray when you...
User Guide
Page 61
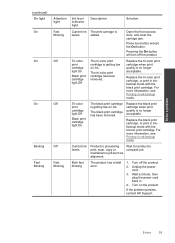
... Off Off Fast Blinking Ink level indicator light Description Solution Current ink The print carriage is processing print, scan, copy or maintenance job such as alignment. Press any button except the On button. The tri-color print cartridge has been removed. If the problem persists, contact... HP Support. Errors 59 Turn on the product. For more information, see Printing in inkbackup mode with the black print cartridge. Current ink levels Product is ...
... Off Off Fast Blinking Ink level indicator light Description Solution Current ink The print carriage is processing print, scan, copy or maintenance job such as alignment. Press any button except the On button. The tri-color print cartridge has been removed. If the problem persists, contact... HP Support. Errors 59 Turn on the product. For more information, see Printing in inkbackup mode with the black print cartridge. Current ink levels Product is ...


