
Hardware Reference Guide - dc7600 CMT
Page 3
... 1-7 Changing from a Desktop to a Minitower Configuration 1-10 2 Hardware Upgrades Serviceability Features 2-1 Warnings and Cautions 2-1 Smart Cover Lock 2-2 Using the Smart Cover FailSafe Key 2-2 Removing the Computer Access Panel 2-4 Replacing the Computer Access Panel 2-5 Removing the Front Bezel 2-6 Replacing the Front Bezel 2-7 Removing Bezel Blanks 2-8 Installing Additional Memory 2-9 DIMMs 2-9 DDR2-SDRAM DIMMs 2-9 Populating DIMM...
... 1-7 Changing from a Desktop to a Minitower Configuration 1-10 2 Hardware Upgrades Serviceability Features 2-1 Warnings and Cautions 2-1 Smart Cover Lock 2-2 Using the Smart Cover FailSafe Key 2-2 Removing the Computer Access Panel 2-4 Replacing the Computer Access Panel 2-5 Removing the Front Bezel 2-6 Replacing the Front Bezel 2-7 Removing Bezel Blanks 2-8 Installing Additional Memory 2-9 DIMMs 2-9 DDR2-SDRAM DIMMs 2-9 Populating DIMM...

Hardware Reference Guide - dc7600 CMT
Page 25
...256Mbit, 512Mbit, and 1Gbit non-ECC memory technologies ■ single-sided and double-sided DIMMS ■ DIMMs constructed with x8 and x16 DDR devices; Hardware Upgrades Installing Additional Memory The computer comes with up to 4GB of memory configured in a high-performing dual channel... mode. To achieve the maximum memory support, you install unsupported DIMMs. Hardware Reference Guide www.hp.com 2-9 DIMMs constructed with...
...256Mbit, 512Mbit, and 1Gbit non-ECC memory technologies ■ single-sided and double-sided DIMMS ■ DIMMs constructed with x8 and x16 DDR devices; Hardware Upgrades Installing Additional Memory The computer comes with up to 4GB of memory configured in a high-performing dual channel... mode. To achieve the maximum memory support, you install unsupported DIMMs. Hardware Reference Guide www.hp.com 2-9 DIMMs constructed with...

Hardware Reference Guide - dc7600 CMT
Page 26
... of the DIMMs in Channel A is determined by the slowest DIMM in the system. Sockets XMM1 and XMM2 operate in memory channel B. 2-10 www.hp.com Hardware Reference Guide There are four DIMM sockets on how the DIMMs are installed. ■ The system will operate in single channel ...mode if the DIMM sockets are labeled XMM1, XMM2, XMM3, and XMM4. Hardware Upgrades Populating DIMM Sockets The system will automatically operate in ...
... of the DIMMs in Channel A is determined by the slowest DIMM in the system. Sockets XMM1 and XMM2 operate in memory channel B. 2-10 www.hp.com Hardware Reference Guide There are four DIMM sockets on how the DIMMs are installed. ■ The system will operate in single channel ...mode if the DIMM sockets are labeled XMM1, XMM2, XMM3, and XMM4. Hardware Upgrades Populating DIMM Sockets The system will automatically operate in ...

Hardware Reference Guide - dc7600 CMT
Page 28
...touch any of personal injury from hot surfaces, allow the internal system components to cool before touching. 2-12 www.hp.com Hardware Reference Guide Locate the memory module sockets on the system board. Å WARNING: To reduce risk of the contacts. Doing so may damage... contacts to prevent corrosion and/or oxidation resulting from the power outlet and disconnect any external devices. 3. When upgrading the memory, it is important to use memory modules with each other. Ä CAUTION: Static electricity can damage the electronic components of static electricity by briefly...
...touch any of personal injury from hot surfaces, allow the internal system components to cool before touching. 2-12 www.hp.com Hardware Reference Guide Locate the memory module sockets on the system board. Å WARNING: To reduce risk of the contacts. Doing so may damage... contacts to prevent corrosion and/or oxidation resulting from the power outlet and disconnect any external devices. 3. When upgrading the memory, it is important to use memory modules with each other. Ä CAUTION: Static electricity can damage the electronic components of static electricity by briefly...
Hardware Reference Guide - dc7600 CMT
Page 29
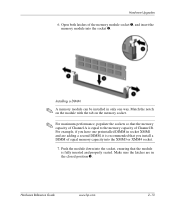
Hardware Upgrades 6. Make sure the latches are in only one preinstalled DIMM in socket XMM1 and are adding a second DIMM, it is recommended that you have one way. For example, if you install a DIMM of Channel B. Installing a DIMM ✎ A memory module can be installed in the ... on the memory socket. ✎ For maximum performance, populate the sockets so that the module is equal to the memory capacity of equal memory capacity into the socket 2. Hardware Reference Guide www.hp.com 2-13 Open both latches of the memory module socket 1, and insert the memory module into...
Hardware Upgrades 6. Make sure the latches are in only one preinstalled DIMM in socket XMM1 and are adding a second DIMM, it is recommended that you have one way. For example, if you install a DIMM of Channel B. Installing a DIMM ✎ A memory module can be installed in the ... on the memory socket. ✎ For maximum performance, populate the sockets so that the module is equal to the memory capacity of equal memory capacity into the socket 2. Hardware Reference Guide www.hp.com 2-13 Open both latches of the memory module socket 1, and insert the memory module into...

Hardware Reference Guide - dc7600 CMT
Page 30
If you turn on the computer. 2-14 www.hp.com Hardware Reference Guide Hardware Upgrades 8. The computer should automatically recognize the additional memory the next time you normally lock the Smart Cover Lock, use Computer Setup to install any additional modules. 9. Replace the access panel. 10. Repeat steps 6 and 7 for to relock the lock and enable the Smart Cover Sensor.
If you turn on the computer. 2-14 www.hp.com Hardware Reference Guide Hardware Upgrades 8. The computer should automatically recognize the additional memory the next time you normally lock the Smart Cover Lock, use Computer Setup to install any additional modules. 9. Replace the access panel. 10. Repeat steps 6 and 7 for to relock the lock and enable the Smart Cover Sensor.

HP Compaq dx 7200 and dc7600 Personal Computers, Technical Reference Guide, 1st Edition
Page 6
...Introduction 8-1 8.2 ROM Flashing 8-2 8.2.1 Upgrading 8-2 8.2.2 Changeable Splash Screen 8-3 8.3 Boot Functions 8-3 8.3.1 Boot Device Order 8-3 8.3.2 Network Boot (F12) Support 8-4 8.3.3 Memory Detection and Configuration 8-4 8.3.4 Boot ...Error Codes 8-5 8.4 Setup Utility 8-6 8.5 Client Management Functions 8-16 8.5.1 System ID and ROM Type 8-16 8.5.2 Temperature Status 8-16 8.5.3 Drive Fault Prediction 8-16 8.6 SMBIOS 8-18 8.7 USB Legacy Support 8-18 A Error Messages and Codes B ASCII Character Set C Keyboard Index 8 www.hp...
...Introduction 8-1 8.2 ROM Flashing 8-2 8.2.1 Upgrading 8-2 8.2.2 Changeable Splash Screen 8-3 8.3 Boot Functions 8-3 8.3.1 Boot Device Order 8-3 8.3.2 Network Boot (F12) Support 8-4 8.3.3 Memory Detection and Configuration 8-4 8.3.4 Boot ...Error Codes 8-5 8.4 Setup Utility 8-6 8.5 Client Management Functions 8-16 8.5.1 System ID and ROM Type 8-16 8.5.2 Temperature Status 8-16 8.5.3 Drive Fault Prediction 8-16 8.6 SMBIOS 8-18 8.7 USB Legacy Support 8-18 A Error Messages and Codes B ASCII Character Set C Keyboard Index 8 www.hp...
HP Compaq dx 7200 and dc7600 Personal Computers, Technical Reference Guide, 1st Edition
Page 34
...height riser is installed. [3] Requires adapter. [4] 2nd serial port requires adapter 2-18 www.hp.com Technical Reference Guide Architectural Differences By Form Factor Model USDT SFF ST MT Memory sockets 3 4 4 4 Graphics upgrade PCI 2.3 card only PCI-E or PCI-E or PCI-E or PCI 2.3 card PCI ...compliment the latest Intel Pentium 4 processors, the chipset serves the processor through the Direct Media Interface (DMI). These systems allow processor upgrading with Hyper-Threading technology, 32-KB L1 cache and 1-MB L2 cache. ■ Intel 945G chipset - All systems include ...
...height riser is installed. [3] Requires adapter. [4] 2nd serial port requires adapter 2-18 www.hp.com Technical Reference Guide Architectural Differences By Form Factor Model USDT SFF ST MT Memory sockets 3 4 4 4 Graphics upgrade PCI 2.3 card only PCI-E or PCI-E or PCI-E or PCI 2.3 card PCI ...compliment the latest Intel Pentium 4 processors, the chipset serves the processor through the Direct Media Interface (DMI). These systems allow processor upgrading with Hyper-Threading technology, 32-KB L1 cache and 1-MB L2 cache. ■ Intel 945G chipset - All systems include ...

HP Compaq dx 7200 and dc7600 Personal Computers, Technical Reference Guide, 1st Edition
Page 40
...key features of the chipset and the Realtek ALC260 High Definition audio codec. PCI Express Memory Amount Memory Type 8 MB pre-allocated DVMT 3.0 DAC Speed 400 MHz Maximum 2D Res. A full graphics controller upgrade on the USDT form factor is only possible through the PCI 2.3 slot. ✎... such as standard. 2-24 www.hp.com Technical Reference Guide Software Compatibility Outputs 2048x1536 @ 85 Hz Quick Draw, DirectX 9.0, Direct Draw, Direct Show, Open GL 1.4, MPEG 1-2, Indeo 1 RGB The graphics subsystem of all form factors supports upgrading through the PCI Express x16 graphics ...
...key features of the chipset and the Realtek ALC260 High Definition audio codec. PCI Express Memory Amount Memory Type 8 MB pre-allocated DVMT 3.0 DAC Speed 400 MHz Maximum 2D Res. A full graphics controller upgrade on the USDT form factor is only possible through the PCI 2.3 slot. ✎... such as standard. 2-24 www.hp.com Technical Reference Guide Software Compatibility Outputs 2048x1536 @ 85 Hz Quick Draw, DirectX 9.0, Direct Draw, Direct Show, Open GL 1.4, MPEG 1-2, Indeo 1 RGB The graphics subsystem of all form factors supports upgrading through the PCI Express x16 graphics ...

HP Compaq dx 7200 and dc7600 Personal Computers, Technical Reference Guide, 1st Edition
Page 48
... III. ■ Additional Streaming SIMD extensions (SSE2)-In addition to be easily changed for servicing and/or upgrading. 3.2.1 Processor Overview The Intel Pentium 4 processor represents the latest generation of Intel's IA32-class of earlier processors...: ■ Hyper-Threading Technology-The main processing loop has twice the depth (20 stages) of processors. Processor/Memory Subsystem 3.2 Pentium 4 Processor These systems each feature an Intel Pentium 4 processor in a FC-LGA775 package mounted with... by an average of earlier processors. 3-2 www.hp.com Technical Reference Guide
... III. ■ Additional Streaming SIMD extensions (SSE2)-In addition to be easily changed for servicing and/or upgrading. 3.2.1 Processor Overview The Intel Pentium 4 processor represents the latest generation of Intel's IA32-class of earlier processors...: ■ Hyper-Threading Technology-The main processing loop has twice the depth (20 stages) of processors. Processor/Memory Subsystem 3.2 Pentium 4 Processor These systems each feature an Intel Pentium 4 processor in a FC-LGA775 package mounted with... by an average of earlier processors. 3-2 www.hp.com Technical Reference Guide

HP Compaq dx 7200 and dc7600 Personal Computers, Technical Reference Guide, 1st Edition
Page 49
...with the processor die. Refer to the applicable Service Reference Guide for x86 processors. 3.2.2 Processor Upgrading All models use the same type heatsink/fan assembly as was the case in the L1 ... A replacement processor must use the LGA775 ZIF (Socket T) mounting socket. Technical Reference Guide www.hp.com 3-3 The processor uses a PLGA775 package consisting of the heatsink to the processor is compatible... the Intel Pentium 4 processor. Processor/Memory Subsystem Figure 3-2 illustrates the internal architecture of the Pentium 4 uses a 200-MHz clock but provides bi-
...with the processor die. Refer to the applicable Service Reference Guide for x86 processors. 3.2.2 Processor Upgrading All models use the same type heatsink/fan assembly as was the case in the L1 ... A replacement processor must use the LGA775 ZIF (Socket T) mounting socket. Technical Reference Guide www.hp.com 3-3 The processor uses a PLGA775 package consisting of the heatsink to the processor is compatible... the Intel Pentium 4 processor. Processor/Memory Subsystem Figure 3-2 illustrates the internal architecture of the Pentium 4 uses a 200-MHz clock but provides bi-

HP Compaq dx 7200 and dc7600 Personal Computers, Technical Reference Guide, 1st Edition
Page 121
... the BIOS during the boot sequence and the integrated graphics controller of system memory to section 6.4 for more information on upgrading the graphics subsystem). The USDT form factor may be upgraded by installing an ADD2 (reverse layout) card in the PCI-E slot or a graphics card into the PCI 2.3 slot. 6...card into the 82945G GMCH component. This chapter covers the following subjects: ■ Functional description (6.2), page 6-2 ■ Display Modes (6.3), page 6-4 ■ Upgrading graphics (6.4) , page 6-5 ■ VGA Monitor connector (6.5), page 6-6 Technical Reference Guide www...
... the BIOS during the boot sequence and the integrated graphics controller of system memory to section 6.4 for more information on upgrading the graphics subsystem). The USDT form factor may be upgraded by installing an ADD2 (reverse layout) card in the PCI-E slot or a graphics card into the PCI 2.3 slot. 6...card into the 82945G GMCH component. This chapter covers the following subjects: ■ Functional description (6.2), page 6-2 ■ Display Modes (6.3), page 6-4 ■ Upgrading graphics (6.4) , page 6-5 ■ VGA Monitor connector (6.5), page 6-6 Technical Reference Guide www...

HP Compaq dx 7200 and dc7600 Personal Computers, Technical Reference Guide, 1st Edition
Page 122
... need for local graphics memory by reducing the bandwidth. ■ Dynamic video memory allocation, where the amount of memory required by the application is acquired (or released) by an appropriate ADD2 accessory card. 6-2 www.hp.com Technical Reference Guide All systems may be also be upgraded by installing a separate...driving two digital displays with a 200-megapixel clock. The IGC can support an optional PCI-E SDVO card. These SDVO ports may be upgraded by an Advanced Digital Display (ADD2) card installed in the PCI Express (PCI-E) graphics slot in the PCI 2.3 slot. 82945G GMCH...
... need for local graphics memory by reducing the bandwidth. ■ Dynamic video memory allocation, where the amount of memory required by the application is acquired (or released) by an appropriate ADD2 accessory card. 6-2 www.hp.com Technical Reference Guide All systems may be also be upgraded by installing a separate...driving two digital displays with a 200-megapixel clock. The IGC can support an optional PCI-E SDVO card. These SDVO ports may be upgraded by an Advanced Digital Display (ADD2) card installed in the PCI Express (PCI-E) graphics slot in the PCI 2.3 slot. 82945G GMCH...

HP Compaq dx 7200 and dc7600 Personal Computers, Technical Reference Guide, 1st Edition
Page 203
... codec 5-32 Audio Specifications 5-35 B beep indications 4-23 BIOS upgrading 8-2 boot device order 8-3 Boot Error Codes 8-5 C CMOS 4-19 CMOS, clearing 4-9 Computer Setup 8-6 configuration memory 4-19 D Direct Memory Access (DMA) 4-16 Diskette Drive Connector 5-11 diskette drive interface...controller (IGC). 6-2 interrupts, hardware 4-11 interrupts, PCI 4-13 K keyboard interface 5-24 L LED indications 4-23, 8-5 M Memory 3-4 memory allocation 6-3 memory map 3-7 model numbering 1-2 mouse (pointing device) interface 5-18 N Network Boot 8-4 Network Interface Controller 5-36 P parallel interface 5-...
... codec 5-32 Audio Specifications 5-35 B beep indications 4-23 BIOS upgrading 8-2 boot device order 8-3 Boot Error Codes 8-5 C CMOS 4-19 CMOS, clearing 4-9 Computer Setup 8-6 configuration memory 4-19 D Direct Memory Access (DMA) 4-16 Diskette Drive Connector 5-11 diskette drive interface...controller (IGC). 6-2 interrupts, hardware 4-11 interrupts, PCI 4-13 K keyboard interface 5-24 L LED indications 4-23, 8-5 M Memory 3-4 memory allocation 6-3 memory map 3-7 model numbering 1-2 mouse (pointing device) interface 5-18 N Network Boot 8-4 Network Interface Controller 5-36 P parallel interface 5-...
HP Compaq dx7200 and dc7600 Series Personal Computers Service Reference Card (1st Edition)
Page 1
...HP Compaq dx7200 and dc7600 Series Personal Computers © 2005 Hewlett-Packard Development Company, L.P. HP shall not be liable for QuickBoot, FullBoot, FullBoot every 1-30 days; and other ), diskette (treated as hard drive. Note: Not all features are disabled, 8, and 16. Lists product name, processor type/speed/stepping, cache size, installed memory...changeable only when drive translation mode is set to insert media containing a BIOS image file or BIOS upgrade utility. Disable allows read and write with PIO transfers. Primary SATA Controller - Enable/disable. Boot Order...
...HP Compaq dx7200 and dc7600 Series Personal Computers © 2005 Hewlett-Packard Development Company, L.P. HP shall not be liable for QuickBoot, FullBoot, FullBoot every 1-30 days; and other ), diskette (treated as hard drive. Note: Not all features are disabled, 8, and 16. Lists product name, processor type/speed/stepping, cache size, installed memory...changeable only when drive translation mode is set to insert media containing a BIOS image file or BIOS upgrade utility. Disable allows read and write with PIO transfers. Primary SATA Controller - Enable/disable. Boot Order...

Troubleshooting Guide
Page 20
...Red two times, once every second, followed by adjusting parameters in and seated properly, but LEDs continue flashing). Upgrade the graphics solution. Ensure that the fan assembly is properly attached. 5. Processor thermal protection activated: A fan may... be blocked or not turning. Contact an authorized reseller or service provider. 2-8 www.hp.com Troubleshooting Guide Open hood, press power button, and see if the processor fan spins. Reseat processor heatsink and... are not blocked and the processor cooling fan is running. 2. Add more memory. 3.
...Red two times, once every second, followed by adjusting parameters in and seated properly, but LEDs continue flashing). Upgrade the graphics solution. Ensure that the fan assembly is properly attached. 5. Processor thermal protection activated: A fan may... be blocked or not turning. Contact an authorized reseller or service provider. 2-8 www.hp.com Troubleshooting Guide Open hood, press power button, and see if the processor fan spins. Reseat processor heatsink and... are not blocked and the processor cooling fan is running. 2. Add more memory. 3.

Troubleshooting Guide
Page 43
...contact Customer Support. Replace the system board. Troubleshooting Guide www.hp.com 2-31 Reseat the graphics card. Power on the system. 2. Review the documentation that came with HP memory. 4. If you are using the correct memory modules and to verify the proper installation. 2. Power LED flashes...integrated graphics, replace the system board. Observe the beeps and LED lights on the front of the computer. Wrong memory modules were used in the upgrade or memory modules were installed in the wrong location. 1. Replace the system board. Power LED flashes Red six times, ...
...contact Customer Support. Replace the system board. Troubleshooting Guide www.hp.com 2-31 Reseat the graphics card. Power on the system. 2. Review the documentation that came with HP memory. 4. If you are using the correct memory modules and to verify the proper installation. 2. Power LED flashes...integrated graphics, replace the system board. Observe the beeps and LED lights on the front of the computer. Wrong memory modules were used in the upgrade or memory modules were installed in the wrong location. 1. Replace the system board. Power LED flashes Red six times, ...

Getting Started
Page 11
... this tool to reconfigure or modify default settings for maintenance purposes or when installing new hardware devices. ■ Desktop Management Guide (PDF on the CD) Provides definitions and "how to" instructions for security and Intelligent Manageability features...on the CD) Provides an overview of the product hardware, as well as instructions for upgrading this series of computers, and includes information on RTC batteries, memory, and power supply. ■ Computer Setup (F10) Utility Guide (PDF on the CD... the Documentation and Diagnostics CD for resolving Getting Started www.hp.com 7
... this tool to reconfigure or modify default settings for maintenance purposes or when installing new hardware devices. ■ Desktop Management Guide (PDF on the CD) Provides definitions and "how to" instructions for security and Intelligent Manageability features...on the CD) Provides an overview of the product hardware, as well as instructions for upgrading this series of computers, and includes information on RTC batteries, memory, and power supply. ■ Computer Setup (F10) Utility Guide (PDF on the CD... the Documentation and Diagnostics CD for resolving Getting Started www.hp.com 7

Getting Started
Page 22
Lower the display resolution for the current application or consult the documentation that came with the application for suggestions on the graphics subsystem. 1. Restart the computer. 18 www.hp.com Getting Started Add more memory. 3. Upgrade the graphics solution. Getting Started Solving General Problems (Continued) Problem Cause Solution Poor performance is experienced. (continued) Some software applications, especially games, are stressful on how to improve performance by adjusting parameters in the application. 2. Cause unknown.
Lower the display resolution for the current application or consult the documentation that came with the application for suggestions on the graphics subsystem. 1. Restart the computer. 18 www.hp.com Getting Started Add more memory. 3. Upgrade the graphics solution. Getting Started Solving General Problems (Continued) Problem Cause Solution Poor performance is experienced. (continued) Some software applications, especially games, are stressful on how to improve performance by adjusting parameters in the application. 2. Cause unknown.

Getting Started
Page 27
... board may not automatically configure when added if the default configuration conflicts with other devices. Replace the system board. Wrong memory modules were used in the upgrade or memory modules were installed in the wrong location. 1. The LED flashes continue until the problem is bad. 1. If you ... beeps and LED lights on the system. 2. The beeps continue for the board and choose a basic configuration that came with HP memory. 4. Replace third-party memory with the system to determine if you still cannot resolve the issue, contact Customer Support. Getting Started www...
... board may not automatically configure when added if the default configuration conflicts with other devices. Replace the system board. Wrong memory modules were used in the upgrade or memory modules were installed in the wrong location. 1. The LED flashes continue until the problem is bad. 1. If you ... beeps and LED lights on the system. 2. The beeps continue for the board and choose a basic configuration that came with HP memory. 4. Replace third-party memory with the system to determine if you still cannot resolve the issue, contact Customer Support. Getting Started www...


