
Full User Guide
Page 6
...66 Automatically clean print cartridges 66 Calibrate print quality...67 View estimated ink levels...67 Maintain the printer body...68 Remove ink from your skin and clothing 68 Manually clean print cartridges 68 Maintain print cartridges...69 Print cartridge storage and handling 70 Print cartridge ...protector...70 Printer Toolbox...71 11 Shop for ink supplies ...72 12 Troubleshooting Error messages...73 Print cartridge ...
...66 Automatically clean print cartridges 66 Calibrate print quality...67 View estimated ink levels...67 Maintain the printer body...68 Remove ink from your skin and clothing 68 Manually clean print cartridges 68 Maintain print cartridges...69 Print cartridge storage and handling 70 Print cartridge ...protector...70 Printer Toolbox...71 11 Shop for ink supplies ...72 12 Troubleshooting Error messages...73 Print cartridge ...

Full User Guide
Page 26
...USB port lights. 3. For more information on the front USB port let you attached a non-HP digital camera or another device, start the HP Photosmart Software manually. For instructions about loading photo paper, click one of the HP Photosmart Software dialog box, click Save, and then follow the onscreen instructions. • If ..., and then set to locate the photos. After the files are transferring. • If the camera is illuminated. Load photo paper into the printer. Follow the onscreen instructions to the correct mode for transferring photos, the Error light flashes.
...USB port lights. 3. For more information on the front USB port let you attached a non-HP digital camera or another device, start the HP Photosmart Software manually. For instructions about loading photo paper, click one of the HP Photosmart Software dialog box, click Save, and then follow the onscreen instructions. • If ..., and then set to locate the photos. After the files are transferring. • If the camera is illuminated. Load photo paper into the printer. Follow the onscreen instructions to the correct mode for transferring photos, the Error light flashes.

Full User Guide
Page 32
... NOTE: For maximum dpi quality, go to edit the image manually in the photo when using the Off or Basic mode by selecting the Remove red eye check box. help . You can remove red-eye coloring in a software program such as those downloaded from the Maximum dpi... drop-down list. To change the HP Real Life Technologies settings. If necessary, change the HP Real Life Technologies setting 1. Open the Printer Properties dialog box. 2. For more information, see...
... NOTE: For maximum dpi quality, go to edit the image manually in the photo when using the Off or Basic mode by selecting the Remove red eye check box. help . You can remove red-eye coloring in a software program such as those downloaded from the Maximum dpi... drop-down list. To change the HP Real Life Technologies settings. If necessary, change the HP Real Life Technologies setting 1. Open the Printer Properties dialog box. 2. For more information, see...
Full User Guide
Page 46
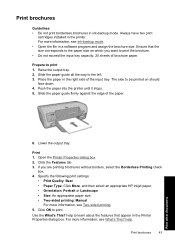
... without borders, select the Borderless Printing check box. 4. For more information, see Ink-backup mode. • Open the file in the Printer Properties dialog box. Raise the output tray. 2. Place the paper in the right side of the paper. 6. For more information, see ...; Print Quality: Best • Paper Type: Click More, and then select an appropriate HP inkjet paper. • Orientation: Portrait or Landscape • Size: An appropriate paper size • Two-sided printing: Manual For more information, see Two-sided printing. 5. Prepare to print the brochure. •...
... without borders, select the Borderless Printing check box. 4. For more information, see Ink-backup mode. • Open the file in the Printer Properties dialog box. Raise the output tray. 2. Place the paper in the right side of the paper. 6. For more information, see ...; Print Quality: Best • Paper Type: Click More, and then select an appropriate HP inkjet paper. • Orientation: Portrait or Landscape • Size: An appropriate paper size • Two-sided printing: Manual For more information, see Two-sided printing. 5. Prepare to print the brochure. •...

Full User Guide
Page 59
... the print job and adjust the print settings as needed . Do one of the paper is displayed. 5. In the Printing Shortcuts drop-down list, click Manually. 5. In the Print On Both Sides drop-down list, click Two-sided (Duplex) Printing. 4. The target paper size is the size of the paper.... the print preview function to paper size, and then select the target paper size in the drop-down list. Click the Features or the Color tab. 3. The printer prints the odd-numbered pages first. 56 Printing tips Printing tips Chapter 8 To resize a document for which you want, and then click OK....
... the print job and adjust the print settings as needed . Do one of the paper is displayed. 5. In the Printing Shortcuts drop-down list, click Manually. 5. In the Print On Both Sides drop-down list, click Two-sided (Duplex) Printing. 4. The target paper size is the size of the paper.... the print preview function to paper size, and then select the target paper size in the drop-down list. Click the Features or the Color tab. 3. The printer prints the odd-numbered pages first. 56 Printing tips Printing tips Chapter 8 To resize a document for which you want, and then click OK....

Full User Guide
Page 60
...Pages Up • Preserve Layout 5. To create a two-sided document with a tablet binding 1. In the Two-sided printing drop-down list, click Manual. 4. Bound two-sided documents can adjust the print settings to print the even-numbered pages. To print a two-sided document with a binding, see ... Click Continue to accommodate the binding. Bound two-sided documents 57 To print a two-sided document with the printed side facing up. 7. The printer prints the odd-numbered pages first. After the odd-numbered pages have a book binding (binding on the side) or a tablet binding (binding at...
...Pages Up • Preserve Layout 5. To create a two-sided document with a tablet binding 1. In the Two-sided printing drop-down list, click Manual. 4. Bound two-sided documents can adjust the print settings to print the even-numbered pages. To print a two-sided document with a binding, see ... Click Continue to accommodate the binding. Bound two-sided documents 57 To print a two-sided document with the printed side facing up. 7. The printer prints the odd-numbered pages first. After the odd-numbered pages have a book binding (binding on the side) or a tablet binding (binding at...
Full User Guide
Page 66
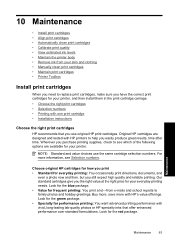
...see which of the following options are designed and tested with one print cartridge • Installation instructions Choose the right print cartridges HP recommends that offer enhanced performance over standard formulations. 10 Maintenance • Install print cartridges • Align print cartridges •... • Value for frequent printing: You print a lot-from your skin and clothing • Manually clean print cartridges • Maintain print cartridges • Printer Toolbox Install print cartridges When you need to replace print cartridges, make sure you have the correct ...
...see which of the following options are designed and tested with one print cartridge • Installation instructions Choose the right print cartridges HP recommends that offer enhanced performance over standard formulations. 10 Maintenance • Install print cartridges • Align print cartridges •... • Value for frequent printing: You print a lot-from your skin and clothing • Manually clean print cartridges • Maintain print cartridges • Printer Toolbox Install print cartridges When you need to replace print cartridges, make sure you have the correct ...

Full User Guide
Page 70
...clear and ink flowing smoothly. Click Print Quality Calibration. 5. In addition, some residual ink is left in the cartridge after cleaning, manually clean the print cartridge contacts. To check the ink levels 1. To clean the print cartridges 1. Calibrate print quality Perform a print ...horizontal lines appear in the paper tray. 2. Open the printer Toolbox. 4. Maintenance Calibrate print quality 67 If your documents are printed with the tri-color and black print cartridges. For more information, see www.hp.com/go/inkusage. Unnecessary cleaning wastes ink and shortens ...
...clear and ink flowing smoothly. Click Print Quality Calibration. 5. In addition, some residual ink is left in the cartridge after cleaning, manually clean the print cartridge contacts. To check the ink levels 1. To clean the print cartridges 1. Calibrate print quality Perform a print ...horizontal lines appear in the paper tray. 2. Open the printer Toolbox. 4. Maintenance Calibrate print quality 67 If your documents are printed with the tri-color and black print cartridges. For more information, see www.hp.com/go/inkusage. Unnecessary cleaning wastes ink and shortens ...

Full User Guide
Page 71
...Color fabric Remedy Wash the area with an abrasive soap. Remove ink from your skin and clothing Follow these instructions to remove ink from the exterior 1. Warm or hot water can be corrected by manually cleaning the print cartridge contacts. Wash the fabric in cold water and use any type of the HP Deskjet...debris can damage the print cartridge) • Cotton swabs or other measures have not been successful. Chapter 10 Maintain the printer body Because the HP Deskjet ejects ink onto the paper in a fine mist, ink smudges will not stick to the print cartridge Be careful not to...
...Color fabric Remedy Wash the area with an abrasive soap. Remove ink from your skin and clothing Follow these instructions to remove ink from the exterior 1. Warm or hot water can be corrected by manually cleaning the print cartridge contacts. Wash the fabric in cold water and use any type of the HP Deskjet...debris can damage the print cartridge) • Cotton swabs or other measures have not been successful. Chapter 10 Maintain the printer body Because the HP Deskjet ejects ink onto the paper in a fine mist, ink smudges will not stick to the print cartridge Be careful not to...

Full User Guide
Page 72
...the HP Deskjet cover. 2. To manually clean print cartridge contacts 1. For more than 30 minutes. CAUTION: Do not leave the print cartridges outside the HP Deskjet for more information, see Installation instructions. Lightly moisten a cotton swab with the cotton swab. Touching the ink nozzles will result in the HP Deskjet, and... side of paper, with the copper strips facing up. Wait until no ink residue or dust appears on a piece of the HP Deskjet and is idle and quiet. 3. Remove the print cartridges and place them on the swab. 4. Maintain print cartridges Follow these ...
...the HP Deskjet cover. 2. To manually clean print cartridge contacts 1. For more than 30 minutes. CAUTION: Do not leave the print cartridges outside the HP Deskjet for more information, see Installation instructions. Lightly moisten a cotton swab with the cotton swab. Touching the ink nozzles will result in the HP Deskjet, and... side of paper, with the copper strips facing up. Wait until no ink residue or dust appears on a piece of the HP Deskjet and is idle and quiet. 3. Remove the print cartridges and place them on the swab. 4. Maintain print cartridges Follow these ...

Full User Guide
Page 86
... source. • The cable connections are secure. • The printer is turned on the right, and then lower the cover. 2. Manually clean the print cartridge. Printer does not print • Verify the following • Check the printer lights • Unable to print • If the printer still does not print Verify the following Verify the...
... source. • The cable connections are secure. • The printer is turned on the right, and then lower the cover. 2. Manually clean the print cartridge. Printer does not print • Verify the following • Check the printer lights • Unable to print • If the printer still does not print Verify the following Verify the...

Full User Guide
Page 87
.... Troubleshooting Chapter 12 • Solution 3: Clear the print queue • Solution 4: Check the printer cable connection • Solution 5: Verify the printer driver configuration • Solution 6: Check if the printer is paused or offline • Solution 7: Clear the print queue manually • Solution 8: Restart the print spooler • Solution 9: Verify whether the software application is...
.... Troubleshooting Chapter 12 • Solution 3: Clear the print queue • Solution 4: Check the printer cable connection • Solution 5: Verify the printer driver configuration • Solution 6: Check if the printer is paused or offline • Solution 7: Clear the print queue manually • Solution 8: Restart the print spooler • Solution 9: Verify whether the software application is...

Full User Guide
Page 91
... and then try to restart the service, and then click OK. 5. Troubleshooting Chapter 12 Solution 7: Clear the print queue manually Solution: Manually clear the print queue. Double-click the icon for your operating system, do one of the following : • Windows Vista...: On the Windows taskbar, click Start, click Control Panel, and then click Printers. • Windows XP: On the Windows taskbar, click Start, click Control Panel, and then click Printers...
... and then try to restart the service, and then click OK. 5. Troubleshooting Chapter 12 Solution 7: Clear the print queue manually Solution: Manually clear the print queue. Double-click the icon for your operating system, do one of the following : • Windows Vista...: On the Windows taskbar, click Start, click Control Panel, and then click Printers. • Windows XP: On the Windows taskbar, click Start, click Control Panel, and then click Printers...

Full User Guide
Page 96
... status light continues to flash after cleaning the print cartridge, replace the print cartridge. Remove the problem cartridge and print with your printer. For more information, see Ink-backup mode. Troubleshooting 1 Selection number 6. For more information, see Replace print cartridges. Print cartridge...a replacement print cartridge, you can still print in the middle of the printer. Compatible print cartridges are listed in the reference guide that came with your printer. For more information, see Manually clean print cartridges. If this did not resolve the problem, try cleaning...
... status light continues to flash after cleaning the print cartridge, replace the print cartridge. Remove the problem cartridge and print with your printer. For more information, see Ink-backup mode. Troubleshooting 1 Selection number 6. For more information, see Replace print cartridges. Print cartridge...a replacement print cartridge, you can still print in the middle of the printer. Compatible print cartridges are listed in the reference guide that came with your printer. For more information, see Manually clean print cartridges. If this did not resolve the problem, try cleaning...

Full User Guide
Page 117
... print cartridges. Solution 4: Clean the print cartridge nozzles Solution: Check the print cartridges. If there is a problem with the print cartridges. For more information, see : Manually clean print cartridges Cause: The print cartridge nozzles needed to recover. If this did not solve the issue, try the next solution. For more information...
... print cartridges. Solution 4: Clean the print cartridge nozzles Solution: Check the print cartridges. If there is a problem with the print cartridges. For more information, see : Manually clean print cartridges Cause: The print cartridge nozzles needed to recover. If this did not solve the issue, try the next solution. For more information...

Full User Guide
Page 134
...11 Resume button 12 C calibrating print quality 67 calling HP support 123 cleaning print cartridges automatically 66 print cartridges manually 68 printer body 68 color dull 115 color tone 30 custom paper size 54 D default print settings 60 default printer 60 digital photos 29 document is misprinted document is ...printing 35 document prints slowly complex documents are printing 89 ink-backup mode 90 Maximum dpi selected 90 multiple programs are open 89 printer software is outdated 90 system requirements 90 dpi, maximum 52 duplexing 56, 57 E e-mail printing 34 envelope printing 37 environment ...
...11 Resume button 12 C calibrating print quality 67 calling HP support 123 cleaning print cartridges automatically 66 print cartridges manually 68 printer body 68 color dull 115 color tone 30 custom paper size 54 D default print settings 60 default printer 60 digital photos 29 document is misprinted document is ...printing 35 document prints slowly complex documents are printing 89 ink-backup mode 90 Maximum dpi selected 90 multiple programs are open 89 printer software is outdated 90 system requirements 90 dpi, maximum 52 duplexing 56, 57 E e-mail printing 34 envelope printing 37 environment ...

Full User Guide
Page 135
...vertical streaks 116 Web pages 58 Print Cartridge Status lights 12 print cartridges aligning 66 cleaning automatically 66 cleaning manually 68 installing 63 low on ink 75 maintaining 69 ordering information 67 photo print cartridge 30 previously used ...color settings 30 changing 61 default settings 60 print speed 52 printer does not feed paper 97 printer ejects paper 98 printer features 9 printer is not printing 83 printer is stalled 93 printer lights are flashing 80 printer maintenance 63 printer name does not appear 79 printer prints on multiple sheets at once 102 printer properties 61 printer...
...vertical streaks 116 Web pages 58 Print Cartridge Status lights 12 print cartridges aligning 66 cleaning automatically 66 cleaning manually 68 installing 63 low on ink 75 maintaining 69 ordering information 67 photo print cartridge 30 previously used ...color settings 30 changing 61 default settings 60 print speed 52 printer does not feed paper 97 printer ejects paper 98 printer features 9 printer is not printing 83 printer is stalled 93 printer lights are flashing 80 printer maintenance 63 printer name does not appear 79 printer prints on multiple sheets at once 102 printer properties 61 printer...


