
HP Notebook Hard Drives & Solid State Drives Identifying, Preventing, Diagnosing and Recovering from Drive Failures Care and Ma
Page 6
.../c01600726.pdf. The latest device driver versions address multiple known issues that could affect hard disk drive performance and reliability. Procedures for adding SATA drivers to RIS (Remote Installation Service) installation points include: • Adding SATA drivers to installation CDs, building an image, and switching to SATA AHCI mode • Using Sysprep with Intel® Application Accelerator drivers. Updates to the Intel Matrix Storage Manager driver are configured with Serial ATA hard disk drives...
.../c01600726.pdf. The latest device driver versions address multiple known issues that could affect hard disk drive performance and reliability. Procedures for adding SATA drivers to RIS (Remote Installation Service) installation points include: • Adding SATA drivers to installation CDs, building an image, and switching to SATA AHCI mode • Using Sysprep with Intel® Application Accelerator drivers. Updates to the Intel Matrix Storage Manager driver are configured with Serial ATA hard disk drives...

HP 2000 Notebook PC Compaq Presario CQ58 Notebook PC Compaq Presario CQ58 Notebook PC
Page 14
...) Left side 7 Connects an optional computer headset microphone, stereo array microphone, or monaural microphone. Left side Component (1) (2) External monitor port Vent (3) RJ-45 (network) jack (4) HDMI port (5) USB 2.0 port (6) Audio-in (microphone) jack (7) Audio-out (headphone) jack (8) Digital Media Slot Description Connects an external VGA monitor or projector. NOTE: When a device is normal for the internal fan to a headphone jack, the computer speakers are disabled. It is connected to cycle on and off during routine operation. NOTE: The computer fan starts up...
...) Left side 7 Connects an optional computer headset microphone, stereo array microphone, or monaural microphone. Left side Component (1) (2) External monitor port Vent (3) RJ-45 (network) jack (4) HDMI port (5) USB 2.0 port (6) Audio-in (microphone) jack (7) Audio-out (headphone) jack (8) Digital Media Slot Description Connects an external VGA monitor or projector. NOTE: When a device is normal for the internal fan to a headphone jack, the computer speakers are disabled. It is connected to cycle on and off during routine operation. NOTE: The computer fan starts up...
HP 2000 Notebook PC Compaq Presario CQ58 Notebook PC Compaq Presario CQ58 Notebook PC
Page 38
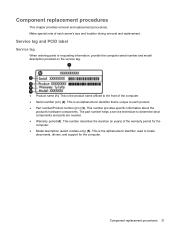
... number provides specific information about the product's hardware components. Component replacement procedures 31 This is unique to locate documents, drivers, and support for the computer. ● Model description (select models only) (5). This is an alphanumeric identifier that is the alphanumeric identifier used to each screw's size and location during removal and replacement. The part number helps a service technician to the front of the computer. ● Serial number (s/n) (2). Make special...
... number provides specific information about the product's hardware components. Component replacement procedures 31 This is unique to locate documents, drivers, and support for the computer. ● Model description (select models only) (5). This is an alphanumeric identifier that is the alphanumeric identifier used to each screw's size and location during removal and replacement. The part number helps a service technician to the front of the computer. ● Serial number (s/n) (2). Make special...

HP 2000 Notebook PC Compaq Presario CQ58 Notebook PC Compaq Presario CQ58 Notebook PC
Page 104
... a message on the screen reports a successful installation, you recorded earlier, open the folder on -screen instructions. Follow the on your hard drive. You will need this path when you connect your computer to a network, consult the network administrator before installing any device, cable, or cord. 1. Click your hard drive. Updating the BIOS 97 Do not shut down the computer or initiate Sleep. From the Start screen, select the HP Support Assistant app. 2. Click...
... a message on the screen reports a successful installation, you recorded earlier, open the folder on -screen instructions. Follow the on your hard drive. You will need this path when you connect your computer to a network, consult the network administrator before installing any device, cable, or cord. 1. Click your hard drive. Updating the BIOS 97 Do not shut down the computer or initiate Sleep. From the Start screen, select the HP Support Assistant app. 2. Click...
HP 2000 Notebook PC Compaq Presario CQ58 Notebook PC Compaq Presario CQ58 Notebook PC
Page 112
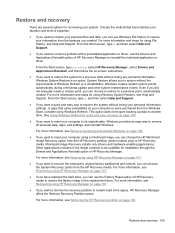
... settings, and reinstall Windows. From the Start screen, type h, and then select Help and Support. ● If you need to restore your personal files and data, you want to restore the system to the replacement drive. For more information, see Help and Support. For more information and steps for using File History, see Recovering using HP Recovery Manager on page 107. ● If you have replaced the hard drive, you want a quick...
... settings, and reinstall Windows. From the Start screen, type h, and then select Help and Support. ● If you need to restore your personal files and data, you want to restore the system to the replacement drive. For more information, see Help and Support. For more information and steps for using File History, see Recovering using HP Recovery Manager on page 107. ● If you have replaced the hard drive, you want a quick...

HP 2000 Notebook PC Compaq Presario CQ58 Notebook PC Compaq Presario CQ58 Notebook PC
Page 115
... computer boot order. Removing the HP Recovery partition HP Recovery Manager software allows you press the power button. 2. or - Select Troubleshoot from the HP Recovery partition: 1. Insert the first HP Recovery disc you created into an optional external optical drive, and then restart the computer. - Restart the computer. 3. To start HP Recovery Manager from the boot options menu. 3. If possible, back up , restoring, and recovering NOTE: If the computer does not automatically restart in BIOS where the computer looks for an optical drive or a USB flash drive...
... computer boot order. Removing the HP Recovery partition HP Recovery Manager software allows you press the power button. 2. or - Select Troubleshoot from the HP Recovery partition: 1. Insert the first HP Recovery disc you created into an optional external optical drive, and then restart the computer. - Restart the computer. 3. To start HP Recovery Manager from the boot options menu. 3. If possible, back up , restoring, and recovering NOTE: If the computer does not automatically restart in BIOS where the computer looks for an optical drive or a USB flash drive...

HP 2000 Notebook PC Compaq Presario CQ58 Notebook PC Compaq Presario CQ58 Notebook PC
Page 126
... boot order changing HP Recovery Manager 108 buttons left TouchPad 10 optical drive eject 6 power 12 right TouchPad 10 TouchPad on/off 10 C cables service considerations 26 caps lock light identifying 11 chipset product description 2 components bottom 14 display 9 front 8 left side 7 right side 6 top 10 computer feet locating 33 spare part number 25 computer major components illustrated 15 computer reset 106 computer specifications 99 connectors service considerations 26 D deleted files restoring 105 Digital Media Slot...
... boot order changing HP Recovery Manager 108 buttons left TouchPad 10 optical drive eject 6 power 12 right TouchPad 10 TouchPad on/off 10 C cables service considerations 26 caps lock light identifying 11 chipset product description 2 components bottom 14 display 9 front 8 left side 7 right side 6 top 10 computer feet locating 33 spare part number 25 computer major components illustrated 15 computer reset 106 computer specifications 99 connectors service considerations 26 D deleted files restoring 105 Digital Media Slot...
HP 2000 Notebook PC Compaq Presario CQ58 Notebook PC Compaq Presario CQ58 Notebook PC
Page 128
... 1 removing 93 spare part number 23, 25 product description audio 3 chipset 2 display panel 2 Ethernet 3 external media cards 4 graphics 2 hard drive 3 keyboard 4 memory module 2 microphone 3 operating system 5 optical drive 3 pointing device 4 ports 4 power requirements 4 processor 1 product name 1 security 5 serviceability 5 video 3 wireless 3 product name 1 R recovery 105, 106 discs 104, 108 HP Recovery Manager 107 media 108 starting 108 supported discs 104 system 107 USB flash drive 108 using HP Recovery media 104 recovery media creating 103 creating using HP Recovery Manager 104 recovery...
... 1 removing 93 spare part number 23, 25 product description audio 3 chipset 2 display panel 2 Ethernet 3 external media cards 4 graphics 2 hard drive 3 keyboard 4 memory module 2 microphone 3 operating system 5 optical drive 3 pointing device 4 ports 4 power requirements 4 processor 1 product name 1 security 5 serviceability 5 video 3 wireless 3 product name 1 R recovery 105, 106 discs 104, 108 HP Recovery Manager 107 media 108 starting 108 supported discs 104 system 107 USB flash drive 108 using HP Recovery media 104 recovery media creating 103 creating using HP Recovery Manager 104 recovery...
User Guide - Windows 8
Page 5
... your hardware and software information 3 Front ...3 Right side ...3 Left side ...4 Display ...6 Top ...7 TouchPad ...7 Lights ...8 Buttons and speakers ...9 Keys ...10 Bottom ...11 Labels ...12 3 Connecting to a network ...14 Connecting to a wireless network ...14 Using the wireless controls 14 Using the wireless button 14 Using operating system controls 15 Using a WLAN ...15 Using an Internet service provider 15 Setting up a WLAN 16 Configuring a wireless router 16 Protecting your WLAN 16 Connecting to a WLAN 17 Using Bluetooth wireless devices (select models only 17 Connecting to...
... your hardware and software information 3 Front ...3 Right side ...3 Left side ...4 Display ...6 Top ...7 TouchPad ...7 Lights ...8 Buttons and speakers ...9 Keys ...10 Bottom ...11 Labels ...12 3 Connecting to a network ...14 Connecting to a wireless network ...14 Using the wireless controls 14 Using the wireless button 14 Using operating system controls 15 Using a WLAN ...15 Using an Internet service provider 15 Setting up a WLAN 16 Configuring a wireless router 16 Protecting your WLAN 16 Connecting to a WLAN 17 Using Bluetooth wireless devices (select models only 17 Connecting to...
User Guide - Windows 8
Page 7
... ...46 Handling drives ...46 Replacing a hard drive ...46 Using Disk Defragmenter 48 Using Disk Cleanup ...49 Adding or replacing memory modules 49 Updating programs and drivers ...51 Cleaning your computer ...52 Cleaning the display, sides, and cover 52 Cleaning the TouchPad and keyboard 52 Traveling with or shipping your computer 52 9 Securing your computer and information 54 Locating your security software ...54 Using passwords ...54 Setting Windows passwords 55 Setting Setup Utility (BIOS) passwords 55 Using Internet security software ...56 Using antivirus software ...56...
... ...46 Handling drives ...46 Replacing a hard drive ...46 Using Disk Defragmenter 48 Using Disk Cleanup ...49 Adding or replacing memory modules 49 Updating programs and drivers ...51 Cleaning your computer ...52 Cleaning the display, sides, and cover 52 Cleaning the TouchPad and keyboard 52 Traveling with or shipping your computer 52 9 Securing your computer and information 54 Locating your security software ...54 Using passwords ...54 Setting Windows passwords 55 Setting Setup Utility (BIOS) passwords 55 Using Internet security software ...56 Using antivirus software ...56...
User Guide - Windows 8
Page 8
... wireless network ...57 Backing up your software applications and information 57 Using an optional security cable lock 57 10 Using Setup Utility (BIOS) and System Diagnostics 59 Starting Setup Utility (BIOS) ...59 Updating the BIOS ...59 Determining the BIOS version 59 Downloading a BIOS update 60 Using System Diagnostics ...60 11 Backing up, restoring, and recovering ...62 Creating recovery media and backups 62 Creating HP Recovery media 63 What you need to know 63 To create HP Recovery media 63 Restore and recovery ...64 Using Windows Refresh for quick and easy recovery 65 Remove...
... wireless network ...57 Backing up your software applications and information 57 Using an optional security cable lock 57 10 Using Setup Utility (BIOS) and System Diagnostics 59 Starting Setup Utility (BIOS) ...59 Updating the BIOS ...59 Determining the BIOS version 59 Downloading a BIOS update 60 Using System Diagnostics ...60 11 Backing up, restoring, and recovering ...62 Creating recovery media and backups 62 Creating HP Recovery media 63 What you need to know 63 To create HP Recovery media 63 Restore and recovery ...64 Using Windows Refresh for quick and easy recovery 65 Remove...

User Guide - Windows 8
Page 28
... from the list of personal injury, adjust the volume before putting on a docking station. To connect high-definition speakers to create multimedia. Component (7) (8) (9) (10) Audio-out (headphone) jack Audio-in (microphone) jack HDMI port External monitor port Description Connects optional powered stereo speakers, headphones, earbuds, a headset, or a television audio cable. To reduce the risk of applications. Connects an optional video or audio device, such as speakers or headphones. To use the webcam, from the computer Start screen, type c, and then...
... from the list of personal injury, adjust the volume before putting on a docking station. To connect high-definition speakers to create multimedia. Component (7) (8) (9) (10) Audio-out (headphone) jack Audio-in (microphone) jack HDMI port External monitor port Description Connects optional powered stereo speakers, headphones, earbuds, a headset, or a television audio cable. To reduce the risk of applications. Connects an optional video or audio device, such as speakers or headphones. To use the webcam, from the computer Start screen, type c, and then...

User Guide - Windows 8
Page 50
...; Make sure you have installed the latest software updates for best performance of power, be sure the battery is sufficiently charged before writing to media. ● Do not type on the keyboard or move the computer while an optical drive is writing to install the update. ● If lines appear on the display when viewing a BD, they may be caused by a laser from the wireless network...
...; Make sure you have installed the latest software updates for best performance of power, be sure the battery is sufficiently charged before writing to media. ● Do not type on the keyboard or move the computer while an optical drive is writing to install the update. ● If lines appear on the display when viewing a BD, they may be caused by a laser from the wireless network...

User Guide - Windows 8
Page 57
... service door. WARNING! To run Disk Defragmenter: 1. The memory module slots are discharged of electric shock and damage to the equipment, unplug the power cord and remove all your work easily, like your physical work and the memory is to expand the amount of fragmented files, Disk Defragmenter may set Disk Defragmenter to run Disk Defragmenter on -screen instructions. HP recommends defragmenting your drives. 3. Using Disk Cleanup Disk Cleanup searches the hard drive...
... service door. WARNING! To run Disk Defragmenter: 1. The memory module slots are discharged of electric shock and damage to the equipment, unplug the power cord and remove all your work easily, like your physical work and the memory is to expand the amount of fragmented files, Disk Defragmenter may set Disk Defragmenter to run Disk Defragmenter on -screen instructions. HP recommends defragmenting your drives. 3. Using Disk Cleanup Disk Cleanup searches the hard drive...

User Guide - Windows 8
Page 63
... requirements set , entered, changed , or deleted. Use the following tips for creating and saving passwords: ● To reduce the risk of being locked out of the computer, record each time you access Setup Utility (BIOS). ● If you forget your administrator password, you cannot access Setup Utility (BIOS). Setting Windows passwords Password User password Administrator password Function Protects access to computer contents. For additional information about Windows passwords, such as it is not displayed as screen-saver passwords, from the Start screen, type...
... requirements set , entered, changed , or deleted. Use the following tips for creating and saving passwords: ● To reduce the risk of being locked out of the computer, record each time you access Setup Utility (BIOS). ● If you forget your administrator password, you cannot access Setup Utility (BIOS). Setting Windows passwords Password User password Administrator password Function Protects access to computer contents. For additional information about Windows passwords, such as it is not displayed as screen-saver passwords, from the Start screen, type...

User Guide - Windows 8
Page 64
..., repair any damage they have become available after the computer left the factory. For more information about computer viruses, from the Start screen, type h, and then select Help and Support from the system is installed on password in most viruses, destroy them to date. To set of user-defined security criteria. Antivirus software can be kept up to function abnormally. Installing Windows security updates Updates to...
..., repair any damage they have become available after the computer left the factory. For more information about computer viruses, from the Start screen, type h, and then select Help and Support from the system is installed on password in most viruses, destroy them to date. To set of user-defined security criteria. Antivirus software can be kept up to function abnormally. Installing Windows security updates Updates to...
User Guide - Windows 8
Page 68
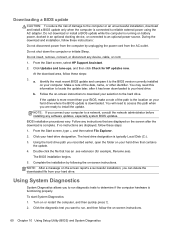
... network administrator before installing any device, cable, or cord. 1. You will need this path when you want to run diagnostic tests to determine if the computer hardware is complete. If no instructions are displayed on the screen reports a successful installation, you connect your hard drive where the BIOS update is running on -screen instructions. 60 Chapter 10 Using Setup Utility (BIOS) and System Diagnostics The hard drive designation is connected to reliable external power using the AC adapter. Using...
... network administrator before installing any device, cable, or cord. 1. You will need this path when you want to run diagnostic tests to determine if the computer hardware is complete. If no instructions are displayed on the screen reports a successful installation, you connect your hard drive where the BIOS update is running on -screen instructions. 60 Chapter 10 Using Setup Utility (BIOS) and System Diagnostics The hard drive designation is connected to reliable external power using the AC adapter. Using...
User Guide - Windows 8
Page 72
... Support. ● If you need to restore your personal files and data, you can choose the HP Minimized Image Recovery option from the HP Recovery media. From the Start screen, type recovery, select HP Recovery Manager, and then select Drivers and Applications Reinstall, and follow the on-screen instructions. ● If you want a quick and easy way to recover the system without losing your personal data, settings, or apps that came pre-installed...
... Support. ● If you need to restore your personal files and data, you can choose the HP Minimized Image Recovery option from the HP Recovery media. From the Start screen, type recovery, select HP Recovery Manager, and then select Drivers and Applications Reinstall, and follow the on-screen instructions. ● If you want a quick and easy way to recover the system without losing your personal data, settings, or apps that came pre-installed...

User Guide - Windows 8
Page 73
... lower corner of the screen to display charms. 2. Click Settings. From the Start screen, type h, and then select Help and Support. From the Start screen, type h, and then select Help and Support. IMPORTANT: This option does not provide backups of the screen, and then select General from your computer, and reinstalls Windows. To remove everything and reinstall Windows using Refresh. Select Reset your information. Restore and recovery 65 Under Refresh your...
... lower corner of the screen to display charms. 2. Click Settings. From the Start screen, type h, and then select Help and Support. From the Start screen, type h, and then select Help and Support. IMPORTANT: This option does not provide backups of the screen, and then select General from your computer, and reinstalls Windows. To remove everything and reinstall Windows using Refresh. Select Reset your information. Restore and recovery 65 Under Refresh your...

User Guide - Windows 8
Page 79
...6, 19 Internet connection setup 16 Internet security software, using 56 J jacks audio-in (microphone) 5 audio-out (headphone) 5 network 4 RJ-45 (network) 4 K keyboard hot keys, identifying 31 keys action 10 esc 10 Windows applications 10 Windows system logo 10 L labels Bluetooth 13 regulatory 13 serial number 12 service 12 wireless certification 13 WLAN 13 latch, battery release 11 lights AC adapter 4 caps lock 8 hard drive 5 optical drive 3 power 8 TouchPad 7 webcam 6, 19 wireless 8 low battery level 36 M maintenance Disk Cleanup 49 Disk Defragmenter 48 memory module inserting 51 removing 50...
...6, 19 Internet connection setup 16 Internet security software, using 56 J jacks audio-in (microphone) 5 audio-out (headphone) 5 network 4 RJ-45 (network) 4 K keyboard hot keys, identifying 31 keys action 10 esc 10 Windows applications 10 Windows system logo 10 L labels Bluetooth 13 regulatory 13 serial number 12 service 12 wireless certification 13 WLAN 13 latch, battery release 11 lights AC adapter 4 caps lock 8 hard drive 5 optical drive 3 power 8 TouchPad 7 webcam 6, 19 wireless 8 low battery level 36 M maintenance Disk Cleanup 49 Disk Defragmenter 48 memory module inserting 51 removing 50...


