HP Presario CQ57-200 Support Question
HP Presario CQ57-200 Support Question
Find answers below for this question about HP Presario CQ57-200.Need a HP Presario CQ57-200 manual? We have 4 online manuals for this item!
Question posted by verykin on November 13th, 2013
Who To Remove Keys From The Keyboard Cq57
The person who posted this question about this HP product did not include a detailed explanation. Please use the "Request More Information" button to the right if more details would help you to answer this question.
Current Answers
Related HP Presario CQ57-200 Manual Pages
HP Notebook Reference Guide - Windows 7 - Page 8
... 47 Identifying the installed optical drive 47 Inserting an optical disc ...48 Tray load ...48 Slot load ...48 Removing an optical disc 49 Tray load ...49 When the disc tray opens normally 49 When the disc tray fails ... ...58 Cleaning your computer ...58 Cleaning the display ...58 Cleaning the TouchPad and keyboard 58 Updating programs and drivers ...58 Using SoftPaq Download Manager ...59
viii
HP Notebook Reference Guide - Windows 7 - Page 13
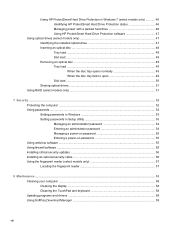
... devices are off
Using the wireless button
NOTE: A computer may have a wireless button, a wireless switch, or a wireless action key on .
Wireless network connection (connected)
Indicates that no wireless connections are on the keyboard. Network status (disconnected)
Not connected to the Getting Started guide for information on identifying the location of wireless controls...
HP Notebook Reference Guide - Windows 7 - Page 17
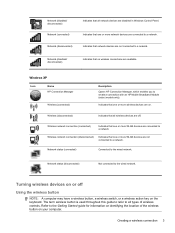
...9679; Wireless encryption-Wi-Fi Protected Access (WPA) uses security settings to dynamically generate a new key for data that is a mobile phone network provider.
You can by using WLANs. Some networks use... network activities to Inserting a SIM on page 8 and Removing a SIM on the network. For information on inserting and removing the SIM, refer to e-mail that are available in most...
HP Notebook Reference Guide - Windows 7 - Page 32
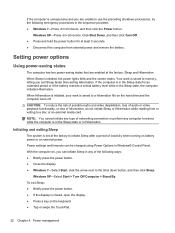
...Sleep is closed, open the display. ● Press a key on the hard drive and the computer turns off.
When ... Sleep or Hibernation while reading from external power and remove the battery. Setting power options
Using power-saving states... 7-Select Start, click the arrow next to a hibernation file on the keyboard. ● Tap or swipe the TouchPad.
22 Chapter 4 Power management ...
HP Notebook Reference Guide - Windows 7 - Page 48
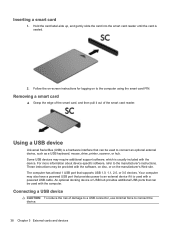
...USB port that can be used to connect the device.
38 Chapter 5 External cards and devices Removing a smart card
▲ Grasp the edge of damage to a USB connector, use minimal force to connect... an optional external device, such as a USB keyboard, mouse, drive, printer, scanner, or hub. Connecting a USB device
CAUTION: To reduce the risk of...
HP Notebook Reference Guide - Windows 7 - Page 54
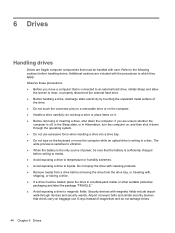
... do not drop a drive or place items on , and then shut it . ● Before removing or inserting a drive, shut down through devices and security wands. Observe these precautions: ● Before... only source of
the drive. ● Do not touch the connector pins on a removable drive or on the keyboard or move a computer that check carry-on baggage use excessive force when inserting a drive...
HP Notebook Reference Guide - Windows 7 - Page 67
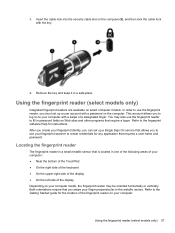
Remove the key and keep it in password fields on select computer models. This account allows you can set up a Single Sign...order to use your finger perpendicular to your computer: ● Near the bottom of the TouchPad ● On the right side of the keyboard ● On the upper-right side of the display ● On the left side of a designated finger. Using the fingerprint reader (...
HP Notebook Reference Guide - Windows 7 - Page 68
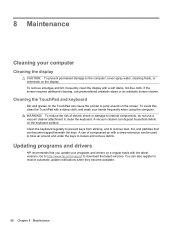
... permanent damage to the computer, never spray water, cleaning fluids, or chemicals on the keyboard surface. To avoid this, clean the TouchPad with the latest versions. Clean the keyboard regularly to prevent keys from sticking, and to loosen and remove debris.
To reduce the risk of compressed air with a soft damp, lint-free cloth...
HP Notebook Reference Guide - Windows 7 - Page 70
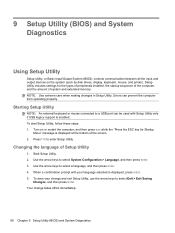
... drives, display, keyboard, mouse, and printer). Start Setup Utility. 2. Changing the language of system and extended memory. To start Setup Utility, follow these steps: 1. Use the arrow keys to a USB ...effect immediately.
60 Chapter 9 Setup Utility (BIOS) and System Diagnostics
Use the arrow keys to enter Setup Utility.
To save your language selected is enabled. NOTE: Use extreme...
HP Notebook Reference Guide - Windows 7 - Page 71
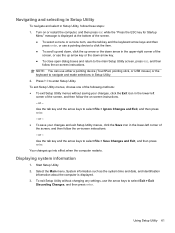
... of the screen. ● To select a menu or a menu item, use the tab key and the keyboard arrow keys and then
press enter, or use a pointing device to navigate and make selections in the lower...without changing any settings, use either a pointing device (TouchPad, pointing stick, or USB mouse) or the keyboard to click the item. ● To scroll up and down, click the up arrow or the down arrow...
HP Notebook Reference Guide - Windows 7 - Page 73
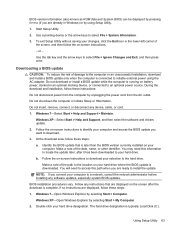
...the download area, follow these steps:
1.
Using Setup Utility 63 Use the tab key and the arrow keys to select File > System Information.
3. Do not download or install a BIOS ...update while the computer is complete. Double-click your hard drive. The hard drive designation is downloaded. Do not insert, remove...
HP Notebook Reference Guide - Windows 7 - Page 79
...1394 devices
connecting 40 defined 39 removing 40 16-bit PC Cards 32 32-bit PC Cards 32
A AC adapter, testing 30 action keys
media 15 volume 16 administrator password ...2 critical battery level 22, 27 critical security updates, installing 56
D digital card
inserting 31 removing 32 supported formats 31 Disk Cleanup software 45 Disk Defragmenter software 45 DisplayPort, connecting 18
docking ...
Getting Started Compaq Notebook - Windows 7 - Page 35
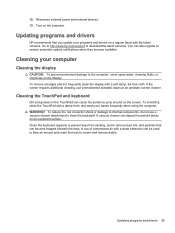
.... To avoid this, clean the TouchPad with a soft damp, lint-free cloth. A vacuum cleaner can also register to clean the keyboard. Clean the keyboard regularly to prevent keys from sticking, and to remove dust, lint, and particles that you update your computer
Cleaning the display
CAUTION: To prevent permanent damage to blow air around...
Compaq Presario CQ57 Notebook PC - Maintenance and Service Guide - Page 9
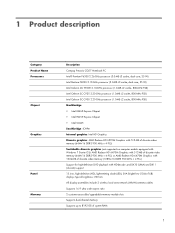
...Product description
Category Product Name Processors
Chipset
Graphics
Panel Memory
Description Compaq Presario CQ57 Notebook PC Intel® Pentium P6300 2.26-GHz processor (3.0-MB L3...215; 4 PCs) or AMD Radeon HD 6470M Graphics with 1024-MB of system RAM
1 typical brightness: 200 nits All display assemblies include 2 wireless local area network (WLAN) antenna cables Supports 16:9 ultra wide ...
Compaq Presario CQ57 Notebook PC - Maintenance and Service Guide - Page 53
...the United States
For use in Hibernation, turn the
computer on page 42). Remove the memory module/wireless module compartment cover (see Hard drive on , and ...646125-AD1
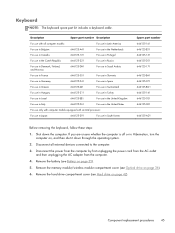
Before removing the keyboard, follow these steps: 1. Remove the hard drive compartment cover (see Optical drive on page 35). 5.
Keyboard
NOTE: The keyboard spare part kit includes a keyboard cable. Remove the battery (...
Compaq Presario CQ57 Notebook PC - Maintenance and Service Guide - Page 54
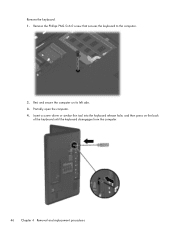
... the computer. 4. Insert a screw driver or similar thin tool into the keyboard release hole, and then press on its left side. 3. Remove the keyboard: 1. Remove the Phillips PM2.5×6.0 screw that secures the keyboard to the computer.
2. Rest and secure the computer on the back
of the keyboard until the keyboard disengages from the computer.
46 Chapter...
Compaq Presario CQ57 Notebook PC - Maintenance and Service Guide - Page 55
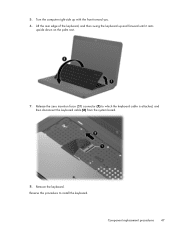
... with the front toward you. 6. Reverse this procedure to which the keyboard cable is attached, and then disconnect the keyboard cable (2) from the system board.
8. Component replacement procedures 47 Remove the keyboard. Turn the computer right-side up and forward until it rests
upside down on the palm rest.
7.
Release the zero insertion force...
Compaq Presario CQ57 Notebook PC - Maintenance and Service Guide - Page 56
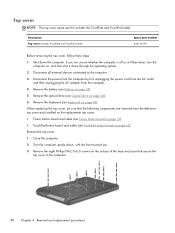
...unsure whether the computer is off or in Hibernation, turn the computer on page 45). Remove the eight Phillips PM2.5×6.0 screws on page 36).
6.
When replacing the top ...Close the computer.
2.
Shut down , with the front toward you are removed from the computer.
4. Remove the keyboard (see Battery on page 53)
Remove the top cover:
1. If you .
3. Description Top cover (includes ...
Compaq Presario CQ57 Notebook PC - Maintenance and Service Guide - Page 111

... number 20, 25, 63
J jacks
audio-in 10 audio-out 10 headphone 10 microphone 10 network 10 RJ-45 10
K key components 7 keyboard
product description removal 45 spare part numbers
45
3 16, 26,
keys Action 7 esc 7 fn 7 Windows applications 7 Windows logo 7
L left-side components 10 light components 8 lights
AC adapter 11 caps lock 8 drive...
Compaq Presario CQ57 Notebook PC - Maintenance and Service Guide - Page 112

...keyboard 3 memory module 1 microphone 2 operating system 4 optical drive 2 pointing device 3 ports 3 power requirements 3 processors 1 product name 1 security 3 serviceability 4 video 2 wireless 2 product name 1, 13, 33 product number 14, 33
R removal...microphone module
removal 62 spare part number 20, 27, 62 Windows applications key 7 Windows logo key 7 wireless antenna locations 5 removal 66 ...
Similar Questions

How To Remove The Keyboard From A Compaq Presario Cq57 Laptop
(Posted by thebrmchtd 9 years ago)

How To Remove The Keyboard From A Compaq Presario Laptop Cq57
(Posted by bobqagpo 9 years ago)

How To Remove Keyboard From Compaq Presario Cq57
(Posted by strrmil 10 years ago)

Keyboard On Laptop Only Works When Connected To Docking Station.
Keyboard on laptop only works when connected to docking station. When disconnect...
Keyboard on laptop only works when connected to docking station. When disconnect...
(Posted by n91192 11 years ago)

Return/enter Key Whereis It On Keyboard Cq57
(Posted by chrisbuck61 11 years ago)