
User Guide
Page 4
... tray (single-sheet feed)...10 Print from a software program...12 Change print settings...14 Set the default print settings...16 Make the HP Photosmart Pro B8800 series the default printer 17 3 Color management What is color management?...18 Use the HP Photosmart Pro print plug-in for Adobe Photoshop®(versions 7.0, CS, and CS 2 only 18 Use application-based...
... tray (single-sheet feed)...10 Print from a software program...12 Change print settings...14 Set the default print settings...16 Make the HP Photosmart Pro B8800 series the default printer 17 3 Color management What is color management?...18 Use the HP Photosmart Pro print plug-in for Adobe Photoshop®(versions 7.0, CS, and CS 2 only 18 Use application-based...
User Guide
Page 5
... Do I? Designed especially for purchasing an HP Photosmart Pro B8800 series printer. English 1 Welcome Thank you for professional and serious amateur photographers, this printer yields rich, bright, fade-resistant, and color-accurate photos, especially when used with HP Advanced Photo paper. The printer driver is the book you have installed the HP Photosmart software on the CD with the following...
... Do I? Designed especially for purchasing an HP Photosmart Pro B8800 series printer. English 1 Welcome Thank you for professional and serious amateur photographers, this printer yields rich, bright, fade-resistant, and color-accurate photos, especially when used with HP Advanced Photo paper. The printer driver is the book you have installed the HP Photosmart software on the CD with the following...

User Guide
Page 6
... a time. 4 Main tray: Place a stack of plain paper or photo paper in this port to connect the power cord included with the printer. Back of printer 1 Rear door: Remove this door to clear paper jams. 2 Rear paper slot: Print jobs from the specialty media tray, the space behind ... media thicker than 0.7 mm, or more information on . 3 Power cord connection: Use this tray for the paper to check the printer status. Printer parts Front of printer English 1 Control panel and indicator lights: Use the buttons on the control panel to open the Toolbox on the computer, resume or cancel...
... a time. 4 Main tray: Place a stack of plain paper or photo paper in this port to connect the power cord included with the printer. Back of printer 1 Rear door: Remove this door to clear paper jams. 2 Rear paper slot: Print jobs from the specialty media tray, the space behind ... media thicker than 0.7 mm, or more information on . 3 Power cord connection: Use this tray for the paper to check the printer status. Printer parts Front of printer English 1 Control panel and indicator lights: Use the buttons on the control panel to open the Toolbox on the computer, resume or cancel...

User Guide
Page 7
... Welcome Do not load media thicker than 0.7mm. Chapter 1 4 USB port: Use this port to connect the printer to a computer. 5 Rear door releases: Press the two releases on the front of the guide and sliding the...across. 2 Paper-size markings: Refer to these stops so that the paper feeds correctly into the printer. 6 Paper-length guide: Adjust this guide to fit close to the left edge of the ... loading paper in this tray for printing. To learn how to use this tray, see Print from the printer. 5 Paper stops: Align the paper against these markings to guide you are loading. 2 Output tray: ...
... Welcome Do not load media thicker than 0.7mm. Chapter 1 4 USB port: Use this port to connect the printer to a computer. 5 Rear door releases: Press the two releases on the front of the guide and sliding the...across. 2 Paper-size markings: Refer to these stops so that the paper feeds correctly into the printer. 6 Paper-length guide: Adjust this guide to fit close to the left edge of the ... loading paper in this tray for printing. To learn how to use this tray, see Print from the printer. 5 Paper stops: Align the paper against these markings to guide you are loading. 2 Output tray: ...

User Guide
Page 8
.... The amber Toolbox light flashes slowly if the printer is busy opening the Toolbox or HP Printer Utility. 4 On: The On light is solid blue when the printer is missing, damaged, or incompatible. English Control panel 1 Cancel: Press to stop the current print job, printhead alignment, or color calibration. 2 Resume: The Resume light flashes if...
.... The amber Toolbox light flashes slowly if the printer is busy opening the Toolbox or HP Printer Utility. 4 On: The On light is solid blue when the printer is missing, damaged, or incompatible. English Control panel 1 Cancel: Press to stop the current print job, printhead alignment, or color calibration. 2 Resume: The Resume light flashes if...

User Guide
Page 9
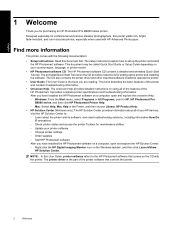
...paper stack in the specialty media tray should not be loaded into : Media Main tray Photo, Inkjet, and Plain Papers Examples: HP Advanced Photo paper, HP Professional Satin Photo paper, brochure, photo, inkjet, and plain papers Recommended Digital Fine Art Papers 220 gsm Examples: Canvas; See Choose the ... tray can hold multiple sheets of media into this tray. • Specialty media tray: The specialty media tray is clear space behind the printer at a time into this tray, and be used in the main tray. English 2 Basic printing This section explains how to 13 x ...
...paper stack in the specialty media tray should not be loaded into : Media Main tray Photo, Inkjet, and Plain Papers Examples: HP Advanced Photo paper, HP Professional Satin Photo paper, brochure, photo, inkjet, and plain papers Recommended Digital Fine Art Papers 220 gsm Examples: Canvas; See Choose the ... tray can hold multiple sheets of media into this tray. • Specialty media tray: The specialty media tray is clear space behind the printer at a time into this tray, and be used in the main tray. English 2 Basic printing This section explains how to 13 x ...
User Guide
Page 10
...printing, because the media can damage the printer. WARNING! Supported sizes The HP Photosmart supports a wide range of HP and non-HP specialty media. English Choose the right paper or other media 7 To print High quality, long lasting prints and enlargements Color calibration and printhead alignment Casual photos from...Art Paper • HP Hahnemühle Watercolor Paper • HP Aquarella Art Paper • HP Artist Matte Canvas • Photo rag Some media types may not be available in the main tray when you are not supported with some of available HP inkjet paper, or to purchase...
...printing, because the media can damage the printer. WARNING! Supported sizes The HP Photosmart supports a wide range of HP and non-HP specialty media. English Choose the right paper or other media 7 To print High quality, long lasting prints and enlargements Color calibration and printhead alignment Casual photos from...Art Paper • HP Hahnemühle Watercolor Paper • HP Aquarella Art Paper • HP Artist Matte Canvas • Photo rag Some media types may not be available in the main tray when you are not supported with some of available HP inkjet paper, or to purchase...

User Guide
Page 11
... visit the Resource Center on the HP Professional Photography Web site at www.hp.com/go/prophoto. TIP: You can be loaded into the main tray, as it can damage the printer and the media. Do not load... be printed facing down. The main tray is no higher than 0.7 mm, as it can damage the printer. English Chapter 2 (continued) Paper type Banner paper Size Up to 13 x 44 inches NOTE: To learn which... media can remove the tray from the printer, if necessary, by grasping the sides of the tray with both hands and pulling it towards you. ...
... visit the Resource Center on the HP Professional Photography Web site at www.hp.com/go/prophoto. TIP: You can be loaded into the main tray, as it can damage the printer and the media. Do not load... be printed facing down. The main tray is no higher than 0.7 mm, as it can damage the printer. English Chapter 2 (continued) Paper type Banner paper Size Up to 13 x 44 inches NOTE: To learn which... media can remove the tray from the printer, if necessary, by grasping the sides of the tray with both hands and pulling it towards you. ...

User Guide
Page 12
... against the edges of the paper by squeezing the release and pushing in the extension, and push the tray back into the printer until it is lying flat in the printer before you are printing on paper larger than 21.6 x 28 cm (8.5 x 11 inches), pull out the output tray extension by holding... tray with one hand and pulling out the extension with your computer, select the paper type that the paper is fully seated. In the printer driver on the printer driver, see Print from the main tray 9 If you have loaded. Print from a software program. English c. Be sure to the end of the...
... against the edges of the paper by squeezing the release and pushing in the extension, and push the tray back into the printer until it is lying flat in the printer before you are printing on paper larger than 21.6 x 28 cm (8.5 x 11 inches), pull out the output tray extension by holding... tray with one hand and pulling out the extension with your computer, select the paper type that the paper is fully seated. In the printer driver on the printer driver, see Print from the main tray 9 If you have loaded. Print from a software program. English c. Be sure to the end of the...

User Guide
Page 13
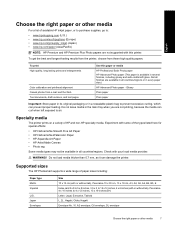
... that before you print on expensive specialty media, you practice using non-HP brands of glossy media in the main tray to 20 sheets, or use...See Print from the specialty media tray (single-sheet feed) for information on . The space behind the printer for printing from the main tray. NOTE: If you are using the specialty media tray by holding the ...specialty media tray. However, if a yellow warning symbol appears (Windows), or the driver does not allow that the printer will feed media from the specialty media tray. NOTE: Do not feed paper into the specialty media tray, see...
... that before you print on expensive specialty media, you practice using non-HP brands of glossy media in the main tray to 20 sheets, or use...See Print from the specialty media tray (single-sheet feed) for information on . The space behind the printer for printing from the main tray. NOTE: If you are using the specialty media tray by holding the ...specialty media tray. However, if a yellow warning symbol appears (Windows), or the driver does not allow that the printer will feed media from the specialty media tray. NOTE: Do not feed paper into the specialty media tray, see...

User Guide
Page 14
... the media feeds under the rollers smoothly. Print from the specialty media tray (single-sheet feed) 11 Feed the media into the printer until the back edge of the printer. Be sure to be printed facing up with the side to close the top door again. Align the right edge of the... media against the raised edge of the tray and not against the side of the printer. Load one sheet in the specialty media tray. English 1 Output tray extension 2 Paper catch 4.
... the media feeds under the rollers smoothly. Print from the specialty media tray (single-sheet feed) 11 Feed the media into the printer until the back edge of the printer. Be sure to be printed facing up with the side to close the top door again. Align the right edge of the... media against the raised edge of the tray and not against the side of the printer. Load one sheet in the specialty media tray. English 1 Output tray extension 2 Paper catch 4.
User Guide
Page 15
...recommended source is the main tray although you have loaded. To modify the settings, see Color management. If you have paper loaded correctly. 2. Select HP Photosmart Pro B8800 series as the default printer, you want to the recommended paper tray. When you can skip this step. Send your... 12 Basic printing Print from that matches the type of the curl. 5. The HP Photosmart Pro B8800 series will need to print a photo or document using the basic printer settings. For more advanced color management settings, see Change print settings. NOTE: When you have already set to ...
...recommended source is the main tray although you have loaded. To modify the settings, see Color management. If you have paper loaded correctly. 2. Select HP Photosmart Pro B8800 series as the default printer, you want to the recommended paper tray. When you can skip this step. Send your... 12 Basic printing Print from that matches the type of the curl. 5. The HP Photosmart Pro B8800 series will need to print a photo or document using the basic printer settings. For more advanced color management settings, see Change print settings. NOTE: When you have already set to ...
User Guide
Page 16
..., or Printer. 5. The Print dialog appears with the Copies & Pages pane open. 6. To print from a software program 13 TIP: You can make your print job by choosing one of print task in the Advanced, Printing Shortcuts, Features, and Color tabs. ...scaling percentage. 4. NOTE: When printing a photo, you must select options for the correct paper type and photo enhancement. 5. Make sure the HP Photosmart is the selected printer. 3. Specify the page attributes: • Choose the paper size. • Select the orientation. • Enter the scaling percentage. 4....
..., or Printer. 5. The Print dialog appears with the Copies & Pages pane open. 6. To print from a software program 13 TIP: You can make your print job by choosing one of print task in the Advanced, Printing Shortcuts, Features, and Color tabs. ...scaling percentage. 4. NOTE: When printing a photo, you must select options for the correct paper type and photo enhancement. 5. Make sure the HP Photosmart is the selected printer. 3. Specify the page attributes: • Choose the paper size. • Select the orientation. • Enter the scaling percentage. 4....
User Guide
Page 17
...speed. • Normal: Provides the best balance between print quality and speed. To enhance color matching and detail in the Finder, and then choose Library, HP Product Help. Open the Printer Properties dialog box. 2. From the Print quality drop-down list, select the appropriate speed ...settings available in for Adobe Photoshop®(versions 7.0, CS, and CS 2 only). For more information on the HP printer driver, see Use the HP Photosmart Pro print plug-in the printer driver. In the Additional Resources area, point to Documents, and then select Onscreen Guide. This setting is ...
...speed. • Normal: Provides the best balance between print quality and speed. To enhance color matching and detail in the Finder, and then choose Library, HP Product Help. Open the Printer Properties dialog box. 2. From the Print quality drop-down list, select the appropriate speed ...settings available in for Adobe Photoshop®(versions 7.0, CS, and CS 2 only). For more information on the HP printer driver, see Use the HP Photosmart Pro print plug-in the printer driver. In the Additional Resources area, point to Documents, and then select Onscreen Guide. This setting is ...

User Guide
Page 18
... paper type, see Paper trays. 4. Choose any other print settings that you are using, overriding the recommended Source setting may result in printer or media damage. Click the Features tab. 3. For more information on the paper type you want , and then click Print. Open .... 5. To select a paper source (Windows) 1. Depending on the paper type you are using , overriding the recommended Paper Source setting may result in printer or media damage. To select a paper source (Mac) 1. To select a specific paper type (Mac) 1. For more information, see Paper trays. Choose...
... paper type, see Paper trays. 4. Choose any other print settings that you are using, overriding the recommended Source setting may result in printer or media damage. Click the Features tab. 3. For more information on the paper type you want , and then click Print. Open .... 5. To select a paper source (Windows) 1. Depending on the paper type you are using , overriding the recommended Paper Source setting may result in printer or media damage. To select a paper source (Mac) 1. To select a specific paper type (Mac) 1. For more information, see Paper trays. Choose...

User Guide
Page 19
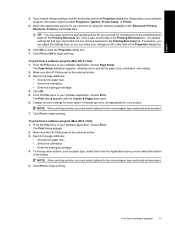
...). On the File menu in the printer driver, see Color management. 3. NOTE: For more information on the right side of the following : • Composite gray • Gray inks only 6. Make changes to open the HP Solution Center home page. 2. Open the Printer Properties dialog box. 2. Open the Print... dialog box. 2. In the Presets pop-up menu, select Grayscale. 5. Click the Paper tab. 4. Click the Color Options tab, and select one of the Windows ...
...). On the File menu in the printer driver, see Color management. 3. NOTE: For more information on the right side of the following : • Composite gray • Gray inks only 6. Make changes to open the HP Solution Center home page. 2. Open the Printer Properties dialog box. 2. Open the Print... dialog box. 2. In the Presets pop-up menu, select Grayscale. 5. Click the Paper tab. 4. Click the Color Options tab, and select one of the Windows ...

User Guide
Page 20
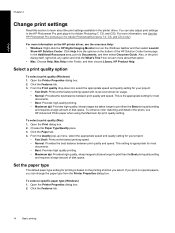
English Make the HP Photosmart Pro B8800 series the default printer Windows 1. In the System Preferences, click Print & Fax, and then click Printing. 2. Choose an option from the Selected printer in Print Dialog pop-up menu. Right-click the HP Photosmart printer icon, and then click Set as Default Printer. Mac 1. Make the HP Photosmart Pro B8800 series the default printer 17 On the Windows taskbar, click Start, and then click Control Panel. 2. Open Printers (Windows Vista) or Printers and Faxes (Windows XP). 3.
English Make the HP Photosmart Pro B8800 series the default printer Windows 1. In the System Preferences, click Print & Fax, and then click Printing. 2. Choose an option from the Selected printer in Print Dialog pop-up menu. Right-click the HP Photosmart printer icon, and then click Set as Default Printer. Mac 1. Make the HP Photosmart Pro B8800 series the default printer 17 On the Windows taskbar, click Start, and then click Control Panel. 2. Open Printers (Windows Vista) or Printers and Faxes (Windows XP). 3.

User Guide
Page 21
... the printing process and simplifies professional color management. Technologies that comes on color spaces1. Color management affects the way the colors in the printing industry is color management? Use either printerbased or application-based color management, but not both in the printer driver and in four-color process printing. 18 Color management Use the HP Photosmart Pro print plug-in for Adobe...
... the printing process and simplifies professional color management. Technologies that comes on color spaces1. Color management affects the way the colors in the printing industry is color management? Use either printerbased or application-based color management, but not both in the printer driver and in four-color process printing. 18 Color management Use the HP Photosmart Pro print plug-in for Adobe...

User Guide
Page 22
... Adobe Photoshop. 2. The HP Printer Utility appears. 4. Use application-based color management 19 Select Photosmart Pro plug-in 1. Start the HP Photosmart Pro print plug-in To start the plug-in for the printer. To print using application-based color management in is installed automatically with your color management system uses these profiles to convert colors between each device's color space. For more...
... Adobe Photoshop. 2. The HP Printer Utility appears. 4. Use application-based color management 19 Select Photosmart Pro plug-in 1. Start the HP Photosmart Pro print plug-in To start the plug-in for the printer. To print using application-based color management in is installed automatically with your color management system uses these profiles to convert colors between each device's color space. For more...

User Guide
Page 23
.... 9. Click OK. Select an appropriate paper type from the drop-down list. Click Preferences in the Print dialog box. Use printer-based color management The HP Photosmart Pro B8800 series printer offers built-in automatic color management that is selected from the Paper Type drop-down list, select Perceptual or Relative. Click Page Setup, set you are...
.... 9. Click OK. Select an appropriate paper type from the drop-down list. Click Preferences in the Print dialog box. Use printer-based color management The HP Photosmart Pro B8800 series printer offers built-in automatic color management that is selected from the Paper Type drop-down list, select Perceptual or Relative. Click Page Setup, set you are...


