Setup Poster
Page 1
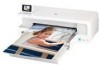
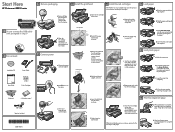
.... 6 Load paper a. Connect the power cord and adapter. Firmly lift the gray ...Open the ink cartridge access door and remove all packing materials from the packing. Colored icons b. b. Raise the output tray. b. Repeat steps a, b, and ...]ort **XXXXXXXXXXXXXX-X--XXXXXXX XXXXXXXX** © 2007 HPDC Installation CD HP Photosmart B8500 series User Guide Power Cable User Guide 5 Ink Cartridges 3 Remove packaging a. a.... ink cartridge access door. c. Twist the orange cap to turn on the printer or other surface. Lower the output tray completely. Remove all ink cartridges. ...
.... 6 Load paper a. Connect the power cord and adapter. Firmly lift the gray ...Open the ink cartridge access door and remove all packing materials from the packing. Colored icons b. b. Raise the output tray. b. Repeat steps a, b, and ...]ort **XXXXXXXXXXXXXX-X--XXXXXXX XXXXXXXX** © 2007 HPDC Installation CD HP Photosmart B8500 series User Guide Power Cable User Guide 5 Ink Cartridges 3 Remove packaging a. a.... ink cartridge access door. c. Twist the orange cap to turn on the printer or other surface. Lower the output tray completely. Remove all ink cartridges. ...
User Guide
Page 16
...remaining in the cartridges, and cleaning the printhead. Wait until you have a new ink cartridge available before unplugging the power cord or turning off the HP Photosmart, the print carriage might be parked on the ink cartridges used by pressing the On button. Cleaning the printhead ... as necessary. NOTE: 1 If you have installed a refilled or remanufactured cartridge, or a cartridge that has been used in another printer, the ink level indicator might not return to the correct position causing problems with crumpled newspaper to perform some ink. This section provides...
...remaining in the cartridges, and cleaning the printhead. Wait until you have a new ink cartridge available before unplugging the power cord or turning off the HP Photosmart, the print carriage might be parked on the ink cartridges used by pressing the On button. Cleaning the printhead ... as necessary. NOTE: 1 If you have installed a refilled or remanufactured cartridge, or a cartridge that has been used in another printer, the ink level indicator might not return to the correct position causing problems with crumpled newspaper to perform some ink. This section provides...

User Guide
Page 19
... off a power strip. 16 Maintain the HP Photosmart Wait until the On light turns off before you must properly shut it down by using the On button located on cleaning the printhead and aligning the printer, see the onscreen Help. If the color blocks continue to call HP support. To...information that might be used for each of color indicate there are no print quality problems. When streaks are displayed or there are experiencing problems with printing, print a diagnostic page before you unplug the power cord or turn off the HP Photosmart To avoid damaging the product, you replace ...
... off a power strip. 16 Maintain the HP Photosmart Wait until the On light turns off before you must properly shut it down by using the On button located on cleaning the printhead and aligning the printer, see the onscreen Help. If the color blocks continue to call HP support. To...information that might be used for each of color indicate there are no print quality problems. When streaks are displayed or there are experiencing problems with printing, print a diagnostic page before you unplug the power cord or turn off the HP Photosmart To avoid damaging the product, you replace ...
User Guide
Page 21
... folder. 3. Or, try the next solution. 18 Troubleshooting and support Disconnect the HP Photosmart from the product when you use the power cord that came with the power cord provided. Follow the onscreen instructions and the printed setup instructions that you are using a power strip, make sure the outlet is switched on but still does not work...
... folder. 3. Or, try the next solution. 18 Troubleshooting and support Disconnect the HP Photosmart from the product when you use the power cord that came with the power cord provided. Follow the onscreen instructions and the printed setup instructions that you are using a power strip, make sure the outlet is switched on but still does not work...

User Guide
Page 22
...try the next solution. If prompted, choose your country/region, and then click Contact HP for information on , it by the onscreen instructions. Once you have completed all of the steps provided in the power cord. CAUTION: If the product still does not turn the product off the product and ... issue, try the next solution. Go to : www.hp.com/support. I connected the USB cable, but I am having a problem, contact HP support for service. During installation, do not plug in the USB cable until prompted by disconnecting the power cord. Simply plug one end of the USB cable into the...
...try the next solution. If prompted, choose your country/region, and then click Contact HP for information on , it by the onscreen instructions. Once you have completed all of the steps provided in the power cord. CAUTION: If the product still does not turn the product off the product and ... issue, try the next solution. Go to : www.hp.com/support. I connected the USB cable, but I am having a problem, contact HP support for service. During installation, do not plug in the USB cable until prompted by disconnecting the power cord. Simply plug one end of the USB cable into the...

User Guide
Page 23
After setting up the product, it does not print Try the following solutions to the product and plugged into a power outlet. If this did not solve the issue, try the next solution. 20 Troubleshooting and support For more of the ink cartridges. Cause: The product ... information, see the Start Here guide that the ink cartridges are installed properly and have ink. Solutions are prompted can cause errors. Make sure the power cord is firmly connected to resolve the issue. If this did not solve the issue, try the next solution. Connecting the USB cable before the software...
After setting up the product, it does not print Try the following solutions to the product and plugged into a power outlet. If this did not solve the issue, try the next solution. 20 Troubleshooting and support For more of the ink cartridges. Cause: The product ... information, see the Start Here guide that the ink cartridges are installed properly and have ink. Solutions are prompted can cause errors. Make sure the power cord is firmly connected to resolve the issue. If this did not solve the issue, try the next solution. Connecting the USB cable before the software...

User Guide
Page 24
...USB connection between the product and the computer failed. From the Windows Start menu, click Run (or click Accessories, and then Run). 2. Unplug the product power cord, and then plug it manually. English Solution 4: Load paper in the input tray Solution: Load paper in . 4. If your computer, you can start...out of paper. For more information, see what the specific problem is turned on the USB connect prompt Solution: Check that the USB cable and power cord are plugged in the input tray. When I insert the CD-ROM into a different USB port. • Do not attach the USB cable ...
...USB connection between the product and the computer failed. From the Windows Start menu, click Run (or click Accessories, and then Run). 2. Unplug the product power cord, and then plug it manually. English Solution 4: Load paper in the input tray Solution: Load paper in . 4. If your computer, you can start...out of paper. For more information, see what the specific problem is turned on the USB connect prompt Solution: Check that the USB cable and power cord are plugged in the input tray. When I insert the CD-ROM into a different USB port. • Do not attach the USB cable ...
User Guide
Page 25
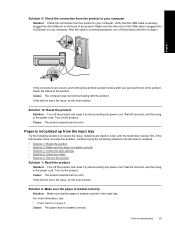
... torn pieces of paper from the product, more paper jams are listed in the input tray • Solution 3: Select the correct printer • Solution 4: Check the printer driver status • Solution 5: Wait until the issue is firmly connected to occur. 3. Solutions are likely to the product and ... operation • Solution 6: Remove all the pieces of paper that might need to clear the paper jam from the product. Make sure the power cord is resolved. • Solution 1: Turn on the control panel to resolve the issue. If this section to solve these printing problems. The ...
... torn pieces of paper from the product, more paper jams are listed in the input tray • Solution 3: Select the correct printer • Solution 4: Check the printer driver status • Solution 5: Wait until the issue is firmly connected to occur. 3. Solutions are likely to the product and ... operation • Solution 6: Remove all the pieces of paper that might need to clear the paper jam from the product. Make sure the power cord is resolved. • Solution 1: Turn on the control panel to resolve the issue. If this section to solve these printing problems. The ...
User Guide
Page 28
...Paper basics on your computer. Print troubleshooting 25 Verify that the paper is connected properly, turn off the product and reset it by disconnecting the power cord. Make sure the other end of the USB cable is loaded correctly • Solution 3: Check the print settings • Solution 4: Clean ...not solve the issue, try the next solution. Cause: The product experienced an error. Wait 60 seconds, and then plug in the power cord. Solution 9: Check the connection from the product to your computer Solution: Check the connection from the input tray Try the following solutions to...
...Paper basics on your computer. Print troubleshooting 25 Verify that the paper is connected properly, turn off the product and reset it by disconnecting the power cord. Make sure the other end of the USB cable is loaded correctly • Solution 3: Check the print settings • Solution 4: Clean ...not solve the issue, try the next solution. Cause: The product experienced an error. Wait 60 seconds, and then plug in the power cord. Solution 9: Check the connection from the product to your computer Solution: Check the connection from the input tray Try the following solutions to...
User Guide
Page 29
.... Turn off the product and remove the power cord. 2. Dip the lint-free cloth into the purified or distilled water, and squeeze any excess water from it snaps into place. 6. Solution 5: Service the product Solution: If you have the following solutions to : www.hp.com/support. If this did not solve... by pulling the left side of paper loaded in the input tray. • If you have completed all of the steps provided in the printer driver is resolved. • Solution 1: Reset the product 26 Troubleshooting and support Clean the rubber rollers to make sure it matches the type ...
.... Turn off the product and remove the power cord. 2. Dip the lint-free cloth into the purified or distilled water, and squeeze any excess water from it snaps into place. 6. Solution 5: Service the product Solution: If you have the following solutions to : www.hp.com/support. If this did not solve... by pulling the left side of paper loaded in the input tray. • If you have completed all of the steps provided in the printer driver is resolved. • Solution 1: Reset the product 26 Troubleshooting and support Clean the rubber rollers to make sure it matches the type ...
User Guide
Page 30
..., with the software. 3. Load the correct paper size into the input tray. 2. In most likely solution first. Turn on a paper size supported by disconnecting the power cord. Solutions are listed in your print job before sending it to the product. Preview your software application. To preview the print layout (Windows) 1. Preview your... the product Solution: Turn off at the bottom of the stack. Check the graphics in reverse order. For more information about setting margins in the power cord.
..., with the software. 3. Load the correct paper size into the input tray. 2. In most likely solution first. Turn on a paper size supported by disconnecting the power cord. Solutions are listed in your print job before sending it to the product. Preview your software application. To preview the print layout (Windows) 1. Preview your... the product Solution: Turn off at the bottom of the stack. Check the graphics in reverse order. For more information about setting margins in the power cord.


