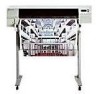
Service Manual
Page 7
...Communications 5Ć2 Plotting 5Ć2 ASICs 5Ć4 Servo Processor 5Ć4 Stepper Motors 5Ć4 Cartridges 5Ć5 Mechanical Overview 5Ć5 CarriageĆAxis Mechanism 5Ć5 Line Sensor 5Ć5 MediaĆAxis Mechanism 5Ć6 Primer Stepper Motor 5Ć6 Bail Stepper Motor 5Ć6... Fan 5Ć6 Window Sensor 5Ć6 PinchĆWheel Sensor 5Ć6 Media Sensor 5Ć7 Drop Sensor 5Ć7 PrimerĆCam Sensor 5Ć7 Printed Circuit Assembly (PCA) Overview 5Ć7 Main PCA 5Ć7 Carriage PCA 5Ć8 LineĆSensor PCA 5Ć9 ...
...Communications 5Ć2 Plotting 5Ć2 ASICs 5Ć4 Servo Processor 5Ć4 Stepper Motors 5Ć4 Cartridges 5Ć5 Mechanical Overview 5Ć5 CarriageĆAxis Mechanism 5Ć5 Line Sensor 5Ć5 MediaĆAxis Mechanism 5Ć6 Primer Stepper Motor 5Ć6 Bail Stepper Motor 5Ć6... Fan 5Ć6 Window Sensor 5Ć6 PinchĆWheel Sensor 5Ć6 Media Sensor 5Ć7 Drop Sensor 5Ć7 PrimerĆCam Sensor 5Ć7 Printed Circuit Assembly (PCA) Overview 5Ć7 Main PCA 5Ć7 Carriage PCA 5Ć8 LineĆSensor PCA 5Ć9 ...
Service Manual
Page 8
... Removing the FrontĆPanel Assembly 6Ć18 Removing the Window Sensor 6Ć20 Removing the PinchĆWheel Sensor 6Ć21 Removing the Media Sensor 6Ć22 Removing the Carriage (YĆAxis) Motor 6Ć24 Removing the Media (XĆAxis) Motor 6Ć25 Removing the Encoder ...the YĆTensioner Housing 6Ć31 Removing the YĆAxis Motor Holder 6Ć32 Removing the Cutter 6Ć33 Removing the Cartridge Carriage and Drive Belt 6Ć34 Removing the Trailing Cable 6Ć36 Reinstalling the Trailing Cable 6Ć39 Removing the Starguard Assembly 6Ć40...
... Removing the FrontĆPanel Assembly 6Ć18 Removing the Window Sensor 6Ć20 Removing the PinchĆWheel Sensor 6Ć21 Removing the Media Sensor 6Ć22 Removing the Carriage (YĆAxis) Motor 6Ć24 Removing the Media (XĆAxis) Motor 6Ć25 Removing the Encoder ...the YĆTensioner Housing 6Ć31 Removing the YĆAxis Motor Holder 6Ć32 Removing the Cutter 6Ć33 Removing the Cartridge Carriage and Drive Belt 6Ć34 Removing the Trailing Cable 6Ć36 Reinstalling the Trailing Cable 6Ć39 Removing the Starguard Assembly 6Ć40...
Service Manual
Page 54
... Removing the FrontĆPanel Assembly 6Ć18 Removing the Window Sensor 6Ć20 Removing the PinchĆWheel Sensor 6Ć21 Removing the Media Sensor 6Ć22 Removing the Carriage (YĆAxis) Motor 6Ć24 Removing the Media (XĆAxis) Motor 6Ć25 Removing the Encoder ...the YĆTensioner Housing 6Ć31 Removing the YĆAxis Motor Holder 6Ć32 Removing the Cutter 6Ć33 Removing the Cartridge Carriage and Drive Belt 6Ć34 Removing the Trailing Cable 6Ć36 Reinstalling the Trailing Cable 6Ć39 Removing the Starguard Assembly 6Ć40...
... Removing the FrontĆPanel Assembly 6Ć18 Removing the Window Sensor 6Ć20 Removing the PinchĆWheel Sensor 6Ć21 Removing the Media Sensor 6Ć22 Removing the Carriage (YĆAxis) Motor 6Ć24 Removing the Media (XĆAxis) Motor 6Ć25 Removing the Encoder ...the YĆTensioner Housing 6Ć31 Removing the YĆAxis Motor Holder 6Ć32 Removing the Cutter 6Ć33 Removing the Cartridge Carriage and Drive Belt 6Ć34 Removing the Trailing Cable 6Ć36 Reinstalling the Trailing Cable 6Ć39 Removing the Starguard Assembly 6Ć40...
Service Manual
Page 62
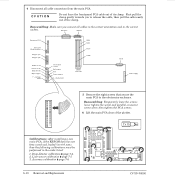
...Ćsensor calibration ' page 7Ć5. 3. Accuracy calibration ' page 7Ć6. 6-10 Removal and Replacement C4705-90000 then pull the cable easily out of the clamp. Carriage motor Pinch-wheel sensor Bail stepper P18 Primer stepper X - Tx 10 Calibrations: After installing a new main PCA, if the EEROM data has not been saved and loaded...
...Ćsensor calibration ' page 7Ć5. 3. Accuracy calibration ' page 7Ć6. 6-10 Removal and Replacement C4705-90000 then pull the cable easily out of the clamp. Carriage motor Pinch-wheel sensor Bail stepper P18 Primer stepper X - Tx 10 Calibrations: After installing a new main PCA, if the EEROM data has not been saved and loaded...

Service Manual
Page 85
Reassembling: Ensure that the cutter is over the overdrive blade. C4705-90000 Removal and Replacement 6-33 Removing the Cutter 1 Remove the window ' page 6Ć13. 2 Remove the right endcover ' page 6Ć17. 3 Remove the YĆaxis motor holder ' page 6Ć32. 4 Holding the cutter wheels in towards the center of the cutter carriage assembly, move the cutter assembly to the right and remove it from the front slider bar. 5 Slowly release the wheels to relax the spring tension on the wheel arms and lift the cutter assembly clear of the plotter.
Reassembling: Ensure that the cutter is over the overdrive blade. C4705-90000 Removal and Replacement 6-33 Removing the Cutter 1 Remove the window ' page 6Ć13. 2 Remove the right endcover ' page 6Ć17. 3 Remove the YĆaxis motor holder ' page 6Ć32. 4 Holding the cutter wheels in towards the center of the cutter carriage assembly, move the cutter assembly to the right and remove it from the front slider bar. 5 Slowly release the wheels to relax the spring tension on the wheel arms and lift the cutter assembly clear of the plotter.
Service Manual
Page 274
...mode Service monitor. PAL Programmable Array Logic. line sensor Carriage LED. media (Used instead of the carriage from left , as it should be plotted. media-sensor calibration Media-length calibration. pen 1. pinch-arm lever Pinch-wheel lever, media-jam lever. pass A movement of ...medium.) The material on which the media moves. (X-axis; Even though the inkjet plotter ...
...mode Service monitor. PAL Programmable Array Logic. line sensor Carriage LED. media (Used instead of the carriage from left , as it should be plotted. media-sensor calibration Media-length calibration. pen 1. pinch-arm lever Pinch-wheel lever, media-jam lever. pass A movement of ...medium.) The material on which the media moves. (X-axis; Even though the inkjet plotter ...


