HP Business Notebook HP_TOOLS Partition Guidelines
Page 2
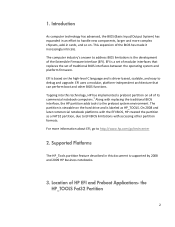
...on all of its commercial notebook computers.1 Along with replacing the traditional BIOS interface, the HP partition adds tools to debug and upgrade. EFI uses a modular, platform‐independent architecture that replaces the set of HP EFI and Preboot Applications- Location of traditional BIOS ... Introduction As computer technology has advanced, the BIOS (Basic Input/Output System) has expanded in this technology, HP has implemented a preboot partition on the hard drive and is the development of the BIOS has made it increasingly intricate. The computer industry's answer to address ...
...on all of its commercial notebook computers.1 Along with replacing the traditional BIOS interface, the HP partition adds tools to debug and upgrade. EFI uses a modular, platform‐independent architecture that replaces the set of HP EFI and Preboot Applications- Location of traditional BIOS ... Introduction As computer technology has advanced, the BIOS (Basic Input/Output System) has expanded in this technology, HP has implemented a preboot partition on the hard drive and is the development of the BIOS has made it increasingly intricate. The computer industry's answer to address ...
Management and Printing - Windows XP, Windows Vista and Windows 7
Page 6
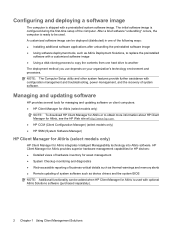
...download HP Client Manager for asset management ● System Checkup monitoring and diagnostics ● Web-accessible reporting of business-critical details such as thermal warnings and memory alerts ● Remote updating of system software such as Altiris Deployment Solutions, to replace the...in one hard drive to obtain more information about HP Client Manager for Altiris, see the HP Web site at http://www.hp.com. ● HP CCM (Client Configuration Manager) (select models only) ● HP SSM (System Software Manager) HP Client Manager for Altiris (select models only) HP Client ...
...download HP Client Manager for asset management ● System Checkup monitoring and diagnostics ● Web-accessible reporting of business-critical details such as thermal warnings and memory alerts ● Remote updating of system software such as Altiris Deployment Solutions, to replace the...in one hard drive to obtain more information about HP Client Manager for Altiris, see the HP Web site at http://www.hp.com. ● HP CCM (Client Configuration Manager) (select models only) ● HP SSM (System Software Manager) HP Client Manager for Altiris (select models only) HP Client ...
Computer Setup - Windows Vista and Windows XP
Page 9
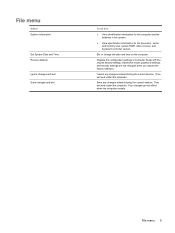
Replace the configuration settings in the system. ● View specification information for the computer and the batteries in Computer Setup with the original factory settings. (Hard drive mode, password settings, and security settings are not changed when you restore the factory settings.) Cancel any changes entered during the current session. Then exit ...
Replace the configuration settings in the system. ● View specification information for the computer and the batteries in Computer Setup with the original factory settings. (Hard drive mode, password settings, and security settings are not changed when you restore the factory settings.) Cancel any changes entered during the current session. Then exit ...

Drives - Linux
Page 3
Table of contents 1 Handling drives 2 Using an optical drive Identifying the installed optical drive ...2 Using optical discs ...3 Selecting the right disc (CDs, DVDs, and BDs 4 CD-R discs ...4 CD-RW discs ...4 DVD±R discs ...4 DVD±RW discs ...4 LightScribe DVD+R ... a CD or DVD ...8 Removing a CD, DVD, or BD ...9 The optical disc tray does not open for removal of a CD, DVD, or BD 10 3 Using external drives Using optional external devices ...12 4 Replacing the hard drive Index ...25 iii
Table of contents 1 Handling drives 2 Using an optical drive Identifying the installed optical drive ...2 Using optical discs ...3 Selecting the right disc (CDs, DVDs, and BDs 4 CD-R discs ...4 CD-RW discs ...4 DVD±R discs ...4 DVD±RW discs ...4 LightScribe DVD+R ... a CD or DVD ...8 Removing a CD, DVD, or BD ...9 The optical disc tray does not open for removal of a CD, DVD, or BD 10 3 Using external drives Using optional external devices ...12 4 Replacing the hard drive Index ...25 iii
Drives - Linux
Page 17
... button. Then shut down the computer through the operating system. Disconnect all external devices connected to the computer. 4. Remove the battery from the hard drive bay. To remove a hard drive: 1. Unplug the power cord. 5. If you are not sure whether the computer is on a flat surface, with the battery bay toward ...you. 6. Turn the computer upside down on , in Suspend, or in Hibernation, turn the computer on by pressing the power button. 4 Replacing the hard drive CAUTION: To prevent information loss or an unresponsive system: Shut down the computer before removing the...
... button. Then shut down the computer through the operating system. Disconnect all external devices connected to the computer. 4. Remove the battery from the hard drive bay. To remove a hard drive: 1. Unplug the power cord. 5. If you are not sure whether the computer is on a flat surface, with the battery bay toward ...you. 6. Turn the computer upside down on , in Suspend, or in Hibernation, turn the computer on by pressing the power button. 4 Replacing the hard drive CAUTION: To prevent information loss or an unresponsive system: Shut down the computer before removing the...
Drives - Linux
Page 18
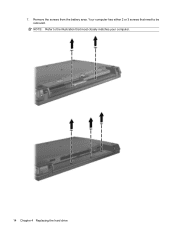
NOTE: Refer to the illustration that need to be removed. 7. Your computer has either 2 or 3 screws that most closely matches your computer. 14 Chapter 4 Replacing the hard drive Remove the screws from the battery area.
NOTE: Refer to the illustration that need to be removed. 7. Your computer has either 2 or 3 screws that most closely matches your computer. 14 Chapter 4 Replacing the hard drive Remove the screws from the battery area.

Drives - Linux
Page 20
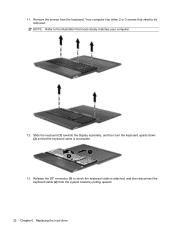
Your computer has either 2 or 3 screws that need to the illustration that the keyboard cable is attached, and then disconnect the keyboard cable (2) from the keyboard. Slide the keyboard (1) towards the display assembly, and then turn the keyboard upside down (2) so that most closely matches your computer. 12. Remove the screws from the system board by pulling upward. 16 Chapter 4 Replacing the hard drive NOTE: Refer to be removed. Release the ZIF connector (1) to which the keyboard cable is accessible. 13. 11.
Your computer has either 2 or 3 screws that need to the illustration that the keyboard cable is attached, and then disconnect the keyboard cable (2) from the keyboard. Slide the keyboard (1) towards the display assembly, and then turn the keyboard upside down (2) so that most closely matches your computer. 12. Remove the screws from the system board by pulling upward. 16 Chapter 4 Replacing the hard drive NOTE: Refer to be removed. Release the ZIF connector (1) to which the keyboard cable is accessible. 13. 11.

Drives - Linux
Page 22
... it disengages from the base enclosure, and then rest the top cover on the hard drive to slide the hard drive to the right to disconnect it from the system board. 18 Chapter 4 Replacing the hard drive Release the ZIF connector (1) to expose the hard drive and WLAN compartment. 19. Use the Mylar tab (2) on the computer so that...
... it disengages from the base enclosure, and then rest the top cover on the hard drive to slide the hard drive to the right to disconnect it from the system board. 18 Chapter 4 Replacing the hard drive Release the ZIF connector (1) to expose the hard drive and WLAN compartment. 19. Use the Mylar tab (2) on the computer so that...

Drives - Linux
Page 23
To install a hard drive: 1. Insert the hard drive into the hard drive bay (1). 2. Replace the hard drive screw (3) to secure the hard drive to the system board. 3. Use the Mylar tab (2) on the hard drive to slide the hard drive to the left to connect it to the computer. 19 21. Lift the hard drive (3) out of the hard drive bay.
To install a hard drive: 1. Insert the hard drive into the hard drive bay (1). 2. Replace the hard drive screw (3) to secure the hard drive to the system board. 3. Use the Mylar tab (2) on the hard drive to slide the hard drive to the left to connect it to the computer. 19 21. Lift the hard drive (3) out of the hard drive bay.
Drives - Linux
Page 24
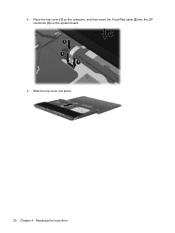
Place the top cover (1) on the system board. 5. Slide the top cover into the ZIF connector (3) on the computer, and then insert the TouchPad cable (2) into place. 20 Chapter 4 Replacing the hard drive 4.
Place the top cover (1) on the system board. 5. Slide the top cover into the ZIF connector (3) on the computer, and then insert the TouchPad cable (2) into place. 20 Chapter 4 Replacing the hard drive 4.
Drives - Linux
Page 26
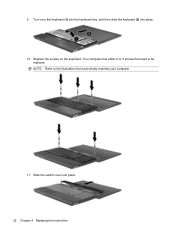
Turn over the keyboard (1) into the keyboard tray, and then slide the keyboard (2) into place. 22 Chapter 4 Replacing the hard drive Your computer has either 2 or 3 screws that most closely matches your computer. 11. Slide the switch cover into place. 10. Replace the screws on the keyboard. NOTE: Refer to the illustration that need to be replaced. 9.
Turn over the keyboard (1) into the keyboard tray, and then slide the keyboard (2) into place. 22 Chapter 4 Replacing the hard drive Your computer has either 2 or 3 screws that most closely matches your computer. 11. Slide the switch cover into place. 10. Replace the screws on the keyboard. NOTE: Refer to the illustration that need to be replaced. 9.
Drives - Linux
Page 28
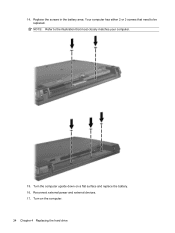
Turn on a flat surface and replace the battery. 16. Replace the screws in the battery area. NOTE: Refer to the illustration that need to be replaced. Turn the computer upside down on the computer. 24 Chapter 4 Replacing the hard drive Your computer has either 2 or 3 screws that most closely matches your computer. 15. Reconnect external power and external devices. 17. 14.
Turn on a flat surface and replace the battery. 16. Replace the screws in the battery area. NOTE: Refer to the illustration that need to be replaced. Turn the computer upside down on the computer. 24 Chapter 4 Replacing the hard drive Your computer has either 2 or 3 screws that most closely matches your computer. 15. Reconnect external power and external devices. 17. 14.
Drives - Linux
Page 29
...) 2, 3 Blu-ray ROM DVD+/-RW SuperMulti Double-Layer LightScribe Drive 3 C CD copying or creating 8 playing 6 removing 9 CD drive 2, 11 copyright warning 7 H hard disk drive external 11 installing 19 replacing 13 hard drive external 11 installing 19 replacing 13 K keyboard removing 16 O optical disc removing 9 using 4 optical drive 2, 11 D diskette drive 11 drives caring for 1 diskette 11 DVD+/-RW SuperMulti Double- Layer...
...) 2, 3 Blu-ray ROM DVD+/-RW SuperMulti Double-Layer LightScribe Drive 3 C CD copying or creating 8 playing 6 removing 9 CD drive 2, 11 copyright warning 7 H hard disk drive external 11 installing 19 replacing 13 hard drive external 11 installing 19 replacing 13 K keyboard removing 16 O optical disc removing 9 using 4 optical drive 2, 11 D diskette drive 11 drives caring for 1 diskette 11 DVD+/-RW SuperMulti Double- Layer...
Drives - Windows Vista
Page 3
... DVD ...11 Removing a CD, DVD, or BD ...12 3 Using external drives Using optional external devices ...14 4 Using HP 3D DriveGuard Identifying HP 3D DriveGuard status 16 Using HP 3D DriveGuard software ...17 5 Improving hard drive performance Using Disk Defragmenter ...18 Using Disk Cleanup ...18 6 Replacing the hard drive 7 Troubleshooting The optical disc tray does not open for removal of...
... DVD ...11 Removing a CD, DVD, or BD ...12 3 Using external drives Using optional external devices ...14 4 Using HP 3D DriveGuard Identifying HP 3D DriveGuard status 16 Using HP 3D DriveGuard software ...17 5 Improving hard drive performance Using Disk Defragmenter ...18 Using Disk Cleanup ...18 6 Replacing the hard drive 7 Troubleshooting The optical disc tray does not open for removal of...

Drives - Windows Vista
Page 23
... pressing the power button. Disconnect all external devices connected to the computer. 4. 6 Replacing the hard drive CAUTION: To prevent information loss or an unresponsive system: Shut down the computer before removing the hard drive from the computer. 19 Save your work. 2. Shut down the computer through the operating... pressing the power button. If you . 6. Remove the battery from the hard drive bay. Then shut down the computer and close the display. Unplug the power cord. 5. Do not remove the hard drive while the computer is off or in Hibernation, turn the computer on a ...
... pressing the power button. Disconnect all external devices connected to the computer. 4. 6 Replacing the hard drive CAUTION: To prevent information loss or an unresponsive system: Shut down the computer before removing the hard drive from the computer. 19 Save your work. 2. Shut down the computer through the operating... pressing the power button. If you . 6. Remove the battery from the hard drive bay. Then shut down the computer and close the display. Unplug the power cord. 5. Do not remove the hard drive while the computer is off or in Hibernation, turn the computer on a ...

Drives - Windows Vista
Page 24
Remove the screws from the battery area. NOTE: Refer to the illustration that need to be removed. 7. Your computer has either 2 or 3 screws that most closely matches your computer. 20 Chapter 6 Replacing the hard drive
Remove the screws from the battery area. NOTE: Refer to the illustration that need to be removed. 7. Your computer has either 2 or 3 screws that most closely matches your computer. 20 Chapter 6 Replacing the hard drive
Drives - Windows Vista
Page 26
NOTE: Refer to the illustration that need to which the keyboard cable is accessible. 13. Release the ZIF connector (1) to be removed. Your computer has either 2 or 3 screws that most closely matches your computer. 12. Slide the keyboard (1) towards the display assembly, and then turn the keyboard upside down (2) so that the keyboard cable is attached, and then disconnect the keyboard cable (2) from the keyboard. 11. Remove the screws from the system board by pulling upward. 22 Chapter 6 Replacing the hard drive
NOTE: Refer to the illustration that need to which the keyboard cable is accessible. 13. Release the ZIF connector (1) to be removed. Your computer has either 2 or 3 screws that most closely matches your computer. 12. Slide the keyboard (1) towards the display assembly, and then turn the keyboard upside down (2) so that the keyboard cable is attached, and then disconnect the keyboard cable (2) from the keyboard. 11. Remove the screws from the system board by pulling upward. 22 Chapter 6 Replacing the hard drive
Drives - Windows Vista
Page 28
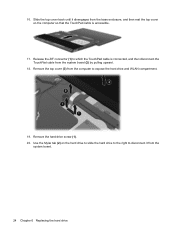
Use the Mylar tab (2) on the hard drive to slide the hard drive to the right to disconnect it disengages from the base enclosure, and then rest the top cover on the computer so that the TouchPad cable ... board (2) by pulling upward. 18. Slide the top cover back until it from the computer to which the TouchPad cable is accessible. 17. Remove the hard drive screw (1). 20. Release the ZIF connector (1) to expose the hard drive and WLAN compartment. 19. Remove the top cover (3) from the system board. 24 Chapter 6 Replacing the hard drive 16.
Use the Mylar tab (2) on the hard drive to slide the hard drive to the right to disconnect it disengages from the base enclosure, and then rest the top cover on the computer so that the TouchPad cable ... board (2) by pulling upward. 18. Slide the top cover back until it from the computer to which the TouchPad cable is accessible. 17. Remove the hard drive screw (1). 20. Release the ZIF connector (1) to expose the hard drive and WLAN compartment. 19. Remove the top cover (3) from the system board. 24 Chapter 6 Replacing the hard drive 16.

Drives - Windows Vista
Page 29
To install a hard drive: 1. Insert the hard drive into the hard drive bay (1). 2. Replace the hard drive screw (3) to secure the hard drive to the system board. 3. Lift the hard drive (3) out of the hard drive bay. Use the Mylar tab (2) on the hard drive to slide the hard drive to the left to connect it to the computer. 25 21.
To install a hard drive: 1. Insert the hard drive into the hard drive bay (1). 2. Replace the hard drive screw (3) to secure the hard drive to the system board. 3. Lift the hard drive (3) out of the hard drive bay. Use the Mylar tab (2) on the hard drive to slide the hard drive to the left to connect it to the computer. 25 21.
Drives - Windows Vista
Page 30
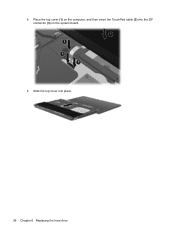
4. Slide the top cover into the ZIF connector (3) on the computer, and then insert the TouchPad cable (2) into place. 26 Chapter 6 Replacing the hard drive Place the top cover (1) on the system board. 5.
4. Slide the top cover into the ZIF connector (3) on the computer, and then insert the TouchPad cable (2) into place. 26 Chapter 6 Replacing the hard drive Place the top cover (1) on the system board. 5.


