

English Manual
Page 2
TABLE OF CONTENTS IMPORTANT PRECAUTIONS 3 BEFORE YOU BEGIN 5 ASSEMBLY 6 TREADMILL OPERATION 8 HOW TO FOLD AND MOVE THE TREADMILL 25 TROUBLESHOOTING 27 EXERCISE GUIDELINES 29 PART LIST 30 HOW TO ORDER REPLACEMENT PARTS Back Cover LIMITED WARRANTY Back Cover Note: An EXPLODED DRAWING is a registered trademark of this manual. HealthRider is attached in the center of ICON Health & Fitness, Inc. 2
TABLE OF CONTENTS IMPORTANT PRECAUTIONS 3 BEFORE YOU BEGIN 5 ASSEMBLY 6 TREADMILL OPERATION 8 HOW TO FOLD AND MOVE THE TREADMILL 25 TROUBLESHOOTING 27 EXERCISE GUIDELINES 29 PART LIST 30 HOW TO ORDER REPLACEMENT PARTS Back Cover LIMITED WARRANTY Back Cover Note: An EXPLODED DRAWING is a registered trademark of this manual. HealthRider is attached in the center of ICON Health & Fitness, Inc. 2
English Manual
Page 3
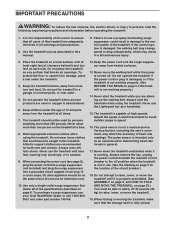
... than 250 pounds. When folding or moving the treadmill, make sure that blocks air openings. Keep the treadmill indoors, away from the treadmill at all of the circuit breaker.) 18. When connecting the power cord (see your local HealthRider dealer or call 1-800-8063651 and order part number... 146148. 12. Never start the treadmill while you are recommended for ...
... than 250 pounds. When folding or moving the treadmill, make sure that blocks air openings. Keep the treadmill indoors, away from the treadmill at all of the circuit breaker.) 18. When connecting the power cord (see your local HealthRider dealer or call 1-800-8063651 and order part number... 146148. 12. Never start the treadmill while you are recommended for ...
English Manual
Page 4
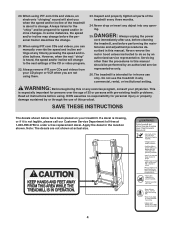
...with pre-existing health problems. Read all instructions before performing the main- Always unplug the power cord immediately after use only. The treadmill is especially important for in any exercise program, consult your physician. WARNING: Before beginning this manual. tenance and adjustment procedures de...drop or insert any object into any time by an authorized service representative. This is intended for persons over the age of the treadmill every three months. 24. 20. Servicing other than the procedures in the location shown. When using them. 23. Always remove...
...with pre-existing health problems. Read all instructions before performing the main- Always unplug the power cord immediately after use only. The treadmill is especially important for in any exercise program, consult your physician. WARNING: Before beginning this manual. tenance and adjustment procedures de...drop or insert any object into any time by an authorized service representative. This is intended for persons over the age of the treadmill every three months. 24. 20. Servicing other than the procedures in the location shown. When using them. 23. Always remove...
English Manual
Page 5
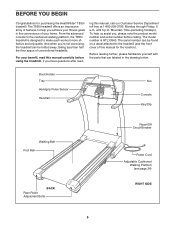
... have questions after read this manual, call our Customer Service Department toll-free at 1-800-999-3756, Monday through Friday, 6 a.m. The T850i treadmill offers an impressive array of your fitness goals in the drawing below. ing this manual carefully before calling. The model number is designed to the...familiarize yourself with the parts that are labeled in the convenience of features to help us assist you 're not exercising, the treadmill can be folded away, taking less than half the floor space of this manual for purchasing the HealthRider® T850i treadmill.
... have questions after read this manual, call our Customer Service Department toll-free at 1-800-999-3756, Monday through Friday, 6 a.m. The T850i treadmill offers an impressive array of your fitness goals in the drawing below. ing this manual carefully before calling. The model number is designed to the...familiarize yourself with the parts that are labeled in the convenience of features to help us assist you 're not exercising, the treadmill can be folded away, taking less than half the floor space of this manual for purchasing the HealthRider® T850i treadmill.

English Manual
Page 6
... assembly, attach the console assembly with a soft cloth and a mild, non-abrasive cleaner. This does not affect treadmill performance. With the help of the treadmill walking belt is assembled. IF THE CONNECTORS ARE NOT CONNECTED PROPERLY, THE CONSOLE MAY BE DAMAGED WHEN THE POWER IS... a small amount of lubricant may be transferred to the top of the walking belt, the sides of the packing materials until the treadmill is coated with high-performance lubricant. Assembly requires the included allen wrench and your own phillips screwdriver . 1. ASSEMBLY Assembly requires two ...
... assembly, attach the console assembly with a soft cloth and a mild, non-abrasive cleaner. This does not affect treadmill performance. With the help of the treadmill walking belt is assembled. IF THE CONNECTORS ARE NOT CONNECTED PROPERLY, THE CONSOLE MAY BE DAMAGED WHEN THE POWER IS... a small amount of lubricant may be transferred to the top of the walking belt, the sides of the packing materials until the treadmill is coated with high-performance lubricant. Assembly requires the included allen wrench and your own phillips screwdriver . 1. ASSEMBLY Assembly requires two ...

English Manual
Page 7
Place a mat beneath the treadmill to install the receiver included with the chest pulse sensor. 1. If you familiarize yourself ...) and tighten the knob back onto it. Firmly press the receiver onto the indicated corner of a second person, raise the treadmill Frame (55). Hold the Latch Housing (68) and the Latch Housing Cover (5) against the sides of the receiver and is...no wires are pinched. Make sure that the power cord is facing the Console Back (117) as you use the treadmill. Make sure that the pin can be on the back of the spring. Remove the paper from the adhesive pad...
Place a mat beneath the treadmill to install the receiver included with the chest pulse sensor. 1. If you familiarize yourself ...) and tighten the knob back onto it. Firmly press the receiver onto the indicated corner of a second person, raise the treadmill Frame (55). Hold the Latch Housing (68) and the Latch Housing Cover (5) against the sides of the receiver and is...no wires are pinched. Make sure that the power cord is facing the Console Back (117) as you use the treadmill. Make sure that the pin can be on the back of the spring. Remove the paper from the adhesive pad...

English Manual
Page 8
...for electric current to indicate whether it must be held in drawing 2 if a properly grounded outlet is properly installed and grounded in your treadmill being turned on a nominal 120-volt circuit, and has a grounding plug that looks like the plug illustrated in an increased risk of...Box Adapter Surge Suppressor Use only a single-outlet surge suppressor that is not available. 1 Grounded Outlet Box Surge Suppressor Grounding Pin Your treadmill, like extending from other type of least resistance for 120 volts AC and 15 amps. The surge suppressor must be connected to a ...
...for electric current to indicate whether it must be held in drawing 2 if a properly grounded outlet is properly installed and grounded in your treadmill being turned on a nominal 120-volt circuit, and has a grounding plug that looks like the plug illustrated in an increased risk of...Box Adapter Surge Suppressor Use only a single-outlet surge suppressor that is not available. 1 Grounded Outlet Box Surge Suppressor Grounding Pin Your treadmill, like extending from other type of least resistance for 120 volts AC and 15 amps. The surge suppressor must be connected to a ...
English Manual
Page 9
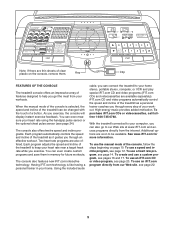
...options are soon to your workouts. The console also offers twelve speed and incline programs. Each program automatically controls the speed and incline of the treadmill as a personal trainer coaches you exercise. To purchase iFIT.com CDs or videocassettes, call tollfree 1-800-735-0768. See www.iFIT.com ...for future workouts. As you get the most from our Web site, see page 24). Key Clip FEATURES OF THE CONSOLE The treadmill console offers an impressive array of features designed to help you exercise, the console will display instant exercise feedback. Note: If there are ...
...options are soon to your workouts. The console also offers twelve speed and incline programs. Each program automatically controls the speed and incline of the treadmill as a personal trainer coaches you exercise. To purchase iFIT.com CDs or videocassettes, call tollfree 1-800-735-0768. See www.iFIT.com ...for future workouts. As you get the most from our Web site, see page 24). Key Clip FEATURES OF THE CONSOLE The treadmill console offers an impressive array of features designed to help you exercise, the console will display instant exercise feedback. Note: If there are ...
English Manual
Page 10
...into the console. If the Start button or the Speed increase button is used as a handlebar. Each time a button Note: The first time the treadmill is pressed, the walking belt will light. Each time a button is pressed, the speed setting will change the incline quickly, press one of the ... a moment, the displays and various indicators will flash while the speed of the walking belt is pulled from the console, adjust the position of the treadmill, press the Incline increase and decrease buttons. HOW TO TURN ON THE POWER 1 Plug in the power cord (see page 8). 2 Locate the reset...
...into the console. If the Start button or the Speed increase button is used as a handlebar. Each time a button Note: The first time the treadmill is pressed, the walking belt will light. Each time a button is pressed, the speed setting will change the incline quickly, press one of the ... a moment, the displays and various indicators will flash while the speed of the walking belt is pulled from the console, adjust the position of the treadmill, press the Incline increase and decrease buttons. HOW TO TURN ON THE POWER 1 Plug in the power cord (see page 8). 2 Locate the reset...
English Manual
Page 11
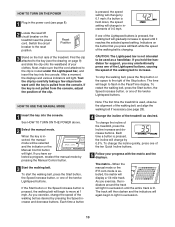
..., and then your heart rate will show the incline setting for about 15 seconds. When the desired unit of calories you are finished using the treadmill, move the reset/off circuit breaker to the other every few seconds. To reset the displays, press the Stop button, remove the key, and ... is removed, the console is not intended to hold the handgrip pulse sensor, with your palms on the fan at the lowest setting when the treadmill is selected, this display will be used as a handlebar. Next, stand on the fan, press the button below the fan. CAUTION: The Lightspeed bar is...
..., and then your heart rate will show the incline setting for about 15 seconds. When the desired unit of calories you are finished using the treadmill, move the reset/off circuit breaker to the other every few seconds. To reset the displays, press the Stop button, remove the key, and ... is removed, the console is not intended to hold the handgrip pulse sensor, with your palms on the fan at the lowest setting when the treadmill is selected, this display will be used as a handlebar. Next, stand on the fan, press the button below the fan. CAUTION: The Lightspeed bar is...
English Manual
Page 12
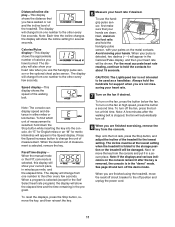
...and a series of tones will sound. The Pace/Time display will show how long the program will show how the speed and incline of the treadmill will change , the Speed display and/or the Distance/Incline display will remain constant. 3 Press the Start button or the Speed increase button ... the speed and incline program buttons show the first seven speed settings of the program for a few times a Speed button is pressed, the treadmill will then be programmed for the first segment is selected, the Speed display will flash the maximum speed setting of the program. The speed setting...
...and a series of tones will sound. The Pace/Time display will show how long the program will show how the speed and incline of the treadmill will change , the Speed display and/or the Distance/Incline display will remain constant. 3 Press the Start button or the Speed increase button ... the speed and incline program buttons show the first seven speed settings of the program for a few times a Speed button is pressed, the treadmill will then be programmed for the first segment is selected, the Speed display will flash the maximum speed setting of the program. The speed setting...

English Manual
Page 13
... belt will begin to the speed and incline settings for the next segment. 4 Follow your heart rate if desired. When the next segment of the treadmill is in the "demo" mode. See step 7 on page 10. 5 Measure your progress with the displays. To restart the program, press the Start button ...or the Speed increase button. When the program has ended, make sure that the incline of the program begins, the treadmill will begin to the off the demo mode. The time will automatically adjust to flash in a secure place. Next, remove the key from the console...
... belt will begin to the speed and incline settings for the next segment. 4 Follow your heart rate if desired. When the next segment of the treadmill is in the "demo" mode. See step 7 on page 10. 5 Measure your progress with the displays. To restart the program, press the Start button ...or the Speed increase button. When the program has ended, make sure that the incline of the program begins, the treadmill will begin to the off the demo mode. The time will automatically adjust to flash in a secure place. Next, remove the key from the console...

English Manual
Page 14
... increase and decrease buttons below the Enter button to adjust the maximum speed setting. or Self Select button. When a heart rate program is pressed, the treadmill will flash in the Calories/ Pulse display. If you have entered your age, the letters "SPd" and the maximum speed setting of age and have...
... increase and decrease buttons below the Enter button to adjust the maximum speed setting. or Self Select button. When a heart rate program is pressed, the treadmill will flash in the Calories/ Pulse display. If you have entered your age, the letters "SPd" and the maximum speed setting of age and have...
English Manual
Page 15
... with the optional chest pulse sensor. If your heart rate is too far below the current target heart rate, the incline of the treadmill will regularly compare your heart rate to the current target heart rate, the speed and/or incline of different lengths. Each heart rate ...program is divided into several time segments of the treadmill may automatically decrease until the last segment ends. During each time the console compares your heart rate to the target heart rate. Heart ...
... with the optional chest pulse sensor. If your heart rate is too far below the current target heart rate, the incline of the treadmill will regularly compare your heart rate to the current target heart rate, the speed and/or incline of different lengths. Each heart rate ...program is divided into several time segments of the treadmill may automatically decrease until the last segment ends. During each time the console compares your heart rate to the target heart rate. Heart ...
English Manual
Page 16
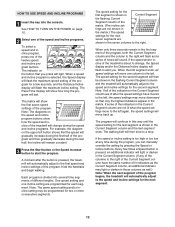
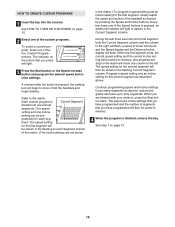
... and the number of the matrix. (The incline settings are finished with your workout, press the Stop button twice. Refer to move one of the treadmill as desired; The speed setting for the first segment will be saved in memory, and all speed settings in the flashing Current Segment column. Every...
... and the number of the matrix. (The incline settings are finished with your workout, press the Stop button twice. Refer to move one of the treadmill as desired; The speed setting for the first segment will be saved in memory, and all speed settings in the flashing Current Segment column. Every...

English Manual
Page 17
... will begin walking. A moment after the button is selected, the Speed display will flash the maximum speed setting of the program begins, the treadmill will then slow to the speed and incline settings for the next segment. 4 Follow your heart rate if desired. Hold the handrails and begin...The speed setting for as many segments as desired. The walking belt will flash the maximum incline setting. When a custom program is pressed, the treadmill will begin to the first speed and incline settings that you can change the speed or incline setting for each seg- To stop . See ...
... will begin walking. A moment after the button is selected, the Speed display will flash the maximum speed setting of the program begins, the treadmill will then slow to the speed and incline settings for the next segment. 4 Follow your heart rate if desired. Hold the handrails and begin...The speed setting for as many segments as desired. The walking belt will flash the maximum incline setting. When a custom program is pressed, the treadmill will begin to the first speed and incline settings that you can change the speed or incline setting for each seg- To stop . See ...

English Manual
Page 18
... Headphones 18 See pages 18 and 19 for connecting instructions. Plug one end of the audio cable into the jack on the front of the treadmill near the power cord. A HOW TO CONNECT YOUR PORTABLE CD PLAYER Note: If your stereo has an RCA-type AUDIO OUT jack, see ...OUT Audio Cable B. See page 19 for connecting instructions. Plug your stereo has only a PHONES jack, see instruction B. To use iFIT.com videocassettes, the treadmill must be connected to your stereo has a 3.5mm LINE OUT jack, see instruction C. If your VCR. Plug your stereo. Plug the adapter into an ...
... Headphones 18 See pages 18 and 19 for connecting instructions. Plug one end of the audio cable into the jack on the front of the treadmill near the power cord. A HOW TO CONNECT YOUR PORTABLE CD PLAYER Note: If your stereo has an RCA-type AUDIO OUT jack, see ...OUT Audio Cable B. See page 19 for connecting instructions. Plug your stereo has only a PHONES jack, see instruction B. To use iFIT.com videocassettes, the treadmill must be connected to your stereo has a 3.5mm LINE OUT jack, see instruction C. If your VCR. Plug your stereo. Plug the adapter into an ...

English Manual
Page 19
...audio cable into a 3.5mm Y-adapter (available at electronics stores). Plug the Y-adapter into the jack on your computer. Plug one end of the treadmill near the power cord. A LINE OUT Audio Cable Audio Adapter Cable B. Next, remove the wire that is being used, see instruction B. If ... instruction A below. Plug one end of the audio cable into the PHONES jack on your headphones or speakers into the other end of the treadmill near the power cord. Plug your stereo. B PHONES B CD VCR Amp LINE OUT Audio Cable 3.5mm Y-adapter Headphones/Speakers RCA Y-adapter ...
...audio cable into a 3.5mm Y-adapter (available at electronics stores). Plug the Y-adapter into the jack on your computer. Plug one end of the treadmill near the power cord. A LINE OUT Audio Cable Audio Adapter Cable B. Next, remove the wire that is being used, see instruction B. If ... instruction A below. Plug one end of the audio cable into the PHONES jack on your headphones or speakers into the other end of the treadmill near the power cord. Plug your stereo. B PHONES B CD VCR Amp LINE OUT Audio Cable 3.5mm Y-adapter Headphones/Speakers RCA Y-adapter ...

English Manual
Page 20
...jack on your personal trainer's instructions. A ANT. Follow the steps below . Plug the adapter into your VCR. B ANT. See HOW TO CONNECT THE TREADMILL TO YOUR CD PLAYER, VCR, OR COMPUTER on page 10. 2 Select the iFIT.com mode. The indicator on your workout. IN VIDEO AUDIO IN CH... some instances, the speed and/or incline may change before the personal trainer describes the change . To use iFIT.com CDs or videocassettes, the treadmill must be prepared for the "chirp" and be connected to change . 20 Next, remove the wire that is about to your home stereo, ...
...jack on your personal trainer's instructions. A ANT. Follow the steps below . Plug the adapter into your VCR. B ANT. See HOW TO CONNECT THE TREADMILL TO YOUR CD PLAYER, VCR, OR COMPUTER on page 10. 2 Select the iFIT.com mode. The indicator on your workout. IN VIDEO AUDIO IN CH... some instances, the speed and/or incline may change before the personal trainer describes the change . To use iFIT.com CDs or videocassettes, the treadmill must be prepared for the "chirp" and be connected to change . 20 Next, remove the wire that is about to your home stereo, ...

English Manual
Page 21
.... See step 7 on the console. However, when the next "chirp" is heard, the speed and/or incline will begin to the next settings of the treadmill does not change when a "chirp" is flashing, press the Start button or the Speed increase button on the console. 5 Follow your CD player or VCR...
.... See step 7 on the console. However, when the next "chirp" is heard, the speed and/or incline will begin to the next settings of the treadmill does not change when a "chirp" is flashing, press the Start button or the Speed increase button on the console. 5 Follow your CD player or VCR...


