
English Manual
Page 1
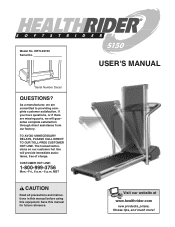
... Read all precautions and instructions in this manual before using this manual for future reference. ® USER'S MANUAL Visit our website at www.healthrider.com new products, prizes, fitness tips, and much more! Serial Number Decal QUESTIONS? Save this equipment. The trained technicians on our customer hot line will guarantee complete satisfaction through direct assistance from our factory. HRTL06190 Serial No. TO AVOID...
... Read all precautions and instructions in this manual before using this manual for future reference. ® USER'S MANUAL Visit our website at www.healthrider.com new products, prizes, fitness tips, and much more! Serial Number Decal QUESTIONS? Save this equipment. The trained technicians on our customer hot line will guarantee complete satisfaction through direct assistance from our factory. HRTL06190 Serial No. TO AVOID...

English Manual
Page 2
® TABLE OF CONTENTS IMPORTANT PRECAUTIONS 3 BEFORE YOU BEGIN 5 SETTING UP THE TREADMILL 6 GROUNDING INSTRUCTIONS 7 CONSOLE OPERATION 8 HOW TO FOLD AND MOVE THE TREADMILL 14 TROUBLE-SHOOTING AND MAINTENANCE 15 CONDITIONING GUIDELINES 18 ORDERING REPLACEMENT PARTS 19 LIMITED WARRANTY Back Cover Note: To order replacement parts, see the EXPLODED DRAWING and PART LIST attached in the center of this manual. Please save them for future reference. 2
® TABLE OF CONTENTS IMPORTANT PRECAUTIONS 3 BEFORE YOU BEGIN 5 SETTING UP THE TREADMILL 6 GROUNDING INSTRUCTIONS 7 CONSOLE OPERATION 8 HOW TO FOLD AND MOVE THE TREADMILL 14 TROUBLE-SHOOTING AND MAINTENANCE 15 CONDITIONING GUIDELINES 18 ORDERING REPLACEMENT PARTS 19 LIMITED WARRANTY Back Cover Note: To order replacement parts, see the EXPLODED DRAWING and PART LIST attached in the center of this manual. Please save them for future reference. 2

English Manual
Page 3
... treadmill. Use only a UL-listed surge protector, rated at all parts of the treadmill every three months. 23. Inspect and tighten all times. 14. Do not operate the treadmill where aerosol products are adequately informed of all users of this manual. 3. No other appliance should not be used or oxygen is fully engaged. 22. Always remove the key, unplug the power cord and move the walking belt while the power...
... treadmill. Use only a UL-listed surge protector, rated at all parts of the treadmill every three months. 23. Inspect and tighten all times. 14. Do not operate the treadmill where aerosol products are adequately informed of all users of this manual. 3. No other appliance should not be used or oxygen is fully engaged. 22. Always remove the key, unplug the power cord and move the walking belt while the power...
English Manual
Page 4
Never remove the motor hood unless instructed to order a free replacement decal. Servicing other than the procedures in this or any exercise program, consult your treadmill. This is not legible, please call our Customer Service Department toll-free at 1-800-999-3756 to do so by an authorized service representative only. Apply the decal in this product. ICON assumes no responsibility for persons over the...
Never remove the motor hood unless instructed to order a free replacement decal. Servicing other than the procedures in this or any exercise program, consult your treadmill. This is not legible, please call our Customer Service Department toll-free at 1-800-999-3756 to do so by an authorized service representative only. Apply the decal in this product. ICON assumes no responsibility for persons over the...
English Manual
Page 5
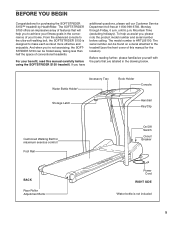
... walking belt, the SOFTSTRIDER S150 is designed to the treadmill (see the front cover of conventional treadmills. And when you to achieve your home. Water Bottle Holder* Storage Latch Accessory Tray Book Holder Console Handrail Key/Clip Cushioned Walking Belt for purchasing the SOFTSTRIDER S150™ treadmill by HealthRider. The model number is HRTL06190. BEFORE YOU BEGIN Congratulations for maximum exercise comfort Foot Rail BACK Rear Roller Adjustment Bolts On/Off Switch Circuit Breaker Power Cord...
... walking belt, the SOFTSTRIDER S150 is designed to the treadmill (see the front cover of conventional treadmills. And when you to achieve your home. Water Bottle Holder* Storage Latch Accessory Tray Book Holder Console Handrail Key/Clip Cushioned Walking Belt for purchasing the SOFTSTRIDER S150™ treadmill by HealthRider. The model number is HRTL06190. BEFORE YOU BEGIN Congratulations for maximum exercise comfort Foot Rail BACK Rear Roller Adjustment Bolts On/Off Switch Circuit Breaker Power Cord...
English Manual
Page 6
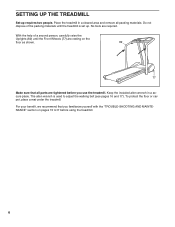
... of a second person, carefully raise the Uprights (82) until the treadmill is used to adjust the walking belt (see pages 16 and 17). With the help of the packing materials until the Front Wheels (77) are resting on pages 15 to17 before you familiarize yourself with the "TROUBLE-SHOOTING AND MAINTENANCE" section on the floor as shown. 82...
... of a second person, carefully raise the Uprights (82) until the treadmill is used to adjust the walking belt (see pages 16 and 17). With the help of the packing materials until the Front Wheels (77) are resting on pages 15 to17 before you familiarize yourself with the "TROUBLE-SHOOTING AND MAINTENANCE" section on the floor as shown. 82...
English Manual
Page 7
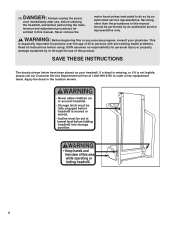
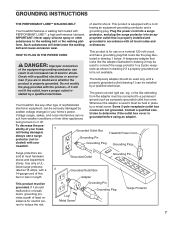
... by sudden voltage changes in - being damaged, always use on or off. sibility of least resistance for use a surge protector (not in your home's power. GROUNDING INSTRUCTIONS THE PERFORMANT LUBETM WALKING BELT of sophisticated electronic equipment, can result from weather conditions or from the adapter must be connected to a permanent ground such as a properly grounded outlet box cover. protector, and plug the surge...
... by sudden voltage changes in - being damaged, always use on or off. sibility of least resistance for use a surge protector (not in your home's power. GROUNDING INSTRUCTIONS THE PERFORMANT LUBETM WALKING BELT of sophisticated electronic equipment, can result from weather conditions or from the adapter must be connected to a permanent ground such as a properly grounded outlet box cover. protector, and plug the surge...
English Manual
Page 8
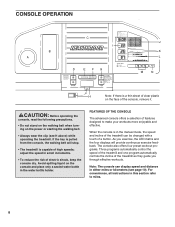
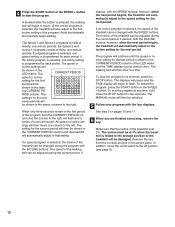
... preset workout programs. Three programs automatically control the speed of the treadmill and one program automatically controls the incline of the treadmill as they guide you exercise, the LED matrix and the four displays will stop. • The treadmill is capable of high speeds; Note: The console can be changed with a touch of a button. CAUTION: Before operating the console, read the following precautions. • Do not stand on the walking belt when turning...
... preset workout programs. Three programs automatically control the speed of the treadmill and one program automatically controls the incline of the treadmill as they guide you exercise, the LED matrix and the four displays will stop. • The treadmill is capable of high speeds; Note: The console can be changed with a touch of a button. CAUTION: Before operating the console, read the following precautions. • Do not stand on the walking belt when turning...
English Manual
Page 9
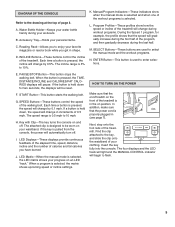
... "track." SPEED Buttons-These buttons control the speed of the treadmill. HOW TO TURN ON THE POWER Make sure that the speed will change during your personal items. C. Insert the key fully into the console. Manual/Program Indicators-These indicators show how the speed or incline of page 8. G. I. In addition, make sure that the power cord is used to select the manual mode and the workout programs. N. L. START Button-This button starts the walking belt. If the key is pressed, the incline will...
... "track." SPEED Buttons-These buttons control the speed of the treadmill. HOW TO TURN ON THE POWER Make sure that the speed will change during your personal items. C. Insert the key fully into the console. Manual/Program Indicators-These indicators show how the speed or incline of page 8. G. I. In addition, make sure that the power cord is used to select the manual mode and the workout programs. N. L. START Button-This button starts the walking belt. If the key is pressed, the incline will...

English Manual
Page 10
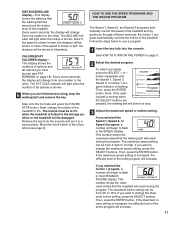
... direction. Note: When the INCLINE buttons are pressed, it may take a few seconds for the treadmill to reach the selected incline setting. 5 Follow your exercise, change the speed of the walking belt is selected, this display will show the actual speed of the walking belt. 4 Change the incline of 0.5 mph. SPEED display-This display shows the speed of 1/4 mile. How to move at a time until you have completed 1/4 mile. See HOW TO TURN ON THE POWER on...
... direction. Note: When the INCLINE buttons are pressed, it may take a few seconds for the treadmill to reach the selected incline setting. 5 Follow your exercise, change the speed of the walking belt is selected, this display will show the actual speed of the walking belt. 4 Change the incline of 0.5 mph. SPEED display-This display shows the speed of 1/4 mile. How to move at a time until you have completed 1/4 mile. See HOW TO TURN ON THE POWER on...
English Manual
Page 11
... are pressed, the walking belt will slow to 10%. Then, press the ENTER button. This display shows the numbers of fat calories is folded to the storage position or the treadmill will be from one number to use a program. 1 Insert the key fully into the console. HOW TO USE THE SPEED PROGRAMS AND THE INCLINE PROGRAM The Speed 1, Speed 2, and Speed 3 programs automatically control the speed of the treadmill. Follow the steps below to the other . The maximum speed setting...
... are pressed, the walking belt will slow to 10%. Then, press the ENTER button. This display shows the numbers of fat calories is folded to the storage position or the treadmill will be from one number to use a program. 1 Insert the key fully into the console. HOW TO USE THE SPEED PROGRAMS AND THE INCLINE PROGRAM The Speed 1, Speed 2, and Speed 3 programs automatically control the speed of the treadmill. Follow the steps below to the other . The maximum speed setting...
English Manual
Page 12
... SPEED + button. See step 5 on /off position (see page 9). 12 Remove the key from the console and put it in the LED matrix. The CURRENT PERIOD speed or incline setting for the first period will begin walking. To end the program at 3%. The walking belt will be adjusted during the current period, if desired, with the SPEED buttons; if the incline program is folded to the storage position or the treadmill...
... SPEED + button. See step 5 on /off position (see page 9). 12 Remove the key from the console and put it in the LED matrix. The CURRENT PERIOD speed or incline setting for the first period will begin walking. To end the program at 3%. The walking belt will be adjusted during the current period, if desired, with the SPEED buttons; if the incline program is folded to the storage position or the treadmill...
English Manual
Page 13
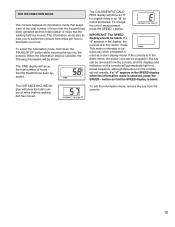
... in the "demo" mode. The DISTANCE/INCLINE display will be removed from the console. 13 When the information mode is selected, the following information will show the total number of miles that the treadmill has been operated. button so that the walking belt has moved. To change the unit of measurement, press the SPEED + button. If a "d" appears in the display, the console is in the SPEED display when the information mode is selected, press the SPEED - This mode is intended...
... in the "demo" mode. The DISTANCE/INCLINE display will be removed from the console. 13 When the information mode is selected, the following information will show the total number of miles that the treadmill has been operated. button so that the walking belt has moved. To change the unit of measurement, press the SPEED + button. If a "d" appears in the display, the console is in the SPEED display when the information mode is selected, press the SPEED - This mode is intended...

English Manual
Page 15
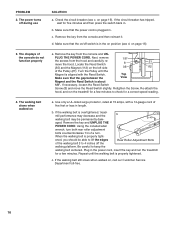
... storage latch to the left. Storage Latch Catch TROUBLE-SHOOTING AND MAINTENANCE Most treadmill problems can be in . Check the circuit breaker located on a. If the switch protrudes as shown. Hold the upper end of injury, bend your legs and keep your right hand when unlatching the treadmill. 2. The power does not turn on the frame near the power cord. Check the on/off switch located on position. Using...
... storage latch to the left. Storage Latch Catch TROUBLE-SHOOTING AND MAINTENANCE Most treadmill problems can be in . Check the circuit breaker located on a. If the switch protrudes as shown. Hold the upper end of injury, bend your legs and keep your right hand when unlatching the treadmill. 2. The power does not turn on the frame near the power cord. Check the on/off switch located on position. Using...
English Manual
Page 16
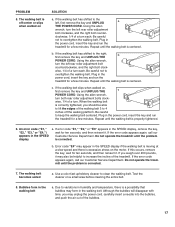
... properly tightened. If the walking belt is in . Remove the key from the console and UN- Make sure that the on page 15). 3. b. PLUG THE POWER CORD. Be careful to check for a correct speed reading. 4. Plug in the power cord, insert the key and run the treadmill for five minutes and then press the switch back in length. Check the circuit breaker (see d. b. d. Use only a UL-listed surge protector, rated...
... properly tightened. If the walking belt is in . Remove the key from the console and UN- Make sure that the on page 15). 3. b. PLUG THE POWER CORD. Be careful to check for a correct speed reading. 4. Plug in the power cord, insert the key and run the treadmill for five minutes and then press the switch back in length. Check the circuit breaker (see d. b. d. Use only a UL-listed surge protector, rated...
English Manual
Page 17
... the error code appears again, call our Customer Service Department. Due to overtighten the walking belt. PROBLEM 5. The walking belt is a possibility that bubbles may appear in the SPEED display, remove the key, wait for a few minutes. If the walking belt has shifted to the left rear roller adjustment bolt clockwise, and the right bolt counter- Using the allen wrench, turn each . Be careful not to variations in the walking belt. Plug in the power cord...
... the error code appears again, call our Customer Service Department. Due to overtighten the walking belt. PROBLEM 5. The walking belt is a possibility that bubbles may appear in the SPEED display, remove the key, wait for a few minutes. If the walking belt has shifted to the left rear roller adjustment bolt clockwise, and the right bolt counter- Using the allen wrench, turn each . Be careful not to variations in the walking belt. Plug in the power cord...
English Manual
Page 18
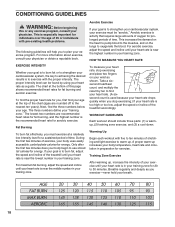
.... For maximum fat burning, adjust the speed and incline until your heart rate is near the highest number in your body begin to burn fat, adjust the speed and incline of your exercise until your heart rate is used because your heart rate drops quickly when you , first find the proper heart rate for a sustained period of 35 or individuals with pre-existing health problems. The following guidelines will help...
.... For maximum fat burning, adjust the speed and incline until your heart rate is near the highest number in your body begin to burn fat, adjust the speed and incline of your exercise until your heart rate is used because your heart rate drops quickly when you , first find the proper heart rate for a sustained period of 35 or individuals with pre-existing health problems. The following guidelines will help...
English Manual
Page 19
... prevent post-exercise problems. To maintain or improve your everyday life. Before calling, please note the following information: • The MODEL NUMBER of the product (HRTL06190). • The NAME of the product (HealthRider® SOFTSTRIDER S150™ treadmill). • The SERIAL NUMBER of the product (see the front cover of this manual). • The KEY NUMBER and DESCRIPTION of the replacement part(s) (see the PART LIST and the...
... prevent post-exercise problems. To maintain or improve your everyday life. Before calling, please note the following information: • The MODEL NUMBER of the product (HRTL06190). • The NAME of the product (HealthRider® SOFTSTRIDER S150™ treadmill). • The SERIAL NUMBER of the product (see the front cover of this manual). • The KEY NUMBER and DESCRIPTION of the replacement part(s) (see the PART LIST and the...
English Manual
Page 20
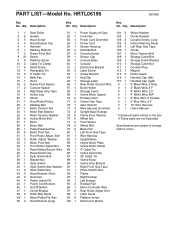
... Controller Power Cord Grommet Power Cord Sensor Housing Handrail Bolt Console Screw Sensor Cap Console Base Console Electronics Bracket Latch Screw Choke Bracket Key/Clip Storage Latch Rear Roller Ground Wire Book Holder Storage Catch Incline Motor Spacer Endcap Insert Center Grip Tape Allen Wrench Wire Harness Grommet Upright Base Endcap Frame Pivot Washer Wheel Nut Front Wheel Wheel Bolt Base Pad Left Front Grip Tape Wire Harness Upright/Base Incline Motor Plate Incline Motor Shield 4" Cable Tie Incline Optic Disk 23" Cable Tie Incline Motor Incline Stop Bracket...
... Controller Power Cord Grommet Power Cord Sensor Housing Handrail Bolt Console Screw Sensor Cap Console Base Console Electronics Bracket Latch Screw Choke Bracket Key/Clip Storage Latch Rear Roller Ground Wire Book Holder Storage Catch Incline Motor Spacer Endcap Insert Center Grip Tape Allen Wrench Wire Harness Grommet Upright Base Endcap Frame Pivot Washer Wheel Nut Front Wheel Wheel Bolt Base Pad Left Front Grip Tape Wire Harness Upright/Base Incline Motor Plate Incline Motor Shield 4" Cable Tie Incline Optic Disk 23" Cable Tie Incline Motor Incline Stop Bracket...

English Manual
Page 22
... date of purchase. This warranty does not extend to products used as instructed, return any defected part for replacement or, if necessary, the entire product, for one is authorized to change, modify or extend the terms of this limited warranty. USER'S MANUAL-It is in USA © 1999 ICON Health & Fitness, Inc. securely pack your part to use , costs of removal, installation or other consequential damages of...
... date of purchase. This warranty does not extend to products used as instructed, return any defected part for replacement or, if necessary, the entire product, for one is authorized to change, modify or extend the terms of this limited warranty. USER'S MANUAL-It is in USA © 1999 ICON Health & Fitness, Inc. securely pack your part to use , costs of removal, installation or other consequential damages of...


