
English Manual
Page 1
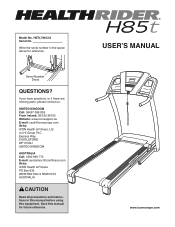
... Health & Fitness PO Box 635 WINSTON HILLS NSW 2153 AUSTRALIA CAUTION Read all precautions and instructions in the space above for future reference. USER’'S MANUAL www.iconeurope.com Write the serial number in this...
... Health & Fitness PO Box 635 WINSTON HILLS NSW 2153 AUSTRALIA CAUTION Read all precautions and instructions in the space above for future reference. USER’'S MANUAL www.iconeurope.com Write the serial number in this...

English Manual
Page 2
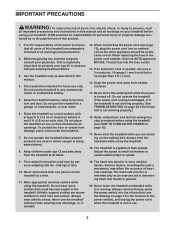
Note: The decals may not be shown at actual size. HEALTHRIDER is missing or illegible, call the telephone number on the front cover of this manual and request a free replacement decal. Apply the decal in the location shown. TABLE OF CONTENTS WARNING DECAL PLACEMENT 2 IMPORTANT ...PRECAUTIONS 3 BEFORE YOU BEGIN 5 PART IDENTIFICATION CHART 6 ASSEMBLY 7 OPERATION AND ADJUSTMENT 13 HOW TO FOLD AND MOVE THE TREADMILL 21 TROUBLESHOOTING ...
Note: The decals may not be shown at actual size. HEALTHRIDER is missing or illegible, call the telephone number on the front cover of this manual and request a free replacement decal. Apply the decal in the location shown. TABLE OF CONTENTS WARNING DECAL PLACEMENT 2 IMPORTANT ...PRECAUTIONS 3 BEFORE YOU BEGIN 5 PART IDENTIFICATION CHART 6 ASSEMBLY 7 OPERATION AND ADJUSTMENT 13 HOW TO FOLD AND MOVE THE TREADMILL 21 TROUBLESHOOTING ...
English Manual
Page 3
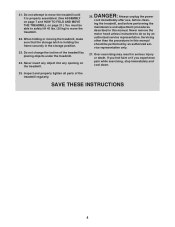
... injury to persons, read all important precautions and instructions in this manual and all warnings and precautions. 2. Never start the treadmill while you are adequately informed of this manual. 4. The treadmill is needed, use the treadmill in speed. 9. Wear appropriate exercise clothes while using the treadmill (see HOW TO TURN ON THE POWER on the same...
... injury to persons, read all important precautions and instructions in this manual and all warnings and precautions. 2. Never start the treadmill while you are adequately informed of this manual. 4. The treadmill is needed, use the treadmill in speed. 9. Wear appropriate exercise clothes while using the treadmill (see HOW TO TURN ON THE POWER on the same...
English Manual
Page 4
.... vice representative only. 27. Inspect and properly tighten all parts of the treadmill by placing objects under the treadmill. 24. Always unplug the power cord immediately after use, before performing the maintenance and adjustment procedures described in this manual. Over exercising may result in the storage position. 23. 21. Servicing other than the...
.... vice representative only. 27. Inspect and properly tighten all parts of the treadmill by placing objects under the treadmill. 24. Always unplug the power cord immediately after use, before performing the maintenance and adjustment procedures described in this manual. Over exercising may result in the storage position. 23. 21. Servicing other than the...
English Manual
Page 5
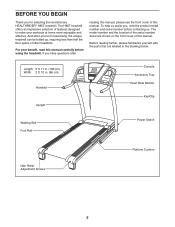
... Walking Belt Foot Rail Power Switch Idler Roller Adjustment Screws Platform Cushion 5 And when you for selecting the revolutionary HEALTHRIDER® H85T treadmill. For your workouts at home more enjoyable and effective. The model number and the location of this manual. Length: 5 ft. 11 in. (180 cm) Width: 2 ft. 10 in the drawing below.
... Walking Belt Foot Rail Power Switch Idler Roller Adjustment Screws Platform Cushion 5 And when you for selecting the revolutionary HEALTHRIDER® H85T treadmill. For your workouts at home more enjoyable and effective. The model number and the location of this manual. Length: 5 ft. 11 in. (180 cm) Width: 2 ft. 10 in the drawing below.

English Manual
Page 6
.... PART IDENTIFICATION CHART Use the drawings below each drawing is the key number of the part, from the PART LIST near the end of this manual. The number in the hardware kit, check to identify small parts used for assembly.
.... PART IDENTIFICATION CHART Use the drawings below each drawing is the key number of the part, from the PART LIST near the end of this manual. The number in the hardware kit, check to identify small parts used for assembly.
English Manual
Page 7
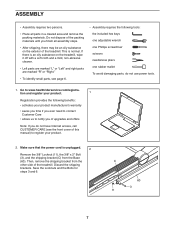
...right parts are marked “"R”" or “"Right.”" •• To identify small parts, see the front cover of this manual) to register your product. 2. tion and register your product. 1 Registration provides the following benefits: •• activates your product manufacturer&#...11 7 Then, remove the shipping bracket from the Base (60). Save the Locknuts and the Bolts for steps 3 and 6. Do not dispose of the treadmill. Make sure that the power cord is unplugged. 2 Remove the 3/8" Locknut (11), the 3/8" x 2" Bolt (3), and the shipping bracket (C) from ...
...right parts are marked “"R”" or “"Right.”" •• To identify small parts, see the front cover of this manual) to register your product. 2. tion and register your product. 1 Registration provides the following benefits: •• activates your product manufacturer&#...11 7 Then, remove the shipping bracket from the Base (60). Save the Locknuts and the Bolts for steps 3 and 6. Do not dispose of the treadmill. Make sure that the power cord is unplugged. 2 Remove the 3/8" Locknut (11), the 3/8" x 2" Bolt (3), and the shipping bracket (C) from ...
English Manual
Page 14
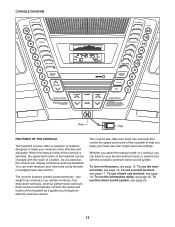
As you through an effective exercise session. To turn on the power, see page 18. When the manual mode of the console is selected, the speed and incline of the treadmill can even measure your favorite workout music or audio books with the touch of a button. Each workout ...changed with the console’'s premium stereo sound system. Whether you select the manual mode or a workout, you keep your workouts more effective and enjoyable. CONSOLE DIAGRAM Key Clip FEATURES OF THE CONSOLE The treadmill console offers a selection of features designed to your heart rate using the builtin...
As you through an effective exercise session. To turn on the power, see page 18. When the manual mode of the console is selected, the speed and incline of the treadmill can even measure your favorite workout music or audio books with the touch of a button. Each workout ...changed with the console’'s premium stereo sound system. Whether you select the manual mode or a workout, you keep your workouts more effective and enjoyable. CONSOLE DIAGRAM Key Clip FEATURES OF THE CONSOLE The treadmill console offers a selection of features designed to your heart rate using the builtin...
English Manual
Page 15
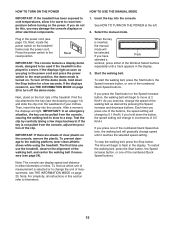
...display. 3. To nd out which unit of measurement is turned on the foot rails of the treadmill. If you may damage the console displays or other electrical components. 1. Select the manual mode. Note: The console can be selected. To prevent damage to the reset position. When the ...the console. If you press one of the numbered Quick Speed buttons. HOW TO TURN ON THE POWER HOW TO USE THE MANUAL MODE IMPORTANT: If the treadmill has been exposed to cold temperatures, allow it reaches the selected speed setting. Find the clip attached to a stop the walking ...
...display. 3. To nd out which unit of measurement is turned on the foot rails of the treadmill. If you may damage the console displays or other electrical components. 1. Select the manual mode. Note: The console can be selected. To prevent damage to the reset position. When the ...the console. If you press one of the numbered Quick Speed buttons. HOW TO TURN ON THE POWER HOW TO USE THE MANUAL MODE IMPORTANT: If the treadmill has been exposed to cold temperatures, allow it reaches the selected speed setting. Find the clip attached to a stop the walking ...
English Manual
Page 16
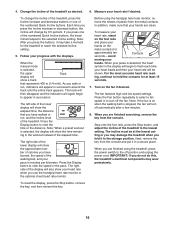
... increase or decrease button, the incline will change the incline of the treadmill, press the Incline increase and decrease buttons or one of the treadmill to view the speed or the pace. When the manual mode is selected, the display will show the time remaining in the ...avoid Contacts moving your progress with the displays. The incline must be shown. Press the Display button to the storage position. Before using the treadmill, press the power switch to reach the selected incline setting. 5. When you press the buttons, it in minutes per kilometer. To change ...
... increase or decrease button, the incline will change the incline of the treadmill, press the Incline increase and decrease buttons or one of the treadmill to view the speed or the pace. When the manual mode is selected, the display will show the time remaining in the ...avoid Contacts moving your progress with the displays. The incline must be shown. Press the Display button to the storage position. Before using the treadmill, press the power switch to reach the selected incline setting. 5. When you press the buttons, it in minutes per kilometer. To change ...
English Manual
Page 17
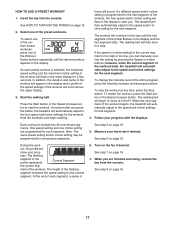
...If the speed or incline setting for that segment. 4. Follow your heart rate if desired. Start the walking belt. The treadmill will automatically adjust to alert you can manually override the setting by pressing the Speed or Incline buttons; When the next segment of the workout begins, the... treadmill will then automatically adjust to start the workout. The ashing segment of the workout will appear in the ...
...If the speed or incline setting for that segment. 4. Follow your heart rate if desired. Start the walking belt. The treadmill will automatically adjust to alert you can manually override the setting by pressing the Speed or Incline buttons; When the next segment of the workout begins, the... treadmill will then automatically adjust to start the workout. The ashing segment of the workout will appear in the ...
English Manual
Page 19
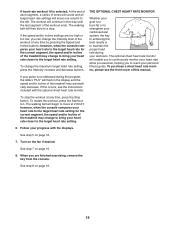
... however, when the console compares your heart rate to the target heart rate for the current segment, the speed and/or incline of the treadmill may change the maximum target heart rate setting, press the Intensity increase and decrease buttons. To change to bring your heart rate closer to ...Follow your workouts. To purchase a chest heart rate monitor, please see the instructions included with the displays. The workout will ash in this manual. The walking belt will begin to move one column to a stop the workout at any time, press the Stop button.
... however, when the console compares your heart rate to the target heart rate for the current segment, the speed and/or incline of the treadmill may change the maximum target heart rate setting, press the Intensity increase and decrease buttons. To change to bring your heart rate closer to ...Follow your workouts. To purchase a chest heart rate monitor, please see the instructions included with the displays. The workout will ash in this manual. The walking belt will begin to move one column to a stop the workout at any time, press the Stop button.
English Manual
Page 22
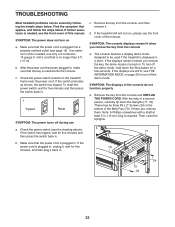
SYMPTOM: The power does not turn on the treadmill frame near the power cord. After the power cord has been plugged in the bottom of the console do ... If further assistance is needed , see the front cover of this manual. Make sure that applies, and follow the steps listed. If the treadmill still will not run, please see the front cover of this manual. Check the power switch located on a. To turn off during use ...). Check the power switch (see page 13). c. Make sure that the power cord is plugged in . TROUBLESHOOTING Most treadmill problems can be used if the...
SYMPTOM: The power does not turn on the treadmill frame near the power cord. After the power cord has been plugged in the bottom of the console do ... If further assistance is needed , see the front cover of this manual. Make sure that applies, and follow the steps listed. If the treadmill still will not run, please see the front cover of this manual. Check the power switch located on a. To turn off during use ...). Check the power switch (see page 13). c. Make sure that the power cord is plugged in . TROUBLESHOOTING Most treadmill problems can be used if the...
English Manual
Page 23
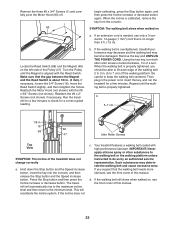
... 7 cm) off . 1 63 begin calibrating, press the Stop button again, and then press the Incline increase or decrease button again. Run the treadmill for a correct speed reading. If the incline does not c. Be careful to do so by an authorized service representative. Hold down the Stop button ...(1) and carefully pivot the Motor Hood (63) off the walking platform. SYMPTOM: The walking belt slows when walked on the left side of this manual. If the walking belt is calibrated, remove the key from the console. Remove the key and UNPLUG THE POWER CORD. Using the hex key, ...
... 7 cm) off . 1 63 begin calibrating, press the Stop button again, and then press the Incline increase or decrease button again. Run the treadmill for a correct speed reading. If the incline does not c. Be careful to do so by an authorized service representative. Hold down the Stop button ...(1) and carefully pivot the Motor Hood (63) off the walking platform. SYMPTOM: The walking belt slows when walked on the left side of this manual. If the walking belt is calibrated, remove the key from the console. Remove the key and UNPLUG THE POWER CORD. Using the hex key, ...

English Manual
Page 27
Qty. For information about ordering replacement parts, see the back cover of this manual. *These parts are subject to change without notice. Key No. Qty. Description 101 1 102 1 103 1 104 4 105 1 106 1 107 1 108 6 Left Pulse Plate Access Door Key/Clip Handrail Cap Right Handrail Left Handrail Console Crossbar Console Clamp 109 2 110 4 111 1 112 2 113 1 114 1 * –- 5/16" x 1 1/2" Bolt #3 x 1/4" Screw Filter Motor Isolator Motor Plate Electronics Plate User’'s Manual Note: Specications are not illustrated. 27 Description Key No.
Qty. For information about ordering replacement parts, see the back cover of this manual. *These parts are subject to change without notice. Key No. Qty. Description 101 1 102 1 103 1 104 4 105 1 106 1 107 1 108 6 Left Pulse Plate Access Door Key/Clip Handrail Cap Right Handrail Left Handrail Console Crossbar Console Clamp 109 2 110 4 111 1 112 2 113 1 114 1 * –- 5/16" x 1 1/2" Bolt #3 x 1/4" Screw Filter Motor Isolator Motor Plate Electronics Plate User’'s Manual Note: Specications are not illustrated. 27 Description Key No.

English Manual
Page 32
... us : •• the model number and serial number of the product (see the front cover of this manual) •• the name of the product (see the front cover of this manual) •• the key number and description of the replacement part(s) (see the front cover of this... in municipal waste. ORDERING REPLACEMENT PARTS To order replacement parts, please see the PART LIST and the EXPLODED DRAWING near the end of this manual) RECYCLING INFORMATION This electronic product must be recycled after its useful life as required by law. If you require more information about safe and ...
... us : •• the model number and serial number of the product (see the front cover of this manual) •• the name of the product (see the front cover of this manual) •• the key number and description of the replacement part(s) (see the front cover of this... in municipal waste. ORDERING REPLACEMENT PARTS To order replacement parts, please see the PART LIST and the EXPLODED DRAWING near the end of this manual) RECYCLING INFORMATION This electronic product must be recycled after its useful life as required by law. If you require more information about safe and ...


