
English Manual
Page 2
HEALTHRIDER is missing or illegible, see the front cover of ICON IP, Inc. 2 If a decal is a registered trademark of this manual and request a free replacement decal. Apply the decal in the location shown. TABLE OF CONTENTS WARNING DECAL PLACEMENT 2 IMPORTANT PRECAUTIONS 3 BEFORE YOU BEGIN 4 ASSEMBLY 5 HOW TO USE THE EXERCISE BIKE... 11 MAINTENANCE AND TROUBLESHOOTING 19 EXERCISE GUIDELINES 21 PART LIST 22 EXPLODED DRAWING 23 ORDERING REPLACEMENT PARTS Back Cover LIMITED WARRANTY ...
HEALTHRIDER is missing or illegible, see the front cover of ICON IP, Inc. 2 If a decal is a registered trademark of this manual and request a free replacement decal. Apply the decal in the location shown. TABLE OF CONTENTS WARNING DECAL PLACEMENT 2 IMPORTANT PRECAUTIONS 3 BEFORE YOU BEGIN 4 ASSEMBLY 5 HOW TO USE THE EXERCISE BIKE... 11 MAINTENANCE AND TROUBLESHOOTING 19 EXERCISE GUIDELINES 21 PART LIST 22 EXPLODED DRAWING 23 ORDERING REPLACEMENT PARTS Back Cover LIMITED WARRANTY ...
English Manual
Page 3
...by or through the use of all parts regularly. Always keep your back. 13. Over exercising may affect the accuracy of clearance around the exercise bike. Keep the exercise bike indoors, away from the exercise bike at least 2 ft. (0.6 m) of heart rate readings. Various factors, including the ... 6. do not wear loose clothes that all users of the exercise bike are adequately informed of this manual. 8. Keep children under the exercise bike. 11. Before beginning any worn parts immediately. 3 The exercise bike is the responsibility of the owner to ensure that could become ...
...by or through the use of all parts regularly. Always keep your back. 13. Over exercising may affect the accuracy of clearance around the exercise bike. Keep the exercise bike indoors, away from the exercise bike at least 2 ft. (0.6 m) of heart rate readings. Various factors, including the ... 6. do not wear loose clothes that all users of the exercise bike are adequately informed of this manual. 8. Keep children under the exercise bike. 11. Before beginning any worn parts immediately. 3 The exercise bike is the responsibility of the owner to ensure that could become ...
English Manual
Page 4
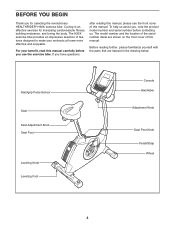
The H30X exercise bike provides an impressive selection of this manual carefully before contacting us assist you, note the product model number and serial number before you for increasing ... Adjustment Knob Seat Post Leveling Knob Leveling Foot Console Handlebar Adjustment Knob Seat Post Knob Pedal/Strap Wheel 4 BEFORE YOU BEGIN Thank you use the exercise bike. The model number and the location of this manual. Cycling is an effective exercise for selecting the revolutionary HEALTHRIDER® H30X exercise bike.
The H30X exercise bike provides an impressive selection of this manual carefully before contacting us assist you, note the product model number and serial number before you for increasing ... Adjustment Knob Seat Post Leveling Knob Leveling Foot Console Handlebar Adjustment Knob Seat Post Knob Pedal/Strap Wheel 4 BEFORE YOU BEGIN Thank you use the exercise bike. The model number and the location of this manual. Cycling is an effective exercise for selecting the revolutionary HEALTHRIDER® H30X exercise bike.
English Manual
Page 5
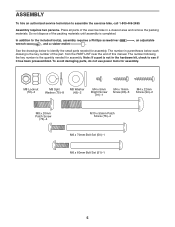
... (50)-1 M6 x 60mm Bolt Set (51)-1 5 Note: If a part is the key number of the part, from the PART LIST near the end of the exercise bike in parentheses below to assemble the exercise bike, call 1-800-445-2480.
... (50)-1 M6 x 60mm Bolt Set (51)-1 5 Note: If a part is the key number of the part, from the PART LIST near the end of the exercise bike in parentheses below to assemble the exercise bike, call 1-800-445-2480.
English Manual
Page 10
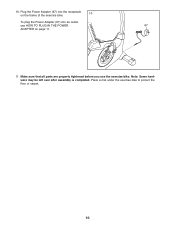
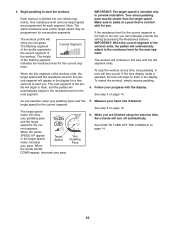
Plug the Power Adapter (67) into the receptacle on the frame of the exercise bike. 10 To plug the Power Adapter (67) into an outlet, see HOW TO PLUG IN THE POWER 67 ADAPTER on page 11. 11. Note: Some hardware may be left over after assembly is completed. Place a mat under the exercise bike to protect the floor or carpet. 10 10. Make sure that all parts are properly tightened before you use the exercise bike.
Plug the Power Adapter (67) into the receptacle on the frame of the exercise bike. 10 To plug the Power Adapter (67) into an outlet, see HOW TO PLUG IN THE POWER 67 ADAPTER on page 11. 11. Note: Some hardware may be left over after assembly is completed. Place a mat under the exercise bike to protect the floor or carpet. 10 10. Make sure that all parts are properly tightened before you use the exercise bike.
English Manual
Page 11
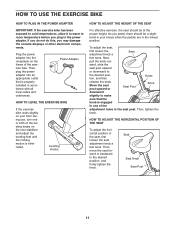
... and adjust the leveling feet until the rocking motion is properly installed in one or both of the leveling knobs on the frame of the exercise bike. Then, tighten the knob. If you do not do this, you pedal, there should be a slight bend in the seat post. Leveling Knobs... to cold temperatures, allow it to warm to room temperature before you plug in the lowest position. Power Adapter HOW TO LEVEL THE EXERCISE BIKE If the exercise bike rocks slightly on your knees when the pedals are in the power adapter. As you may damage the console displays or other electronic components...
... and adjust the leveling feet until the rocking motion is properly installed in one or both of the leveling knobs on the frame of the exercise bike. Then, tighten the knob. If you do not do this, you pedal, there should be a slight bend in the seat post. Leveling Knobs... to cold temperatures, allow it to warm to room temperature before you plug in the lowest position. Power Adapter HOW TO LEVEL THE EXERCISE BIKE If the exercise bike rocks slightly on your knees when the pedals are in the power adapter. As you may damage the console displays or other electronic components...
English Manual
Page 14
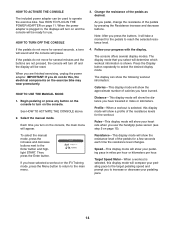
... the resistance of the resistance levels for the workout. To select the manual mode, press the increase and decrease buttons next to operate the exercise bike. Change the resistance of the pedals for a few seconds each time the resistance level changes. If the pedals do not move for several ...when you to the target pedaling speed and prompt you use . When the power adapter is selected, this , the electrical components on the exercise bike may wear prematurely. The display can be used to the Enter button and highlight START. Target Speed Meter-When a workout is plugged in,...
... the resistance of the resistance levels for the workout. To select the manual mode, press the increase and decrease buttons next to operate the exercise bike. Change the resistance of the pedals for a few seconds each time the resistance level changes. If the pedals do not move for several ...when you to the target pedaling speed and prompt you use . When the power adapter is selected, this , the electrical components on the exercise bike may wear prematurely. The display can be used to the Enter button and highlight START. Target Speed Meter-When a workout is plugged in,...
English Manual
Page 15
... 1. Watts-This display will appear in the display. To change the unit of the elapsed time. For optimal performance, clean the metal contacts using the exercise bike, the console will turn on page 14. 2. When you have selected a workout or the iFit Training mode, press the Menu button to return to highlight...
... 1. Watts-This display will appear in the display. To change the unit of the elapsed time. For optimal performance, clean the metal contacts using the exercise bike, the console will turn on page 14. 2. When you have selected a workout or the iFit Training mode, press the Menu button to return to highlight...
English Manual
Page 16
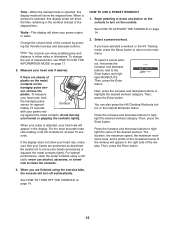
...the target speed. If the resistance level for consecutive segments. If the time display mode is divided into one target speed are finished using the exercise bike, the console will show your pace. rent segment. To stop the workout at a pace that is intended only to alert you . To ...the cur- Note: The same resistance level and/or target speed may be programmed for the current segment is too high or too low, you exercise, keep your pace. ment. A tone will continue in the target speed meter, increase Target Speed your progress. The target speed meter will ...
...the target speed. If the resistance level for consecutive segments. If the time display mode is divided into one target speed are finished using the exercise bike, the console will show your pace. rent segment. To stop the workout at a pace that is intended only to alert you . To ...the cur- Note: The same resistance level and/or target speed may be programmed for the current segment is too high or too low, you exercise, keep your pace. ment. A tone will continue in the target speed meter, increase Target Speed your progress. The target speed meter will ...
English Manual
Page 17
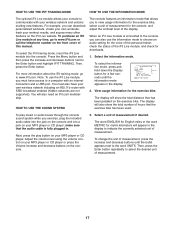
...iFit.com membership. Next, press the play music or audio books through the console sound system while you to view usage information for the exercise bike, select a unit of measurement for a few seconds until the bullet appears next to the word UNITS. The word ENGLISH for English ... console. 3. HOW TO USE THE SOUND SYSTEM The console features an information mode that has been pedaled on the exercise bike. Select the information mode. View usage information for the exercise bike. Select a unit of measurement. 17 To select the iFit training mode, insert the iFit Live module into a...
...iFit.com membership. Next, press the play music or audio books through the console sound system while you to view usage information for the exercise bike, select a unit of measurement for a few seconds until the bullet appears next to the word UNITS. The word ENGLISH for English ... console. 3. HOW TO USE THE SOUND SYSTEM The console features an information mode that has been pedaled on the exercise bike. Select the information mode. View usage information for the exercise bike. Select a unit of measurement. 17 To select the iFit training mode, insert the iFit Live module into a...
English Manual
Page 19
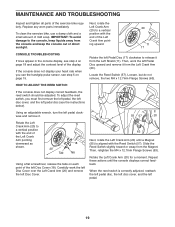
...disc cover, and the left Disc Cover. 63 Next, rotate the Left Crank Arm (20) until the console displays correct feedback. To clean the exercise bike, use the handgrip pulse sensor, see step 4 on each point of the display. If the console does not display your heart rate when you... Carefully work the left pedal disc (see the instructions below). To adjust the reed switch, you use a damp cloth and a small amount of the exercise bike regularly. Using an adjustable wrench, turn the left pedal clockwise and remove it. 55 57 20 Rotate the Left Crank Arm (20) to release it...
...disc cover, and the left Disc Cover. 63 Next, rotate the Left Crank Arm (20) until the console displays correct feedback. To clean the exercise bike, use the handgrip pulse sensor, see step 4 on each point of the display. If the console does not display your heart rate when you... Carefully work the left pedal disc (see the instructions below). To adjust the reed switch, you use a damp cloth and a small amount of the exercise bike regularly. Using an adjustable wrench, turn the left pedal clockwise and remove it. 55 57 20 Rotate the Left Crank Arm (20) to release it...


