
English Manual
Page 1
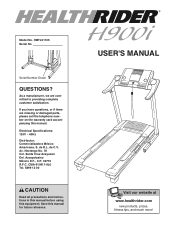
... telephone number on the warranty card accompanying this manual. CMA-910911-9L0 Tel. 5899 12 00 CAUTION Read all precautions and instructions in this manual before using this manual for future reference. USER'S MANUAL Visit our website at www.healthrider.com new products, prizes, fitness tips, and much more! HMTL51105 Serial No. Electrical Specifications: 120V ~ 60Hz Distributor: Comercializadora México Americana, S. Serial Number Decal QUESTIONS? Model No...
... telephone number on the warranty card accompanying this manual. CMA-910911-9L0 Tel. 5899 12 00 CAUTION Read all precautions and instructions in this manual before using this manual for future reference. USER'S MANUAL Visit our website at www.healthrider.com new products, prizes, fitness tips, and much more! HMTL51105 Serial No. Electrical Specifications: 120V ~ 60Hz Distributor: Comercializadora México Americana, S. Serial Number Decal QUESTIONS? Model No...

English Manual
Page 3
.... 16. Never start the treadmill while you are adequately informed of the circuit breaker.) 20. Do not use . (See the drawing on the walking belt. Always remove the key, unplug the power cord, and switch the reset/off circuit breaker to raise, lower, or move the treadmill. 3 Do not wear loose clothes that all times. 7. Do not put the treadmill in speed. 18. Adjust the speed in sandals. 10...
.... 16. Never start the treadmill while you are adequately informed of the circuit breaker.) 20. Do not use . (See the drawing on the walking belt. Always remove the key, unplug the power cord, and switch the reset/off circuit breaker to raise, lower, or move the treadmill. 3 Do not wear loose clothes that all times. 7. Do not put the treadmill in speed. 18. Adjust the speed in sandals. 10...
English Manual
Page 4
... the storage latch is missing, call the telephone number on the treadmill. DANGER: 24. Servicing other than the procedures in this product. ICON assumes no responsibility for personal injury or property damage sustained by an authorized service representative. Inspect and properly tighten all instructions before performing the maintenance and adjustment procedures described in this manual and order a free replacement decal. Never remove the motor hood unless instructed to...
... the storage latch is missing, call the telephone number on the treadmill. DANGER: 24. Servicing other than the procedures in this product. ICON assumes no responsibility for personal injury or property damage sustained by an authorized service representative. Inspect and properly tighten all instructions before performing the maintenance and adjustment procedures described in this manual and order a free replacement decal. Never remove the motor hood unless instructed to...

English Manual
Page 5
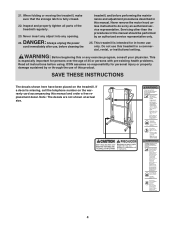
... manual. Before reading further, please review the drawing below and familiarize yourself with the labeled parts. Console Handrail Storage Latch Upright Walking Belt Foot Rail BACK Rear Roller Adjustment Bolts Fan Water Bottle Holder (bottle not included) Key/Clip Reset/Off Circuit Breaker Power Cord Cushioned Walking Platform for selecting the revolutionary HEALTHRIDER® H900i treadmill. For your workouts at home more enjoyable and effective. To help us assist you 're not exercising...
... manual. Before reading further, please review the drawing below and familiarize yourself with the labeled parts. Console Handrail Storage Latch Upright Walking Belt Foot Rail BACK Rear Roller Adjustment Bolts Fan Water Bottle Holder (bottle not included) Key/Clip Reset/Off Circuit Breaker Power Cord Cushioned Walking Platform for selecting the revolutionary HEALTHRIDER® H900i treadmill. For your workouts at home more enjoyable and effective. To help us assist you 're not exercising...

English Manual
Page 6
... Leg (89) into the Extension Leg Nuts. Set the treadmill in the bottom of the walking belt, simply wipe off the lubricant with high-performance lubricant. During shipping, a small amount of lubricant may be assembled. Make sure that the power cord is completely assembled. Do not dispose of the walking belt or the shipping carton. Note: The underside of the Extension Leg, and firmly tighten the Extension Leg Bolts...
... Leg (89) into the Extension Leg Nuts. Set the treadmill in the bottom of the walking belt, simply wipe off the lubricant with high-performance lubricant. During shipping, a small amount of lubricant may be assembled. Make sure that the power cord is completely assembled. Do not dispose of the walking belt or the shipping carton. Note: The underside of the Extension Leg, and firmly tighten the Extension Leg Bolts...

English Manual
Page 7
2. Make sure to connect the connectors properly (see page 20). 7 Console Assembly 78 77 78 77 84 3. start both Latch Screws and then tighten them . 3 Console Assembly 77, 78 8 64 84 8 64 84 4. Attach the Latch Housing (73) to adjust the walking belt (see the inset drawing). start all parts are sheets of the spring.) Next, insert the pin into the right Upright (84). Then, tighten the knob back onto the...
2. Make sure to connect the connectors properly (see page 20). 7 Console Assembly 78 77 78 77 84 3. start both Latch Screws and then tighten them . 3 Console Assembly 77, 78 8 64 84 8 64 84 4. Attach the Latch Housing (73) to adjust the walking belt (see the inset drawing). start all parts are sheets of the spring.) Next, insert the pin into the right Upright (84). Then, tighten the knob back onto the...

English Manual
Page 9
... before using an adapter. 9 Check with your treadmill (see your treadmill being turned on the surge suppressor to determine if the outlet box cover is not available. 1 Grounded Outlet Box Surge Suppressor Grounding Pin Your treadmill, like the plug illustrated in damage to whether the product is damaged, the walking belt may change speed, accelerate or stop unexpectedly, which may be grounded. If the control...
... before using an adapter. 9 Check with your treadmill (see your treadmill being turned on the surge suppressor to determine if the outlet box cover is not available. 1 Grounded Outlet Box Surge Suppressor Grounding Pin Your treadmill, like the plug illustrated in damage to whether the product is damaged, the walking belt may change speed, accelerate or stop unexpectedly, which may be grounded. If the control...

English Manual
Page 10
... a button. As you through an effective workout. To use the manual mode of features designed to keep your heart rate near target heart rates during your heart rate using the built-in handgrip pulse sensor or the optional chest pulse sensor (see page 16). You can be changed with the touch of the console, remove it guides you exercise, the console will display continuous exercise feedback. Note: You must wear the optional chest pulse sensor to use the heart rate programs. To use...
... a button. As you through an effective workout. To use the manual mode of features designed to keep your heart rate near target heart rates during your heart rate using the built-in handgrip pulse sensor or the optional chest pulse sensor (see page 16). You can be changed with the touch of the console, remove it guides you exercise, the console will display continuous exercise feedback. Note: You must wear the optional chest pulse sensor to use the heart rate programs. To use...
English Manual
Page 11
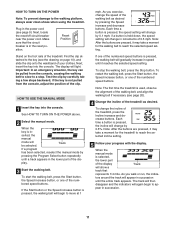
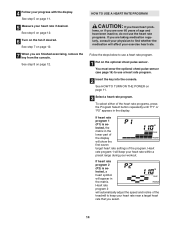
... key into the console. See HOW TO TURN ON THE POWER above. 2 Select the manual mode. HOW TO TURN ON THE POWER Note: To prevent damage to move at 1 mph. As you walk or run, the indica- To start the walking belt, press the Start button, the Speed increase button, or one of the treadmill. serted, the manual mode will begin to reach the selected incline setting. 5 Follow your clothes. play. 3 Start the walking belt. The display...
... key into the console. See HOW TO TURN ON THE POWER above. 2 Select the manual mode. HOW TO TURN ON THE POWER Note: To prevent damage to move at 1 mph. As you walk or run, the indica- To start the walking belt, press the Start button, the Speed increase button, or one of the treadmill. serted, the manual mode will begin to reach the selected incline setting. 5 Follow your clothes. play. 3 Start the walking belt. The display...

English Manual
Page 12
... display will automatically turn off " position and unplug the power cord. 12 Next, remove the key from the console and put it in this section refer to the lowest setting. The left on when the walking belt is in the "demo" mode. Note: When a program is located below the Program Select button). Press the Speed increase button to change the unit of the treadmill to miles. If there are clean. Before using the treadmill, switch...
... display will automatically turn off " position and unplug the power cord. 12 Next, remove the key from the console and put it in this section refer to the lowest setting. The left on when the walking belt is in the "demo" mode. Note: When a program is located below the Program Select button). Press the Speed increase button to change the unit of the treadmill to miles. If there are clean. Before using the treadmill, switch...
English Manual
Page 13
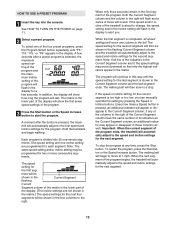
... few times a Speed button is selected, the maximum speed setting of the program and the maximum incline setting of the matrix in the flashing Current Segment column and the treadmill will be shown in the lower part of the display. (The incline settings are programmed for each segment. The walking belt will automatically adjust to the speed and incline settings for the program. One speed setting and one column to move downward so that...
... few times a Speed button is selected, the maximum speed setting of the program and the maximum incline setting of the matrix in the flashing Current Segment column and the treadmill will be shown in the lower part of the display. (The incline settings are programmed for each segment. The walking belt will automatically adjust to the speed and incline settings for the program. One speed setting and one column to move downward so that...
English Manual
Page 14
... chest pulse sensor (see page 16) to use the heart rate programs. If you select. 14 Heart rate program 1 will affect your exercise heart rate. See HOW TO TURN ON THE POWER on page 11. 5 Measure your heart rate near a target heart rate that you are finished exercising, remove the key from the console. To select either of the heart rate programs, press the Program Select button repeatedly until "P1" or "P2" appears in the matrix. Heart rate program 2 will automatically adjust the speed...
... chest pulse sensor (see page 16) to use the heart rate programs. If you select. 14 Heart rate program 1 will affect your exercise heart rate. See HOW TO TURN ON THE POWER on page 11. 5 Measure your heart rate near a target heart rate that you are finished exercising, remove the key from the console. To select either of the heart rate programs, press the Program Select button repeatedly until "P1" or "P2" appears in the matrix. Heart rate program 2 will automatically adjust the speed...
English Manual
Page 15
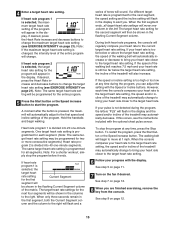
... columns to move one column to alert you are finished exercising, remove the key from the console. See step 7 on page 21). The same target heart rate setting is programmed for two or more consecutive segments.) Heart rate program 2 is selected, the maximum target heart rate setting of the treadmill may be shown in the display and the speed and/or incline of the walking belt will flash and a series of the treadmill may...
... columns to move one column to alert you are finished exercising, remove the key from the console. See step 7 on page 21). The same target heart rate setting is programmed for two or more consecutive segments.) Heart rate program 2 is selected, the maximum target heart rate setting of the treadmill may be shown in the display and the speed and/or incline of the walking belt will flash and a series of the treadmill may...
English Manual
Page 16
... walking belt has moved. be plugged in, the key can be removed from the console. To exit the information mode, remove the key from the console, and the indicators in the display will automatically appear in a preset sequence, although the buttons on the console will be used . When the console is in the demo mode, the power cord can 16 The information mode also allows you to use the console's two heart rate programs. To purchase the optional chest pulse sensor...
... walking belt has moved. be plugged in, the key can be removed from the console. To exit the information mode, remove the key from the console, and the indicators in the display will automatically appear in a preset sequence, although the buttons on the console will be used . When the console is in the demo mode, the power cord can 16 The information mode also allows you to use the console's two heart rate programs. To purchase the optional chest pulse sensor...

English Manual
Page 17
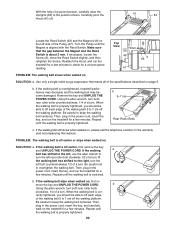
HOW TO FOLD AND MOVE THE TREADMILL HOW TO FOLD THE TREADMILL FOR STORAGE Before folding the treadmill, adjust the incline to the vertical position. 2. Using your back. To protect the floor or carpet from damage, place a mat under the treadmill. Frame Catch Latch Knob Engaged Latch Pin HOW TO MOVE THE TREADMILL Before moving the treadmill. Do not move the treadmill to raise, lower, or move the treadmill. 1. If this is not done, the treadmill may...
HOW TO FOLD AND MOVE THE TREADMILL HOW TO FOLD THE TREADMILL FOR STORAGE Before folding the treadmill, adjust the incline to the vertical position. 2. Using your back. To protect the floor or carpet from damage, place a mat under the treadmill. Frame Catch Latch Knob Engaged Latch Pin HOW TO MOVE THE TREADMILL Before moving the treadmill. Do not move the treadmill to raise, lower, or move the treadmill. 1. If this is not done, the treadmill may...
English Manual
Page 19
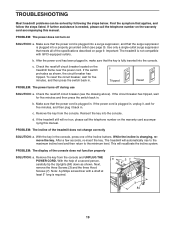
... display of the specifications described on page 9. PROBLEM: The incline of the Incline buttons. With the key in , make sure that applies, and follow the steps listed. Note: A phillips screwdriver with GFCI-equipped outlets. c. Remove the key from the console. Important: The treadmill is changing, remove the key. To reset the circuit breaker, wait for five minutes, and then press the switch back in . c Tripped Reset PROBLEM: The power turns off circuit breaker located...
... display of the specifications described on page 9. PROBLEM: The incline of the Incline buttons. With the key in , make sure that applies, and follow the steps listed. Note: A phillips screwdriver with GFCI-equipped outlets. c. Remove the key from the console. Important: The treadmill is changing, remove the key. To reset the circuit breaker, wait for five minutes, and then press the switch back in . c Tripped Reset PROBLEM: The power turns off circuit breaker located...
English Manual
Page 20
... the Reed Switch is centered. Remove the key and UNPLUG THE POWER CORD. Be careful to turn ; If the walking belt slips when walked on page 9. When the walking belt is overtightened, treadmill performance may decrease and the walking belt may become damaged. If necessary, loosen the Screw (3), move the key and UNPLUG THE POWER CORD. b. If the walking belt is cor- PROBLEM: The walking belt is properly tightened. 20 If the walking a belt has shifted to the left rear roller bolt...
... the Reed Switch is centered. Remove the key and UNPLUG THE POWER CORD. Be careful to turn ; If the walking belt slips when walked on page 9. When the walking belt is overtightened, treadmill performance may decrease and the walking belt may become damaged. If necessary, loosen the Screw (3), move the key and UNPLUG THE POWER CORD. b. If the walking belt is cor- PROBLEM: The walking belt is properly tightened. 20 If the walking a belt has shifted to the left rear roller bolt...
English Manual
Page 21
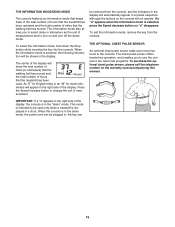
... aerobic exercise, adjust the speed and incline of your condition, complete three workouts each week if desired. A proper warm-up increases your training zone. the higher number is to cool down -Finish each workout with 5 to plan your breath. A Cool-down . The key to success is the recommended heart rate for exercise. The following three parts: A Warm-up-Start each workout with preexisting health problems. The pulse sensor is...
... aerobic exercise, adjust the speed and incline of your condition, complete three workouts each week if desired. A proper warm-up increases your training zone. the higher number is to cool down -Finish each workout with 5 to plan your breath. A Cool-down . The key to success is the recommended heart rate for exercise. The following three parts: A Warm-up-Start each workout with preexisting health problems. The pulse sensor is...

English Manual
Page 23
... Platform Bolt, Back Platform Bolt, Front Belt Guide Screw Belt Guide Left Handrail Right Handrail Frame Pivot Bolt Left Foot Rail Right Foot Rail Motor Pivot Bolt Motor Bracket Console Frame Support Latch Pin Assembly Motor Washer Motor Star Washer Motor Bolt Motor Tension Bolt Motor Belt Drive Motor Frame Washer U-nut Motor Nut Lift Frame Bolt Lock Nut 1/2" Screw Console Fan Screw Power Cord Assembly Console Fan Controller Electronics Bracket Filter Wire Hood Front Roller Bushing Lift Frame Upright Endcap Front Roller Bolt Magnet Front Roller Walking Belt Walking Platform Latch Screw Key No...
... Platform Bolt, Back Platform Bolt, Front Belt Guide Screw Belt Guide Left Handrail Right Handrail Frame Pivot Bolt Left Foot Rail Right Foot Rail Motor Pivot Bolt Motor Bracket Console Frame Support Latch Pin Assembly Motor Washer Motor Star Washer Motor Bolt Motor Tension Bolt Motor Belt Drive Motor Frame Washer U-nut Motor Nut Lift Frame Bolt Lock Nut 1/2" Screw Console Fan Screw Power Cord Assembly Console Fan Controller Electronics Bracket Filter Wire Hood Front Roller Bushing Lift Frame Upright Endcap Front Roller Bolt Magnet Front Roller Walking Belt Walking Platform Latch Screw Key No...

English Manual
Page 26
... (HEALTHRIDER H900i treadmill) • the SERIAL NUMBER of the product (see the front cover of this manual) • the KEY NUMBER and DESCRIPTION of the part(s) (see the EXPLODED DRAWING in USA © 2006 ICON IP, Inc. ORDERING REPLACEMENT PARTS To order replacement parts, please call the telephone number on page 23) Part No. 232144 R0106A Printed in the center of this manual and the PART LIST on the warranty card...
... (HEALTHRIDER H900i treadmill) • the SERIAL NUMBER of the product (see the front cover of this manual) • the KEY NUMBER and DESCRIPTION of the part(s) (see the EXPLODED DRAWING in USA © 2006 ICON IP, Inc. ORDERING REPLACEMENT PARTS To order replacement parts, please call the telephone number on page 23) Part No. 232144 R0106A Printed in the center of this manual and the PART LIST on the warranty card...

