
English Manual
Page 1
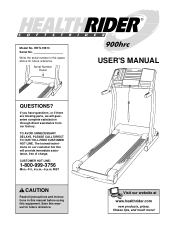
... above for future reference. CUSTOMER HOT LINE: 1-800-999-3756 Mon.-Fri., 6 a.m.- 6 p.m. Write the serial number in this manual before using this manual for future reference. TO AVOID UNNECESSARY DELAYS, PLEASE CALL DIRECT TO OUR TOLL-FREE CUSTOMER HOT LINE. If you have questions, or ...if there are missing parts, we will provide immediate assistance, free of charge. Serial Number Decal USER'S MANUAL QUESTIONS? Visit our website at www.healthrider.com new products, prizes, fitness tips, and much more! Model No. Save this equipment. The trained technicians on our...
... above for future reference. CUSTOMER HOT LINE: 1-800-999-3756 Mon.-Fri., 6 a.m.- 6 p.m. Write the serial number in this manual before using this manual for future reference. TO AVOID UNNECESSARY DELAYS, PLEASE CALL DIRECT TO OUR TOLL-FREE CUSTOMER HOT LINE. If you have questions, or ...if there are missing parts, we will provide immediate assistance, free of charge. Serial Number Decal USER'S MANUAL QUESTIONS? Visit our website at www.healthrider.com new products, prizes, fitness tips, and much more! Model No. Save this equipment. The trained technicians on our...

English Manual
Page 2
TABLE OF CONTENTS IMPORTANT PRECAUTIONS 3 BEFORE YOU BEGIN 5 ASSEMBLY 6 HOW TO USE THE CHEST PULSE SENSOR 7 TREADMILL OPERATION 8 HOW TO FOLD AND MOVE THE TREADMILL 24 TROUBLESHOOTING 25 EXERCISE GUIDELINES 27 PART LIST 30 HOW TO ORDER REPLACEMENT PARTS 31 LIMITED WARRANTY Back Cover Note: An EXPLODED DRAWING is a registered trademark of this manual. HealthRider is attached in the center of ICON Health & Fitness, Inc. 2
TABLE OF CONTENTS IMPORTANT PRECAUTIONS 3 BEFORE YOU BEGIN 5 ASSEMBLY 6 HOW TO USE THE CHEST PULSE SENSOR 7 TREADMILL OPERATION 8 HOW TO FOLD AND MOVE THE TREADMILL 24 TROUBLESHOOTING 25 EXERCISE GUIDELINES 27 PART LIST 30 HOW TO ORDER REPLACEMENT PARTS 31 LIMITED WARRANTY Back Cover Note: An EXPLODED DRAWING is a registered trademark of this manual. HealthRider is attached in the center of ICON Health & Fitness, Inc. 2

English Manual
Page 3
... high speeds. If the control system is damaged, the walking belt may change speed or stop unexpectedly, which may compromise your local HealthRider dealer or call 1-800806-3651 and order part number 146148. Never start the treadmill while you are recommended for the location of the on/off switch.) 19. The... not in use. (See the drawing on page 5 for both men and women. Keep the treadmill indoors, away from heated surfaces. 13. Do not wear loose clothing that meets all users of this manual. 3. Adjust the speed in small increments to the con- Using hand weights and not holding the ...
... high speeds. If the control system is damaged, the walking belt may change speed or stop unexpectedly, which may compromise your local HealthRider dealer or call 1-800806-3651 and order part number 146148. Never start the treadmill while you are recommended for the location of the on/off switch.) 19. The... not in use. (See the drawing on page 5 for both men and women. Keep the treadmill indoors, away from heated surfaces. 13. Do not wear loose clothing that meets all users of this manual. 3. Adjust the speed in small increments to the con- Using hand weights and not holding the ...
English Manual
Page 4
... The decals shown below have been placed on your CD player or VCR when you can manually override the speed and incline settings at 1-800-999-3756 to the next settings of the treadmill every three months. 25. When using iFIT.com CDs and videos, you are not using...service representative only. 27. Never remove the motor hood unless instructed to change . 22. Always remove iFIT.com CDs and videos from your treadmill. This is intended for speed and/or incline changes. Apply the decal in any time by an authorized service representative. tenance and adjustment procedures...
... The decals shown below have been placed on your CD player or VCR when you can manually override the speed and incline settings at 1-800-999-3756 to the next settings of the treadmill every three months. 25. When using iFIT.com CDs and videos, you are not using...service representative only. 27. Never remove the motor hood unless instructed to change . 22. Always remove iFIT.com CDs and videos from your treadmill. This is intended for speed and/or incline changes. Apply the decal in any time by an authorized service representative. tenance and adjustment procedures...
English Manual
Page 5
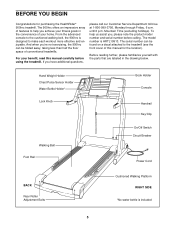
... RIGHT SIDE *No water bottle is HRTL19913. For your benefit, read this manual for purchasing the HealthRider® 900hrc treadmill. The model number is included 5 The serial number can be found on a decal attached to the treadmill (see the front cover of conventional treadmills. And when you , please note the product model number and serial number...
... RIGHT SIDE *No water bottle is HRTL19913. For your benefit, read this manual for purchasing the HealthRider® 900hrc treadmill. The model number is included 5 The serial number can be found on a decal attached to the treadmill (see the front cover of conventional treadmills. And when you , please note the product model number and serial number...

English Manual
Page 9
... offers an impressive selection of features to create your own workout programs and store them in the manual mode, the speed and incline of the treadmill can be changed with a class and an instructor-the hottest new trend at www.iFIT.com and access basic programs, audio programs, and video programs ... incline of your VCR and TV and play To use the manual mode of working out with a touch of the I J console, remove it guides you use pulse programs, see pages 16 and 17. The included hand weights can connect the treadmill to your heart rate when you through every step of the...
... offers an impressive selection of features to create your own workout programs and store them in the manual mode, the speed and incline of the treadmill can be changed with a class and an instructor-the hottest new trend at www.iFIT.com and access basic programs, audio programs, and video programs ... incline of your VCR and TV and play To use the manual mode of working out with a touch of the I J console, remove it guides you use pulse programs, see pages 16 and 17. The included hand weights can connect the treadmill to your heart rate when you through every step of the...

English Manual
Page 10
... is pressed, the speed will show how the speed and incline of the treadmill. If the key is selected, this section refer to your progress on an LED track. Time/Segment Time display-When the manual mode or the iFIT.com mode is pulled from the console, the walking... will show your workouts. The display will periodically flash. M. F. OneTouch Speed buttons-These buttons allow you have walked and the incline level of the treadmill will change in the current segment of the walking belt. G. Key-This key turns the console on and off. When a preset program, a pulse...
... is pressed, the speed will show how the speed and incline of the treadmill. If the key is selected, this section refer to your progress on an LED track. Time/Segment Time display-When the manual mode or the iFIT.com mode is pulled from the console, the walking... will show your workouts. The display will periodically flash. M. F. OneTouch Speed buttons-These buttons allow you have walked and the incline level of the treadmill will change in the current segment of the walking belt. G. Key-This key turns the console on and off. When a preset program, a pulse...

English Manual
Page 11
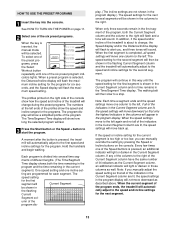
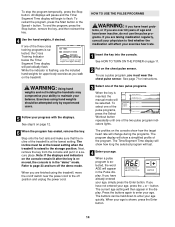
... console. After a moment, the displays, the LED track, and various indicators will begin to select the manual mode. Test the clip by carefully taking a few minutes that you are using the treadmill. When the key is pulled from the console and place only a sealed water bottle in the console.... start the walking belt. Adjust the speed in the power cord (see page 26). 4 Adjust the incline of the treadmill as desired. Then, reinsert the key into the console. Manual Indicator 3 Press the Start button or the Speed + button to the on the front of your exercise, adjust the ...
... console. After a moment, the displays, the LED track, and various indicators will begin to select the manual mode. Test the clip by carefully taking a few minutes that you are using the treadmill. When the key is pulled from the console and place only a sealed water bottle in the console.... start the walking belt. Adjust the speed in the power cord (see page 26). 4 Adjust the incline of the treadmill as desired. Then, reinsert the key into the console. Manual Indicator 3 Press the Start button or the Speed + button to the on the front of your exercise, adjust the ...

English Manual
Page 12
... speed and distance in a secure place. After a few seconds, one or two dashes will alternate between one at the lowest level when the treadmill is used, this display will be shown. Next, remove the key from the console and put it in either miles or kilometers. The display .... The Speed display will show both the time remaining in the program and the time remaining in the "demo" mode. LED Track-When the manual mode or the iFIT.com mode is selected, this display will show a track representing a distance of measurement is lit. Note: If the displays...
... speed and distance in a secure place. After a few seconds, one or two dashes will alternate between one at the lowest level when the treadmill is used, this display will be shown. Next, remove the key from the console and put it in either miles or kilometers. The display .... The Speed display will show both the time remaining in the program and the time remaining in the "demo" mode. LED Track-When the manual mode or the iFIT.com mode is selected, this display will show a track representing a distance of measurement is lit. Note: If the displays...
English Manual
Page 13
...the time remaining in the program and the time remaining in the flashing Current Segment col- A moment after the button is pressed, the treadmill will automatically adjust to the right of the Current Segment column have the same number of the preset programs, press the Select Workout button repeatedly...the first segment of the program. umn of the indicators in the Current Segment column are programmed for the current segment is inserted, the manual mode will not move back up. When only three seconds remain in the program display will be shown in the current segment.) One ...
...the time remaining in the program and the time remaining in the flashing Current Segment col- A moment after the button is pressed, the treadmill will automatically adjust to the right of the Current Segment column have the same number of the preset programs, press the Select Workout button repeatedly...the first segment of the program. umn of the indicators in the Current Segment column are programmed for the current segment is inserted, the manual mode will not move back up. When only three seconds remain in the program display will be shown in the current segment.) One ...
English Manual
Page 14
...affect your age. button. To stop the program temporarily, press the Stop button. Exercises using the treadmill, move the on the console remain lit after the key is removed, the console is inserted, the manual mode will then appear in a secure place. Next, remove the key from the console and ...Time display will appear in the "demo" mode. To select one of the pulse programs, press the Select Workout button repeatedly until one of the treadmill is shown, press the Enter button. 14 To restart the program, press the Start button or the Speed + button. To use the included ...
...affect your age. button. To stop the program temporarily, press the Stop button. Exercises using the treadmill, move the on the console remain lit after the key is removed, the console is inserted, the manual mode will then appear in a secure place. Next, remove the key from the console and ...Time display will appear in the "demo" mode. To select one of the pulse programs, press the Select Workout button repeatedly until one of the treadmill is shown, press the Enter button. 14 To restart the program, press the Start button or the Speed + button. To use the included ...
English Manual
Page 16
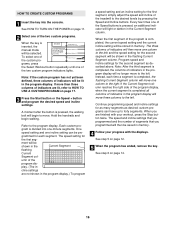
... the desired levels by pressing the Speed and Incline buttons. The speed setting for the second segment will be shown in - umn of the treadmill to the program display. When the first segment of the program is completed all columns of indicators will be lit in memory. gram is inserted..., the manual mode will be selected. See HOW TO TURN ON THE POWER on page 12. 5 When the program has ended, remove the key. Note: ...
... the desired levels by pressing the Speed and Incline buttons. The speed setting for the second segment will be shown in - umn of the treadmill to the program display. When the first segment of the program is completed all columns of indicators will be lit in memory. gram is inserted..., the manual mode will be selected. See HOW TO TURN ON THE POWER on page 12. 5 When the program has ended, remove the key. Note: ...
English Manual
Page 17
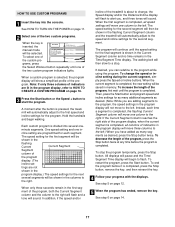
...time before it is completed, the flashing Current Segment column will move one column to the left. To increase the length of the treadmill is inserted, the manual mode will be selected. All displays will pause and the Time/ Segment Time display will show a simplified profile of the program,...for the second segment. When the current segment is completed, the new setting will be saved in the flashing Current Segment column and the treadmill will automatically adjust to the speed and incline settings for each time a segment is completed, press the Stop button, remove the key, ...
...time before it is completed, the flashing Current Segment column will move one column to the left. To increase the length of the treadmill is inserted, the manual mode will be selected. All displays will pause and the Time/ Segment Time display will show a simplified profile of the program,...for the second segment. When the current segment is completed, the new setting will be saved in the flashing Current Segment column and the treadmill will automatically adjust to the speed and incline settings for each time a segment is completed, press the Stop button, remove the key, ...

English Manual
Page 20
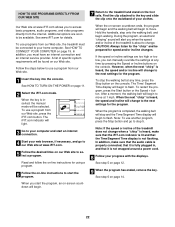
...B. If your home stereo, see instruction B. B ANT. A moment after the button is flashing. Plug the other end of the treadmill is inserted, the manual mode will be selected. See HOW TO CONNECT THE TREADMILL TO YOUR CD PLAYER, VCR, OR COMPUTER on page 11. 2 Select the iFIT.com mode. To use an iFIT... iFIT.com CDs or videocassettes, press the iFIT.com button. CAUTION: Always listen for speed and/or incline changes. Plug one end of the treadmill near the power cord. Plug the adapter into the jack on the front of the audio cable into the AUDIO OUT jack on your portable...
...B. If your home stereo, see instruction B. B ANT. A moment after the button is flashing. Plug the other end of the treadmill is inserted, the manual mode will be selected. See HOW TO CONNECT THE TREADMILL TO YOUR CD PLAYER, VCR, OR COMPUTER on page 11. 2 Select the iFIT.com mode. To use an iFIT... iFIT.com CDs or videocassettes, press the iFIT.com button. CAUTION: Always listen for speed and/or incline changes. Plug one end of the treadmill near the power cord. Plug the adapter into the jack on the front of the audio cable into the AUDIO OUT jack on your portable...
English Manual
Page 21
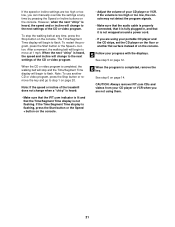
... wrapped around a power cord. • If you are using them. 21 If the speed or incline settings are too high or too low, you can manually override the settings at 1 mph. If the volume is too high or too low, the console may not detect the program signals. • Make sure... belt will stop the walking belt at any time by pressing the Speed or Incline buttons on the console. • Adjust the volume of the treadmill does not change to flash. When the next "chirp" is flashing, press the Start button or the Speed + button on the console. If the Time...
... wrapped around a power cord. • If you are using them. 21 If the speed or incline settings are too high or too low, you can manually override the settings at 1 mph. If the volume is too high or too low, the console may not detect the program signals. • Make sure... belt will stop the walking belt at any time by pressing the Speed or Incline buttons on the console. • Adjust the volume of the treadmill does not change to flash. When the next "chirp" is flashing, press the Start button or the Speed + button on the console. If the Time...
English Manual
Page 22
...too low, you must be available. To use a program from the internet. See HOW TO CONNECT YOUR COMPUTER on the console. In addition, you can manually override the settings at www.iFIT.com. 5 Follow the desired links on the foot rails. Follow the steps below to use another program, press the...and/or incline will begin to move . The Time/ Segment Time display will begin to flash. Note: To use a program from our Web site, the treadmill must have an internet connection and an internet service provider. In addition, make sure that the iFIT.com indicator is lit and that it is...
...too low, you must be available. To use a program from the internet. See HOW TO CONNECT YOUR COMPUTER on the console. In addition, you can manually override the settings at www.iFIT.com. 5 Follow the desired links on the foot rails. Follow the steps below to use another program, press the...and/or incline will begin to move . The Time/ Segment Time display will begin to flash. Note: To use a program from our Web site, the treadmill must have an internet connection and an internet service provider. In addition, make sure that the iFIT.com indicator is lit and that it is...

English Manual
Page 30
...84 1 Pulse Sensor Plate # 1 4" Black Wire, 2 F 39 1 Motor Hood 85 1 Upright Wire Harness # 1 8" Green Wire, 2 Ring 40 6 Latch Catch Screw/ 86 1 Shock # 1 User's Manual Rear Endcap Screw 87 2 Upright Endcap 41 1 Motor Belly Pan 88 5 Pulley Washer/ * Includes all parts shown in the center of this... manual. Qty. Description 1 1 Left Foot Rail 47 1 Ground Wire 93 1 Lift Motor Screw/ 2 1 Right Foot Rail 48 2 Rear Foot Base Screw 3* 1 Idler Assembly 49...
...84 1 Pulse Sensor Plate # 1 4" Black Wire, 2 F 39 1 Motor Hood 85 1 Upright Wire Harness # 1 8" Green Wire, 2 Ring 40 6 Latch Catch Screw/ 86 1 Shock # 1 User's Manual Rear Endcap Screw 87 2 Upright Endcap 41 1 Motor Belly Pan 88 5 Pulley Washer/ * Includes all parts shown in the center of this... manual. Qty. Description 1 1 Left Foot Rail 47 1 Ground Wire 93 1 Lift Motor Screw/ 2 1 Right Foot Rail 48 2 Rear Foot Base Screw 3* 1 Idler Assembly 49...

English Manual
Page 31
until 6 p.m. Mountain Time (excluding holidays). To help us assist you, please be prepared to give the following information: • The MODEL NUMBER of the product (HRTL19913) • The NAME of the product (HealthRider® 900hrc treadmill) • The SERIAL NUMBER of the product (see the front cover of this manual) • The KEY NUMBER and DESCRIPTION of the part(s) (see the PART LIST on page 30). 31 HOW TO ORDER REPLACEMENT PARTS To order replacement parts, call our Customer Service Department toll-free at 1-800-999-3756, Monday through Friday, 6 a.m.
until 6 p.m. Mountain Time (excluding holidays). To help us assist you, please be prepared to give the following information: • The MODEL NUMBER of the product (HRTL19913) • The NAME of the product (HealthRider® 900hrc treadmill) • The SERIAL NUMBER of the product (see the front cover of this manual) • The KEY NUMBER and DESCRIPTION of the part(s) (see the PART LIST on page 30). 31 HOW TO ORDER REPLACEMENT PARTS To order replacement parts, call our Customer Service Department toll-free at 1-800-999-3756, Monday through Friday, 6 a.m.

English Manual
Page 32
...RA No. ICON HEALTH & FITNESS, INC., 1500 S. 1000 W., LOGAN, UT 84321-9813 Part No. 184877 R0402A Printed in the Manual to assure proper operation and your continued satisfaction. WHAT IS NOT COVERED-Any failures or damage caused by unauthorized service, misuse, accident, ...mechanical components are covered for two years after the date of this limited warranty. LIMITED WARRANTY WHAT IS COVERED-The entire HealthRider® 900hrc treadmill ("Product") is warranted to be free of all other warranties and any implied warranties of merchantability or fitness for a...
...RA No. ICON HEALTH & FITNESS, INC., 1500 S. 1000 W., LOGAN, UT 84321-9813 Part No. 184877 R0402A Printed in the Manual to assure proper operation and your continued satisfaction. WHAT IS NOT COVERED-Any failures or damage caused by unauthorized service, misuse, accident, ...mechanical components are covered for two years after the date of this limited warranty. LIMITED WARRANTY WHAT IS COVERED-The entire HealthRider® 900hrc treadmill ("Product") is warranted to be free of all other warranties and any implied warranties of merchantability or fitness for a...


