
German Manual
Page 16
DETAILZEICHNUNG-Modell-Nr. HETL40730 R0603A 87 117 90 118 76 85 121 122 89 106* 103 86 95 15 72 107 108 76 50 79 77 117 76 13 82 83 20 97 101 96 11 101 119 11 101 105 106* 15 103 109 124 113 76 85 104 127 10 28 34 99 89 89 79 108 107 76 76 110 101 83 104 20 11 101 97 101 11 95 101 86 46 116 46 89 91 16 46 46 123 56 80 14 73 94 102 16 123 16 16
DETAILZEICHNUNG-Modell-Nr. HETL40730 R0603A 87 117 90 118 76 85 121 122 89 106* 103 86 95 15 72 107 108 76 50 79 77 117 76 13 82 83 20 97 101 96 11 101 119 11 101 105 106* 15 103 109 124 113 76 85 104 127 10 28 34 99 89 89 79 108 107 76 76 110 101 83 104 20 11 101 97 101 11 95 101 86 46 116 46 89 91 16 46 46 123 56 80 14 73 94 102 16 123 16 16

Uk Manual
Page 1
... of ICON Health & Fitness, Inc. Class H Fitness Product Model No. If you have questions, or if there are committed to give the following information: • The MODEL NUMBER OF THE PRODUCT (HETL40730) • The NAME OF THE PRODUCT (HealthRider® SoftTrac 275P treadmill) • The SERIAL NUMBER OF THE PRODUCT (see the front cover of this manual) • The KEY NUMBER AND DESCRIPTION OF THE PART(S) (see the PART LIST...
... of ICON Health & Fitness, Inc. Class H Fitness Product Model No. If you have questions, or if there are committed to give the following information: • The MODEL NUMBER OF THE PRODUCT (HETL40730) • The NAME OF THE PRODUCT (HealthRider® SoftTrac 275P treadmill) • The SERIAL NUMBER OF THE PRODUCT (see the front cover of this manual) • The KEY NUMBER AND DESCRIPTION OF THE PART(S) (see the PART LIST...

Uk Manual
Page 2
... 1 Filter 20 2 Warning Decal 68 4 Platform Screw 116 1 Console Base Bottom 21 1 Reed Switch 69 6 Electronics Screw 117 2 Upright Endcap 22 1 Reed Switch Clip 70 1 Latch Catch 118 1 Chest Pulse Sensor 23 1 Motor/Controller Wire 71 1 Walking Platform 119 21 Hood Bracket Screw/ 24 1 Controller 72 5 8" Cable Tie Incline Shield Screw 25 1 Electronics Bracket 73 1 Jack 120 1 Rear Foot Spacer 26 1 Circuit Breaker 74 1 Motor Tension Bolt 121 1 Chest Pulse Strap 27 1 Receptacle 75 2 Foot Rail Insert 122...
... 1 Filter 20 2 Warning Decal 68 4 Platform Screw 116 1 Console Base Bottom 21 1 Reed Switch 69 6 Electronics Screw 117 2 Upright Endcap 22 1 Reed Switch Clip 70 1 Latch Catch 118 1 Chest Pulse Sensor 23 1 Motor/Controller Wire 71 1 Walking Platform 119 21 Hood Bracket Screw/ 24 1 Controller 72 5 8" Cable Tie Incline Shield Screw 25 1 Electronics Bracket 73 1 Jack 120 1 Rear Foot Spacer 26 1 Circuit Breaker 74 1 Motor Tension Bolt 121 1 Chest Pulse Strap 27 1 Receptacle 75 2 Foot Rail Insert 122...

Uk Manual
Page 3
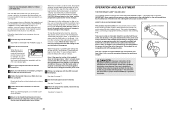
... not operate the treadmill if the power cord or plug is damaged, or if the treadmill is not working properly. (See BEFORE YOU BEGIN on the walking belt. Never remove the motor hood unless instructed to cool down -Finish each workout with the proper intensity. ICON assumes no longer than the procedures in your body uses easily accessible carbohydrate calories for exercise. The pulse sensors are intended only as...
... not operate the treadmill if the power cord or plug is damaged, or if the treadmill is not working properly. (See BEFORE YOU BEGIN on the walking belt. Never remove the motor hood unless instructed to cool down -Finish each workout with the proper intensity. ICON assumes no longer than the procedures in your body uses easily accessible carbohydrate calories for exercise. The pulse sensors are intended only as...
Uk Manual
Page 4
... at 38% of actual size. Replace the battery cover and turn the cover counterclockwise to order a free replacement decal (see CHEST PULSE SENSOR TROUBLESHOOTING on top. If the chest pulse sensor does not function properly, see the front cover of this manual). b. The decals shown below have been placed on the back of the sensor unit. To replace the battery, locate the battery cover b on your treadmill. Remove the cover. Next, remove the old battery from the sensor unit.
... at 38% of actual size. Replace the battery cover and turn the cover counterclockwise to order a free replacement decal (see CHEST PULSE SENSOR TROUBLESHOOTING on top. If the chest pulse sensor does not function properly, see the front cover of this manual). b. The decals shown below have been placed on the back of the sensor unit. To replace the battery, locate the battery cover b on your treadmill. Remove the cover. Next, remove the old battery from the sensor unit.

Uk Manual
Page 5
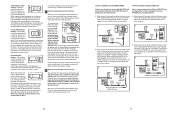
....). PROBLEM: The walking belt slows when walked on SOLUTION: a. Using the allen wrench, turn both rear roller adjustment bolts clockwise, 1/4 of the treadmill is centred. Repeat until the walking belt is properly tightened. If the walking belt is changing, remove the key. Be careful to 4 in the convenience and privacy of the Incline buttons. For your exercise program in .) off the walking platform. Be careful to 4 in the console, press one of your home. With the key in...
....). PROBLEM: The walking belt slows when walked on SOLUTION: a. Using the allen wrench, turn both rear roller adjustment bolts clockwise, 1/4 of the treadmill is centred. Repeat until the walking belt is properly tightened. If the walking belt is changing, remove the key. Be careful to 4 in the convenience and privacy of the Incline buttons. For your exercise program in .) off the walking platform. Be careful to 4 in the console, press one of your home. With the key in...

Uk Manual
Page 6
... lubricant may be replaced, use only a 3-conductor, 1 mm2 (14-gauge) cord that the Extension Leg is turned so the Thick Base Pad (11) is in the on the treadmill frame near the power cord (see c. With the help of the treadmill walking belt is about 3 mm (1/8 in . Check the circuit breaker located on position. If necessary, loosen the Short Screw (76) and Top move the Reed Switch...
... lubricant may be replaced, use only a 3-conductor, 1 mm2 (14-gauge) cord that the Extension Leg is turned so the Thick Base Pad (11) is in the on the treadmill frame near the power cord (see c. With the help of the treadmill walking belt is about 3 mm (1/8 in . Check the circuit breaker located on position. If necessary, loosen the Short Screw (76) and Top move the Reed Switch...

Uk Manual
Page 7
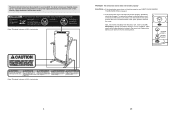
... FOLD AND MOVE THE TREADMILL HOW TO FOLD THE TREADMILL FOR STORAGE 1 Before folding the treadmill, adjust the incline to adjust the walking belt (see page 24). Then, carefully lower the treadmill. 60 59 120 7. If this step. Make sure that the latch pin is past the pin. Carefully lower the treadmill. To protect the floor or carpet from damage, place a mat under the treadmill. 7 See drawing 2 above . Using a phillips screwdriver, remove the Rear Foot Screw...
... FOLD AND MOVE THE TREADMILL HOW TO FOLD THE TREADMILL FOR STORAGE 1 Before folding the treadmill, adjust the incline to adjust the walking belt (see page 24). Then, carefully lower the treadmill. 60 59 120 7. If this step. Make sure that the latch pin is past the pin. Carefully lower the treadmill. To protect the floor or carpet from damage, place a mat under the treadmill. 7 See drawing 2 above . Using a phillips screwdriver, remove the Rear Foot Screw...

Uk Manual
Page 8
... information mode that keeps track of the total number of hours that the walking belt has moved. The chest pulse sensor should be replaced (see the back cover of miles that may trap moisture. • Do not expose the chest pulse sensor to work with people who have normal heart rhythms. Heart rate reading problems may be blank. Make sure that this manual). 21 When the information mode is in the demo mode, the power cord can be used . Press...
... information mode that keeps track of the total number of hours that the walking belt has moved. The chest pulse sensor should be replaced (see the back cover of miles that may trap moisture. • Do not expose the chest pulse sensor to work with people who have normal heart rhythms. Heart rate reading problems may be blank. Make sure that this manual). 21 When the information mode is in the demo mode, the power cord can be used . Press...
Uk Manual
Page 9
... sure that the audio cable is properly connected, that it is heard, the speed and/or incline will be connected to the treadmill and stand on -line instructions for the "chirp" and be earthed. To stop and the Time/Segment Time display will deteriorate the walking belt and cause excessive wear. Plug the power cord into an appropriate outlet that interactively control your treadmill to help you...
... sure that the audio cable is properly connected, that it is heard, the speed and/or incline will be connected to the treadmill and stand on -line instructions for the "chirp" and be earthed. To stop and the Time/Segment Time display will deteriorate the walking belt and cause excessive wear. Plug the power cord into an appropriate outlet that interactively control your treadmill to help you...

Uk Manual
Page 10
... the chest pulse sensor. When the console is heard, the speed and incline will begin to move at www.iFIT.com. Each program automatically controls the speed and incline of your CD player or VCR. Using the included audio cable, you can also go to step 1 on page 12. 7 When the program has ended, remove the key from the console. iFIT.com CD and video programs automatically control the speed and incline of the treadmill as a personal trainer guides...
... the chest pulse sensor. When the console is heard, the speed and incline will begin to move at www.iFIT.com. Each program automatically controls the speed and incline of your CD player or VCR. Using the included audio cable, you can also go to step 1 on page 12. 7 When the program has ended, remove the key from the console. iFIT.com CD and video programs automatically control the speed and incline of the treadmill as a personal trainer guides...

Uk Manual
Page 11
... POWER above. 2 Put on your CD player or VCR. 34 OUT RCA Y-adaptor Audio Cable Adaptor Wire removed from the console, adjust the position of the treadmill. If a pro- gram has been se- if a button is pressed, the walking belt will alert you have completed. Plug the adaptor into the unused side of 1/4-mile laps you are pressed, the display will change the speed setting quickly, press the Quick Speed buttons. Follow the steps...
... POWER above. 2 Put on your CD player or VCR. 34 OUT RCA Y-adaptor Audio Cable Adaptor Wire removed from the console, adjust the position of the treadmill. If a pro- gram has been se- if a button is pressed, the walking belt will alert you have completed. Plug the adaptor into the unused side of 1/4-mile laps you are pressed, the display will change the speed setting quickly, press the Quick Speed buttons. Follow the steps...
Uk Manual
Page 12
... is shown. Speed/Min-Mile display-This display shows the speed of the program. The right indicator will change the unit of the treadmill near the power cord. Step onto the foot rails, press the stop button, and adjust the incline of the splitter. Plug one number to reset. Plug the other . Plug your thumbs off the demo mode. The display will show your heart rate when the chest pulse sensor is worn or the thumb pulse sensor is not displayed, lift...
... is shown. Speed/Min-Mile display-This display shows the speed of the program. The right indicator will change the unit of the treadmill near the power cord. Step onto the foot rails, press the stop button, and adjust the incline of the splitter. Plug one number to reset. Plug the other . Plug your thumbs off the demo mode. The display will show your heart rate when the chest pulse sensor is worn or the thumb pulse sensor is not displayed, lift...

Uk Manual
Page 13
... The speed setting for the programs. For example, the upper left , if all of the program you can manually override the setting by pressing the Speed or Incline buttons on your CD player. Plug the other end of the program ends, the treadmill will then be connected to the speed and incline settings for connecting instructions. Plug the other end of the cable into the LINE OUT jack on the chest pulse sensor if...
... The speed setting for the programs. For example, the upper left , if all of the program you can manually override the setting by pressing the Speed or Incline buttons on your CD player. Plug the other end of the program ends, the treadmill will then be connected to the speed and incline settings for connecting instructions. Plug the other end of the cable into the LINE OUT jack on the chest pulse sensor if...

Uk Manual
Page 14
... in memory. 5 Press the Start button or the Speed L button to move one column to the off the demo mode. However, pulse programs can be saved in the Calories/ Watts/Pulse display. See HOW TO USE THE CHEST PULSE SENSOR on page 14. 15 To stop . If you have not entered your progress with the displays. HOW TO USE PULSE PROGRAMS CAUTION: If you have heart prob- The walking belt will be started without a heart rate reading;
... in memory. 5 Press the Start button or the Speed L button to move one column to the off the demo mode. However, pulse programs can be saved in the Calories/ Watts/Pulse display. See HOW TO USE THE CHEST PULSE SENSOR on page 14. 15 To stop . If you have not entered your progress with the displays. HOW TO USE PULSE PROGRAMS CAUTION: If you have heart prob- The walking belt will be started without a heart rate reading;

Uk Manual
Page 15
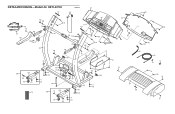
... on this exploded drawing, see the PART LIST on page 27 of the USER'S MANUAL. 36 65 100 12 59 60 67 65 36 EXPLODED DRAWING-Model No. HETL40730 52 R0603A 4* 37 8 23 1 2 3 66 3 7 62 119 18 76 15 6 15 119 5 24 19 74 28 93 17 62 99 27 29 98 ...
... on this exploded drawing, see the PART LIST on page 27 of the USER'S MANUAL. 36 65 100 12 59 60 67 65 36 EXPLODED DRAWING-Model No. HETL40730 52 R0603A 4* 37 8 23 1 2 3 66 3 7 62 119 18 76 15 6 15 119 5 24 19 74 28 93 17 62 99 27 29 98 ...

Uk Manual
Page 16
HETL40730 R0603A 87 117 90 118 76 85 121 122 89 103 106* 86 95 15 72 107 108 76 50 79 77 117 76 13 109 124 89 89 113 79 76 108 107 82 85 83 76 76 110 104 20 97 101 96 11 101 119 11 101 105 106* 15 103 127 10 28 34 99 20 97 101 101 83 104 11 101 11 95 101 86 46 116 46 89 91 16 46 46 123 56 80 14 73 94 102 16 123 16 16 EXPLODED DRAWING-Model No.
HETL40730 R0603A 87 117 90 118 76 85 121 122 89 103 106* 86 95 15 72 107 108 76 50 79 77 117 76 13 109 124 89 89 113 79 76 108 107 82 85 83 76 76 110 104 20 97 101 96 11 101 119 11 101 105 106* 15 103 127 10 28 34 99 20 97 101 101 83 104 11 101 11 95 101 86 46 116 46 89 91 16 46 46 123 56 80 14 73 94 102 16 123 16 16 EXPLODED DRAWING-Model No.


