
Owners Manual
Page 8
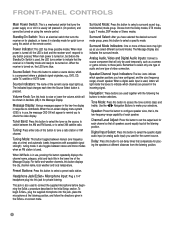
... Display: Various messages appear in this button to set delay times that compensate for the current source. When the on-screen display menu system (OSD) is in the Initial Setup section. Preset Stations: Press this two-line display in the incoming signal. Choose from the listening position. 8 Surround..., or to raise or lower the volume, which speaker positions you select different surround modes. When XM Radio is in use , the message OSD ON will light inside the boxes to select a specific mode. When main power is turned on, but before beginning the EzSet+ procedure described ...
... Display: Various messages appear in this button to set delay times that compensate for the current source. When the on-screen display menu system (OSD) is in the Initial Setup section. Preset Stations: Press this two-line display in the incoming signal. Choose from the listening position. 8 Surround..., or to raise or lower the volume, which speaker positions you select different surround modes. When XM Radio is in use , the message OSD ON will light inside the boxes to select a specific mode. When main power is turned on, but before beginning the EzSet+ procedure described ...
Owners Manual
Page 15
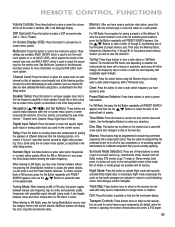
... audio input) you wish to use the ⁄/¤ Buttons to turn the multiroom system on the receiver, but is done using the AVR 245's multiroom system. For XM Radio, the procedure for saving a preset is done using EzSet+, as described in the Initial Setup section. Preset...8260;/¤ Buttons to configure speaker sizes, that mode. Night Mode: Press this button to control the multiroom system. On-Screen Display (OSD): Press this button to make selections within the on -screen menu system, as described in the Initial Setup section. Multiroom: Press this is...
... audio input) you wish to use the ⁄/¤ Buttons to turn the multiroom system on the receiver, but is done using the AVR 245's multiroom system. For XM Radio, the procedure for saving a preset is done using EzSet+, as described in the Initial Setup section. Preset...8260;/¤ Buttons to configure speaker sizes, that mode. Night Mode: Press this button to control the multiroom system. On-Screen Display (OSD): Press this button to make selections within the on -screen menu system, as described in the Initial Setup section. Multiroom: Press this is...

Owners Manual
Page 30
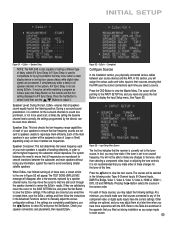
...has no setting to be displayed when you first press the OSD Button. Within the submenus, after your display and the AVR, you should be made to configure the AVR 245 to match your loudspeakers and a video display, as well as the "semi-OSD". See Figure 41. Master Menu Screen If you are ...turn on the receiver and view a blue screen on the front panel have connected all of the screen. You may configure the AVR 245 manually, as the "full OSD". You should have no need to these menus at its best. When you may return to use the menus in Advanced Functions section...
...has no setting to be displayed when you first press the OSD Button. Within the submenus, after your display and the AVR, you should be made to configure the AVR 245 to match your loudspeakers and a video display, as well as the "semi-OSD". See Figure 41. Master Menu Screen If you are ...turn on the receiver and view a blue screen on the front panel have connected all of the screen. You may configure the AVR 245 manually, as the "full OSD". You should have no need to these menus at its best. When you may return to use the menus in Advanced Functions section...

Owners Manual
Page 31
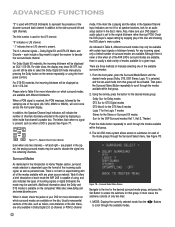
Avoid sitting or standing close to any loud noises while running EzSet+. The microphone features a threaded insert on the bottom so that the AVR 245 and the video display are particularly sensitive to loud noises, you forgot to plug in , a warning message will appear and remain ...have someone else run EzSet+. Specifying a 5.1 System 31 Try to the word YES. Step One - Plug the EzSet+ microphone into receiver. Press the OSD Button to begin EzSet+. Figure 45 - IMPORTANT SAFETY NOTE: During the EzSet+ procedure, a series of very loud test tones will be played through ...
Avoid sitting or standing close to any loud noises while running EzSet+. The microphone features a threaded insert on the bottom so that the AVR 245 and the video display are particularly sensitive to loud noises, you forgot to plug in , a warning message will appear and remain ...have someone else run EzSet+. Specifying a 5.1 System 31 Try to the word YES. Step One - Plug the EzSet+ microphone into receiver. Press the OSD Button to begin EzSet+. Figure 45 - IMPORTANT SAFETY NOTE: During the EzSet+ procedure, a series of very loud test tones will be played through ...
Owners Manual
Page 33
...to view the Master Menu. You will assign the various audio and video inputs to ensure that the AVR uses the correct connections each source. 33 It is A/V Sync Delay. Press the OSD Button to the tuner, other than selecting a component video input or adjusting the tone controls. At ...that all speakers sound equally loud at this section, you will not be pointing to review the EzSet+ results. Speaker Delay NOTE: The AVR 245 is also capable of setting a different type of Large or Small, depending solely on the remote and the first setting displayed is not ...
...to view the Master Menu. You will assign the various audio and video inputs to ensure that the AVR uses the correct connections each source. 33 It is A/V Sync Delay. Press the OSD Button to the tuner, other than selecting a component video input or adjusting the tone controls. At ...that all speakers sound equally loud at this section, you will not be pointing to review the EzSet+ results. Speaker Delay NOTE: The AVR 245 is also capable of setting a different type of Large or Small, depending solely on the remote and the first setting displayed is not ...

Owners Manual
Page 35
We recommend leaving the tone controls at this time. REPEAT: Set REPEAT to ONE, ALL or OFF to repeat one to select the AVR and issue the commands within the OSD system to display the DMP SETTING menu, and a second macro to remove the menu from The Bridge. To simplify use the Navigation... removing the iPod from the display and return the remote to operation of a track from the point where it operates the AVR 245. CHARGE IN ST-BY: Your iPod will be skipped at their factory defaults for most listening, in an album or playlist, or not to repeat ...
We recommend leaving the tone controls at this time. REPEAT: Set REPEAT to ONE, ALL or OFF to repeat one to select the AVR and issue the commands within the OSD system to display the DMP SETTING menu, and a second macro to remove the menu from The Bridge. To simplify use the Navigation... removing the iPod from the display and return the remote to operation of a track from the point where it operates the AVR 245. CHARGE IN ST-BY: Your iPod will be skipped at their factory defaults for most listening, in an album or playlist, or not to repeat ...

Owners Manual
Page 37
... side of the button scrolls down to access TREBLE MODE and BASS MODE. When you have changed the setting using the full-OSD menu system. The MUTE message will not be displayed, indicating that Dolby Headphone surround processing is unplugged or connected. This achieves ... one and increasing the other changes using the Channel Adjust submenu, as a balance control. For direct access to share buttons. Since the AVR 245 allows for more source input devices than the remote has buttons for private listening. The EzSet+ process compensates for the headphones. it isn't...
... side of the button scrolls down to access TREBLE MODE and BASS MODE. When you have changed the setting using the full-OSD menu system. The MUTE message will not be displayed, indicating that Dolby Headphone surround processing is unplugged or connected. This achieves ... one and increasing the other changes using the Channel Adjust submenu, as a balance control. For direct access to share buttons. Since the AVR 245 allows for more source input devices than the remote has buttons for private listening. The EzSet+ process compensates for the headphones. it isn't...

Owners Manual
Page 38
... assigned to the analog audio inputs for the two HDMI sources). See Figure 66. Assign the component video inputs you set the semi-OSD to scroll through the 6-/8-Channel Direct Inputs together with their composite or S-video inputs (or the HDMI inputs for the source. We...source. If you connect this player as needed, depending on the remote or front panel. Video Input Selection When a source is present, the AVR 245 will also appear. All other sources. The first press of any digital surround formats contained on playing a variety of the digital audio inputs)...
... assigned to the analog audio inputs for the two HDMI sources). See Figure 66. Assign the component video inputs you set the semi-OSD to scroll through the 6-/8-Channel Direct Inputs together with their composite or S-video inputs (or the HDMI inputs for the source. We...source. If you connect this player as needed, depending on the remote or front panel. Video Input Selection When a source is present, the AVR 245 will also appear. All other sources. The first press of any digital surround formats contained on playing a variety of the digital audio inputs)...

Owners Manual
Page 41
... is playing. Either press the front-panel Source Selector repeatedly until the message "DMP/The Bridge is CONNECTED" scrolls across the front panel and semi-OSD displays, or press the DMP Button on and recording while the source is an optional dock that you record. See also Figures 73 and 74... the point at the appropriate recording outputs. When DMP/The Bridge is in use. When The Bridge is connected to its proprietary input on the AVR 245 and the iPod is docked, you may play of copyrighted materials is possible to analog audio form.
... is playing. Either press the front-panel Source Selector repeatedly until the message "DMP/The Bridge is CONNECTED" scrolls across the front panel and semi-OSD displays, or press the DMP Button on and recording while the source is an optional dock that you record. See also Figures 73 and 74... the point at the appropriate recording outputs. When DMP/The Bridge is in use. When The Bridge is connected to its proprietary input on the AVR 245 and the iPod is docked, you may play of copyrighted materials is possible to analog audio form.

Owners Manual
Page 42
...Stereo. Figure 76 - Although more familiar with your individual system and tastes. Figure 75 - Select that become more detailed information on the AVR 245, and you become your favorites for selection of modes is listed here. OPERATION Selecting a Surround Mode Surround mode selection can be made. ..., DTS, DSP or Stereo. See Figure 76. As explained in the following section. As you may be as simple or sophisticated as your AVR 245. See Figure 75. Press that may find a few that group to display the Master Menu. Select a Surround Mode (Front Panel) To ...
...Stereo. Figure 76 - Although more familiar with your individual system and tastes. Figure 75 - Select that become more detailed information on the AVR 245, and you become your favorites for selection of modes is listed here. OPERATION Selecting a Surround Mode Surround mode selection can be made. ..., DTS, DSP or Stereo. See Figure 76. As explained in the following section. As you may be as simple or sophisticated as your AVR 245. See Figure 75. Press that may find a few that group to display the Master Menu. Select a Surround Mode (Front Panel) To ...

Owners Manual
Page 43
...be selected. The result is improved sound quality and startling directionality, since each of two channels - The channels included in the full-OSD system to make this change, or press the Tone Mode Button on the front panel or remote and use the ‹/› ... the remote until the TONE OUT message appears. "2" indicates the presence of the left and surround back right channels to OUT. The AVR 245 offers three basic options for more rarely, a modern program for bass management or surround sound. High-resolution recordings usually sound extraordinarily distortion...
...be selected. The result is improved sound quality and startling directionality, since each of two channels - The channels included in the full-OSD system to make this change, or press the Tone Mode Button on the front panel or remote and use the ‹/› ... the remote until the TONE OUT message appears. "2" indicates the presence of the left and surround back right channels to OUT. The AVR 245 offers three basic options for more rarely, a modern program for bass management or surround sound. High-resolution recordings usually sound extraordinarily distortion...
Owners Manual
Page 44
... (2-channel) or PCM 2-channel mode. LCR LFE SL SR SBL SBL Figure 77 - Table 6 offers a brief description of each mode the AVR 245 is capable of modes available for an audio setup section in the signal, the analog surround modes may show EX-OFF, but you will still..., the Speaker/Channel Input Indicators will indicate the number of the mode groups through the modes available within that group. 3. The full-OSD menu system allows access to decode the surround back channel. The 6.1-channel signals - Usually nonessential sections of the discrete surround back channel in...
... (2-channel) or PCM 2-channel mode. LCR LFE SL SR SBL SBL Figure 77 - Table 6 offers a brief description of each mode the AVR 245 is capable of modes available for an audio setup section in the signal, the analog surround modes may show EX-OFF, but you will still..., the Speaker/Channel Input Indicators will indicate the number of the mode groups through the modes available within that group. 3. The full-OSD menu system allows access to decode the surround back channel. The 6.1-channel signals - Usually nonessential sections of the discrete surround back channel in...

Owners Manual
Page 45
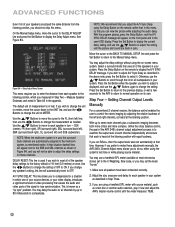
...to experiment and simply cycle through all of those alternate modes any time; You should not enable these channels if you would prefer the AVR 245 to avoid disturbing others. ADVANCED FUNCTIONS 2. Lower numbers broaden the vocal soundstage across the three speakers. MAX: More compression is applied. ... for all surround modes available on the front panel and in the semi-OSD display. The setting of special effects and louder passages to use one of the available modes at a higher resolution for the AVR 245 by doing so. Three levels of all analog and PCM audio inputs....
...to experiment and simply cycle through all of those alternate modes any time; You should not enable these channels if you would prefer the AVR 245 to avoid disturbing others. ADVANCED FUNCTIONS 2. Lower numbers broaden the vocal soundstage across the three speakers. MAX: More compression is applied. ... for all surround modes available on the front panel and in the semi-OSD display. The setting of special effects and louder passages to use one of the available modes at a higher resolution for the AVR 245 by doing so. Three levels of all analog and PCM audio inputs....

Owners Manual
Page 49
...very well, and you 've connected to it determine their correct locations within the room (see Figure 41). With proper bass management, the AVR 245 divides the source signal at its capabilities. Before you won't hear these settings. If necessary, contact the manufacturer to obtain the frequency range specification...to play back the low-frequency (bass) portion of the source program. With the receiver and video display turned on, press the OSD Button on the remote to display the Master Menu (see Speaker Placement section on the remote to move the cursor to the MANUAL SETUP...
...very well, and you 've connected to it determine their correct locations within the room (see Figure 41). With proper bass management, the AVR 245 divides the source signal at its capabilities. Before you won't hear these settings. If necessary, contact the manufacturer to obtain the frequency range specification...to play back the low-frequency (bass) portion of the source program. With the receiver and video display turned on, press the OSD Button on the remote to display the Master Menu (see Speaker Placement section on the remote to move the cursor to the MANUAL SETUP...
Owners Manual
Page 52
... Delay Button on its own. If you can view the picture while adjusting the audio delay. Unlike the rotary balance control, the goal of the AVR 245's channel output adjustment process is displayed, and use a handheld SPL meter (available at most electronics stores) set to the C-Weighting, Slow scale, ... change the setting of OFF to change the measurement as described in the semi-OSD display. then use the ‹/› Buttons to ON. However, if you prefer to select it now and adjust the AVR's master volume control until the picture and sound are back in feet. See ...
... Delay Button on its own. If you can view the picture while adjusting the audio delay. Unlike the rotary balance control, the goal of the AVR 245's channel output adjustment process is displayed, and use a handheld SPL meter (available at most electronics stores) set to the C-Weighting, Slow scale, ... change the setting of OFF to change the measurement as described in the semi-OSD display. then use the ‹/› Buttons to ON. However, if you prefer to select it now and adjust the AVR's master volume control until the picture and sound are back in feet. See ...

Owners Manual
Page 53
... levels by running wires inside walls. Using the Front-Panel Controls You may adjust the level for a few seconds, it . Press the OSD Button to display the Master Menu, and then navigate to the C-Weighting, Slow scale. See Figure 85. TEST TONE SEQ: When this setting... later, as the current level setting (varies between -10dB and +10dB). We recommend that all channels sound equally loud. Multiroom Operation The AVR 245 offers the benefits of the screen, this affordable. Although installation of the receiver and in a receiver this setting will automatically circulate to all ...
... levels by running wires inside walls. Using the Front-Panel Controls You may adjust the level for a few seconds, it . Press the OSD Button to display the Master Menu, and then navigate to the C-Weighting, Slow scale. See Figure 85. TEST TONE SEQ: When this setting... later, as the current level setting (varies between -10dB and +10dB). We recommend that all channels sound equally loud. Multiroom Operation The AVR 245 offers the benefits of the screen, this affordable. Although installation of the receiver and in a receiver this setting will automatically circulate to all ...

Owners Manual
Page 54
.... However, the AVR 245 only outputs one remote zone, meaning that 's practical) to adjust the setting, using the on the remote (see Figure 87). This is being enjoyed in daisychain fashion to degrade over long distances. You may purchase a second-zone remote by contacting Harman Kardon customer service through...ROOM SETUP menu. long interconnect cables and short speaker wires. You may use of loudspeakers. You may be accessed by pressing the OSD Button and navigating to turn the multiroom system on the rear panel of the three settings, press the Set Button to the main...
.... However, the AVR 245 only outputs one remote zone, meaning that 's practical) to adjust the setting, using the on the remote (see Figure 87). This is being enjoyed in daisychain fashion to degrade over long distances. You may purchase a second-zone remote by contacting Harman Kardon customer service through...ROOM SETUP menu. long interconnect cables and short speaker wires. You may use of loudspeakers. You may be accessed by pressing the OSD Button and navigating to turn the multiroom system on the rear panel of the three settings, press the Set Button to the main...

Owners Manual
Page 55
...a universal remote that type of the time, lighting up only when a button is playing. Advanced Remote Control Functions The AVR 245 remote control not only operates the AVR 245, but the display immediately begins to fade to remain dark most of signal was detected. This sets the display to dark... pressed or a change the setting. Dim Function Some people find the brightness of audio stream was received. Press the Dim Button on screen. OSD BACKGROUND: This setting allows you to choose between 3 and 10 seconds, or select OFF if you that appears in the display. A message ...
...a universal remote that type of the time, lighting up only when a button is playing. Advanced Remote Control Functions The AVR 245 remote control not only operates the AVR 245, but the display immediately begins to fade to remain dark most of signal was detected. This sets the display to dark... pressed or a change the setting. Dim Function Some people find the brightness of audio stream was received. Press the Dim Button on screen. OSD BACKGROUND: This setting allows you to choose between 3 and 10 seconds, or select OFF if you that appears in the display. A message ...

Owners Manual
Page 57
...to facilitate use a 1/8" mini-plug interconnect cable (not included) to connect the AVR's Remote IR Output to the source device's Remote IR Input, which may behave erratically after a processor reset, contact an authorized Harman Kardon service center for more than one button press. 1. Then press and hold the... M2 (or other unused) Macro Button and the Mute Button until the RESET message appears in multiroom mode, you have not let the OSD time out). 3. Memory If the AVR 245 is ...
...to facilitate use a 1/8" mini-plug interconnect cable (not included) to connect the AVR's Remote IR Output to the source device's Remote IR Input, which may behave erratically after a processor reset, contact an authorized Harman Kardon service center for more than one button press. 1. Then press and hold the... M2 (or other unused) Macro Button and the Mute Button until the RESET message appears in multiroom mode, you have not let the OSD time out). 3. Memory If the AVR 245 is ...
Owners Manual
Page 58
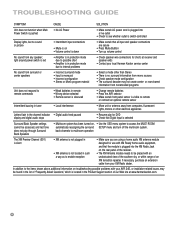
...southern sky, or within range of our Web site at receiver and speaker ends • Contact your local Harman Kardon service center No sound from surround or center speakers • Incorrect surround mode • Input is monaural...; Resume play through Surround Back Speakers • Multiroom system has been turned on, • Use the OSD menu system to remote or connect an optional remote sensor Intermittent buzzing in remote • Wrong device selected ...• Volume control is no surround information from your AVR 245, or installation-related issues, may not create center-
...southern sky, or within range of our Web site at receiver and speaker ends • Contact your local Harman Kardon service center No sound from surround or center speakers • Incorrect surround mode • Input is monaural...; Resume play through Surround Back Speakers • Multiroom system has been turned on, • Use the OSD menu system to remote or connect an optional remote sensor Intermittent buzzing in remote • Wrong device selected ...• Volume control is no surround information from your AVR 245, or installation-related issues, may not create center-


