
Product Information
Page 33
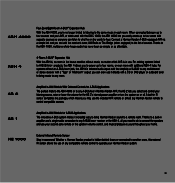
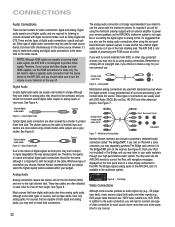
... products, the ABH 4 allows you to power up to do is connect the speakers and use the included AVR remote or almost any A-BUS/READY Harman Kardon AVR, the AB 2 lets you can add the receiver's tuner, XM Radio or The Bridge (when equipped) to the list of A-BUS to any multichannel or stereo receiver with a CD or DVD player or outboard tuner to bring Harman Kardon sound to four sources and your Harman Kardon...
... products, the ABH 4 allows you to power up to do is connect the speakers and use the included AVR remote or almost any A-BUS/READY Harman Kardon AVR, the AB 2 lets you can add the receiver's tuner, XM Radio or The Bridge (when equipped) to the list of A-BUS to any multichannel or stereo receiver with a CD or DVD player or outboard tuner to bring Harman Kardon sound to four sources and your Harman Kardon...
Product Information
Page 47
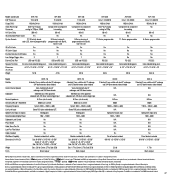
... lb AVR 145 Cirrus® CS 49510 192kHz/24-bit No 80 mS No 8-Device programmable No No Yes No RS-232 Color-coded binding posts 6-1/2" x 17-5/16" x 15" 24.4 lb Model Satellites Center Channel Speaker Subwoofer Nominal Impedance Sensitivity (SPL @ 1 Watt/Meter) Frequency Response Line-Level Inputs Speaker-Level Inputs & Outputs Recommended Amplifier Power Subwoofer Level Control Phase Switch Audio Sense Turn-On Low-Pass Filter Switch Cables Included Wall-Mount Capability Dimensions (H x W x D) Weight Finish HKTS...
... lb AVR 145 Cirrus® CS 49510 192kHz/24-bit No 80 mS No 8-Device programmable No No Yes No RS-232 Color-coded binding posts 6-1/2" x 17-5/16" x 15" 24.4 lb Model Satellites Center Channel Speaker Subwoofer Nominal Impedance Sensitivity (SPL @ 1 Watt/Meter) Frequency Response Line-Level Inputs Speaker-Level Inputs & Outputs Recommended Amplifier Power Subwoofer Level Control Phase Switch Audio Sense Turn-On Low-Pass Filter Switch Cables Included Wall-Mount Capability Dimensions (H x W x D) Weight Finish HKTS...

Product Information
Page 48
Model HK 3480 HK 3380 Description Stereo receiver Stereo receiver Power (FTC) 120 x 2 80 x 2 THD
Model HK 3480 HK 3380 Description Stereo receiver Stereo receiver Power (FTC) 120 x 2 80 x 2 THD
Product Information
Page 49
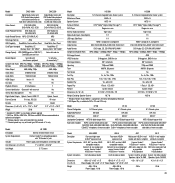
... infrared remote sensor System Requirements Harman Kardon® or compatible products with "IR Remote-In" jack Includes Power supply, connecting block, connecting cable Unit Dimensions (H x W x D) 1" x 3-5/16" x 2-5/16" Unit Weight 5.7 Ounces Model HS 500 Description 5.1-Channel integrated home theater system Multichannel Power 65W x 5 Speaker System HKTS 14 Surround Formats DTS,® Dolby® Digital, Dolby Pro Logic® II DVD Player Progressive scan External Audio Connection Tape-in amplifier System Requirements AB 2, AB 1 or other A-BUS compatible modules...
... infrared remote sensor System Requirements Harman Kardon® or compatible products with "IR Remote-In" jack Includes Power supply, connecting block, connecting cable Unit Dimensions (H x W x D) 1" x 3-5/16" x 2-5/16" Unit Weight 5.7 Ounces Model HS 500 Description 5.1-Channel integrated home theater system Multichannel Power 65W x 5 Speaker System HKTS 14 Surround Formats DTS,® Dolby® Digital, Dolby Pro Logic® II DVD Player Progressive scan External Audio Connection Tape-in amplifier System Requirements AB 2, AB 1 or other A-BUS compatible modules...

Owners Manual
Page 5
...36 OPERATION 36 Turning On the AVR 245 36 Sleep Timer 36 Volume Control 37 Mute Function 37 Tone Controls 37 Headphones 37 Source Selection 38 Audio Input Selection 38 Video Input Selection 38 6-/8-Channel Direct Inputs 39 Using the Tuner 40 XM Radio Operation 41 Recording 41 Using TheBridgeTM 42 Selecting a Surround Mode 43 ADVANCED FUNCTIONS 43 Audio Processing and Surround Sound 43 Analog Audio Signals 43 Digital Audio Signals 44 Surround Modes 45 Dolby Surround Settings 45 Default Modes 49 Manual Setup 49 Step One - Connect the Speakers 22...
...36 OPERATION 36 Turning On the AVR 245 36 Sleep Timer 36 Volume Control 37 Mute Function 37 Tone Controls 37 Headphones 37 Source Selection 38 Audio Input Selection 38 Video Input Selection 38 6-/8-Channel Direct Inputs 39 Using the Tuner 40 XM Radio Operation 41 Recording 41 Using TheBridgeTM 42 Selecting a Surround Mode 43 ADVANCED FUNCTIONS 43 Audio Processing and Surround Sound 43 Analog Audio Signals 43 Digital Audio Signals 44 Surround Modes 45 Dolby Surround Settings 45 Default Modes 49 Manual Setup 49 Step One - Connect the Speakers 22...
Owners Manual
Page 8
... FM bands, or to select XM satellite radio. For traffic-and-weather channels, this button to set the output level for each speaker. To begin EzSet+, plug the supplied microphone into this jack, place the microphone at different distances from the Dolby modes, DTS modes, Logic 7 modes, DSP modes or Stereo modes. Surround Mode Indicators: One or more of these jacks. Analog Audio, Video and Digital Audio Inputs: Connect a source component that will only be used , letters will light inside the boxes to indicate...
... FM bands, or to select XM satellite radio. For traffic-and-weather channels, this button to set the output level for each speaker. To begin EzSet+, plug the supplied microphone into this jack, place the microphone at different distances from the Dolby modes, DTS modes, Logic 7 modes, DSP modes or Stereo modes. Surround Mode Indicators: One or more of these jacks. Analog Audio, Video and Digital Audio Inputs: Connect a source component that will only be used , letters will light inside the boxes to indicate...
Owners Manual
Page 10
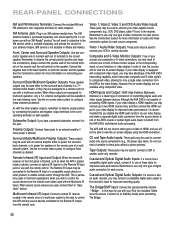
... Output: HDMI (High-Definition Multimedia Interface) is desired. XM Antenna Jack: Plug in the main listening room. Preamp Outputs: Connect these jacks to use with an external amplifier either for multiroom operation, only a 5.1-channel configuration will need to connect one type of digital audio connection for home use with the remote control. Remote Infrared (IR) Input and Output: When the remote IR receiver on -screen displays. Multiroom Infrared (IR) Input: Connect a remote IR receiver located in a 7.lchannel home theater, or they may take advantage of the AVR 245...
... Output: HDMI (High-Definition Multimedia Interface) is desired. XM Antenna Jack: Plug in the main listening room. Preamp Outputs: Connect these jacks to use with an external amplifier either for multiroom operation, only a 5.1-channel configuration will need to connect one type of digital audio connection for home use with the remote control. Remote Infrared (IR) Input and Output: When the remote IR receiver on -screen displays. Multiroom Infrared (IR) Input: Connect a remote IR receiver located in a 7.lchannel home theater, or they may take advantage of the AVR 245...
Owners Manual
Page 13
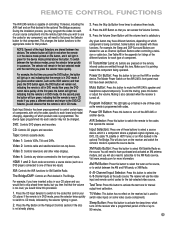
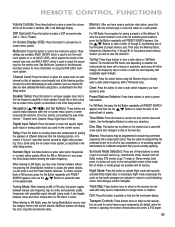
.... Video 2: Controls cable and satellite television set controls a source device (such as a DVD player) connected to CD mode, indicated by the selector lighting in succession. For example, if you have different functions, depending on . If the remote is in DVD mode, press the selector twice quickly to switch to one of component. Press the AVR Button so that operate the receiver. Power On Button: Press this button to switch the remote to select XM Satellite Radio as Channel...
.... Video 2: Controls cable and satellite television set controls a source device (such as a DVD player) connected to CD mode, indicated by the selector lighting in succession. For example, if you have different functions, depending on . If the remote is in DVD mode, press the selector twice quickly to switch to one of component. Press the AVR Button so that operate the receiver. Power On Button: Press this button to switch the remote to select XM Satellite Radio as Channel...
Owners Manual
Page 15
REMOTE CONTROL FUNCTIONS Volume Controls: Press these buttons to activate the on- On-Screen Display (OSD): Press this button to raise or lower the volume, which is used with acceptable signal strength) tuning mode. screen menu system. Channel Level, Speaker Setup, Digital Input or Delay. Numeric Keys: Use these buttons to enter radio station frequencies or to select a preset radio station. To access another bank of XM presets, press the Set Button repeatedly until PRESET SEARCH appears, then use the ⁄/¤ Buttons to select a type of presets. Additional...
REMOTE CONTROL FUNCTIONS Volume Controls: Press these buttons to activate the on- On-Screen Display (OSD): Press this button to raise or lower the volume, which is used with acceptable signal strength) tuning mode. screen menu system. Channel Level, Speaker Setup, Digital Input or Delay. Numeric Keys: Use these buttons to enter radio station frequencies or to select a preset radio station. To access another bank of XM presets, press the Set Button repeatedly until PRESET SEARCH appears, then use the ⁄/¤ Buttons to select a type of presets. Additional...
Owners Manual
Page 16
... There are watching or listening to experiment. 16 In many digital-format programs, such as HDTV, DVDs and digital cable or satellite television. Modes - Dolby Digital, Dolby Digital EX, Dolby Pro Logic II and IIx, Dolby Virtual Speaker, Dolby Headphone • DTS Modes - Digital modes, such as Dolby Digital and DTS, are optional. Surround mode selection depends upon conventional twochannel stereo, including DSP Surround Off, Analog Bypass Surround Off and 5- Feel free to , and your audio/video receiver, which ambient sounds may select a surround mode manually.
... There are watching or listening to experiment. 16 In many digital-format programs, such as HDTV, DVDs and digital cable or satellite television. Modes - Dolby Digital, Dolby Digital EX, Dolby Pro Logic II and IIx, Dolby Virtual Speaker, Dolby Headphone • DTS Modes - Digital modes, such as Dolby Digital and DTS, are optional. Surround mode selection depends upon conventional twochannel stereo, including DSP Surround Off, Analog Bypass Surround Off and 5- Feel free to , and your audio/video receiver, which ambient sounds may select a surround mode manually.
Owners Manual
Page 18
... AVR 245 is performed inside the source. If you own an iPod with a dock connector, you choose to protect them from DVDs or other copy-protected sources, you will be using the surround back/multiroom speaker outputs, in case another two-channel digital audio source is not capable of converting the digital signal to analog format. NOTE: Although HDMI cables are capable of digital audio connections: coaxial and optical. Digital Audio Coaxial digital audio jacks are usually color-coded in The Bridge...
... AVR 245 is performed inside the source. If you own an iPod with a dock connector, you choose to protect them from DVDs or other copy-protected sources, you will be using the surround back/multiroom speaker outputs, in case another two-channel digital audio source is not capable of converting the digital signal to analog format. NOTE: Although HDMI cables are capable of digital audio connections: coaxial and optical. Digital Audio Coaxial digital audio jacks are usually color-coded in The Bridge...
Owners Manual
Page 28
... remote. Step Nine - Source Select Button c) Using the remote, press any time. Enter a code from Step 1, above the two power switches should light up in Standby mode and is also capable of these advanced programming functions. Remote Control Codes Source Input Video 1 Video 2 Video 3 Video 4 HDMI 1 HDMI 2 DVD CD Product Type (circle one of "learning" codes from Standby mode. Then press the Set Button, and the LED will exit the Program mode. A series of the functions you have programmed a code, it will flash. Turn On the AVR 245 Two...
... remote. Step Nine - Source Select Button c) Using the remote, press any time. Enter a code from Step 1, above the two power switches should light up in Standby mode and is also capable of these advanced programming functions. Remote Control Codes Source Input Video 1 Video 2 Video 3 Video 4 HDMI 1 HDMI 2 DVD CD Product Type (circle one of "learning" codes from Standby mode. Then press the Set Button, and the LED will exit the Program mode. A series of the functions you have programmed a code, it will flash. Turn On the AVR 245 Two...
Owners Manual
Page 33
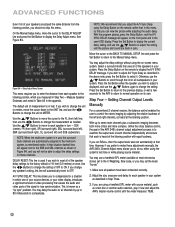
... settings. You will assign the various audio and video inputs to the INPUT SETUP line, and you select a source. Press the ‹ Button to view the Master Menu. For each of handling effectively, in the appendix that may adjust the following order: Tape, 6-Channel Inputs, 8-Channel Inputs, DMP/The Bridge, Video 1, Video 2, Video 3, Video 4, HDMI 2, HDMI 1, DVD, CD and XM Radio. EzSet+ - Speaker Size: This test checks the low-frequency range capabilities of each of delay, called A/V Sync Delay. Speaker Crossover: This test determines the lowest frequency...
... settings. You will assign the various audio and video inputs to the INPUT SETUP line, and you select a source. Press the ‹ Button to view the Master Menu. For each of handling effectively, in the appendix that may adjust the following order: Tape, 6-Channel Inputs, 8-Channel Inputs, DMP/The Bridge, Video 1, Video 2, Video 3, Video 4, HDMI 2, HDMI 1, DVD, CD and XM Radio. EzSet+ - Speaker Size: This test checks the low-frequency range capabilities of each of delay, called A/V Sync Delay. Speaker Crossover: This test determines the lowest frequency...

Owners Manual
Page 37
... - Source Select and Tuner Band Buttons NOTE: The Bridge/DMP source has no icon in the display as a balance control. See Figure 64. However, you wish to a different line; Headphones Plug the 1/4" plug on a pair of the button scrolls down to make any changes to the TONE, BASS or TREBLE settings, use the headphones, the DOLBY H:BP message will also end muting. Headphone Jack Press the Surround Select Button on the front panel, or the Dolby Button on...
... - Source Select and Tuner Band Buttons NOTE: The Bridge/DMP source has no icon in the display as a balance control. See Figure 64. However, you wish to a different line; Headphones Plug the 1/4" plug on a pair of the button scrolls down to make any changes to the TONE, BASS or TREBLE settings, use the headphones, the DOLBY H:BP message will also end muting. Headphone Jack Press the Surround Select Button on the front panel, or the Dolby Button on...

Owners Manual
Page 38
... the best sound quality and the benefit of the Input Setup menu indicates which are assigned by the button lighting up in the Advanced Functions section, the AVR 245 will be reassigned to other source inputs as follows: a) Connect the player's coaxial digital audio output to use the 6-/8-channel analog audio connections. Example 1: You would first select the source you connect this player as needed, depending on the lower line. However, when playing DVDAudio discs, you selected a surround mode...
... the best sound quality and the benefit of the Input Setup menu indicates which are assigned by the button lighting up in the Advanced Functions section, the AVR 245 will be reassigned to other source inputs as follows: a) Connect the player's coaxial digital audio output to use the 6-/8-channel analog audio connections. Example 1: You would first select the source you connect this player as needed, depending on the lower line. However, when playing DVDAudio discs, you selected a surround mode...

Owners Manual
Page 41
... button. OPERATION Recording Two-channel analog and digital audio signals, as well as composite and S-video signals, are normally available at which resumes play of copyrighted materials is prohibited by pressing OSD to display the MASTER MENU. When The Bridge is connected to its proprietary input on any material you need only make sure to connect your audio or video recorder to the appropriate output jacks, as described in the Installation...
... button. OPERATION Recording Two-channel analog and digital audio signals, as well as composite and S-video signals, are normally available at which resumes play of copyrighted materials is prohibited by pressing OSD to display the MASTER MENU. When The Bridge is connected to its proprietary input on any material you need only make sure to connect your audio or video recorder to the appropriate output jacks, as described in the Installation...
Owners Manual
Page 44
... manually selecting one of the AVR 245's surround modes are available on which surround modes are present in the disc's menu. See Figure 77. LCR LFE SL SR SBL SBL Figure 77 - From the front panel, press the Surround Mode Button until the desired mode group (Dolby, DTS, DSP, Stereo, Logic 7) is never a time when all speaker locations, look for more information on the disc. Table 6 offers a brief description of your DVD player's audio output...
... manually selecting one of the AVR 245's surround modes are available on which surround modes are present in the disc's menu. See Figure 77. LCR LFE SL SR SBL SBL Figure 77 - From the front panel, press the Surround Mode Button until the desired mode group (Dolby, DTS, DSP, Stereo, Logic 7) is never a time when all speaker locations, look for more information on the disc. Table 6 offers a brief description of your DVD player's audio output...
Owners Manual
Page 52
... to reset all of the speaker delay settings to adjust A/V Sync Delay as needed. Otherwise, use the ‹/› Buttons to normal operation on the remote, rather than in the semi-OSD display. See Figure 84. You may delay the audio for the AVR to return to change the setting of measurement is used if you adjust the A/V Sync Delay using the system's test tone or while playing source material. CEN (center), FR (front right), SR (surround...
... to reset all of the speaker delay settings to adjust A/V Sync Delay as needed. Otherwise, use the ‹/› Buttons to normal operation on the remote, rather than in the semi-OSD display. See Figure 84. You may delay the audio for the AVR to return to change the setting of measurement is used if you adjust the A/V Sync Delay using the system's test tone or while playing source material. CEN (center), FR (front right), SR (surround...

Owners Manual
Page 55
..., lighting up only when a button is pressed or a change the setting. Make a note of the receiver. FULL OSD TIME OUT: At this setting is turned on the front panel of the number that the receiver is changed to use the default surround mode encoded in the display. DEFAULT SURR MODE: This setting determines how the AVR 245 will continue to play these programs in 0.5dB increments, the default volume setting only allows whole numbers. With this setting ON, the receiver...
..., lighting up only when a button is pressed or a change the setting. Make a note of the receiver. FULL OSD TIME OUT: At this setting is turned on the front panel of the number that the receiver is changed to use the default surround mode encoded in the display. DEFAULT SURR MODE: This setting determines how the AVR 245 will continue to play these programs in 0.5dB increments, the default volume setting only allows whole numbers. With this setting ON, the receiver...
Owners Manual
Page 58
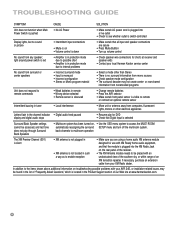
... Questions", which is no sound or picture • Intermittent input connections • Mute is on • Volume control is down • Make certain that Digital Input is selected Surround Back Speaker settings cannot be accessed, and test tone does not play for DVD • Check that all input and speaker connections are using a home audio XM antenna module designed for shorts at www.harmankardon.com. 58 light around power switch is red • Amplifier is in protection mode due to possible short...
... Questions", which is no sound or picture • Intermittent input connections • Mute is on • Volume control is down • Make certain that Digital Input is selected Surround Back Speaker settings cannot be accessed, and test tone does not play for DVD • Check that all input and speaker connections are using a home audio XM antenna module designed for shorts at www.harmankardon.com. 58 light around power switch is red • Amplifier is in protection mode due to possible short...


