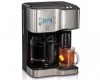
Use and Care Manual
Page 2
...is securely in a microwave oven. 14. Do not clean carafe with this coffee maker. Be certain carafe lid is designed for use with cleansers, steel wool pads, or other liquid. 6. To disconnect coffee maker, turn controls to cool before putting on carafe. 18. WARNING: To reduce...parts inside. Call the provided customer service number for other than intended use and before cleaning the appliance. 7. SAVE THESE INSTRUCTIONS! 2 Coffee maker must be operated on examination, repair, or adjustment. 9. Close supervision is necessary when any manner. Care must be taken, as ...
...is securely in a microwave oven. 14. Do not clean carafe with this coffee maker. Be certain carafe lid is designed for use with cleansers, steel wool pads, or other liquid. 6. To disconnect coffee maker, turn controls to cool before putting on carafe. 18. WARNING: To reduce...parts inside. Call the provided customer service number for other than intended use and before cleaning the appliance. 7. SAVE THESE INSTRUCTIONS! 2 Coffee maker must be operated on examination, repair, or adjustment. 9. Close supervision is necessary when any manner. Care must be taken, as ...
Use and Care Manual
Page 4
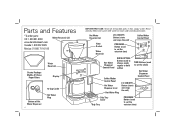
... (starts and stops the unit) PROGRAM Button (used to set the autostart time) Coffee Maker Control Panel Hot Water Dispenser Control Panel BREW OPTION Button (used to choose mode: regular or bold coffee) TIME Buttons (used to set the clock) Coffee Maker Control Panel Hot Water Dispense Lever Hot Water Plug I/O (ON/OFF) Button (starts...
... (starts and stops the unit) PROGRAM Button (used to set the autostart time) Coffee Maker Control Panel Hot Water Dispenser Control Panel BREW OPTION Button (used to choose mode: regular or bold coffee) TIME Buttons (used to set the clock) Coffee Maker Control Panel Hot Water Dispense Lever Hot Water Plug I/O (ON/OFF) Button (starts...
Use and Care Manual
Page 5
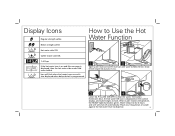
Coffee maker side ON. 1-4 Cups If the hot water icon is on and this message is displayed on...turns on the control display, and water begins to heat. Fill reservoir with water to dispense. 5 Display Icons Regular strength coffee How to heat the water. When water reaches temperature, the READY light illuminates green. Press I/O (ON/OFF) to ...Use the Hot Water Function BOLD strength coffee Hot water side ON. The button illuminates blue, the hot water ON icon is displayed, then the hot water side...
Coffee maker side ON. 1-4 Cups If the hot water icon is on and this message is displayed on...turns on the control display, and water begins to heat. Fill reservoir with water to dispense. 5 Display Icons Regular strength coffee How to heat the water. When water reaches temperature, the READY light illuminates green. Press I/O (ON/OFF) to ...Use the Hot Water Function BOLD strength coffee Hot water side ON. The button illuminates blue, the hot water ON icon is displayed, then the hot water side...
Use and Care Manual
Page 6
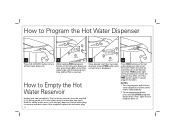
...4 Press I/O (ON/OFF) button to remove and drain water. Once desired start time (AM or PM) is reached. Hold the coffee maker over a sink and pull down on the coffee maker side until the desired start time has been reached, release PROG button and current time is being stored or if it is... has been set the water heater to turn off hot water dispenser. NOTES: • You can program both the hot water dispenser and the coffee maker independently. • To see programmed time, press and hold PROG (program) button once. After emptied, replace the hot water plug. Press PROG...
...4 Press I/O (ON/OFF) button to remove and drain water. Once desired start time (AM or PM) is reached. Hold the coffee maker over a sink and pull down on the coffee maker side until the desired start time has been reached, release PROG button and current time is being stored or if it is... has been set the water heater to turn off hot water dispenser. NOTES: • You can program both the hot water dispenser and the coffee maker independently. • To see programmed time, press and hold PROG (program) button once. After emptied, replace the hot water plug. Press PROG...
Use and Care Manual
Page 7
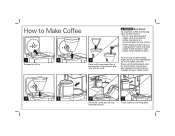
... carafe past 12-cup mark (60 ounces). To avoid hot coffee overflowing from the filter basket: • When using decaffeinated coffee, do not exceed the coffee manufacturer's recommended serving amount. • If filter basket overflow occurs, unplug coffee maker and allow coffee in filter basket to Make Coffee 1 2 To open lid, lift lid. Please visit hamiltonbeach.com...
... carafe past 12-cup mark (60 ounces). To avoid hot coffee overflowing from the filter basket: • When using decaffeinated coffee, do not exceed the coffee manufacturer's recommended serving amount. • If filter basket overflow occurs, unplug coffee maker and allow coffee in filter basket to Make Coffee 1 2 To open lid, lift lid. Please visit hamiltonbeach.com...

Use and Care Manual
Page 8
NOTE: If the coffee maker is selected: (Regular), (Bold), or (1-4 cups). Press I /O (ON/OFF) button when finished. Press I /O (ON/OFF) button to Make Coffee (cont.) 8 9 10 11 Press BREW OPTION button until desired option is not turned off manually, it will automatically shut off in 2 hours. 8 How to start. Blue light illuminates around button.
NOTE: If the coffee maker is selected: (Regular), (Bold), or (1-4 cups). Press I /O (ON/OFF) button when finished. Press I /O (ON/OFF) button to Make Coffee (cont.) 8 9 10 11 Press BREW OPTION button until desired option is not turned off manually, it will automatically shut off in 2 hours. 8 How to start. Blue light illuminates around button.
Use and Care Manual
Page 9
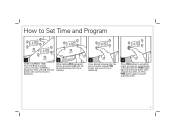
...) button until current minute is displayed. Press PROG button again to cancel automatic brew. 9 PROG button light will illuminate green when program has been set coffee maker to come on automatically at the desired time. While holding PROG (program) button, press H and M until the desired brewing start time is reached. 3 Once desired...
...) button until current minute is displayed. Press PROG button again to cancel automatic brew. 9 PROG button light will illuminate green when program has been set coffee maker to come on automatically at the desired time. While holding PROG (program) button, press H and M until the desired brewing start time is reached. 3 Once desired...
Use and Care Manual
Page 10
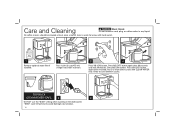
Press I /O (ON) button. Allow to cool between cycles. All coffee makers should be cleaned at least once a month (once a week for areas with CLEAN WATER only. TOP-RACK DISHWASHER-SAFE 5 6 DO NOT use the "SANI" setting ... could damage your product. 10 Press I /O (OFF) button again after 30 seconds and wait 30 minutes. Press I /O (ON) button. Do not immerse cord, plug, or coffee maker in the dishwasher.
Press I /O (ON) button. Allow to cool between cycles. All coffee makers should be cleaned at least once a month (once a week for areas with CLEAN WATER only. TOP-RACK DISHWASHER-SAFE 5 6 DO NOT use the "SANI" setting ... could damage your product. 10 Press I /O (OFF) button again after 30 seconds and wait 30 minutes. Press I /O (ON) button. Do not immerse cord, plug, or coffee maker in the dishwasher.


