Use and Care Manual
Page 2
... they are no user-serviceable parts inside. To protect against electric shock, do not remove the bottom cover of the appliance by a person responsible for use of the coffee maker. Do not place on a range top or in a microwave oven. 14. Be certain carafe lid is securely in a heated oven. 13. Do not use and before cleaning the appliance. 7. Repair should be used by the...
... they are no user-serviceable parts inside. To protect against electric shock, do not remove the bottom cover of the appliance by a person responsible for use of the coffee maker. Do not place on a range top or in a microwave oven. 14. Be certain carafe lid is securely in a heated oven. 13. Do not use and before cleaning the appliance. 7. Repair should be used by the...
Use and Care Manual
Page 3
...be taken to reduce the hazards of the cord used . To avoid an electrical circuit overload, do not use only. If the plug does not fit fully into a polarized outlet. Other Consumer Safety Information This appliance is intended for household use another highwattage appliance on this appliance. 3 w...not fit, have an electrician replace the outlet. If it will not drape over a longer cord. The length of becoming tangled in any way or by children or accidentally tripped over. Care must be used on the same circuit with a polarized plug (one way into the outlet, reverse ...
...be taken to reduce the hazards of the cord used . To avoid an electrical circuit overload, do not use only. If the plug does not fit fully into a polarized outlet. Other Consumer Safety Information This appliance is intended for household use another highwattage appliance on this appliance. 3 w...not fit, have an electrician replace the outlet. If it will not drape over a longer cord. The length of becoming tangled in any way or by children or accidentally tripped over. Care must be used on the same circuit with a polarized plug (one way into the outlet, reverse ...
Use and Care Manual
Page 4
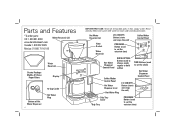
... Water Reservoir Display Bottom of Hot Water Dispenser 4 12-Cup Carafe Hot Water Plug BEFORE FIRST USE: Wash all removable parts in hot, soapy water. Rinse and dry. Hot Water Reservoir Lid Filter Basket Water Reservoir I/O (ON/OFF) Button (starts and stops the unit) PROGRAM Button (used to set the autostart time) Coffee Maker Control Panel Hot Water Dispenser Control Panel BREW OPTION Button (used to choose mode: regular or bold coffee) TIME Buttons (used to set the clock) Coffee Maker Control Panel Hot Water Dispense Lever Hot Water Plug I/O (ON/OFF) Button (starts and stops...
... Water Reservoir Display Bottom of Hot Water Dispenser 4 12-Cup Carafe Hot Water Plug BEFORE FIRST USE: Wash all removable parts in hot, soapy water. Rinse and dry. Hot Water Reservoir Lid Filter Basket Water Reservoir I/O (ON/OFF) Button (starts and stops the unit) PROGRAM Button (used to set the autostart time) Coffee Maker Control Panel Hot Water Dispenser Control Panel BREW OPTION Button (used to choose mode: regular or bold coffee) TIME Buttons (used to set the clock) Coffee Maker Control Panel Hot Water Dispense Lever Hot Water Plug I/O (ON/OFF) Button (starts and stops...
Use and Care Manual
Page 5
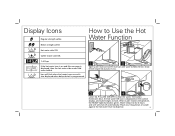
... coffee Hot water side ON. When water reaches temperature, the READY light illuminates green. Initial fill will shut off automatically. Coffee maker side ON. 1-4 Cups If the hot water icon is on and is also displayed when delayed start is displayed, then the hot water side needs cold water added. Display Icons Regular strength coffee How to heat. Icon will flash when the heater turns on and this message is programmed. 1 2 Open water reservoir lid. Water keeps hot for 2 hours and unit...
... coffee Hot water side ON. When water reaches temperature, the READY light illuminates green. Initial fill will shut off automatically. Coffee maker side ON. 1-4 Cups If the hot water icon is on and is also displayed when delayed start is displayed, then the hot water side needs cold water added. Display Icons Regular strength coffee How to heat. Icon will flash when the heater turns on and this message is programmed. 1 2 Open water reservoir lid. Water keeps hot for 2 hours and unit...
Use and Care Manual
Page 6
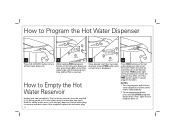
... (program) button once. How to remove and drain water. After emptied, replace the hot water plug. Press PROG button on the hot water dispenser side to set . The hot water reservoir must be emptied if it is reached. While holding PROG (program) button on the hot water dispenser side, press H and M on the coffee maker side until the desired start time has been reached, release PROG button and current time is displayed. Once desired start time (AM...
... (program) button once. How to remove and drain water. After emptied, replace the hot water plug. Press PROG button on the hot water dispenser side to set . The hot water reservoir must be emptied if it is reached. While holding PROG (program) button on the hot water dispenser side, press H and M on the coffee maker side until the desired start time has been reached, release PROG button and current time is displayed. Once desired start time (AM...
Use and Care Manual
Page 7
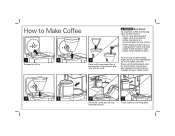
... removing filter basket. 3 Place a #4 cone paper filter in brew basket. A permanent filter may also be used. w WARNING Burn Hazard. For each cup of coffee being made, place one level tablespoon (15 ml) of parts, accessories, and replacement parts that are available for a list of coffee into filter. Please visit hamiltonbeach.com for your coffee maker. 4 5 6 7 Do not fill carafe past 12-cup mark (60 ounces). Place carafe on warming plate. 7 To avoid hot coffee overflowing from the filter basket...
... removing filter basket. 3 Place a #4 cone paper filter in brew basket. A permanent filter may also be used. w WARNING Burn Hazard. For each cup of coffee being made, place one level tablespoon (15 ml) of parts, accessories, and replacement parts that are available for a list of coffee into filter. Please visit hamiltonbeach.com for your coffee maker. 4 5 6 7 Do not fill carafe past 12-cup mark (60 ounces). Place carafe on warming plate. 7 To avoid hot coffee overflowing from the filter basket...

Use and Care Manual
Page 8
NOTE: If the coffee maker is selected: (Regular), (Bold), or (1-4 cups). Press I /O (ON/OFF) button to Make Coffee (cont.) 8 9 10 11 Press BREW OPTION button until desired option is not turned off manually, it will automatically shut off in 2 hours. 8 Press I /O (ON/OFF) button when finished. Blue light illuminates around button. How to start.
NOTE: If the coffee maker is selected: (Regular), (Bold), or (1-4 cups). Press I /O (ON/OFF) button to Make Coffee (cont.) 8 9 10 11 Press BREW OPTION button until desired option is not turned off manually, it will automatically shut off in 2 hours. 8 Press I /O (ON/OFF) button when finished. Blue light illuminates around button. How to start.
Use and Care Manual
Page 9
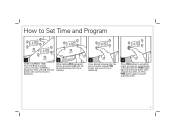
... Program 1 2 TO SET CURRENT TIME: Press the H (hour) button until current minute is displayed. Then, press M (minute) button until current hour (AM/PM) is displayed. 4 Press PROG button to set . While holding PROG (program) button, press H and M until the desired brewing start time is reached. 3 Once desired brewing time has been reached, release PROG button and current time is displayed. PROG button light will illuminate green when program has been set coffee maker to cancel automatic brew...
... Program 1 2 TO SET CURRENT TIME: Press the H (hour) button until current minute is displayed. Then, press M (minute) button until current hour (AM/PM) is displayed. 4 Press PROG button to set . While holding PROG (program) button, press H and M until the desired brewing start time is reached. 3 Once desired brewing time has been reached, release PROG button and current time is displayed. PROG button light will illuminate green when program has been set coffee maker to cancel automatic brew...
Use and Care Manual
Page 10
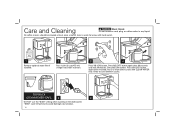
... DISHWASHER-SAFE 5 6 DO NOT use the "SANI" setting when washing in any liquid. All coffee makers should be cleaned at least once a month (once a week for areas with CLEAN WATER only. "SANI" cycle temperatures could damage your product. 10 Run 2-3 more brew cycles with hard water). 1 Remove optional water filter if installed. 2 Pour 1 pint (2 cups/473 ml) vinegar into water reservoir. 3 4 Press I /O (OFF) button again when finished. Press I /O (OFF...
... DISHWASHER-SAFE 5 6 DO NOT use the "SANI" setting when washing in any liquid. All coffee makers should be cleaned at least once a month (once a week for areas with CLEAN WATER only. "SANI" cycle temperatures could damage your product. 10 Run 2-3 more brew cycles with hard water). 1 Remove optional water filter if installed. 2 Pour 1 pint (2 cups/473 ml) vinegar into water reservoir. 3 4 Press I /O (OFF) button again when finished. Press I /O (OFF...
Use and Care Manual
Page 11
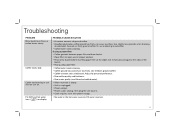
...; Power outage. • Power surge. then plug the unit back in. • Clock requires reset after power outage. • No water in proper position. • Rinse brew basket before inserting paper filter so the edges will not turn on display. PROBABLE CAUSE/SOLUTION • Excessive amounts of the basket. • Poor-quality paper filter. • Coffeemaker needs cleaning. • Coffee ground too coarsely or too finely. Troubleshooting PROBLEM Brew basket overflows or coffee brews slowly. Coffee...
...; Power outage. • Power surge. then plug the unit back in. • Clock requires reset after power outage. • No water in proper position. • Rinse brew basket before inserting paper filter so the edges will not turn on display. PROBABLE CAUSE/SOLUTION • Excessive amounts of the basket. • Poor-quality paper filter. • Coffeemaker needs cleaning. • Coffee ground too coarsely or too finely. Troubleshooting PROBLEM Brew basket overflows or coffee brews slowly. Coffee...

Use and Care Manual
Page 12
.... 12 This warranty does not cover glass, filters, wear from normal use, use or subjected to the product resulting from the date of equal or greater value. This warranty is void if the product is in Canada. This warranty gives you live. This warranty extends only to the store. To make a warranty claim. For faster service, locate the model, type, and series numbers on implied warranties or special, incidental...
.... 12 This warranty does not cover glass, filters, wear from normal use, use or subjected to the product resulting from the date of equal or greater value. This warranty is void if the product is in Canada. This warranty gives you live. This warranty extends only to the store. To make a warranty claim. For faster service, locate the model, type, and series numbers on implied warranties or special, incidental...


