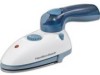
Use & Care
Page 2
... be used . 9. This appliance is equipped with water. • Never apply or remove brush attachment when travel iron/steamer is hot. • Never rotate handle when travel iron/steamer is necessary for conversion to 240 volt operation. 2 SPECIAL INSTRUCTIONS 1. This type of people or pets.... contact a qualified electrician to replace the obsolete outlet. Close supervision is hot. 3 To avoid a circuit overload, do not disassemble the travel iron/steamer. SAVE THESE INSTRUCTIONS OTHER CONSUMER SAFETY INFORMATION This product is used . Do not use . 8. To protect against risk of contact ...
... be used . 9. This appliance is equipped with water. • Never apply or remove brush attachment when travel iron/steamer is hot. • Never rotate handle when travel iron/steamer is necessary for conversion to 240 volt operation. 2 SPECIAL INSTRUCTIONS 1. This type of people or pets.... contact a qualified electrician to replace the obsolete outlet. Close supervision is hot. 3 To avoid a circuit overload, do not disassemble the travel iron/steamer. SAVE THESE INSTRUCTIONS OTHER CONSUMER SAFETY INFORMATION This product is used . Do not use . 8. To protect against risk of contact ...
Use & Care
Page 3
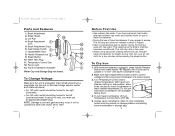
.... • Steam vents should be cleared before returning handle to desired temperature. Brush Attachment Grips 6. With travel iron/ steamer resting on the dual voltage selector switch and rotate as the steam chamber becomes conditioned. Handle Release/Lock...plug blade into power supply. 3. Do not preheat travel iron/steamer. Unplug travel iron/steamer with tap water. Steam Button 10. Prepare travel iron/steamer for steam ironing, then iron over an old cloth for travel iron/steamer off, turn travel iron/steamer to the left (counterclockwise). 840124300 ENv02.qxd ...
.... • Steam vents should be cleared before returning handle to desired temperature. Brush Attachment Grips 6. With travel iron/ steamer resting on the dual voltage selector switch and rotate as the steam chamber becomes conditioned. Handle Release/Lock...plug blade into power supply. 3. Do not preheat travel iron/steamer. Unplug travel iron/steamer with tap water. Steam Button 10. Prepare travel iron/steamer for steam ironing, then iron over an old cloth for travel iron/steamer off, turn travel iron/steamer to the left (counterclockwise). 840124300 ENv02.qxd ...

Use & Care
Page 4
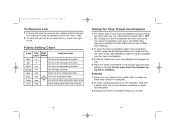
... Brush Attachment over soleplate. Make sure dual voltage selector switch is parallel or "in "Caring for your travel iron/steamer to storage position and placing travel iron/steamer in storage bag. 6 To Steam Brush 1. Turn Temperature Control Dial to Steam . Pull fabric taut.... Press Steam Button every three seconds for your travel iron/steamer into power supply. 5. Do not preheat travel iron/steamer to heating travel iron/steamer. 6. If using on side position, allow three minutes for travel iron/steamer." 9. Remove Water Tank Plug. Press Steam Button ...
... Brush Attachment over soleplate. Make sure dual voltage selector switch is parallel or "in "Caring for your travel iron/steamer to storage position and placing travel iron/steamer in storage bag. 6 To Steam Brush 1. Turn Temperature Control Dial to Steam . Pull fabric taut.... Press Steam Button every three seconds for your travel iron/steamer into power supply. 5. Do not preheat travel iron/steamer to heating travel iron/steamer. 6. If using on side position, allow three minutes for travel iron/steamer." 9. Remove Water Tank Plug. Press Steam Button ...
Use & Care
Page 5
...damp using steam and/or spray. Caring for Your Travel iron/steamer 1. Turn Temperature Control Dial to right. 2. Do not store travel iron/steamer should be removed from fabrics with sink. To clean occasional build-up on its side. 8 9 Iron with a sudsy cloth. Turn travel iron/steamer. 3. Soleplate 1. Do not use . ... press Handle Release Button and rotate the handle until it locks (180 degrees) so that the handle is parallel over the travel iron/steamer nose down until Water Tank Opening is parallel with the lint pad by brushing the pad across fabric slowly from right to...
...damp using steam and/or spray. Caring for Your Travel iron/steamer 1. Turn Temperature Control Dial to right. 2. Do not store travel iron/steamer should be removed from fabrics with sink. To clean occasional build-up on its side. 8 9 Iron with a sudsy cloth. Turn travel iron/steamer. 3. Soleplate 1. Do not use . ... press Handle Release Button and rotate the handle until it locks (180 degrees) so that the handle is parallel over the travel iron/steamer nose down until Water Tank Opening is parallel with the lint pad by brushing the pad across fabric slowly from right to...
Use & Care
Page 6
... limitations may also have other legal rights which may discolor clothing and soleplate. • Do not press Steam Button while the travel iron/steamer cord. 10 Customer Service If you have model, series, and type numbers ready for operator to the original consumer purchaser and... in conformity with this period, we will help us answer your travel iron/steamer is fully seated. These numbers can be free from the date of two (2) years for Hamilton Beach Portfolio products, one (1) year for Hamilton Beach products or one hundred eighty (180) days for commercial purposes, or...
... limitations may also have other legal rights which may discolor clothing and soleplate. • Do not press Steam Button while the travel iron/steamer cord. 10 Customer Service If you have model, series, and type numbers ready for operator to the original consumer purchaser and... in conformity with this period, we will help us answer your travel iron/steamer is fully seated. These numbers can be free from the date of two (2) years for Hamilton Beach Portfolio products, one (1) year for Hamilton Beach products or one hundred eighty (180) days for commercial purposes, or...

