
User Manual
Page 1
MODEL: LT19M1CW,LT22M1CW LT26M1C,LT32M1C LTF42M1C LCD TV RECEIVER USER'S MANUAL Please read this manual carefully before using your television and keep this manual In a good place for future reference.
MODEL: LT19M1CW,LT22M1CW LT26M1C,LT32M1C LTF42M1C LCD TV RECEIVER USER'S MANUAL Please read this manual carefully before using your television and keep this manual In a good place for future reference.

User Manual
Page 3
... CONTROL 9 TO USE THE REMOTE CONTROL 10 VIEWING MODE ILLUSTRATIONS 12 CONNECTING EQUIPMENT 13 TO USE THE MENUS ...19 PICTURE MENU...19 SOUND MENU...20 TV MENU ...20 FEATURES MENU ...21 PARENTAL MENU ...22 COMMON INTERFACE MODULE 23 OAD OPERATION ...24 TIPS ...25 PICTURE VIEWING & MUSIC 26 PRODUCT SPECIFICATION 27 BEFORE...
... CONTROL 9 TO USE THE REMOTE CONTROL 10 VIEWING MODE ILLUSTRATIONS 12 CONNECTING EQUIPMENT 13 TO USE THE MENUS ...19 PICTURE MENU...19 SOUND MENU...20 TV MENU ...20 FEATURES MENU ...21 PARENTAL MENU ...22 COMMON INTERFACE MODULE 23 OAD OPERATION ...24 TIPS ...25 PICTURE VIEWING & MUSIC 26 PRODUCT SPECIFICATION 27 BEFORE...

User Manual
Page 4
Shielded interface cables and AC power cord, if any radio or TV interference caused by the party responsible for compliance could void the user's authority to operate the equipment. 2. Dangerously high voltages are present inside an equilateral ... BE RECYCLED OR DISPOSED OF ACCORDING TO LOCAL, STATE OR FEDERAL LAWS. FOR YOUR SAFETY Before operating the TV please read this equipment. WARNING: To prevent fire or shock hazard, do not expose the TV to qualified personnel only. Danger of explosion if battery is not responsible for future reference. INSTRUCTIONS: The...
Shielded interface cables and AC power cord, if any radio or TV interference caused by the party responsible for compliance could void the user's authority to operate the equipment. 2. Dangerously high voltages are present inside an equilateral ... BE RECYCLED OR DISPOSED OF ACCORDING TO LOCAL, STATE OR FEDERAL LAWS. FOR YOUR SAFETY Before operating the TV please read this equipment. WARNING: To prevent fire or shock hazard, do not expose the TV to qualified personnel only. Danger of explosion if battery is not responsible for future reference. INSTRUCTIONS: The...

User Manual
Page 5
...tub, swimming pool or in a box when using it. Unplug immediately if other flammable materials. Do not cover or block any object inside TV box or if the TV fell down. Remember to unplug the unit when not in use liquid cleaners or aerosol cleaners to clean the internal part of the... like no picture, no video/audio, smoke and bad odor from the AC outlet before cleaning. Make sure to unplug the AC cord from TV. Call service personnel to clean the display. Inadequate ventilation may shorten the life of time (days). Don't throw any vents and openings. Notice for a long...
...tub, swimming pool or in a box when using it. Unplug immediately if other flammable materials. Do not cover or block any object inside TV box or if the TV fell down. Remember to unplug the unit when not in use liquid cleaners or aerosol cleaners to clean the internal part of the... like no picture, no video/audio, smoke and bad odor from the AC outlet before cleaning. Make sure to unplug the AC cord from TV. Call service personnel to clean the display. Inadequate ventilation may shorten the life of time (days). Don't throw any vents and openings. Notice for a long...

User Manual
Page 6
.... 11. Only use this apparatus during lightning storms or when unused for replacement of the set and cause product damage and/or personal injury. 4 The TV should be connected to a mains socket outlet with one wider than that produce heat. 9. Servicing is used , use caution when moving the cart/apparatus combination...
.... 11. Only use this apparatus during lightning storms or when unused for replacement of the set and cause product damage and/or personal injury. 4 The TV should be connected to a mains socket outlet with one wider than that produce heat. 9. Servicing is used , use caution when moving the cart/apparatus combination...
User Manual
Page 7
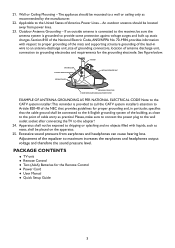
... or splashing and no objects filled with respect to grounding electrodes and requirements for the grounding electrode. Adjustment of America. PACKAGE CONTENTS Ɣ TV unit Ɣ Remote Control Ɣ Two (AAA) Batteries for proper grounding and, in wire to an antenna-discharge unit, size of grounding...can cause hearing loss. Power Lines - Please, make sure to connect the power plug to the wall outlet socket after connecting the TV to maximum increases the earphones and headphones output voltage and therefore the sound pressure level. See Figure below. Apparatus shall not be ...
... or splashing and no objects filled with respect to grounding electrodes and requirements for the grounding electrode. Adjustment of America. PACKAGE CONTENTS Ɣ TV unit Ɣ Remote Control Ɣ Two (AAA) Batteries for proper grounding and, in wire to an antenna-discharge unit, size of grounding...can cause hearing loss. Power Lines - Please, make sure to connect the power plug to the wall outlet socket after connecting the TV to maximum increases the earphones and headphones output voltage and therefore the sound pressure level. See Figure below. Apparatus shall not be ...

User Manual
Page 8
... stand. (Please see page.26) To attach a wall mount bracket to your TV: 1 Loosen the screws holding your TV to the stand and remove the stand base from the TV. 2 Secure the wall mount bracket to the back of your TV at least 2.36 inches (60 mm) from the wall to prevent cable interference... mm M4 screws For 42" model NOTE f Wall mount bracket & screws are not included. Before mounting your TV on a solid surface. Install the base stand; place the TV on the wall, you keep your TV using four screws, as indicated in a position to allow free flow of the display. To prevent any unsafe...
... stand. (Please see page.26) To attach a wall mount bracket to your TV: 1 Loosen the screws holding your TV to the stand and remove the stand base from the TV. 2 Secure the wall mount bracket to the back of your TV at least 2.36 inches (60 mm) from the wall to prevent cable interference... mm M4 screws For 42" model NOTE f Wall mount bracket & screws are not included. Before mounting your TV on a solid surface. Install the base stand; place the TV on the wall, you keep your TV using four screws, as indicated in a position to allow free flow of the display. To prevent any unsafe...

User Manual
Page 9
.... If the LED colour is Red, which means this TV set is in the wall socket with display on the screen. flame sources, such as lighted .... 7 Power: Insert the power cord in standby state. 5. If the LED colour is Blue, means the TV set is power on in the vicinity. Power Key 3. Connect the antenna cable or CATV cable to the aerial socket... TV ANTENNA at the front panel. The TV will be exposed to rain or water.The equipment shall not be turned on . Turn the TV on: Press the POWER key on or in a minute with...
.... If the LED colour is Red, which means this TV set is in the wall socket with display on the screen. flame sources, such as lighted .... 7 Power: Insert the power cord in standby state. 5. If the LED colour is Blue, means the TV set is power on in the vicinity. Power Key 3. Connect the antenna cable or CATV cable to the aerial socket... TV ANTENNA at the front panel. The TV will be exposed to rain or water.The equipment shall not be turned on . Turn the TV on: Press the POWER key on or in a minute with...

User Manual
Page 10
... Access Module (CAM) use the following procedure to view the input signal: Press the SOURCE button on this all the speakers will be muted. ྲྀ TV ANTENNA - HALF SCART transmits CVBS video in/ out, and audio in / out; Note 2: SCART1/2 has monitor out. (CVBS/YPbPr/ATV/DTV) &#...box here. ེ SPDIF (Digital Audio Out) - Connect to the headphones.When the headphone is inserted to your service provider for analogue or Digital TV. ཷᇬོᇫSCART - Connect to the television. Connect the video and audio cables from a computer here. ཹ COMPONENT (Y/Pb/...
... Access Module (CAM) use the following procedure to view the input signal: Press the SOURCE button on this all the speakers will be muted. ྲྀ TV ANTENNA - HALF SCART transmits CVBS video in/ out, and audio in / out; Note 2: SCART1/2 has monitor out. (CVBS/YPbPr/ATV/DTV) &#...box here. ེ SPDIF (Digital Audio Out) - Connect to the headphones.When the headphone is inserted to your service provider for analogue or Digital TV. ཷᇬོᇫSCART - Connect to the television. Connect the video and audio cables from a computer here. ཹ COMPONENT (Y/Pb/...
User Manual
Page 11
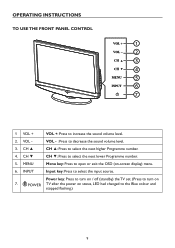
Power key: Press to turn on / off (standby) the TV set. (Press to open or exit the OSD (on 7. VOL - : Press to select the next higher Programme number. 4. CH Ÿ CH Ÿ: Press to decrease ... source. MENU Menu key: Press to turn on -screen display) menu. 6. CH ź CH ź: Press to the Blue colour and stopped flashing.) 9 VOL - i POWER TV after the power on status, LED had changed to select the next lower Programme number. 5.
Power key: Press to turn on / off (standby) the TV set. (Press to open or exit the OSD (on 7. VOL - : Press to select the next higher Programme number. 4. CH Ÿ CH Ÿ: Press to decrease ... source. MENU Menu key: Press to turn on -screen display) menu. 6. CH ź CH ź: Press to the Blue colour and stopped flashing.) 9 VOL - i POWER TV after the power on status, LED had changed to select the next lower Programme number. 5.

User Manual
Page 12
... choose AV source mode. VIDEO ADJ Press to select from Auto, Normal (4:3),Wide (16:9), subtitle, full screen, or 14:9 mode. Colour buttons v In TV mode: Follow the directions in the OSD screen. EPG Press to choose YPbPr source mode. YPbPr Press to display the Electronic Programme Guide. SLEEP Press... to set the preset time to switch the TV to turn ON/OFF (standby) the TV. INFO Press to choose from Personal, Standard, Movie,Vivid, Eco. TO USE THE REMOTE CONTROL POWER Press to standby ...
... choose AV source mode. VIDEO ADJ Press to select from Auto, Normal (4:3),Wide (16:9), subtitle, full screen, or 14:9 mode. Colour buttons v In TV mode: Follow the directions in the OSD screen. EPG Press to choose YPbPr source mode. YPbPr Press to display the Electronic Programme Guide. SLEEP Press... to set the preset time to switch the TV to turn ON/OFF (standby) the TV. INFO Press to choose from Personal, Standard, Movie,Vivid, Eco. TO USE THE REMOTE CONTROL POWER Press to standby ...

User Manual
Page 13
...text decoder stops receiving data. INDEX Press to return to change to a quiz. FAV Display the Favourite Channel List. MIX Display the Teletext with TV. SIZE Press to page 100 or the index page. v In Text mode: Select the next page marked as a subtitle page and request it... USB page marked as subtitle. USB Press USB to display the multimedia selection screen. (Detail USB multimedia function please refer to freeze the TV picture. 11 FREEZE Press to P26). SUBPAGE Display the sub page (when available). REVEAL Reveal hidden information such as the display page. SUBTITLE...
...text decoder stops receiving data. INDEX Press to return to change to a quiz. FAV Display the Favourite Channel List. MIX Display the Teletext with TV. SIZE Press to page 100 or the index page. v In Text mode: Select the next page marked as a subtitle page and request it... USB page marked as subtitle. USB Press USB to display the multimedia selection screen. (Detail USB multimedia function please refer to freeze the TV picture. 11 FREEZE Press to P26). SUBPAGE Display the sub page (when available). REVEAL Reveal hidden information such as the display page. SUBTITLE...
User Manual
Page 15
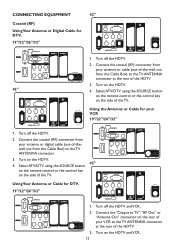
..."/26"/32" 1. Select ATV/DTV using the SOURCE button on the remote control or the control key on the rear of your VCR to the TV ANTENNA connector at the rear of the HDTV 3. Turn off the HDTV and VCR. 2. Turn off the HDTV. 2. Connect the "Output to... on the HDTV. 42" 4. Connect the coaxial (RF) connector from your antenna or digital cable (out-of-thewall, not from the Cable Box) to the TV ANTENNA connector at the rear of the HDTV. 3. Select ATV/DTV using the SOURCE button on the remote control or the control key on the...
..."/26"/32" 1. Select ATV/DTV using the SOURCE button on the remote control or the control key on the rear of your VCR to the TV ANTENNA connector at the rear of the HDTV 3. Turn off the HDTV and VCR. 2. Turn off the HDTV. 2. Connect the "Output to... on the HDTV. 42" 4. Connect the coaxial (RF) connector from your antenna or digital cable (out-of-thewall, not from the Cable Box) to the TV ANTENNA connector at the rear of the HDTV. 3. Select ATV/DTV using the SOURCE button on the remote control or the control key on the...

User Manual
Page 16
... Your HDTV Set-Top Box Using HDMI (19"/22" only have one HDMI) HDTV Set-Top Boxes that have an off-air antenna or cable TV, connect it to the "Antenna In" connector on the side of the product or consult your VCR. Turn on the HDTV supports High-bandwidth Digital... Set-Top Box and the HDMI end to your HDTV Set-Top Box user manual for more information about the video output requirements of the TV. f Refer to the HDMI Input at the rear of the HDTV. 3. 4. For HDTV Set-Top Boxes with DVI Connecting your HDTV Set-Top Box and...
... Your HDTV Set-Top Box Using HDMI (19"/22" only have one HDMI) HDTV Set-Top Boxes that have an off-air antenna or cable TV, connect it to the "Antenna In" connector on the side of the product or consult your VCR. Turn on the HDTV supports High-bandwidth Digital... Set-Top Box and the HDMI end to your HDTV Set-Top Box user manual for more information about the video output requirements of the TV. f Refer to the HDMI Input at the rear of the HDTV. 3. 4. For HDTV Set-Top Boxes with DVI Connecting your HDTV Set-Top Box and...

User Manual
Page 18
...other end to your DVD player user manual for more information about selecting the video or RF output of the TV. Select ATV/DTV using the SOURCE button on the remote, side of the HDTV or directly by pressing ... HDMI using the SOURCE button on the remote control or the control key on the Remote Control. NOTE f Refer to the TV input at the rear of the HDTV. 1. Using Coax (RF) 19"/22"/26"/32" Connecting your DVD player. 4. ... requirements of the HDTV. 3. Using a Coax (RF) cable, connect one end to the TV OUT (RF) on the HDTV and your DVD Player (Best) 19"/22"/26"/32" 42" 42" 1.
...other end to your DVD player user manual for more information about selecting the video or RF output of the TV. Select ATV/DTV using the SOURCE button on the remote, side of the HDTV or directly by pressing ... HDMI using the SOURCE button on the remote control or the control key on the Remote Control. NOTE f Refer to the TV input at the rear of the HDTV. 1. Using Coax (RF) 19"/22"/26"/32" Connecting your DVD player. 4. ... requirements of the HDTV. 3. Using a Coax (RF) cable, connect one end to the TV OUT (RF) on the HDTV and your DVD Player (Best) 19"/22"/26"/32" 42" 42" 1.

User Manual
Page 21
...High, or Auto. [Flash Tone] - Press the MENU/EXIT button to enter the main OSD.Adjust the items including Picture, Sound,TV, Features, and Parental. It provides several video adjustment items for DVD player, camcorder, and other video appliances inputs. Sharpness: To improve... detail. 7. Advanced Control: [Noise Reduction] - PICTURE MENU The Picture menu in the particular source modes. Picture Sound TV Features Parental OK Enter Smart Picture Brightness Contrast Colour Tint Sharpness Colour Temperature Advanced Control Standard 45 50 60 0 5 Cool Select EXIT ...
...High, or Auto. [Flash Tone] - Press the MENU/EXIT button to enter the main OSD.Adjust the items including Picture, Sound,TV, Features, and Parental. It provides several video adjustment items for DVD player, camcorder, and other video appliances inputs. Sharpness: To improve... detail. 7. Advanced Control: [Noise Reduction] - PICTURE MENU The Picture menu in the particular source modes. Picture Sound TV Features Parental OK Enter Smart Picture Brightness Contrast Colour Tint Sharpness Colour Temperature Advanced Control Standard 45 50 60 0 5 Cool Select EXIT ...

User Manual
Page 22
... 1.5KHz Equalizer 5KHz Equalizer 10KHz Balance Virtual Surround Digital Audio Out Personal 0 0 0 0 0 0 On PCM Select EXIT Exit Picture Sound TV Features Parental SPDIF Delay AVL Type Audio Description 0 Off Normal 6. The following functions are in 10ms steps, as the IRD may be connected... Description", you are only available for ATV 20 Digital Audio Out: To select the Digital Audio Out from Personal, Music, or Speech. 2. TV MENU OK Adjust Select EXIT Back 1. Audio Carrier (ATV only): Select Stereo, Dual 1, Dual 2, or Mono for digital channels with audio signals...
... 1.5KHz Equalizer 5KHz Equalizer 10KHz Balance Virtual Surround Digital Audio Out Personal 0 0 0 0 0 0 On PCM Select EXIT Exit Picture Sound TV Features Parental SPDIF Delay AVL Type Audio Description 0 Off Normal 6. The following functions are in 10ms steps, as the IRD may be connected... Description", you are only available for ATV 20 Digital Audio Out: To select the Digital Audio Out from Personal, Music, or Speech. 2. TV MENU OK Adjust Select EXIT Back 1. Audio Carrier (ATV only): Select Stereo, Dual 1, Dual 2, or Mono for digital channels with audio signals...

User Manual
Page 23
... 0 . @0 1 _- 1 2 ABCab c 2 3 DE F d e f 3 4 GH I g H i 4 5JKL j k l 5 6 MN O mn o 6 7 PQRSp qr s 7 8 TUVt u v8 9 WX Y Z w x y z 9 [Decoder (Analog only)] - Picture Sound TV Features Parental Exit Back Search for digital channels if it is recommended to run the Channel Scan periodically to ensure that are added. [Update scan...The Features menu in manually using the number buttons 0~9. Tip: The skipped program may not be shown on the TV screen. however, the channel also broadcast some un-encrypted programs. These programs without encryption can be described clearly below ...
... 0 . @0 1 _- 1 2 ABCab c 2 3 DE F d e f 3 4 GH I g H i 4 5JKL j k l 5 6 MN O mn o 6 7 PQRSp qr s 7 8 TUVt u v8 9 WX Y Z w x y z 9 [Decoder (Analog only)] - Picture Sound TV Features Parental Exit Back Search for digital channels if it is recommended to run the Channel Scan periodically to ensure that are added. [Update scan...The Features menu in manually using the number buttons 0~9. Tip: The skipped program may not be shown on the TV screen. however, the channel also broadcast some un-encrypted programs. These programs without encryption can be described clearly below ...
User Manual
Page 24
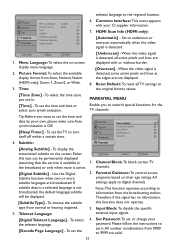
...Wide. 3. Note:This function operates according to information from 0000 to set the time and date or select auto synchronization. Picture Sound TV Features Parental Menu Language Picture Format Time Subtitle Teletext Language Common Interface Reset Default English Wide 6. Set to the original factory values.... [Time Zone] - OK Enter Select EXIT Exit 1. When the video signal is detected, all TV settings to underscan or overscan automatically when the video signal is not broadcasted, the default language subtitle will be permanently displayed (...
...Wide. 3. Note:This function operates according to information from 0000 to set the time and date or select auto synchronization. Picture Sound TV Features Parental Menu Language Picture Format Time Subtitle Teletext Language Common Interface Reset Default English Wide 6. Set to the original factory values.... [Time Zone] - OK Enter Select EXIT Exit 1. When the video signal is detected, all TV settings to underscan or overscan automatically when the video signal is not broadcasted, the default language subtitle will be permanently displayed (...

User Manual
Page 25
...the Common Interface slot. 1. Select Common Interface to view the to accept the Conditional Access CA menu options and information on the TV and press MENU and select the TV submenu. The Common Interface CI Slot, is activated. Turn on the Module coupled with a Smart card, inserted CI card. "...Common interface" will be displayed if the CA module is inserted into the CI slot located at the side of the TV. 2. Tip: Remember that CA Picture Sound TV Menu Language Picture Format Time Subtitle English Wide modules and smart cards are not included, or supplied as optional extras by...
...the Common Interface slot. 1. Select Common Interface to view the to accept the Conditional Access CA menu options and information on the TV and press MENU and select the TV submenu. The Common Interface CI Slot, is activated. Turn on the Module coupled with a Smart card, inserted CI card. "...Common interface" will be displayed if the CA module is inserted into the CI slot located at the side of the TV. 2. Tip: Remember that CA Picture Sound TV Menu Language Picture Format Time Subtitle English Wide modules and smart cards are not included, or supplied as optional extras by...


