

User Manual -MG01-35
Page 1
LED LCD TV OWNER' S MANUAL MODEL: LE50K6500UA LE55K6500UA LE65K6500UA Please READ this manual carefully before operating your TV, and retain it for future reference
LED LCD TV OWNER' S MANUAL MODEL: LE50K6500UA LE55K6500UA LE65K6500UA Please READ this manual carefully before operating your TV, and retain it for future reference
User Manual -MG01-35
Page 2
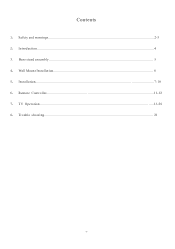
Base stand assembly ...5 4、 Wall Mount Installation...6 5、 Installation...7-10 6、 Remote Controller...11-12 7、 TV Operation...13-20 8、 Trouble shooting...21 -1- Contents 1、 Safety and warnings...2-3 2、 Introduction...4 3.
Base stand assembly ...5 4、 Wall Mount Installation...6 5、 Installation...7-10 6、 Remote Controller...11-12 7、 TV Operation...13-20 8、 Trouble shooting...21 -1- Contents 1、 Safety and warnings...2-3 2、 Introduction...4 3.
User Manual -MG01-35
Page 3
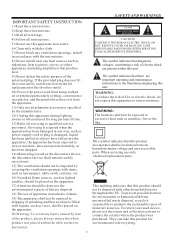
... RISK OF ELECTRIC SHOCK, DO NOT REMOVE COVER (OR BACK).NO USER SERVICEABLE PARTS INSIDE. REFER SERVICING TO QUALIFIED SERVICE PERSONNEL. WARNING: The batteries shall not be exposed to qualified service personnel. To prevent possible harm to ...plug is used device, please use of apparatus in the literaturaccompanying this product for replacement of the obsolete outlet. 10) Protect the power cord from the apparatus. 11) Only use only identical replacement parts. This marking indicates that dangerous voltages constituting a risk of time. 13) Refer all instructions. 5) Do not use...
... RISK OF ELECTRIC SHOCK, DO NOT REMOVE COVER (OR BACK).NO USER SERVICEABLE PARTS INSIDE. REFER SERVICING TO QUALIFIED SERVICE PERSONNEL. WARNING: The batteries shall not be exposed to qualified service personnel. To prevent possible harm to ...plug is used device, please use of apparatus in the literaturaccompanying this product for replacement of the obsolete outlet. 10) Protect the power cord from the apparatus. 11) Only use only identical replacement parts. This marking indicates that dangerous voltages constituting a risk of time. 13) Refer all instructions. 5) Do not use...
User Manual -MG01-35
Page 4
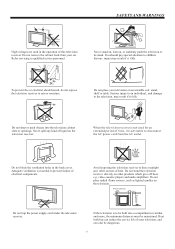
... holes in the operation of this television receiver. video cassette players and audio amplifiers. Do not stand the television receiver directly on the television. To prevent fire or electrical shock hazard, do not expose the television receiver to direct sunlight and other products which give off heat, e.g. SAFETY AND WARNINGS High voltages are used for an extended period of time, it falls. Never...
... holes in the operation of this television receiver. video cassette players and audio amplifiers. Do not stand the television receiver directly on the television. To prevent fire or electrical shock hazard, do not expose the television receiver to direct sunlight and other products which give off heat, e.g. SAFETY AND WARNINGS High voltages are used for an extended period of time, it falls. Never...
User Manual -MG01-35
Page 5
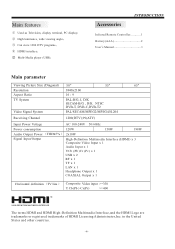
... Viewing Picture Size (Diagonal) 50" 55" 65" Resolution 3840x2160 Aspect Ratio 16 : 9 TV System PAL-B/G, I, D/K SECAM-B/G , D/K NTSC DVB-T, DVB-C,DVB-T2 Video Signal System PAL/SECAM/MPEG2/MPEG4/H.264 Receiving Channel 1200(DTV);99(ATV) Input Power Voltage AC 100-240V 50/60Hz Power consumption 120W 150W 198W Audio Output Power (THD 7%) 2x10W Signal Input/Output High-Definition Multimedia Interface (HDMI) x 3 Composite Video Input x 1 Audio Input x 1 YCb (Pb )Cr (P r) x 1 USB x 2 RF x 1 TF x 1 LAN x 1 Headphone Output...
... Viewing Picture Size (Diagonal) 50" 55" 65" Resolution 3840x2160 Aspect Ratio 16 : 9 TV System PAL-B/G, I, D/K SECAM-B/G , D/K NTSC DVB-T, DVB-C,DVB-T2 Video Signal System PAL/SECAM/MPEG2/MPEG4/H.264 Receiving Channel 1200(DTV);99(ATV) Input Power Voltage AC 100-240V 50/60Hz Power consumption 120W 150W 198W Audio Output Power (THD 7%) 2x10W Signal Input/Output High-Definition Multimedia Interface (HDMI) x 3 Composite Video Input x 1 Audio Input x 1 YCb (Pb )Cr (P r) x 1 USB x 2 RF x 1 TF x 1 LAN x 1 Headphone Output...

User Manual -MG01-35
Page 6
Lock screws below and check each screw is not a swivel stand. Use a cloth to rotate the TV. -5- M4X14MM Note: This stand is firmly tightened. Locate the 2PCS of bottom bracket into the gap in the bottom of the TV. 2. BASE STAND ASSEMBLY 1. Do not attempt to protect the display. Place the TV with the display side down on a flat surface.
Lock screws below and check each screw is not a swivel stand. Use a cloth to rotate the TV. -5- M4X14MM Note: This stand is firmly tightened. Locate the 2PCS of bottom bracket into the gap in the bottom of the TV. 2. BASE STAND ASSEMBLY 1. Do not attempt to protect the display. Place the TV with the display side down on a flat surface.

User Manual -MG01-35
Page 7
Warning: the angle between the TV and wall must not be bigger than 3º. Step Three: Put the LCD TV with wall mount screws onto the wall mount brackets. wall -6- WALL MOUNT INSTALLATION Step One: Use the expansion bolts(4*36PWA) to fix the wall mount brackets into the rear side of the LCD TV,using the tongue of 8kgf.cm. * The TV appearance subject to material object. wall Step Two: Fix the wall mount screws (M6x12mm/4pcs) into the wall.
Warning: the angle between the TV and wall must not be bigger than 3º. Step Three: Put the LCD TV with wall mount screws onto the wall mount brackets. wall -6- WALL MOUNT INSTALLATION Step One: Use the expansion bolts(4*36PWA) to fix the wall mount brackets into the rear side of the LCD TV,using the tongue of 8kgf.cm. * The TV appearance subject to material object. wall Step Two: Fix the wall mount screws (M6x12mm/4pcs) into the wall.

User Manual -MG01-35
Page 8
Left/Righ: VOL-/+ REAR AV Connections LAN HEADPHONE VGA PC AUDIO HDMI1 HDMI2(ARC) HDMI3 RF All the terminals are (from left to right): VIDEO,YPbPr, AUDIO INPUT, COAXIAL OUTPUT, TF, USB. VIDEO/Y Pb Pr L R COAXIAL TF USB USB All the terminals are (from left near the right side of signal indicator. Middle Button: press longtime for "source" function 2. Note: VIDEO and YPbPr share one audio channel. -7- Rocker Bottom 1. Up...
Left/Righ: VOL-/+ REAR AV Connections LAN HEADPHONE VGA PC AUDIO HDMI1 HDMI2(ARC) HDMI3 RF All the terminals are (from left to right): VIDEO,YPbPr, AUDIO INPUT, COAXIAL OUTPUT, TF, USB. VIDEO/Y Pb Pr L R COAXIAL TF USB USB All the terminals are (from left near the right side of signal indicator. Middle Button: press longtime for "source" function 2. Note: VIDEO and YPbPr share one audio channel. -7- Rocker Bottom 1. Up...

User Manual -MG01-35
Page 9
ANTENNA INSTALLATION Note: Aerial connections: IEC(female). LAN HEADPHONE VGA PC AUDIO HDMI1 HDMI2(ARC) HDMI3 RF -8- PC STEPS: Be sure both the TV and computer are Power off. 1.Connect VGA and audio cable 2.Connect power cord 3.Power on the TV, switch to PC mode 4.Power on the PC This sequence is very important. Input impendance: 75 unbalanced.
ANTENNA INSTALLATION Note: Aerial connections: IEC(female). LAN HEADPHONE VGA PC AUDIO HDMI1 HDMI2(ARC) HDMI3 RF -8- PC STEPS: Be sure both the TV and computer are Power off. 1.Connect VGA and audio cable 2.Connect power cord 3.Power on the TV, switch to PC mode 4.Power on the PC This sequence is very important. Input impendance: 75 unbalanced.
User Manual -MG01-35
Page 11
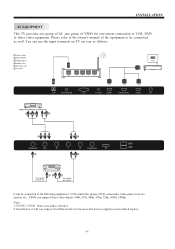
... to the owner's manual of the equipment to be connected to VCR, DVD or other video equipment. INSTALLATION AV EQUIPMENT This TV provides one group of AV ,one audio channel. 2.Sometimes it will not support in different device because the device supplys nonstandard signal. -10- Note: 1.VIDEO, YPbPr share one group of YPbPr for convenient connection to the following appliances: VCR, multi disc player, DVD, camcorder, video game or...
... to the owner's manual of the equipment to be connected to VCR, DVD or other video equipment. INSTALLATION AV EQUIPMENT This TV provides one group of AV ,one audio channel. 2.Sometimes it will not support in different device because the device supplys nonstandard signal. -10- Note: 1.VIDEO, YPbPr share one group of YPbPr for convenient connection to the following appliances: VCR, multi disc player, DVD, camcorder, video game or...
User Manual -MG01-35
Page 12
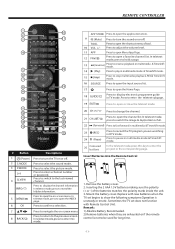
... play in TV mode. GUIDE Press to open the INDEX page. Press to display electronic programme guide in multimedia mode & Timeshift mode. Insert Batteries into the Remote Control 1. Replace with Remote Control Unit. In teletext mode, press to open the Home Page. Press to pause in DTV mode. Remove the battery cover. 2. Mount the battery cover. Press to revealthe hidden information. In teletext mode,press to enter a channel number or password...
... play in TV mode. GUIDE Press to open the INDEX page. Press to display electronic programme guide in multimedia mode & Timeshift mode. Insert Batteries into the Remote Control 1. Replace with Remote Control Unit. In teletext mode, press to open the Home Page. Press to pause in DTV mode. Remove the battery cover. 2. Mount the battery cover. Press to revealthe hidden information. In teletext mode,press to enter a channel number or password...
User Manual -MG01-35
Page 13
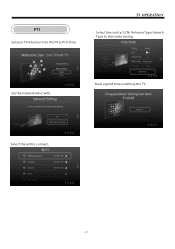
Have a good time watching the TV . TV OPERATION Select the contry/ LCN/ Antenna Type/ Search Type to connect. -12- Select the wifi to start auto tuning. Set the network(wire/wifi). FTI Set your TV when turn on the TV at first time.
Have a good time watching the TV . TV OPERATION Select the contry/ LCN/ Antenna Type/ Search Type to connect. -12- Select the wifi to start auto tuning. Set the network(wire/wifi). FTI Set your TV when turn on the TV at first time.
User Manual -MG01-35
Page 14
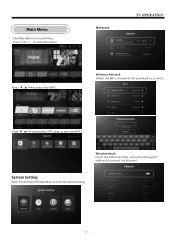
Press to select the APP Center to select the APPS. Press to select the APPS. System Setting Select the Setting in the Main Menu to connect the Ethernet. Main Menu The Main Menu UI are as follow. Wired network Insert the Ethernet cable ,and select Auto get IP address to enter the System Setting. -13- Press to connect. Network TV OPERATION Wireless Network Select the WIFI ,and press the passwork to select the menu.
Press to select the APP Center to select the APPS. Press to select the APPS. System Setting Select the Setting in the Main Menu to connect the Ethernet. Main Menu The Main Menu UI are as follow. Wired network Insert the Ethernet cable ,and select Auto get IP address to enter the System Setting. -13- Press to connect. Network TV OPERATION Wireless Network Select the WIFI ,and press the passwork to select the menu.

User Manual -MG01-35
Page 15
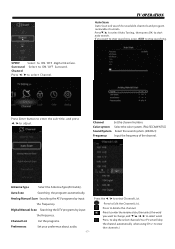
... time zone. Time Press the ◀/▶ to select the Time to set the general setting. -14- Select the Input method. Time Edit Edit the current time and date. General Press the◄ / ►to select the General and set . Auto Attach Get the current time and date automatically. 24 Hours Select the 12 hours or 24 hours. TV OPERATION Language Setting Input Method System Upgrade System Recovery Select current display...
... time zone. Time Press the ◀/▶ to select the Time to set the general setting. -14- Select the Input method. Time Edit Edit the current time and date. General Press the◄ / ►to select the General and set . Auto Attach Get the current time and date automatically. 24 Hours Select the 12 hours or 24 hours. TV OPERATION Language Setting Input Method System Upgrade System Recovery Select current display...

User Manual -MG01-35
Page 16
Audio Track Change the audio track. Region Language Select the language. Play Mode Select the play mode. Aspect Ratio Select 16:9/4:3. Media Multimedia Press the Input to select the Music. Music Press the ◄ / ► button to select Media source. Input Source Press INPUT button to enter input source Press the ▼ /▲button to select the Folder. Select Subtitle Select On/OFF the subtitle. Encoding Standard Select the encoding standard. Folder Press the ◄ / ► button to select. ( A va...
Audio Track Change the audio track. Region Language Select the language. Play Mode Select the play mode. Aspect Ratio Select 16:9/4:3. Media Multimedia Press the Input to select the Music. Music Press the ◄ / ► button to select Media source. Input Source Press INPUT button to enter input source Press the ▼ /▲button to select the Folder. Select Subtitle Select On/OFF the subtitle. Encoding Standard Select the encoding standard. Folder Press the ◄ / ► button to select. ( A va...
User Manual -MG01-35
Page 17
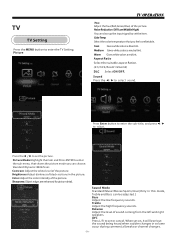
... Gives white colors a red tint. Select Back Adjust Sound Mode Standard/Music/Movie/Sports/User(Only in volume occur during commercial breaks or channel changes. -16- Aspect Ratio Select the suitable aspect Ration. (4:3/16:9/Zoom1/Zoom2) DLC Select ON/OFF. Contrast: Adjust the white level of the picture. TV TV Setting Press the MENU button to select sound. Picture TV OPERATION Hue Adjust the hue(Red,Green,Blue) of the picture. Cool Gives white colors a blue tint. Sound Press...
... Gives white colors a red tint. Select Back Adjust Sound Mode Standard/Music/Movie/Sports/User(Only in volume occur during commercial breaks or channel changes. -16- Aspect Ratio Select the suitable aspect Ration. (4:3/16:9/Zoom1/Zoom2) DLC Select ON/OFF. Contrast: Adjust the white level of the picture. TV TV Setting Press the MENU button to select sound. Picture TV OPERATION Hue Adjust the hue(Red,Green,Blue) of the picture. Cool Gives white colors a blue tint. Sound Press...
User Manual -MG01-35
Page 18
... ON/OFF Surround. Antenna Type Select the Antenna Type(Air/Cable). Channel List List the programs. Preferences Set your preference about audio. -17- Press the ◄/►to view the channels.) to select Channel List. Auto Scan Searching the programs automatically. Press to delete the channel. Color system Select the color system. (PAL/SECAM/NTSC) Sound System Select the sound system. (DK/BG/I) Frequency Input the frequency of the channel. TV OPERATION Auto Scan Auto Scan will skip the channel automatically when using CH+/- If you...
... ON/OFF Surround. Antenna Type Select the Antenna Type(Air/Cable). Channel List List the programs. Preferences Set your preference about audio. -17- Press the ◄/►to view the channels.) to select Channel List. Auto Scan Searching the programs automatically. Press to delete the channel. Color system Select the color system. (PAL/SECAM/NTSC) Sound System Select the sound system. (DK/BG/I) Frequency Input the frequency of the channel. TV OPERATION Auto Scan Auto Scan will skip the channel automatically when using CH+/- If you...
User Manual -MG01-35
Page 19
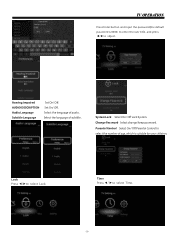
... input the password(the default password is suitable for your children. Select the language of age, which is 0000) to enter the sub-title, and press ◄/►to select Time. -18- System Lock Select On/ Off Lock System. Parental Control Select On/ Off Parental Control to select Lock. Hearing Impaired AUDIO DESCRIPTION Audio Language Subtitle Language Set On/ Off. Change Password Select change/keep password. Time Press ◄/►to sdjust. Lock Press ◄/►to select the number...
... input the password(the default password is suitable for your children. Select the language of age, which is 0000) to enter the sub-title, and press ◄/►to select Time. -18- System Lock Select On/ Off Lock System. Parental Control Select On/ Off Parental Control to select Lock. Hearing Impaired AUDIO DESCRIPTION Audio Language Subtitle Language Set On/ Off. Change Password Select change/keep password. Time Press ◄/►to sdjust. Lock Press ◄/►to select the number...
User Manual -MG01-35
Page 20
... program. TV OPERATION OSD Timer Select OSD Timer ,and◄/►to adjust. (Available: OFF, 5sec, 15sec, 30sec) Sleep Timer Select Sleep Timer ,and◄/►to select HDMI CEC Setup. HDMI CEC Setup Press ▼/▲to adjust. (Available:OFF, 15min, 30min, 45min, 60min, 90min, 120min, 240min). Setting Press ◄/►to blue or black when no input signal. Blue Screen Set the background color to select Setting. Teletext Set the Teletext. Reset Recall the default setting. Press Enter button...
... program. TV OPERATION OSD Timer Select OSD Timer ,and◄/►to adjust. (Available: OFF, 5sec, 15sec, 30sec) Sleep Timer Select Sleep Timer ,and◄/►to select HDMI CEC Setup. HDMI CEC Setup Press ▼/▲to adjust. (Available:OFF, 15min, 30min, 45min, 60min, 90min, 120min, 240min). Setting Press ◄/►to blue or black when no input signal. Blue Screen Set the background color to select Setting. Teletext Set the Teletext. Reset Recall the default setting. Press Enter button...
User Manual -MG01-35
Page 21
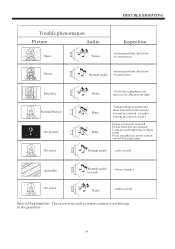
TROUBLE SHOOTING Trouble phenomenon Picture Audio Snow Noise Inspection antenna position, direction or connection Ghost antenna position, direction Normal audio or connection Interfere Normal Picture No picture No color Noise electronic equipment,car/ motorcycle,fluorescent light Mute Mute Volume(inspect wether the mute function on the remote control are started , or audio system are correct or not) Power cord is not inserted Power switch is not opened Contrast and brightness/volume setup Press standby key on...
TROUBLE SHOOTING Trouble phenomenon Picture Audio Snow Noise Inspection antenna position, direction or connection Ghost antenna position, direction Normal audio or connection Interfere Normal Picture No picture No color Noise electronic equipment,car/ motorcycle,fluorescent light Mute Mute Volume(inspect wether the mute function on the remote control are started , or audio system are correct or not) Power cord is not inserted Power switch is not opened Contrast and brightness/volume setup Press standby key on...


