User Manual
Page 2
... Function buttons and External Connections 6 Front panel of the TV set 6 Rear panel of the TV set 7 Using the remote control 8 The other video and audio equipment 9 Antenna connections 10 Cable TV connections 11 Connections the other equipment 12 Basic operation Setting the language and blue screen 13 Channel menu 14 Channel selection 16 Volume adjustment 17 Screen information 18 Video menu 19 Manual time setting 21 Setting the ON/OFF timer 22 Function menu 23 Closed caption 28 DTV setup menu 29 Other functions 34 Others Troubleshooting guide 36 Specifications 37 Warranty...
... Function buttons and External Connections 6 Front panel of the TV set 6 Rear panel of the TV set 7 Using the remote control 8 The other video and audio equipment 9 Antenna connections 10 Cable TV connections 11 Connections the other equipment 12 Basic operation Setting the language and blue screen 13 Channel menu 14 Channel selection 16 Volume adjustment 17 Screen information 18 Video menu 19 Manual time setting 21 Setting the ON/OFF timer 22 Function menu 23 Closed caption 28 DTV setup menu 29 Other functions 34 Others Troubleshooting guide 36 Specifications 37 Warranty...
User Manual
Page 3
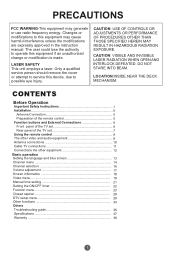
... NOT EXPOSE THIS APPLIANCE TO RAIN OR MOISTURE. Use of controls or adjustments or performance of the unit, and to protect it from the wall outlet before the unit is provided and/or the manufacturer`s instructions have been adhered to your home, consult your appliance dealer or local power company. When a cart is present inthis unit. VENTILATION...
... NOT EXPOSE THIS APPLIANCE TO RAIN OR MOISTURE. Use of controls or adjustments or performance of the unit, and to protect it from the wall outlet before the unit is provided and/or the manufacturer`s instructions have been adhered to your home, consult your appliance dealer or local power company. When a cart is present inthis unit. VENTILATION...
User Manual
Page 4
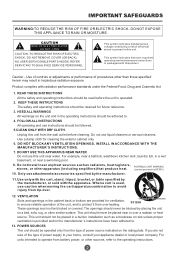
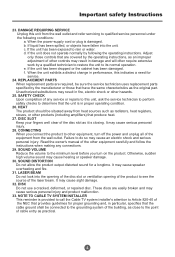
... as opening or removing covers may touch dangerous voltage points or short out parts that could result in this unit yourself as power-supply cord or plug is grounded to qualified service personnel. 3 POWER LINES An outside antenna system should be sure the antenna or cable system is damaged... in fire or electric shock. Refer all servicing to provide some protection against such power lines or circuits. A grounding type plug has two blades and a third grounding prong. When installing an outside antenna or cable system is connected to the unit, be taken to rain or...
... as opening or removing covers may touch dangerous voltage points or short out parts that could result in this unit yourself as power-supply cord or plug is grounded to qualified service personnel. 3 POWER LINES An outside antenna system should be sure the antenna or cable system is damaged... in fire or electric shock. Refer all servicing to provide some protection against such power lines or circuits. A grounding type plug has two blades and a third grounding prong. When installing an outside antenna or cable system is connected to the unit, be taken to rain or...
User Manual
Page 5
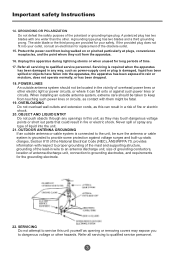
... a distinct change in damage and will often require extensive work by the operating instructions, as an improper adjustment of the disc slot as the original part. Unauthorized substitutions may result in performance, this indicates a need for service. 24. Failure to rain or water. When the power-supply cord or plug is provided to call the Cable TV system installer's attention to qualified service personnel under...
... a distinct change in damage and will often require extensive work by the operating instructions, as an improper adjustment of the disc slot as the original part. Unauthorized substitutions may result in performance, this indicates a need for service. 24. Failure to rain or water. When the power-supply cord or plug is provided to call the Cable TV system installer's attention to qualified service personnel under...

User Manual
Page 8
... Rear panel of the TV set HTR13/HTR20/HTF20 Component video input terminal Video output terminal Video input terminal HTF201 Y Cb Cr OUT IN VIDEO1 L R AUDIO1 Antenna input socket Audio right channel output terminal Audio left channel output terminal Audio right channel input terminal Audio left channel input terminal VIDEO Video input terminal L AUDIO R Audio left channel output terminal Audio right channel output terminal Component video input terminal Video output terminal Video input terminal Y Cb Cr OUT IN VIDEO1 L R AUDIO1 7 Antenna input socket Audio right channel...
... Rear panel of the TV set HTR13/HTR20/HTF20 Component video input terminal Video output terminal Video input terminal HTF201 Y Cb Cr OUT IN VIDEO1 L R AUDIO1 Antenna input socket Audio right channel output terminal Audio left channel output terminal Audio right channel input terminal Audio left channel input terminal VIDEO Video input terminal L AUDIO R Audio left channel output terminal Audio right channel output terminal Component video input terminal Video output terminal Video input terminal Y Cb Cr OUT IN VIDEO1 L R AUDIO1 7 Antenna input socket Audio right channel...
User Manual
Page 11
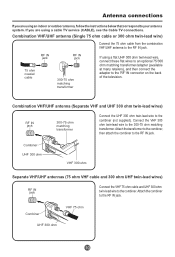
If you are using a cable TV service (CABLE), see the Cable TV connections. RF IN jack RF IN jack 75 ohm coaxial cable 300-75 ohm matching transformer If using a flat UHF 300 ohm twin-lead wire, connect these flat wires to an optional 75/300 ohm matching transformer/adapter (available at many retailers), and then connect the adapter to the 300-75 ohm matching...
If you are using a cable TV service (CABLE), see the Cable TV connections. RF IN jack RF IN jack 75 ohm coaxial cable 300-75 ohm matching transformer If using a flat UHF 300 ohm twin-lead wire, connect these flat wires to an optional 75/300 ohm matching transformer/adapter (available at many retailers), and then connect the adapter to the 300-75 ohm matching...
User Manual
Page 12
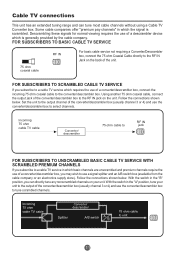
... box (usually channel 3 or 4) and use of a descrambler device which requires the use a signal splitter and an A/B switch box (available from the cable company or an electronics supply store). Set the unit to use of the converter/descrambler box to tune scrambled channels. FOR SUBSCRIBERS TO BASIC CABLE TV SERVICE 75 ohm coaxial cable RF IN jack For basic cable service not requiring a Converter/Descrambler box, connect the 75 ohm Coaxial Cable directly...
... box (usually channel 3 or 4) and use of a descrambler device which requires the use a signal splitter and an A/B switch box (available from the cable company or an electronics supply store). Set the unit to use of the converter/descrambler box to tune scrambled channels. FOR SUBSCRIBERS TO BASIC CABLE TV SERVICE 75 ohm coaxial cable RF IN jack For basic cable service not requiring a Converter/Descrambler box, connect the 75 ohm Coaxial Cable directly...
User Manual
Page 14
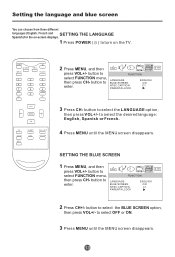
MUTE Q.VIEW INPUT INFO TV/DTV 1 2 3 4 5 6 7 8 9 SAP P.MODE 0 OK - VOL + CC GUIDE EXIT SLEEP ARC FAV.LIST CH.LIST 2 Press MENU, and then 0101 press VOL+/- button to select FUNCTION menu, FUNCTION then press CH- button to select FUNCTION menu, then press CH- button to select the LANGUAGE option, then press VOL+/- button to enter. SETTING THE BLUE SCREEN 1 Press MENU, and then 0101 press VOL+/- FUNCTION LANGUAGE BLUE SCREEN NTSC CAPTION PARENTAL LOCK ENGLISH ON C1 3 Press...
MUTE Q.VIEW INPUT INFO TV/DTV 1 2 3 4 5 6 7 8 9 SAP P.MODE 0 OK - VOL + CC GUIDE EXIT SLEEP ARC FAV.LIST CH.LIST 2 Press MENU, and then 0101 press VOL+/- button to select FUNCTION menu, FUNCTION then press CH- button to select FUNCTION menu, then press CH- button to select the LANGUAGE option, then press VOL+/- button to enter. SETTING THE BLUE SCREEN 1 Press MENU, and then 0101 press VOL+/- FUNCTION LANGUAGE BLUE SCREEN NTSC CAPTION PARENTAL LOCK ENGLISH ON C1 3 Press...
User Manual
Page 16
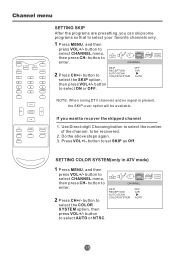
... some programs so that to recover the skipped channel 1. Use Direct-digit Choosing button to select the number of the channel to enter. VOL - Do the above steps again. 3. button to CHANNEL enter. 2 Press CH+/- button to select CHANNEL menu, then press CH- button to SKIP RECEPTION AUTO SCAN COLOR SYSTEM OFF AIR AUTO select the COLOR SYSTEM option, then press VOL+/- SETTING COLOR SYSTEM(only in ATV mode) 1 Press MENU, and then press VOL+/- button to select...
... some programs so that to recover the skipped channel 1. Use Direct-digit Choosing button to select the number of the channel to enter. VOL - Do the above steps again. 3. button to CHANNEL enter. 2 Press CH+/- button to select CHANNEL menu, then press CH- button to SKIP RECEPTION AUTO SCAN COLOR SYSTEM OFF AIR AUTO select the COLOR SYSTEM option, then press VOL+/- SETTING COLOR SYSTEM(only in ATV mode) 1 Press MENU, and then press VOL+/- button to select...
User Manual
Page 18
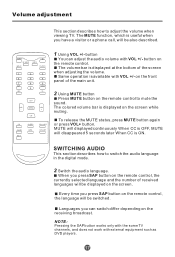
...+ button. button You can switch differ depending on the remote control to mute the sound. The colored volume bar is available with external equipment such as DVD players. 17 MUTE Q.VIEW INPUT INFO TV/DTV 1 2 3 4 5 6 7 8 9 SAP P.MODE 0 OK - Same operation is displayed on the remote control. MUTE will displayed continuously When CC is OFF, MUTE will be also described. Volume adjustment This section describes how to switch the audio language in the digital mode. 2 Switch the audio language...
...+ button. button You can switch differ depending on the remote control to mute the sound. The colored volume bar is available with external equipment such as DVD players. 17 MUTE Q.VIEW INPUT INFO TV/DTV 1 2 3 4 5 6 7 8 9 SAP P.MODE 0 OK - Same operation is displayed on the remote control. MUTE will displayed continuously When CC is OFF, MUTE will be also described. Volume adjustment This section describes how to switch the audio language in the digital mode. 2 Switch the audio language...
User Manual
Page 19
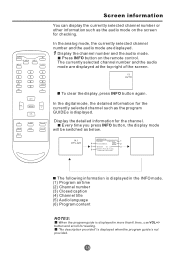
... SLEEP ARC FAV.LIST CH.LIST In the analog mode, the currently selected channel number and the audio mode are displayed at the top right of Lauis Armstrong A self-taught The following information is displayed in the INFO mode. (1) Program air time (2) Channel number (3) Closed caption (4) Channel title (5) Audio language (6) Program content NOTES: When the program guide is displayed in more than 6 lines, use VOL+/button and scroll for checking. The currently selected channel number and the audio mode are displayed. 1 Display the channel number and the audio mode...
... SLEEP ARC FAV.LIST CH.LIST In the analog mode, the currently selected channel number and the audio mode are displayed at the top right of Lauis Armstrong A self-taught The following information is displayed in the INFO mode. (1) Program air time (2) Channel number (3) Closed caption (4) Channel title (5) Audio language (6) Program content NOTES: When the program guide is displayed in more than 6 lines, use VOL+/button and scroll for checking. The currently selected channel number and the audio mode are displayed. 1 Display the channel number and the audio mode...

User Manual
Page 20
button to select the desired option, then press VOL+/- to select VIDEO Option, 0101 then press CH- Brightness This will adjust the light output of the picture. The main menu screen will mainly affect the darker areas of the complete picture, which will appear. 2 Press VOL+/- Video menu SETTING VIDEO MUTE Q.VIEW INPUT INFO TV/DTV 1 2 3 4 5 6 7 8 9 SAP P.MODE 0 OK - VIDEO CONTRAST 80 BRIGHTNESS 80 COLOR 50 SHARPNESS 50 TINT 0 3 Press CH+/- Tint...
button to select the desired option, then press VOL+/- to select VIDEO Option, 0101 then press CH- Brightness This will adjust the light output of the picture. The main menu screen will mainly affect the darker areas of the complete picture, which will appear. 2 Press VOL+/- Video menu SETTING VIDEO MUTE Q.VIEW INPUT INFO TV/DTV 1 2 3 4 5 6 7 8 9 SAP P.MODE 0 OK - VIDEO CONTRAST 80 BRIGHTNESS 80 COLOR 50 SHARPNESS 50 TINT 0 3 Press CH+/- Tint...

User Manual
Page 21
button to adjust. to enter. CC GUIDE EXIT SLEEP ARC FAV.LIST CH.LIST 20 Audio menu SETTING AUDIO 1 Press MENU button. button to select the desired option, then CH+ press VOL+/- to select AUDIO Option, 0101 MUTE Q.VIEW INPUT INFO TV/DTV then press CH- VOL - MENU CH- VOL + Volume This will appear. 2 Press VOL+/- VOLUME AUDIO 20 1 2 3 4 5 6 7 8 9 SAP P.MODE 0 OK - 3 Press CH+/- The main menu screen will adjust the sound output level.
button to adjust. to enter. CC GUIDE EXIT SLEEP ARC FAV.LIST CH.LIST 20 Audio menu SETTING AUDIO 1 Press MENU button. button to select the desired option, then CH+ press VOL+/- to select AUDIO Option, 0101 MUTE Q.VIEW INPUT INFO TV/DTV then press CH- VOL - MENU CH- VOL + Volume This will appear. 2 Press VOL+/- VOLUME AUDIO 20 1 2 3 4 5 6 7 8 9 SAP P.MODE 0 OK - 3 Press CH+/- The main menu screen will adjust the sound output level.

User Manual
Page 27
MUTE Q.VIEW INPUT INFO TV/DTV 1 2 3 4 5 6 7 8 9 SAP P.MODE 0 OK - When the program applied to TV-Y7) password. VOL + CC GUIDE EXIT SLEEP ARC FAV.LIST CH.LIST 2 press CH+/- sexual dialogue) (applies to TV-PG, TV-14, TV-MA) 26 Ratings for Television programs including made-for-TV movies : TV-Y (All children) TV-Y7 (Children 7 years older) TV-G (General audience) TV-PG (Parental guidance suggested...
MUTE Q.VIEW INPUT INFO TV/DTV 1 2 3 4 5 6 7 8 9 SAP P.MODE 0 OK - When the program applied to TV-Y7) password. VOL + CC GUIDE EXIT SLEEP ARC FAV.LIST CH.LIST 2 press CH+/- sexual dialogue) (applies to TV-PG, TV-14, TV-MA) 26 Ratings for Television programs including made-for-TV movies : TV-Y (All children) TV-Y7 (Children 7 years older) TV-G (General audience) TV-PG (Parental guidance suggested...

User Manual
Page 28
... VOL+ button to select delete or . 5 Press MENU until the MENU screen disappears. 27 button to select the desired rating. VOL + CC GUIDE EXIT SLEEP ARC FAV.LIST CH.LIST 2 Press CH+/- MPAA RATING MPAA-X MPAA-NC-17 MPAA-R MPAA-PG-13 MPAA-PG MPAA-G MPAA-NR ( : BLOCK) 4 Press VOL+/- Function menu TO SET THE MPAA RATING 1 Enter the PARENT CONTROL menu. MUTE Q.VIEW INPUT INFO TV/DTV 1 2 3 4 5 6 7 8 9 SAP P.MODE 0 OK...
... VOL+ button to select delete or . 5 Press MENU until the MENU screen disappears. 27 button to select the desired rating. VOL + CC GUIDE EXIT SLEEP ARC FAV.LIST CH.LIST 2 Press CH+/- MPAA RATING MPAA-X MPAA-NC-17 MPAA-R MPAA-PG-13 MPAA-PG MPAA-G MPAA-NR ( : BLOCK) 4 Press VOL+/- Function menu TO SET THE MPAA RATING 1 Enter the PARENT CONTROL menu. MUTE Q.VIEW INPUT INFO TV/DTV 1 2 3 4 5 6 7 8 9 SAP P.MODE 0 OK...
User Manual
Page 29
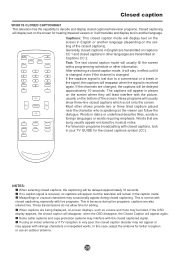
... Q.VIEW INPUT INFO TV/DTV 1 2 3 4 5 6 7 8 9 SAP P.MODE 0 OK - Some cable systems and copy protection systems may be delayed approximately 10 seconds. NOTES: When selecting closed caption will disappear, when the OSD disappear, the Closed Caption will display text on -screen displays, such as volume and mute may interfere with live programs, captions are transmitted on captions CC 1 and closed captions symbol (CC). In this case, adjust the antenna for editing. After selecting a closed captions...
... Q.VIEW INPUT INFO TV/DTV 1 2 3 4 5 6 7 8 9 SAP P.MODE 0 OK - Some cable systems and copy protection systems may be delayed approximately 10 seconds. NOTES: When selecting closed caption will disappear, when the OSD disappear, the Closed Caption will display text on -screen displays, such as volume and mute may interfere with live programs, captions are transmitted on captions CC 1 and closed captions symbol (CC). In this case, adjust the antenna for editing. After selecting a closed captions...
User Manual
Page 30
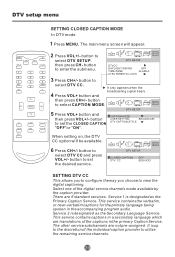
... SETUP. Select one of the individual caption provider to select DTV CC and press VOL+/- Service 2 is designated as the Secondary Language Service. button to select CAPTION MODE. button to view the digital captioning. There are not pre-assigned. This service contains captions in a secondary language which are translations of the captions in the accompanying program audio. VOL - VOL + CC GUIDE SLEEP ARC FAV.LIST CH.LIST 2 Press VOL+/- DTV SETUP CLOSED CAPTION DTV CC OFF SERVICE1 SETTING...
... SETUP. Select one of the individual caption provider to select DTV CC and press VOL+/- Service 2 is designated as the Secondary Language Service. button to select CAPTION MODE. button to view the digital captioning. There are not pre-assigned. This service contains captions in a secondary language which are translations of the captions in the accompanying program audio. VOL - VOL + CC GUIDE SLEEP ARC FAV.LIST CH.LIST 2 Press VOL+/- DTV SETUP CLOSED CAPTION DTV CC OFF SERVICE1 SETTING...

User Manual
Page 33
... the clock display for daylight saving time, based on the specially broadcasted signals. button to select DAYLIGHT SAVING, DTVCC DAYLIGHT SAVING OFF TIME ZONE ALASKA ATSC PARENTAL LOCK then press VOL+/- button to enter. button to select TIME ZONE option. 0101 DTV SETUP DTVCC DAYLIGHT SAVING OFF TIME ZONE ALASKA ATSC PARENTAL LOCK 4 Press VOL+/- The main menu screen will appear. 2 Press VOL+/- VOL + CC GUIDE EXIT SLEEP ARC FAV.LIST CH.LIST SETTING THE...
... the clock display for daylight saving time, based on the specially broadcasted signals. button to select DAYLIGHT SAVING, DTVCC DAYLIGHT SAVING OFF TIME ZONE ALASKA ATSC PARENTAL LOCK then press VOL+/- button to enter. button to select TIME ZONE option. 0101 DTV SETUP DTVCC DAYLIGHT SAVING OFF TIME ZONE ALASKA ATSC PARENTAL LOCK 4 Press VOL+/- The main menu screen will appear. 2 Press VOL+/- VOL + CC GUIDE EXIT SLEEP ARC FAV.LIST CH.LIST SETTING THE...

User Manual
Page 36
... time, press SLEEP button repeatedly to select the number of picture modes (i.e., "MILD","STANDARD","VIVID" , "CUSTOM", ) can simply press the Q.View button. 3 If you used last time. VOL - CC SLEEP TIMER SLEEP FAV.LIST GUIDE EXIT ARC CH.LIST To set the TV to the last watched program. PICTURE MODE Every time press the P.MODE button to OFF. CH- Four kinds of minutes. To cancel the sleep timer, Press SLEEP repeatedly until the display turns to switch desired picture quality mode. Other Functions QUICKLY VIEW...
... time, press SLEEP button repeatedly to select the number of picture modes (i.e., "MILD","STANDARD","VIVID" , "CUSTOM", ) can simply press the Q.View button. 3 If you used last time. VOL - CC SLEEP TIMER SLEEP FAV.LIST GUIDE EXIT ARC CH.LIST To set the TV to the last watched program. PICTURE MODE Every time press the P.MODE button to OFF. CH- Four kinds of minutes. To cancel the sleep timer, Press SLEEP repeatedly until the display turns to switch desired picture quality mode. Other Functions QUICKLY VIEW...

User Manual
Page 37
No color Adjust color control Normal volume Scramble Color Spot Adjust channel again Normal or Weak Volume Normal volume Color Purity is a fault that may produce the occasional "snapping sound" This is normal and caused by a qualified registered service person. When the power is connected to remove the back cover as vacuum cleaners near the TV screen or turning on overhead power cables. Note: 1.If the fault can be repaired by the...
No color Adjust color control Normal volume Scramble Color Spot Adjust channel again Normal or Weak Volume Normal volume Color Purity is a fault that may produce the occasional "snapping sound" This is normal and caused by a qualified registered service person. When the power is connected to remove the back cover as vacuum cleaners near the TV screen or turning on overhead power cables. Note: 1.If the fault can be repaired by the...


