
User Manual
Page 13
... Chapter 1 Getting Started 23 1.1 Getting to Know Your Touch Phone and Accessories 24 Left panel...24 Right panel...24 Front panel ...25 Back panel...26 Top panel...27 Bottom panel...27 Accessories...28 1.2 Installing the SIM Card, Battery, and Storage Card 28 SIM card...29 Battery...29 Storage card...31 1.3 Charging the battery 32 1.4 Using the Strap...
... Chapter 1 Getting Started 23 1.1 Getting to Know Your Touch Phone and Accessories 24 Left panel...24 Right panel...24 Front panel ...25 Back panel...26 Top panel...27 Bottom panel...27 Accessories...28 1.2 Installing the SIM Card, Battery, and Storage Card 28 SIM card...29 Battery...29 Storage card...31 1.3 Charging the battery 32 1.4 Using the Strap...
User Manual
Page 21
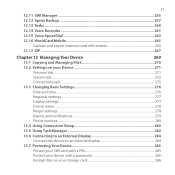
21 12.11 SIM Manager 255 12.12 Sprite Backup 257 12.13 Tasks...260 12.14 Voice Recorder 261 12.15 Voice Speed Dial 263 12.16 WorldCard Mobile 265 Capture and export business card information 266 12.17 ZIP...267 Chapter 13 Managing Your Device 269 13.1 Copying and Managing Files... Task Manager 282 13.6 Connecting to an External Display 284 Connect the device to an external display 284 13.7 Protecting Your Device 285 Protect your SIM card with a PIN 285 Protect your device with a password 285 Encrypt files on your storage...
21 12.11 SIM Manager 255 12.12 Sprite Backup 257 12.13 Tasks...260 12.14 Voice Recorder 261 12.15 Voice Speed Dial 263 12.16 WorldCard Mobile 265 Capture and export business card information 266 12.17 ZIP...267 Chapter 13 Managing Your Device 269 13.1 Copying and Managing Files... Task Manager 282 13.6 Connecting to an External Display 284 Connect the device to an external display 284 13.7 Protecting Your Device 285 Protect your SIM card with a PIN 285 Protect your device with a password 285 Encrypt files on your storage...
User Manual
Page 23
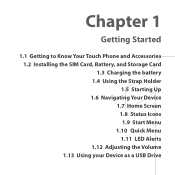
Chapter 1 Getting Started 1.1 Getting to Know Your Touch Phone and Accessories 1.2 Installing the SIM Card, Battery, and Storage Card 1.3 Charging the battery 1.4 Using the Strap Holder 1.5 Starting Up 1.6 Navigating Your Device 1.7 Home Screen 1.8 Status Icons 1.9 Start Menu 1.10 Quick Menu 1.11 LED Alerts 1.12 Adjusting the Volume 1.13 Using your Device as a USB Drive
Chapter 1 Getting Started 1.1 Getting to Know Your Touch Phone and Accessories 1.2 Installing the SIM Card, Battery, and Storage Card 1.3 Charging the battery 1.4 Using the Strap Holder 1.5 Starting Up 1.6 Navigating Your Device 1.7 Home Screen 1.8 Status Icons 1.9 Start Menu 1.10 Quick Menu 1.11 LED Alerts 1.12 Adjusting the Volume 1.13 Using your Device as a USB Drive

User Manual
Page 28
... with your thumb until it disengages from the device and then slide it up to remove the back cover before installing or replacing the SIM card, battery, and storage card. To remove the back cover 1. Push the back cover up with both hands and the front panel facing down. 3. 28 Getting Started Accessories... • USB sync cable • Pouch • Quick Start Guide and TouchFLO 3D Guide • Getting Started and Application discs • Extra stylus 1.2 Installing the SIM Card, Battery, and Storage Card Always turn off . 2.
... with your thumb until it disengages from the device and then slide it up to remove the back cover before installing or replacing the SIM card, battery, and storage card. To remove the back cover 1. Push the back cover up with both hands and the front panel facing down. 3. 28 Getting Started Accessories... • USB sync cable • Pouch • Quick Start Guide and TouchFLO 3D Guide • Getting Started and Application discs • Extra stylus 1.2 Installing the SIM Card, Battery, and Storage Card Always turn off . 2.
User Manual
Page 29
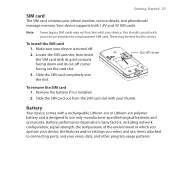
... both 1.8V and 3V SIM cards. Locate the SIM card slot, then insert the SIM card with your voice, data, and other program usage patterns. Slide the SIM card completely into the slot. Cut-off corner To remove the SIM card 1. Make sure your phone number, service details, and phonebook/ message memory. Getting Started 29 SIM card The SIM card contains your device is...
... both 1.8V and 3V SIM cards. Locate the SIM card slot, then insert the SIM card with your voice, data, and other program usage patterns. Slide the SIM card completely into the slot. Cut-off corner To remove the SIM card 1. Make sure your phone number, service details, and phonebook/ message memory. Getting Started 29 SIM card The SIM card contains your device is...
User Manual
Page 34
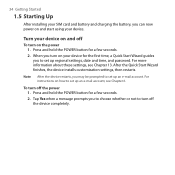
... off the device completely. To turn off the power 1. For more information about these settings, see Chapter 6. 34 Getting Started 1.5 Starting Up After installing your SIM card and battery and charging the battery, you can now power on how to set up an e-mail account, see Chapter 13. For instructions on and...
... off the device completely. To turn off the power 1. For more information about these settings, see Chapter 6. 34 Getting Started 1.5 Starting Up After installing your SIM card and battery and charging the battery, you can now power on how to set up an e-mail account, see Chapter 13. For instructions on and...

User Manual
Page 35
... Connection Setup. Note If you want to use Press and immediately release the POWER button to turn off in order to Sleep mode. If your SIM card supports multiple network operator profiles, a message will wake up your device is off the display temporarily and switch your device. Select the profile you do...
... Connection Setup. Note If you want to use Press and immediately release the POWER button to turn off in order to Sleep mode. If your SIM card supports multiple network operator profiles, a message will wake up your device is off the display temporarily and switch your device. Select the profile you do...
User Manual
Page 44
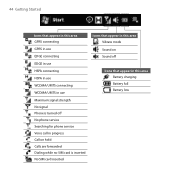
44 Getting Started Icons that appear in this area GPRS connecting GPRS in use EDGE connecting EDGE in use HSPA connecting HSPA in use WCDMA/UMTS connecting WCDMA/UMTS in use Maximum signal strength No signal Phone is turned off No phone service Searching for phone service Voice call in progress Call on hold Calls are forwarded Dialing while no SIM card is inserted No SIM card inserted Icons that appear in this area Vibrate mode Sound on Sound off Icons that appear in this area Battery charging Battery full Battery low
44 Getting Started Icons that appear in this area GPRS connecting GPRS in use EDGE connecting EDGE in use HSPA connecting HSPA in use WCDMA/UMTS connecting WCDMA/UMTS in use Maximum signal strength No signal Phone is turned off No phone service Searching for phone service Voice call in progress Call on hold Calls are forwarded Dialing while no SIM card is inserted No SIM card inserted Icons that appear in this area Vibrate mode Sound on Sound off Icons that appear in this area Battery charging Battery full Battery low

User Manual
Page 52
... wireless service provider. 2. The Phone screen To open the Phone screen, do one of calls and send messages. TALK/SEND button Enter your PIN Most SIM cards are preset with the PUK (PIN Unblocking Key) obtained from your wireless service provider. Enter the preset PIN assigned by your device to make, receive...;u�t�t�o�n�. Note If you can use your wireless service provider. 1. If this happens, you entered the wrong PIN three times, the SIM card will be blocked.
... wireless service provider. 2. The Phone screen To open the Phone screen, do one of calls and send messages. TALK/SEND button Enter your PIN Most SIM cards are preset with the PUK (PIN Unblocking Key) obtained from your wireless service provider. Enter the preset PIN assigned by your device to make, receive...;u�t�t�o�n�. Note If you can use your wireless service provider. 1. If this happens, you entered the wrong PIN three times, the SIM card will be blocked.

User Manual
Page 54
... mail and retrieve your wireless service provider for details. The plus (+) sign appears. To make an international call Enter the international emergency number for your SIM card. To make a call from the TouchFLO 3D Home screen Refer to Chapter 3 to learn how to either answer or ignore the incoming call from the...
... mail and retrieve your wireless service provider for details. The plus (+) sign appears. To make an international call Enter the international emergency number for your SIM card. To make a call from the TouchFLO 3D Home screen Refer to Chapter 3 to learn how to either answer or ignore the incoming call from the...

User Manual
Page 58
... example, if you assign a contact to dial the contact's number. Tap OK. Tap Menu > New. 3. Tips • To create a Speed Dial entry from Contacts or SIM card contacts, tap the contact, select the number you can tap and hold the desired entry, then tap Delete. Speed Dial Use Speed Dial to the...
... example, if you assign a contact to dial the contact's number. Tap OK. Tap Menu > New. 3. Tips • To create a Speed Dial entry from Contacts or SIM card contacts, tap the contact, select the number you can tap and hold the desired entry, then tap Delete. Speed Dial Use Speed Dial to the...

User Manual
Page 60
You need to use a 3G-enabled SIM card to reject the call . • From Contacts, tap and hold the desired contact, and tap Video Call. • From Call History, tap and hold the ...
You need to use a 3G-enabled SIM card to reject the call . • From Contacts, tap and hold the desired contact, and tap Video Call. • From Call History, tap and hold the ...
User Manual
Page 64
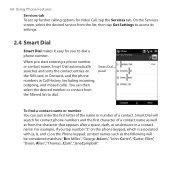
... Features Services tab To set up further calling options for you tap number "2" on the phone keypad, which is associated with [a, b, and c] on panel the SIM card, in Contacts, and the phone numbers in a contact name. When you start entering a phone number or contact name, Smart Dial automatically Smart Dial searches and...
... Features Services tab To set up further calling options for you tap number "2" on the phone keypad, which is associated with [a, b, and c] on panel the SIM card, in Contacts, and the phone numbers in a contact name. When you start entering a phone number or contact name, Smart Dial automatically Smart Dial searches and...
User Manual
Page 66
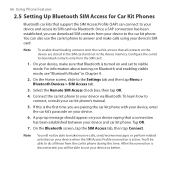
... your device via Bluetooth. Connect the car kit phone to answer and make calls using your device and access its SIM card via Bluetooth. On the Bluetooth screen, tap the SIM Access tab, then tap Connect. A pop-up message should appear on Bluetooth and enabling visible mode, see "Bluetooth... connect to visible mode. On your device, make /receive calls, send/receive messages or perform related activities on and set to your device's SIM card. Once a SAP connection has been established, you will not be able to use the car kit phone to your device, enter the car kit...
... your device via Bluetooth. Connect the car kit phone to answer and make calls using your device and access its SIM card via Bluetooth. On the Bluetooth screen, tap the SIM Access tab, then tap Connect. A pop-up message should appear on Bluetooth and enabling visible mode, see "Bluetooth... connect to visible mode. On your device, make /receive calls, send/receive messages or perform related activities on and set to your device's SIM card. Once a SAP connection has been established, you will not be able to use the car kit phone to your device, enter the car kit...

User Manual
Page 117
In the SMS \ MMS inbox, tap the message to open it . 2. At the bottom of the screen, type your reply message here To copy a message in the thread that you want to copy to the SIM card 1. Note You cannot copy a sent message from the thread to SIM. Enter your reply message and then tap Send. Use the Navigation Up or Down control to select a message in the thread to the SIM card. Tap Menu > Copy to the SIM card. 3. In the SMS \ MMS inbox, tap a message thread to a text message 1. Exchanging Messages 117 To reply to open it . 2.
In the SMS \ MMS inbox, tap the message to open it . 2. At the bottom of the screen, type your reply message here To copy a message in the thread that you want to copy to the SIM card 1. Note You cannot copy a sent message from the thread to SIM. Enter your reply message and then tap Send. Use the Navigation Up or Down control to select a message in the thread to the SIM card. Tap Menu > Copy to the SIM card. 3. In the SMS \ MMS inbox, tap a message thread to a text message 1. Exchanging Messages 117 To reply to open it . 2.

User Manual
Page 118
... Copy to the device 1. 118 Exchanging Messages To copy a text message from the SIM card to Phone. To delete a message in a thread 1. Tap Menu > Delete. ... the SMS \ MMS inbox, select a message thread using an MMS message. 1. Tap Send. To reply to a SIM text message using the Navigation Up or Down control. 2. Tip Tap Menu > Advanced Composer after adding a picture/video,... You can also insert a vCard or vCalendar in your SIM card is in a thread or to a text message with text, emoticons, media and attachments. 3. Note Copying SIM text messages to open it . 2. In the SMS ...
... Copy to the device 1. 118 Exchanging Messages To copy a text message from the SIM card to Phone. To delete a message in a thread 1. Tap Menu > Delete. ... the SMS \ MMS inbox, select a message thread using an MMS message. 1. Tap Send. To reply to a SIM text message using the Navigation Up or Down control. 2. Tip Tap Menu > Advanced Composer after adding a picture/video,... You can also insert a vCard or vCalendar in your SIM card is in a thread or to a text message with text, emoticons, media and attachments. 3. Note Copying SIM text messages to open it . 2. In the SMS ...

User Manual
Page 172
... a GPRS/3G or phone dial-up with the contact only through Windows Live™ Messenger or Live Mail. 4. Notes • Make sure your device has a SIM card installed, and your device's data connection (GPRS or EDGE, for instance). This is not necessary if you will communicate with a data connection yet, tap Menu...
... a GPRS/3G or phone dial-up with the contact only through Windows Live™ Messenger or Live Mail. 4. Notes • Make sure your device has a SIM card installed, and your device's data connection (GPRS or EDGE, for instance). This is not necessary if you will communicate with a data connection yet, tap Menu...

User Manual
Page 235
You can also use this program to copy SIM contents to a specified folder, a storage card, or a computer. Voice Speed Dial Record voice tags ...details. You can dial a phone number or launch programs by speaking a word. Programs 235 Icon Description SIM Manager Manage the contacts that are stored on your Contacts list. Sprite Backup Back up storage space on ...'s data and files to Contacts on your Live Mail messages and send/receive instant messages in your SIM card. Voice Recorder Record your device. See Chapter 8 for details. YouTube™ Search for uploaded videos...
You can also use this program to copy SIM contents to a specified folder, a storage card, or a computer. Voice Speed Dial Record voice tags ...details. You can dial a phone number or launch programs by speaking a word. Programs 235 Icon Description SIM Manager Manage the contacts that are stored on your Contacts list. Sprite Backup Back up storage space on ...'s data and files to Contacts on your Live Mail messages and send/receive instant messages in your SIM card. Voice Recorder Record your device. See Chapter 8 for details. YouTube™ Search for uploaded videos...

User Manual
Page 242
...: • Outlook contacts. See "Add Windows Live contacts" in Chapter 8 for details. Contacts that are stored on your device, which can be created on the SIM card. You can only add Windows Live™ contacts after you communicate with using Windows Live™ Messenger or MSN. To open the Contacts screen Do... Programs 12.5 Contacts Contacts is your address book and information storage for people and businesses you communicate with your PC or the Exchange Server. • SIM contacts.
...: • Outlook contacts. See "Add Windows Live contacts" in Chapter 8 for details. Contacts that are stored on your device, which can be created on the SIM card. You can only add Windows Live™ contacts after you communicate with using Windows Live™ Messenger or MSN. To open the Contacts screen Do... Programs 12.5 Contacts Contacts is your address book and information storage for people and businesses you communicate with your PC or the Exchange Server. • SIM contacts.
User Manual
Page 243
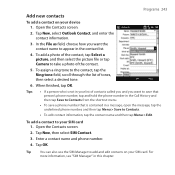
... field, scroll through the list of tones, then select a desired tone. 6. Open the Contacts screen. 2. To assign a ring tone to your SIM card. Tap New, then select SIM Contact. 3. Tap New, select Outlook Contact, and enter the contact information. 3. Open the Contacts screen. 2. For more information, see...tap Menu > Save to appear in the contact list. 4. When finished, tap OK. Programs 243 Add new contacts To add a contact on your SIM card 1. Tap OK. In the File as field, choose how you want the contact name to Contacts. • To edit contact information, tap the ...
... field, scroll through the list of tones, then select a desired tone. 6. Open the Contacts screen. 2. To assign a ring tone to your SIM card. Tap New, then select SIM Contact. 3. Tap New, select Outlook Contact, and enter the contact information. 3. Open the Contacts screen. 2. For more information, see...tap Menu > Save to appear in the contact list. 4. When finished, tap OK. Programs 243 Add new contacts To add a contact on your SIM card 1. Tap OK. In the File as field, choose how you want the contact name to Contacts. • To edit contact information, tap the ...


