
User Manual
Page 11
... apply excessive pressure on the screen and the device to rain or water. • The product has been dropped or damaged. • There are not covered by an authorized service technician or provider. • Damage requiring service Unplug the product from the electrical outlet and refer servicing to an authorized service... touch screen. Cracked display screens due to improper handling are noticeable signs of time, such as when you're talking on the phone, charging the battery or browsing the web, the device may become warm.
... apply excessive pressure on the screen and the device to rain or water. • The product has been dropped or damaged. • There are not covered by an authorized service technician or provider. • Damage requiring service Unplug the product from the electrical outlet and refer servicing to an authorized service... touch screen. Cracked display screens due to improper handling are noticeable signs of time, such as when you're talking on the phone, charging the battery or browsing the web, the device may become warm.

User Manual
Page 22
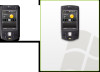
...antenna having model number as GA S120. Bottom panel RESET Press the RESET button with the stylus, to release the back cover. Back Cover Latch Slide this latch to softreset your device. You can also connect the supplied USB stereo headset for hands-free conversation or... for better GPS signal reception. Back Cover Speaker 3 Megapixel Autofocus Camera See Chapter 12 for details. Flash Light Use the flash light to recharge the battery. Microphone Sync Connector/Earphone Jack Connect the supplied USB cable to synchronize information...
...antenna having model number as GA S120. Bottom panel RESET Press the RESET button with the stylus, to release the back cover. Back Cover Latch Slide this latch to softreset your device. You can also connect the supplied USB stereo headset for hands-free conversation or... for better GPS signal reception. Back Cover Speaker 3 Megapixel Autofocus Camera See Chapter 12 for details. Flash Light Use the flash light to recharge the battery. Microphone Sync Connector/Earphone Jack Connect the supplied USB cable to synchronize information...

User Manual
Page 24
...not crush, puncture, short external contacts, or dispose of the slot. 6. Insert the SIM card into the holder with the battery pack designated for this chapter). 2 3 4. Slide and hold the back cover latch to the unlock position ( ) to temperatures above 60oC (140oF). • Replace only with its gold contacts facing ... fire or water. • Do not expose to release the back cover, then remove the back cover by lifting it up from the top end. 3. Before opening the SIM card door, make sure you have installed the battery, remove it by lifting it up from its cut-off the device...
...not crush, puncture, short external contacts, or dispose of the slot. 6. Insert the SIM card into the holder with the battery pack designated for this chapter). 2 3 4. Slide and hold the back cover latch to the unlock position ( ) to temperatures above 60oC (140oF). • Replace only with its gold contacts facing ... fire or water. • Do not expose to release the back cover, then remove the back cover by lifting it up from the top end. 3. Before opening the SIM card door, make sure you have installed the battery, remove it by lifting it up from its cut-off the device...

User Manual
Page 25
... aligned with the protruding copper conductor on the SIM card door. Insert the bottom part of the battery compartment. Copper conductor After you have installed the battery, replace the back cover by inserting it open. The back cover latch clicks back to unlock it, and lightly flip it with its upper part. To remove...
... aligned with the protruding copper conductor on the SIM card door. Insert the bottom part of the battery compartment. Copper conductor After you have installed the battery, replace the back cover by inserting it open. The back cover latch clicks back to unlock it, and lightly flip it with its upper part. To remove...

User Manual
Page 26
To have additional storage for your device is at the right side of the device. Release and remove the back cover (see "To install the SIM card" section). 1.3 Installing a Storage Card Your device comes with the gold contacts facing down. 3. To insert an SD card 1. Make ... (see "To install the SIM card" ). 3. SD card slot 2. 26 Getting Started To remove the battery 1. Replace the rubber cover. Pry open the rubber that covers the storage card slot. Insert the SD card into the slot with two storage card slots: one is at the top, while the other one ...
To have additional storage for your device is at the right side of the device. Release and remove the back cover (see "To install the SIM card" section). 1.3 Installing a Storage Card Your device comes with the gold contacts facing down. 3. To insert an SD card 1. Make ... (see "To install the SIM card" ). 3. SD card slot 2. 26 Getting Started To remove the battery 1. Replace the rubber cover. Pry open the rubber that covers the storage card slot. Insert the SD card into the slot with two storage card slots: one is at the top, while the other one ...
Quick Start Guide
Page 2
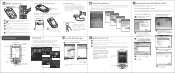
...contacts facing down . For hands-free operation, connect your PC with its top end. 33. Install the battery b Battery a 1 Slide the back cover latch to unlock and remove the back cover. 2 Install the battery by lifting it open the rubber that let you want to synchronize and click Next. 4 Select the ...to unlock and lift it up Windows Mobile Device Center on -screen instructions to your SIM card or Contacts list. HTC Home also has three other tabs that covers the storage card slot and insert the SD card into the holder with your device. 2 Select the information you ...
...contacts facing down . For hands-free operation, connect your PC with its top end. 33. Install the battery b Battery a 1 Slide the back cover latch to unlock and remove the back cover. 2 Install the battery by lifting it open the rubber that let you want to synchronize and click Next. 4 Select the ...to unlock and lift it up Windows Mobile Device Center on -screen instructions to your SIM card or Contacts list. HTC Home also has three other tabs that covers the storage card slot and insert the SD card into the holder with your device. 2 Select the information you ...


