
User Manual
Page 12
12 • Avoid pushing objects into product Never push objects of the product should follow the manufacturer's instructions, and should be blocked or covered. • Mounting accessories Do not use a mounting accessory recommended by the manufacturer. • Avoid unstable mounting Do not place the product with an unstable base. &#...
12 • Avoid pushing objects into product Never push objects of the product should follow the manufacturer's instructions, and should be blocked or covered. • Mounting accessories Do not use a mounting accessory recommended by the manufacturer. • Avoid unstable mounting Do not place the product with an unstable base. &#...

User Manual
Page 20
...plug in the AC adapter to remove it. 20 Getting Started Back panel GPS Antenna Connector Push the self-portrait mirror from inside the back cover, then connect an external GPS antenna for details. Macro Mode Switch See Chapter 12 for details. 2 Megapixel Camera See Chapter 12 for better... GPS signal reception. Self-portrait Mirror Back Cover Push the back cover upward to recharge the battery. Note Use only the external GPS antenna with model number GA S100. You can also connect the supplied ...
...plug in the AC adapter to remove it. 20 Getting Started Back panel GPS Antenna Connector Push the self-portrait mirror from inside the back cover, then connect an external GPS antenna for details. Macro Mode Switch See Chapter 12 for details. 2 Megapixel Camera See Chapter 12 for better... GPS signal reception. Self-portrait Mirror Back Cover Push the back cover upward to recharge the battery. Note Use only the external GPS antenna with model number GA S100. You can also connect the supplied ...

User Manual
Page 22
To remove the back cover 1. Hold the device firmly with your service provider for this service. You should consult with both... it down until it disengages from the device, then slide it clicks into the slot. Push the back cover up to remove the back cover before installing or replacing the SIM card, storage card, and battery. Cut-off your device. Note To ...replace the back cover, align its cut-off . 2. Note Some legacy SIM cards may be fees for a replacement SIM card. ...
To remove the back cover 1. Hold the device firmly with your service provider for this service. You should consult with both... it down until it disengages from the device, then slide it clicks into the slot. Push the back cover up to remove the back cover before installing or replacing the SIM card, storage card, and battery. Cut-off your device. Note To ...replace the back cover, align its cut-off . 2. Note Some legacy SIM cards may be fees for a replacement SIM card. ...

User Manual
Page 24
... crush, puncture, short external contacts, or dispose of used battery as stipulated by local regulations. Gently push the battery into place, then replace the back cover. Note Battery life is designed to connecting ports, and your voice, data, and other program usage patterns. To install the battery 1. Battery performance depends on...
... crush, puncture, short external contacts, or dispose of used battery as stipulated by local regulations. Gently push the battery into place, then replace the back cover. Note Battery life is designed to connecting ports, and your voice, data, and other program usage patterns. To install the battery 1. Battery performance depends on...

User Manual
Page 25
... the AC adapter and USB sync cable provided with your device must be used to the USB port of the Today screen. Remove the back cover. 3. Getting Started 25 Groove Charge the battery New batteries are charging it is turned off. 2. To charge the battery 1. Plug in the title bar of...
... the AC adapter and USB sync cable provided with your device must be used to the USB port of the Today screen. Remove the back cover. 3. Getting Started 25 Groove Charge the battery New batteries are charging it is turned off. 2. To charge the battery 1. Plug in the title bar of...

User Manual
Page 202
... reset Occasionally, you perform a hard reset. Only Windows Mobile® software and other pre-installed programs will be useful when your device. Remove the back cover. 2. After a hard reset, the device is not performing properly. Warning! Your device restarts and displays the Today screen. The list will remain. Choose whether to...
... reset Occasionally, you perform a hard reset. Only Windows Mobile® software and other pre-installed programs will be useful when your device. Remove the back cover. 2. After a hard reset, the device is not performing properly. Warning! Your device restarts and displays the Today screen. The list will remain. Choose whether to...

User Manual
Page 203
Remove the back cover. 2. Clear Storage Another way of clearing the device storage and reset all settings back to factory default settings is or was enabled before, then backup ...
Remove the back cover. 2. Clear Storage Another way of clearing the device storage and reset all settings back to factory default settings is or was enabled before, then backup ...

User Manual
Page 226
... PHAR160. European Union Notice Products with CE marking comply with your product is intended for mobile stations in the GSM 900 and GSM 1800 bands, covering essential requirements of article 3.2 of the European Community. Part 1: Common technical requirements. Wideband Transmission systems; To ensure continued reliable and safe operation of your device...
... PHAR160. European Union Notice Products with CE marking comply with your product is intended for mobile stations in the GSM 900 and GSM 1800 bands, covering essential requirements of article 3.2 of the European Community. Part 1: Common technical requirements. Wideband Transmission systems; To ensure continued reliable and safe operation of your device...

User Manual
Page 235
download 119 Audio Manager 42, 193 B Backlight 73 Back cover - save battery power 206 Beam - Bluetooth shared folder 160 - controls 172 - file formats 172 - icons 172 - normal mode 170 - overview 42 battery information 22 - ...
download 119 Audio Manager 42, 193 B Backlight 73 Back cover - save battery power 206 Beam - Bluetooth shared folder 160 - controls 172 - file formats 172 - icons 172 - normal mode 170 - overview 42 battery information 22 - ...
Quick Start Guide
Page 2
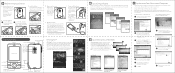
... you up menus, and allow wireless connections while your device is fully charged after you purchased the device. Battery connectors Align the back cover tabs with the battery connectors inside the battery compartment. The battery is connected to the computer. 6 Click Finish. 1 Connect your computer...for your computer. The PDA Phone Earpiece Touch Screen Speaker Macro Mode Switch 2 Megapixel Camera Self-portrait Mirror VOLUME UP/DOWN POWER HTC Home™ HTC Home™ is a Today screen plug-in your device, connect the AC adapter* to your device using the USB sync ...
... you up menus, and allow wireless connections while your device is fully charged after you purchased the device. Battery connectors Align the back cover tabs with the battery connectors inside the battery compartment. The battery is connected to the computer. 6 Click Finish. 1 Connect your computer...for your computer. The PDA Phone Earpiece Touch Screen Speaker Macro Mode Switch 2 Megapixel Camera Self-portrait Mirror VOLUME UP/DOWN POWER HTC Home™ HTC Home™ is a Today screen plug-in your device, connect the AC adapter* to your device using the USB sync ...


