
Getting Started Guide
Page 1
Sprint Power VisionSM Smart Device Mogul™ by HTC Getting Started Guide www.sprint.com © 2007 Sprint Nextel. SPRINT and other trademarks are trademarks of Sprint Nextel. All rights reserved. Printed in the U.S.A.
Sprint Power VisionSM Smart Device Mogul™ by HTC Getting Started Guide www.sprint.com © 2007 Sprint Nextel. SPRINT and other trademarks are trademarks of Sprint Nextel. All rights reserved. Printed in the U.S.A.

Getting Started Guide
Page 2
YOUR WARRANTY IS INVALIDATED IF YOU OPEN OR TAMPER WITH THE DEVICE'S OUTER CASING. Always obey the relevant laws and regulations of your country when using the recording feature of Microsoft Corporation in the United States and other countries. Microsoft, MS-DOS, Windows, Windows NT, Windows Server, Windows Mobile, Windows XP, Windows Vista, ActiveSync, Windows Mobile Device Center, Internet Explorer, Windows Live, MSN, Hotmail, Outlook, Excel, PowerPoint, Word, and Windows Media are trademarks and/or service marks of Macromedia Netherlands, B.V. Copyright © 2007, JATAAYU ...
YOUR WARRANTY IS INVALIDATED IF YOU OPEN OR TAMPER WITH THE DEVICE'S OUTER CASING. Always obey the relevant laws and regulations of your country when using the recording feature of Microsoft Corporation in the United States and other countries. Microsoft, MS-DOS, Windows, Windows NT, Windows Server, Windows Mobile, Windows XP, Windows Vista, ActiveSync, Windows Mobile Device Center, Internet Explorer, Windows Live, MSN, Hotmail, Outlook, Excel, PowerPoint, Word, and Windows Media are trademarks and/or service marks of Macromedia Netherlands, B.V. Copyright © 2007, JATAAYU ...

Getting Started Guide
Page 3
The information is provided "as is subject to revise the content of HTC. HTC also reserves the right to change without prior written permission of this document may be liable for technical or editorial errors or omissions contained herein... incidental or consequential damages resulting from furnishing this material. No part of this document at any kind and is " without warranty of their respective owners. HTC shall not be reproduced or transmitted in any form without notice. Licensed by any means, electronic or mechanical, including photocopying, recording or storing in a ...
The information is provided "as is subject to revise the content of HTC. HTC also reserves the right to change without prior written permission of this document may be liable for technical or editorial errors or omissions contained herein... incidental or consequential damages resulting from furnishing this material. No part of this document at any kind and is " without warranty of their respective owners. HTC shall not be reproduced or transmitted in any form without notice. Licensed by any means, electronic or mechanical, including photocopying, recording or storing in a ...

Getting Started Guide
Page 4
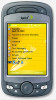
Table of Contents Section 1 Getting Started 1 1.1 Setting Up Service 2 1.2 Your Device 6 1.3 Battery Information 12 1.4 Starting Up 15 1.5 The Today Screen 17 1.6 Programs 21 Section 2 Entering Information 23 2.1 Using the Hardware Keyboard 24 2.2 Entering Information 26 2.3 Using the Onscreen Keyboard 27 2.4 Using Symbol Pad 27 Section 3 Using Phone Features 29 3.1 Using the Phone 30 3.2 Making a Call 32 3.3 Receiving a Call 34 3.4 In-Call Options 34 3.5 Phone Settings 36 Section 4 Setting Up Your Device 37 4.1 Personalizing Your Device 38 4.2 Resetting Your Device 39
Table of Contents Section 1 Getting Started 1 1.1 Setting Up Service 2 1.2 Your Device 6 1.3 Battery Information 12 1.4 Starting Up 15 1.5 The Today Screen 17 1.6 Programs 21 Section 2 Entering Information 23 2.1 Using the Hardware Keyboard 24 2.2 Entering Information 26 2.3 Using the Onscreen Keyboard 27 2.4 Using Symbol Pad 27 Section 3 Using Phone Features 29 3.1 Using the Phone 30 3.2 Making a Call 32 3.3 Receiving a Call 34 3.4 In-Call Options 34 3.5 Phone Settings 36 Section 4 Setting Up Your Device 37 4.1 Personalizing Your Device 38 4.2 Resetting Your Device 39

Getting Started Guide
Page 5
Section 5 Synchronizing Information With Your Computer........41 5.1 Setting Up ActiveSync on Windows XP 42 5.2 Setting Up Windows Mobile Device Center on Windows Vista 43 5.3 Synchronizing With Your Computer 45 Section 6 Organizing Contacts, Appointments, Tasks, and Other Information 47 6.1 Contacts 48 6.2 Calendar 50 6.3 Tasks 52 6.4 Notes 54 Section 7 Exchanging Messages 57 7.1 Messaging 58 7.2 Text Messages 59 7.3 Setting Up Email Accounts 60 7.4 Using Email 61 Section 8 Working With Company Email and Meeting Appointments 65 8.1 Synchronizing Your Device with the Exchange ...
Section 5 Synchronizing Information With Your Computer........41 5.1 Setting Up ActiveSync on Windows XP 42 5.2 Setting Up Windows Mobile Device Center on Windows Vista 43 5.3 Synchronizing With Your Computer 45 Section 6 Organizing Contacts, Appointments, Tasks, and Other Information 47 6.1 Contacts 48 6.2 Calendar 50 6.3 Tasks 52 6.4 Notes 54 Section 7 Exchanging Messages 57 7.1 Messaging 58 7.2 Text Messages 59 7.3 Setting Up Email Accounts 60 7.4 Using Email 61 Section 8 Working With Company Email and Meeting Appointments 65 8.1 Synchronizing Your Device with the Exchange ...

Getting Started Guide
Page 6
Section 9 Getting Connected 71 9.1 Comm Manager 72 9.2 Internet Explorer Mobile 73 9.3 Using Bluetooth 74 9.4 Using Wi-Fi 78 Section 10 Experiencing Multimedia 81 10.1 Using the Built-in Camera 82 10.2 Using Pictures & Videos 89 10.3 Using Windows Media Player 92 Section 11 Using Other Applications 99 11.1 Microsoft® Office Word Mobile 100 11.2 Microsoft® Office Excel® Mobile 101 11.3 Microsoft® Office PowerPoint Mobile 102 11.4 Adobe Reader LE 103 11.5 Windows Live 104 11.6 Using Voice Speed Dial 108 Appendix A.1 Regulatory Notices 112 ...
Section 9 Getting Connected 71 9.1 Comm Manager 72 9.2 Internet Explorer Mobile 73 9.3 Using Bluetooth 74 9.4 Using Wi-Fi 78 Section 10 Experiencing Multimedia 81 10.1 Using the Built-in Camera 82 10.2 Using Pictures & Videos 89 10.3 Using Windows Media Player 92 Section 11 Using Other Applications 99 11.1 Microsoft® Office Word Mobile 100 11.2 Microsoft® Office Excel® Mobile 101 11.3 Microsoft® Office PowerPoint Mobile 102 11.4 Adobe Reader LE 103 11.5 Windows Live 104 11.6 Using Voice Speed Dial 108 Appendix A.1 Regulatory Notices 112 ...
Getting Started Guide
Page 7
Section 1 Getting Started In This Section 1.1 Setting Up Service 1.2 Your Device 1.3 Battery Information 1.4 Starting Up 1.5 The Today Screen 1.6 Programs
Section 1 Getting Started In This Section 1.1 Setting Up Service 1.2 Your Device 1.3 Battery Information 1.4 Starting Up 1.5 The Today Screen 1.6 Programs
Getting Started Guide
Page 8
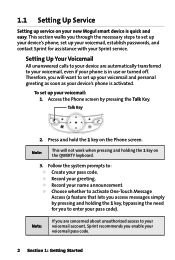
To set up service on your new Mogul smart device is quick and easy. Setting Up Your Voicemail All unanswered calls to your device are concerned about unauthorized access to set up your ...
To set up service on your new Mogul smart device is quick and easy. Setting Up Your Voicemail All unanswered calls to your device are concerned about unauthorized access to set up your ...
Getting Started Guide
Page 9
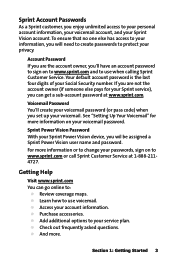
Your default account password is the last four digits of your voicemail password. See "Setting Up Your Voicemail" for your Sprint service), you can go online to your account information. Getting Help Visit www.sprint.com You can get a sub-account password at 1-888-2114727. Add additional options to : Review coverage maps. Account Password If you are not the account owner (if someone else pays for more . Sprint Power Vision Password With your Sprint Power Vision device, you set up your voicemail. For more information or to change your passwords, sign on your Social Security ...
Your default account password is the last four digits of your voicemail password. See "Setting Up Your Voicemail" for your Sprint service), you can go online to your account information. Getting Help Visit www.sprint.com You can get a sub-account password at 1-888-2114727. Add additional options to : Review coverage maps. Account Password If you are not the account owner (if someone else pays for more . Sprint Power Vision Password With your Sprint Power Vision device, you set up your voicemail. For more information or to change your passwords, sign on your Social Security ...

Getting Started Guide
Page 10
Write to us online at Sprint Customer Service, P.O. movie listings; For more information or to your account at 1-888-211-4727 (Consumer customers) or 1-888-788-4727 (Business customers). There is a per-call Sprint 411: From the Phone screen, dial . To access Sprint Operator Services: From the Phone screen, dial . Box 8077, London, KY 40742. To call charge and you will be billed for airtime. Sign on to see the latest in products and services, visit us at www.sprint.com. 4 Section 1: Getting Started Sprint Operator Services Sprint Operator...
Write to us online at Sprint Customer Service, P.O. movie listings; For more information or to your account at 1-888-211-4727 (Consumer customers) or 1-888-788-4727 (Business customers). There is a per-call Sprint 411: From the Phone screen, dial . To access Sprint Operator Services: From the Phone screen, dial . Box 8077, London, KY 40742. To call charge and you will be billed for airtime. Sign on to see the latest in products and services, visit us at www.sprint.com. 4 Section 1: Getting Started Sprint Operator Services Sprint Operator...
Getting Started Guide
Page 11
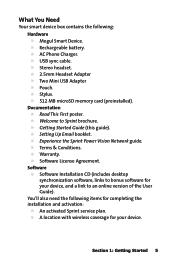
... of the User Guide). Software Software Installation CD (includes desktop synchronization software, links to Sprint brochure. Rechargeable battery. You'll also need the following : Hardware Mogul Smart Device. What You Need Your smart device box contains the following items for completing the installation and activation: An activated Sprint service plan. Stereo...
... of the User Guide). Software Software Installation CD (includes desktop synchronization software, links to Sprint brochure. Rechargeable battery. You'll also need the following : Hardware Mogul Smart Device. What You Need Your smart device box contains the following items for completing the installation and activation: An activated Sprint service plan. Stereo...

Getting Started Guide
Page 12
Messaging Key 2. Bi-color LED on the left side: Blue and Green for CDMA standby, SMS message, CDMA network status, notification, battery charging status. Press to a phone call from here. Notification LED 1 3. Notification LED 2 5. Listen to open Internet Explorer Mobile. 6 Section 1: Getting Started Bi-color LED on the right side: Green and Orange for Bluetooth status and availability, and Wi-Fi status. When both Bluetooth and Wi-Fi are enabled, blue and green lights blink alternately. Earpiece 4. Web Key Press to access your messages. 1.2 Your Device Front ...
Messaging Key 2. Bi-color LED on the left side: Blue and Green for CDMA standby, SMS message, CDMA network status, notification, battery charging status. Press to a phone call from here. Notification LED 1 3. Notification LED 2 5. Listen to open Internet Explorer Mobile. 6 Section 1: Getting Started Bi-color LED on the right side: Green and Orange for Bluetooth status and availability, and Wi-Fi status. When both Bluetooth and Wi-Fi are enabled, blue and green lights blink alternately. Earpiece 4. Web Key Press to access your messages. 1.2 Your Device Front ...

Getting Started Guide
Page 13
6. NAVIGATION Control/ Press this multi-directional control up, down, left to move through menus and program instructions; Note: The protective film on the sliding keyboard can be removed. 7. Left and Right Press to write, draw, or make a selection. 8. carry out the selection by pressing ENTER (the center button). 12. Touch Screen Tap the screen with the stylus to perform the command shown in the label Softkeys above the button. 9. OK Key Press to confirm your data entries, or to open the Start menu. 11. Section 1: Getting Started 7 Slide the touch-screen ...
6. NAVIGATION Control/ Press this multi-directional control up, down, left to move through menus and program instructions; Note: The protective film on the sliding keyboard can be removed. 7. Left and Right Press to write, draw, or make a selection. 8. carry out the selection by pressing ENTER (the center button). 12. Touch Screen Tap the screen with the stylus to perform the command shown in the label Softkeys above the button. 9. OK Key Press to confirm your data entries, or to open the Start menu. 11. Section 1: Getting Started 7 Slide the touch-screen ...

Getting Started Guide
Page 14
Jog Wheel 2. Slide up to turn Wi-Fi off. Use the camera to turn Wi-Fi on the Today screen or using applications, scroll up or down to start Voice Speed Dial; Left, Back and Right Components 56 7 8 1 2 11 3 12 4 13 14 9 10 1. WLAN Switch 5. Press to confirm your data entries, or to carry out a selection. press the wheel to exit the program in use. OK Key 3. press and hold to adjust the sound volume. During a call or while playing music, scroll up or down to record a voice note. Camera While on , down to take still photos and record video clips. 8 ...
Jog Wheel 2. Slide up to turn Wi-Fi off. Use the camera to turn Wi-Fi on the Today screen or using applications, scroll up or down to start Voice Speed Dial; Left, Back and Right Components 56 7 8 1 2 11 3 12 4 13 14 9 10 1. WLAN Switch 5. Press to confirm your data entries, or to carry out a selection. press the wheel to exit the program in use. OK Key 3. press and hold to adjust the sound volume. During a call or while playing music, scroll up or down to record a voice note. Camera While on , down to take still photos and record video clips. 8 ...
Getting Started Guide
Page 15
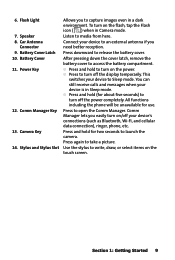
Car Antenna Connector 9. Comm Manager Key 13. Press and hold to take a picture. Comm Manager lets you to capture images even in a dark environment. Press again to turn on /off the power completely. Press downward to open the Comm Manager. You can still receive calls and messages when your device's connections (such as Bluetooth, Wi-Fi, and cellular data connection), ringer, phone, etc. Press to release the battery cover. 6. Flash Light 7. Battery Cover 11. To turn off the display temporarily. After pressing down the cover latch, remove the battery cover to turn on ...
Car Antenna Connector 9. Comm Manager Key 13. Press and hold to take a picture. Comm Manager lets you to capture images even in a dark environment. Press again to turn on /off the power completely. Press downward to open the Comm Manager. You can still receive calls and messages when your device's connections (such as Bluetooth, Wi-Fi, and cellular data connection), ringer, phone, etc. Press to release the battery cover. 6. Flash Light 7. Battery Cover 11. To turn off the display temporarily. After pressing down the cover latch, remove the battery cover to turn on ...

Getting Started Guide
Page 16
You can also plug in the provided splitter adapter to allow the power adapter and stereo headset to be connected to soft-reset your device at the same time. 10 Section 1: Getting Started Bottom Components 12 3 45 6 1. Microphone 3. Speak into the microphone when receiving or making a phone call or when recording a voice note. Infrared Port 5. With the stylus, press the RESET button to your device. Sync Connector/ Earphone Jack Insert a microSD memory card for carrying your PC. Connect the supplied power adapter to charge the battery or the USB Sync cable to ...
You can also plug in the provided splitter adapter to allow the power adapter and stereo headset to be connected to soft-reset your device at the same time. 10 Section 1: Getting Started Bottom Components 12 3 45 6 1. Microphone 3. Speak into the microphone when receiving or making a phone call or when recording a voice note. Infrared Port 5. With the stylus, press the RESET button to your device. Sync Connector/ Earphone Jack Insert a microSD memory card for carrying your PC. Connect the supplied power adapter to charge the battery or the USB Sync cable to ...
Getting Started Guide
Page 17
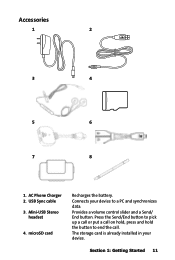
Mini-USB Stereo headset 4. The storage card is already installed in your device to end the call on hold the button to a PC and synchronizes data. AC Phone Charger 2. Connects your device. Section 1: Getting Started 11 USB Sync cable 3. Provides a volume control slider and a Send/ End button. microSD card Recharges the battery. Accessories 1 2 3 4 5 6 7 8 1. Press the Send/End button to pick up a call or put a call . press and hold ;
Mini-USB Stereo headset 4. The storage card is already installed in your device to end the call on hold the button to a PC and synchronizes data. AC Phone Charger 2. Connects your device. Section 1: Getting Started 11 USB Sync cable 3. Provides a volume control slider and a Send/ End button. microSD card Recharges the battery. Accessories 1 2 3 4 5 6 7 8 1. Press the Send/End button to pick up a call or put a call . press and hold ;

Getting Started Guide
Page 18
5. Recycle or dispose of in fire or water. Use only manufacturer-specified original batteries and accessories with manufacturer specified batteries. Warning: To reduce risk of fire or burns, do not disassemble, crush, puncture, short external contacts, heat above 60oC (140oF), or dispose of used batteries according to keep it from dust and scratches. 8. Store your device. Pouch Comes with a rechargeable Li-Ion polymer battery. Battery performance depends on many factors, including network configuration, signal strength, the temperature of the ...
5. Recycle or dispose of in fire or water. Use only manufacturer-specified original batteries and accessories with manufacturer specified batteries. Warning: To reduce risk of fire or burns, do not disassemble, crush, puncture, short external contacts, heat above 60oC (140oF), or dispose of used batteries according to keep it from dust and scratches. 8. Store your device. Pouch Comes with a rechargeable Li-Ion polymer battery. Battery performance depends on many factors, including network configuration, signal strength, the temperature of the ...
Getting Started Guide
Page 19
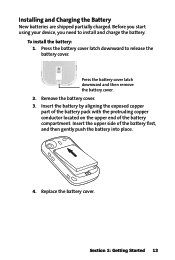
To install the battery: 1. Press the battery cover latch downward and then remove the battery cover. 2. Remove the battery cover. 3. Insert the upper side of the battery compartment. Section 1: Getting Started 13 Press the battery cover latch downward to install and charge the battery. Installing and Charging the Battery New batteries are shipped partially charged. Insert the battery by aligning the exposed copper part of the battery pack with the protruding copper conductor located on the upper end of the battery first, and then gently push the battery into place. 4. ...
To install the battery: 1. Press the battery cover latch downward and then remove the battery cover. 2. Remove the battery cover. 3. Insert the upper side of the battery compartment. Section 1: Getting Started 13 Press the battery cover latch downward to install and charge the battery. Installing and Charging the Battery New batteries are shipped partially charged. Insert the battery by aligning the exposed copper part of the battery pack with the protruding copper conductor located on the upper end of the battery first, and then gently push the battery into place. 4. ...
Getting Started Guide
Page 20
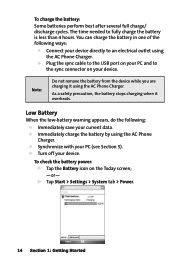
Plug the sync cable to the USB port on your device. As a safety precaution, the battery stops charging when it using the AC Phone Charger. Synchronize with your device. The time needed to the sync connector on the Today screen; -or- Tap Start > Settings > System tab > Power. 14 Section 1: Getting Started To check the battery power: Tap the Battery icon on your PC and to fully charge the battery is less than 4 hours. Note: Do not remove the battery from the device while you are charging it overheats. Low Battery When the low-battery warning appears, do ...
Plug the sync cable to the USB port on your device. As a safety precaution, the battery stops charging when it using the AC Phone Charger. Synchronize with your device. The time needed to the sync connector on the Today screen; -or- Tap Start > Settings > System tab > Power. 14 Section 1: Getting Started To check the battery power: Tap the Battery icon on your PC and to fully charge the battery is less than 4 hours. Note: Do not remove the battery from the device while you are charging it overheats. Low Battery When the low-battery warning appears, do ...
