Manual
Page 1
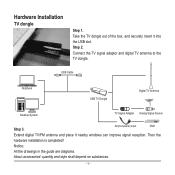
... signal reception. Step 2. USB Cable Notebook USB TV Dongle Digital TV Antenna Desktop System TV Signal Adapter Analog Signal Source Step 3. Hardware Installation TV dongle Step 1. Connect the TV signal adaptor and digital TV antenna to the TV dongle. AV(Composite) input DVD Extend digital TV/FM antenna and place it into the USB slot. Then the hardware installation is completed! Notice: All the drawings in the guide are diagrams. About accessories...
... signal reception. Step 2. USB Cable Notebook USB TV Dongle Digital TV Antenna Desktop System TV Signal Adapter Analog Signal Source Step 3. Hardware Installation TV dongle Step 1. Connect the TV signal adaptor and digital TV antenna to the TV dongle. AV(Composite) input DVD Extend digital TV/FM antenna and place it into the USB slot. Then the hardware installation is completed! Notice: All the drawings in the guide are diagrams. About accessories...
Manual
Page 2
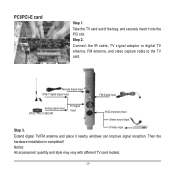
... antenna, and video capture cable to the TV card. Notice: All accessories' quantity and style may vary with different TV card models. - 2 - Step 2. Take the TV card out of the bag, and securely insert it nearby windows can improve signal reception. PCI/PCI-E card Step 1. Remote Signal input DVB-T digital signal input FM Signal input analog signal input NTSC, PAL or SECAM TV Signal input AV(Composite) input Stereo sound input Step 3. Then the hardware installation is completed! S-Video input...
... antenna, and video capture cable to the TV card. Notice: All accessories' quantity and style may vary with different TV card models. - 2 - Step 2. Take the TV card out of the bag, and securely insert it nearby windows can improve signal reception. PCI/PCI-E card Step 1. Remote Signal input DVB-T digital signal input FM Signal input analog signal input NTSC, PAL or SECAM TV Signal input AV(Composite) input Stereo sound input Step 3. Then the hardware installation is completed! S-Video input...
Manual
Page 3
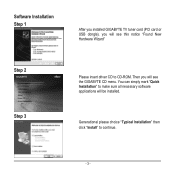
Then you will see the GIGABYTE CD menu. You can simply mark "Quick Installation" to make sure all necessary software applications will see this notice "Found New Hardware Wizard" Step 2 Step 3 Please insert driver CD to continue. - 3 - Software Installation Step 1 After you installed GIGABYTE TV tuner card (PCI card or USB dongle), you will be installed. Generational please choice "Typical Installation" then click "Install" to CD-ROM.
Then you will see the GIGABYTE CD menu. You can simply mark "Quick Installation" to make sure all necessary software applications will see this notice "Found New Hardware Wizard" Step 2 Step 3 Please insert driver CD to continue. - 3 - Software Installation Step 1 After you installed GIGABYTE TV tuner card (PCI card or USB dongle), you will be installed. Generational please choice "Typical Installation" then click "Install" to CD-ROM.
Manual
Page 7
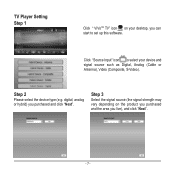
Step 3 Select the signal source (the signal strength may vary depending on your desktop, you can start to select your device and signal source such as Digital, Analog (Cable or Antenna), Video (Composite, S-Video). Step 2 Please select the device type (e.g. Click "Source Input" icon to set up this software. digital, analog or hybrid) you live), and click "Next". - 7 - TV Player Setting Step 1 Click " ViVoTM TV" icon on the product you purchased and the area you purchased and click "Next".
Step 3 Select the signal source (the signal strength may vary depending on your desktop, you can start to select your device and signal source such as Digital, Analog (Cable or Antenna), Video (Composite, S-Video). Step 2 Please select the device type (e.g. Click "Source Input" icon to set up this software. digital, analog or hybrid) you live), and click "Next". - 7 - TV Player Setting Step 1 Click " ViVoTM TV" icon on the product you purchased and the area you purchased and click "Next".
Manual
Page 8
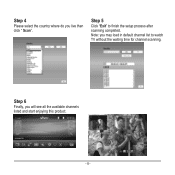
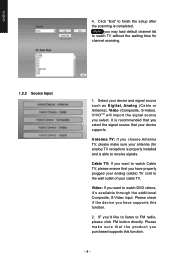
Step 4 Please select the country where do you may load in default channel list to finish the setup process after scanning completed. Note: you live then click " Scan". Step 6 Finally, you will see all the available channels listed and start enjoying this product. - 8 - Step 5 Click "Exit" to watch TV without the waiting time for channel scanning.
Step 4 Please select the country where do you may load in default channel list to finish the setup process after scanning completed. Note: you live then click " Scan". Step 6 Finally, you will see all the available channels listed and start enjoying this product. - 8 - Step 5 Click "Exit" to watch TV without the waiting time for channel scanning.
Manual
Page 2
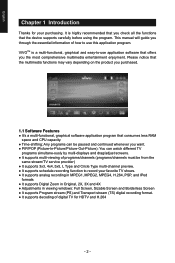
...-to use application software that offers you want. ● PIP/POP (Picture-In-Picture/Picture-Out-Picture): You can watch different TV programs simultane-ously by multi-displays and drag/adjust screens. ● It supports multi-viewing of programs/channels (programs/channels must be from the same stream/TV service provider) ● It supports 3x3, 4x4, 5x5, L Type and Circle Type multi-channel preview. ● It supports schedule-recording function to record...
...-to use application software that offers you want. ● PIP/POP (Picture-In-Picture/Picture-Out-Picture): You can watch different TV programs simultane-ously by multi-displays and drag/adjust screens. ● It supports multi-viewing of programs/channels (programs/channels must be from the same stream/TV service provider) ● It supports 3x3, 4x4, 5x5, L Type and Circle Type multi-channel preview. ● It supports schedule-recording function to record...
Manual
Page 3
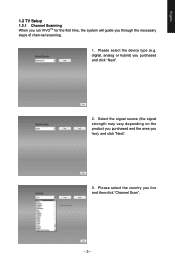
English 1.2 TV Setup 1.2.1 Channel Scanning When you run VIVOTM for the first time, the system will guide you purchased and click "Next". 2. Please select the device type (e.g. Select the signal source (the signal strength may vary depending on the product you purchased and the area you live ), and click "Next". 3. Please select the country you live and then click "Channel Scan". - 3 - digital, analog or hybrid) you through the necessary steps of chan-nel scanning. 1.
English 1.2 TV Setup 1.2.1 Channel Scanning When you run VIVOTM for the first time, the system will guide you purchased and click "Next". 2. Please select the device type (e.g. Select the signal source (the signal strength may vary depending on the product you purchased and the area you live ), and click "Next". 3. Please select the country you live and then click "Channel Scan". - 3 - digital, analog or hybrid) you through the necessary steps of chan-nel scanning. 1.
Manual
Page 4
... want to the wall outlet of your antenna (for channel scanning. 1.2.2 Source Input 1. Note you select the signal source that your device and signal source such as Digital, Analog (Cable or Antenna), Video (Composite, S-Video). Cable TV: If you want to FM radio, please click FM button directly. English 4. It is recommended that you may load default channel list to watch Cable TV, please ensure that the product you...
... want to the wall outlet of your antenna (for channel scanning. 1.2.2 Source Input 1. Note you select the signal source that your device and signal source such as Digital, Analog (Cable or Antenna), Video (Composite, S-Video). Cable TV: If you want to FM radio, please click FM button directly. English 4. It is recommended that you may load default channel list to watch Cable TV, please ensure that the product you...
Manual
Page 5
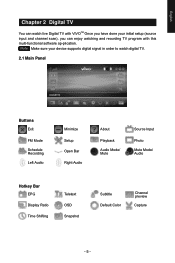
... recording TV program with this multi-functional software ap-plication. Note Make sure your initial setup (source input and channel scan), you have done your device supports digital signal in order to watch digital TV. 2.1 Main Panel Buttons Exit FM Mode Schedule Recording Left Audio Minimize Setup Open Bar Right Audio About Playback Audio Mode/ Mute Source Input Photo Mute Mode/ Audio Hotkey Bar EPG Display Ratio Time Shifting Teletext OSD Snapshot Subtitle Default Color Channel...
... recording TV program with this multi-functional software ap-plication. Note Make sure your initial setup (source input and channel scan), you have done your device supports digital signal in order to watch digital TV. 2.1 Main Panel Buttons Exit FM Mode Schedule Recording Left Audio Minimize Setup Open Bar Right Audio About Playback Audio Mode/ Mute Source Input Photo Mute Mode/ Audio Hotkey Bar EPG Display Ratio Time Shifting Teletext OSD Snapshot Subtitle Default Color Channel...
Manual
Page 6
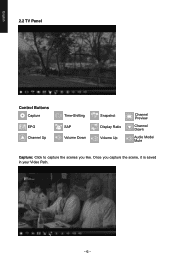
Once you like. English 2.2 TV Panel Control Buttons Capture EPG Channel Up Time-Shifting SAP Volume Down Snapshot Display Ratio Volume Up Channel Preview Channel Down Audio Mode/ Mute Capture: Click to capture the scenes you capture the scene, it is saved in your Video Path. - 6 -
Once you like. English 2.2 TV Panel Control Buttons Capture EPG Channel Up Time-Shifting SAP Volume Down Snapshot Display Ratio Volume Up Channel Preview Channel Down Audio Mode/ Mute Capture: Click to capture the scenes you capture the scene, it is saved in your Video Path. - 6 -

Manual
Page 7
Time Shifting function records the TV program you 'd like to pause/fast-forward/rewind TV shows so you won't miss any part when you left the show for something else. English If you are currently watching. Time Shifting: This icon enables Time-shifting function once clicked. Audio Mode/Mute Stop Backward Pause Forward - 7 - This function enables you to stop capture, click caption button again or right click on the screen and then enable "Stop Capture". Control buttons define as table below.
Time Shifting function records the TV program you 'd like to pause/fast-forward/rewind TV shows so you won't miss any part when you left the show for something else. English If you are currently watching. Time Shifting: This icon enables Time-shifting function once clicked. Audio Mode/Mute Stop Backward Pause Forward - 7 - This function enables you to stop capture, click caption button again or right click on the screen and then enable "Stop Capture". Control buttons define as table below.
Manual
Page 8
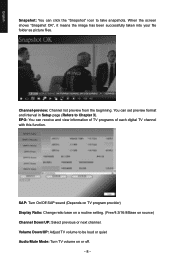
... quiet Audio/Mute Mode: Turn TV volume on source) Channel Down/UP: Select previous or next channel. Volume Down/UP: Adjust TV volume to take snapshots. SAP: Turn On/Off SAP sound (Depends on TV program provider) Display Ratio: Change ratio base on a routine setting. (Free/4:3/16:9/Base on or off. - 8 - Channel-preview: Channel list preview from the beginning. EPG: You can receive and view information of TV programs of each digital TV channel with...
... quiet Audio/Mute Mode: Turn TV volume on source) Channel Down/UP: Select previous or next channel. Volume Down/UP: Adjust TV volume to take snapshots. SAP: Turn On/Off SAP sound (Depends on TV program provider) Display Ratio: Change ratio base on a routine setting. (Free/4:3/16:9/Base on or off. - 8 - Channel-preview: Channel list preview from the beginning. EPG: You can receive and view information of TV programs of each digital TV channel with...
Manual
Page 10
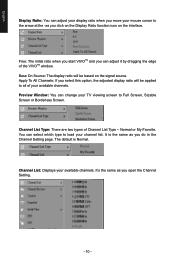
... Window: You can change your channel list. You can select which type to load your TV viewing screen to Full Screen, Sizable Screen or Borderless Screen. It's the same as you do in the Channel Setting page. It is Normal. Apply To All Channels: If you select this option, the adjusted display ratio will be applied to all of your available channels. Channel List: Displays your available channels. The default...
... Window: You can change your channel list. You can select which type to load your TV viewing screen to Full Screen, Sizable Screen or Borderless Screen. It's the same as you do in the Channel Setting page. It is Normal. Apply To All Channels: If you select this option, the adjusted display ratio will be applied to all of your available channels. Channel List: Displays your available channels. The default...

Manual
Page 11
... multiple channels/programs that were in TS or PS formats. Those sub screens that two other viewing screens appear within the main TV screen. Start Multi-view: When you move your mouse cursor to your viewing demands. - 11 - Note You can choose to take the Snapshot. Capture: You can then drag the sub screens that are from the same signal frequency at...
... multiple channels/programs that were in TS or PS formats. Those sub screens that two other viewing screens appear within the main TV screen. Start Multi-view: When you move your mouse cursor to your viewing demands. - 11 - Note You can choose to take the Snapshot. Capture: You can then drag the sub screens that are from the same signal frequency at...
Manual
Page 12
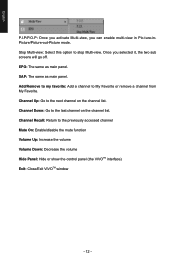
.../disable the mute function Volume Up: Increase the volume Volume Down: Decrease the volume Hide Panel: Hide or show the control panel (the VIVOTM interface) Exit: Close/Exit VIVOTM window - 12 - English P.I.P/P.O.P: Once you activate Multi-view, you selected it, the two sub screens will go off. Channel Down: Go to the last channel on the channel list. SAP: The same as...
.../disable the mute function Volume Up: Increase the volume Volume Down: Decrease the volume Hide Panel: Hide or show the control panel (the VIVOTM interface) Exit: Close/Exit VIVOTM window - 12 - English P.I.P/P.O.P: Once you activate Multi-view, you selected it, the two sub screens will go off. Channel Down: Go to the last channel on the channel list. SAP: The same as...
Manual
Page 14
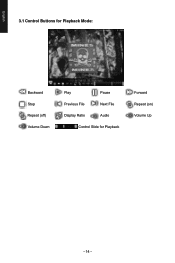
English 3.1 Control Buttons for Playback Mode: Backward Stop Repeat (off) Volume Down Play Pause Previous File Next File Display Ratio Audio Control Slide for Playback Forward Repeat (on) Volume Up - 14 -
English 3.1 Control Buttons for Playback Mode: Backward Stop Repeat (off) Volume Down Play Pause Previous File Next File Display Ratio Audio Control Slide for Playback Forward Repeat (on) Volume Up - 14 -
Manual
Page 15
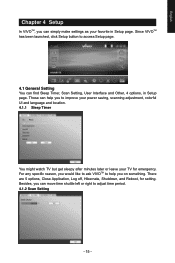
... emergency. English Chapter 4 Setup In VIVOTM, you can move time shuttle left or right to adjust time period. 4.1.2 Scan Setting - 15 - Since VIVOTM has been launched, click Setup button to access Setup page. 4.1 General Setting You can help you to help you on something. Besides, you can simply make settings as your TV for setting. Those can find Sleep Timer, Scan Setting, User Interface and Other, 4 options...
... emergency. English Chapter 4 Setup In VIVOTM, you can move time shuttle left or right to adjust time period. 4.1.2 Scan Setting - 15 - Since VIVOTM has been launched, click Setup button to access Setup page. 4.1 General Setting You can help you to help you on something. Besides, you can simply make settings as your TV for setting. Those can find Sleep Timer, Scan Setting, User Interface and Other, 4 options...
Manual
Page 16
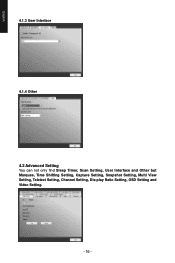
English 4.1.3 User Interface 4.1.4 Other 4.2 Advanced Setting You can not only find Sleep Timer, Scan Setting, User Interface and Other but Marquee, Time Shifting Setting, Capture Setting, Snapshot Setting, Multi View Setting, Teletext Setting, Channel Setting, Dis-play Ratio Setting, OSD Setting and Video Setting. - 16 -
English 4.1.3 User Interface 4.1.4 Other 4.2 Advanced Setting You can not only find Sleep Timer, Scan Setting, User Interface and Other but Marquee, Time Shifting Setting, Capture Setting, Snapshot Setting, Multi View Setting, Teletext Setting, Channel Setting, Dis-play Ratio Setting, OSD Setting and Video Setting. - 16 -

Manual
Page 18
English 4.2.4 Snapshot Setting Here we can set the snapshot file format, where to save the pics, and the how many pics will be saved when using the snapshot function. 4.2.5 Teletext Setting Here we can input the teletext main page and sub page, or use the color button to switch teletext page. 4.2.6 Channel Setting Here we can set the channel preview type, preview interval, channel group, and channel management. - 18 -
English 4.2.4 Snapshot Setting Here we can set the snapshot file format, where to save the pics, and the how many pics will be saved when using the snapshot function. 4.2.5 Teletext Setting Here we can input the teletext main page and sub page, or use the color button to switch teletext page. 4.2.6 Channel Setting Here we can set the channel preview type, preview interval, channel group, and channel management. - 18 -
Manual
Page 19
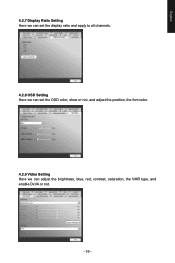
English 4.2.7 Display Ratio Setting Here we can set the display ratio and apply to all channels. 4.2.8 OSD Setting Here we can set the OSD color, show or not, and adjust the position, the font color. 4.2.9 Video Setting Here we can adjust the brightness, blue, red, contrast, saturation, the VMR type, and enable DxVA or not. - 19 -
English 4.2.7 Display Ratio Setting Here we can set the display ratio and apply to all channels. 4.2.8 OSD Setting Here we can set the OSD color, show or not, and adjust the position, the font color. 4.2.9 Video Setting Here we can adjust the brightness, blue, red, contrast, saturation, the VMR type, and enable DxVA or not. - 19 -


