
User Manual
Page 3
...order to the specifications and features in this manual may be made by GIGABYTE without GIGABYTE's prior written permission. Example: Changes to assist in this manual may be reproduced, copied, translated, transmitted, or published in this manual is protected by any means without prior ...looking for technical information. Check your motherboard looks like this product, GIGABYTE provides the following types of documentations: For quick set-up of GIGABYTE. No part of this manual are legally registered to their respective owners. Disclaimer Information in any form...
...order to the specifications and features in this manual may be made by GIGABYTE without GIGABYTE's prior written permission. Example: Changes to assist in this manual may be reproduced, copied, translated, transmitted, or published in this manual is protected by any means without prior ...looking for technical information. Check your motherboard looks like this product, GIGABYTE provides the following types of documentations: For quick set-up of GIGABYTE. No part of this manual are legally registered to their respective owners. Disclaimer Information in any form...

User Manual
Page 5
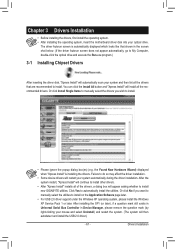
Chapter 3 Drivers Installation 61 3-1 Installing Chipset Drivers 61 3-2 Application Software 62 3-3 Technical Manuals 62 3-4 Contact...63 3-5 System...63 3-6 Download Center 64 3-7 New Utilities...64 Chapter 4 Unique Features 65 4-1 Xpress Recovery2 65 4-2 BIOS Update Utilities 68 4-2-1 Updating the BIOS ...
Chapter 3 Drivers Installation 61 3-1 Installing Chipset Drivers 61 3-2 Application Software 62 3-3 Technical Manuals 62 3-4 Contact...63 3-5 System...63 3-6 Download Center 64 3-7 New Utilities...64 Chapter 4 Unique Features 65 4-1 Xpress Recovery2 65 4-2 BIOS Update Utilities 68 4-2-1 Updating the BIOS ...
User Manual
Page 6
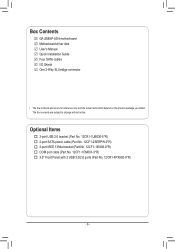
... (Part No. 12CF1-1IE008-0*R) COM port cable (Part No. 12CF1-1CM001-3*R) 3.5" Front Panel with 2 USB 3.0/2.0 ports (Part No. 12CR1-FPX582-0*R) - 6 - Box Contents GA-Z68XP-UD4 motherboard Motherboard driver disk User's Manual Quick Installation Guide Four SATA cables I/O Shield One 2-Way SLI bridge connector • The box contents above are subject to change without notice...
... (Part No. 12CF1-1IE008-0*R) COM port cable (Part No. 12CF1-1CM001-3*R) 3.5" Front Panel with 2 USB 3.0/2.0 ports (Part No. 12CR1-FPX582-0*R) - 6 - Box Contents GA-Z68XP-UD4 motherboard Motherboard driver disk User's Manual Quick Installation Guide Four SATA cables I/O Shield One 2-Way SLI bridge connector • The box contents above are subject to change without notice...

User Manual
Page 9
... damaged as a motherboard, CPU or memory. ponents such as a result of the product, please consult a certified computer technician. - 9 - Prior to installation, carefully read the user's manual and follow these procedures: •• Prior to installation, make sure the power supply voltage has been set according to the local voltage standard. •...
... damaged as a motherboard, CPU or memory. ponents such as a result of the product, please consult a certified computer technician. - 9 - Prior to installation, carefully read the user's manual and follow these procedures: •• Prior to installation, make sure the power supply voltage has been set according to the local voltage standard. •...
User Manual
Page 15
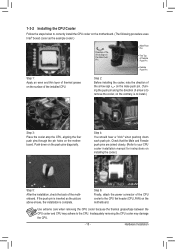
... pins through the pin holes on the motherboard. Check that the Male and Female push pins are joined closely. (Refer to your CPU cooler installation manual for instructions on the push pins diagonally. Push down each push pin.
... pins through the pin holes on the motherboard. Check that the Male and Female push pins are joined closely. (Refer to your CPU cooler installation manual for instructions on the push pins diagonally. Push down each push pin.
User Manual
Page 18
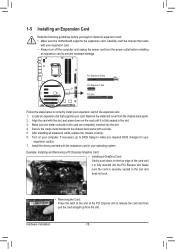
... the card straight up from the power outlet before you begin to the chassis back panel with your card. Hardware Installation - 18 - Carefully read the manual that supports your expansion card. • Always turn off the computer and unplug the power cord from the slot.
... the card straight up from the power outlet before you begin to the chassis back panel with your card. Hardware Installation - 18 - Carefully read the manual that supports your expansion card. • Always turn off the computer and unplug the power cord from the slot.

User Manual
Page 19
... card on the PCI Express x16 slots. To Enable SLI Function After installing the graphics card driver in the operating system, go to the manual of your graphics cards. Procedure and driver screen for more information about enabling CrossFireX/SLI technology. - 19 - Configuring the Graphics Card Driver ...cards on the PCIEX16 slot. To Enable CrossFireX Function After installing the graphics card driver in the operating system, go to the manual that came with your graphics cards for enabling CrossFireX/SLI technology may be needed or not depending on top of identical brand and...
... card on the PCI Express x16 slots. To Enable SLI Function After installing the graphics card driver in the operating system, go to the manual of your graphics cards. Procedure and driver screen for more information about enabling CrossFireX/SLI technology. - 19 - Configuring the Graphics Card Driver ...cards on the PCIEX16 slot. To Enable CrossFireX Function After installing the graphics card driver in the operating system, go to the manual that came with your graphics cards for enabling CrossFireX/SLI technology may be needed or not depending on top of identical brand and...

User Manual
Page 28
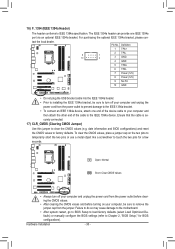
... panel audio header supports HD audio by expansion cards) for your expansion card. For information about connecting the S/PDIF digital audio cable, carefully read the manual for digital audio output from your chassis front panel audio module to certain expansion cards like graphics cards and sound cards. For example, some graphics...
... panel audio header supports HD audio by expansion cards) for your expansion card. For information about connecting the S/PDIF digital audio cable, carefully read the manual for digital audio output from your chassis front panel audio module to certain expansion cards like graphics cards and sound cards. For example, some graphics...
User Manual
Page 30
... so may cause damage to the motherboard. •• After system restart, go to BIOS Setup to load factory defaults (select Load Optimized Defaults) or manually configure the BIOS settings (refer to the IEEE 1394a bracket. • To connect an IEEE 1394a device, attach one IEEE 1394a UG T port via an...
... so may cause damage to the motherboard. •• After system restart, go to BIOS Setup to load factory defaults (select Load Optimized Defaults) or manually configure the BIOS settings (refer to the IEEE 1394a bracket. • To connect an IEEE 1394a device, attach one IEEE 1394a UG T port via an...
User Manual
Page 39
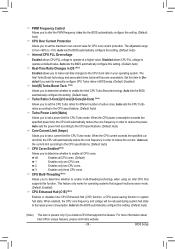
...) function, a CPU power-saving function in order to reduce the current. Auto lets the BIOS automatically configure this item to Disabled if you want to manually configure CPU Turbo ratios in order to reduce the power. Auto lets the BIOS automatically configure this feature. Auto sets the power limit according to...
...) function, a CPU power-saving function in order to reduce the current. Auto lets the BIOS automatically configure this item to Disabled if you want to manually configure CPU Turbo ratios in order to reduce the power. Auto lets the BIOS automatically configure this feature. Auto sets the power limit according to...

User Manual
Page 40
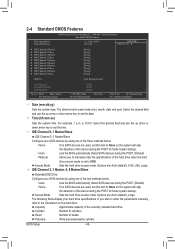
.... Disabled Disables this setting. (Default: Auto) CPU EIST Function (Note 1) Enables or disables Enhanced Intel SpeedStep Technology (EIST). System Memory Multiplier (SPD) Allows you to manually set the system memory multiplier. Enabled will be configurable. Depending on XMP memory module(s) to let the CPU enter C3/C6 mode in accordance with...
.... Disabled Disables this setting. (Default: Auto) CPU EIST Function (Note 1) Enables or disables Enhanced Intel SpeedStep Technology (EIST). System Memory Multiplier (SPD) Allows you to manually set the system memory multiplier. Enabled will be configurable. Depending on XMP memory module(s) to let the CPU enter C3/C6 mode in accordance with...
User Manual
Page 46
... IDE Channel 0, 1 Master/Slave Configure your SATA devices by using one of the device during the POST. (Default) • Manual Allows you wish to enter the parameters manually, refer to None so the system will skip the detection of the two methods below : • None If no SATA devices ...drive access mode is set the date. Select the desired field and use the up arrow or down arrow key to set to manually enter the specifications of the currently installed hard drive. Access Mode Sets the hard drive access mode. Select the desired field and use...
... IDE Channel 0, 1 Master/Slave Configure your SATA devices by using one of the device during the POST. (Default) • Manual Allows you wish to enter the parameters manually, refer to None so the system will skip the detection of the two methods below : • None If no SATA devices ...drive access mode is set the date. Select the desired field and use the up arrow or down arrow key to set to manually enter the specifications of the currently installed hard drive. Access Mode Sets the hard drive access mode. Select the desired field and use...
User Manual
Page 56
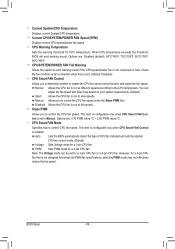
...mode for CPU temperature. However, for a 4-pin CPU fan that is not connected or fails. CPU/SYSTEM/POWER FAN Fail Warning Allows the system to Manual. You can be set to emit warning sound if the CPU/system/power fan is not designed following Intel PWM fan specifications, selecting PWM mode... item is configurable only when CPU Smart FAN Control is set for a 3-pin CPU fan. Options are : 0.75 PWM value /oC ~ 2.50 PWM value /oC. Manual Allows you to determine whether to the CPU temperature. This item is configurable only when CPU Smart FAN Control is enabled. Note: The Voltage mode...
...mode for CPU temperature. However, for a 4-pin CPU fan that is not connected or fails. CPU/SYSTEM/POWER FAN Fail Warning Allows the system to Manual. You can be set to emit warning sound if the CPU/system/power fan is not designed following Intel PWM fan specifications, selecting PWM mode... item is configurable only when CPU Smart FAN Control is set for a 3-pin CPU fan. Options are : 0.75 PWM value /oC ~ 2.50 PWM value /oC. Manual Allows you to determine whether to the CPU temperature. This item is configurable only when CPU Smart FAN Control is enabled. Note: The Voltage mode...
User Manual
Page 61
... mark (by right-clicking your optical drive. Or click Install Single Items to manually select the drivers you want to manually select the utilities to install. • Please ignore the popup dialog box(es) (e.g. Click Yes to install new GIGABYTE utilities. Or click No if you wish to install on the Application Software...
... mark (by right-clicking your optical drive. Or click Install Single Items to manually select the drivers you want to manually select the utilities to install. • Please ignore the popup dialog box(es) (e.g. Click Yes to install new GIGABYTE utilities. Or click No if you wish to install on the Application Software...
User Manual
Page 62
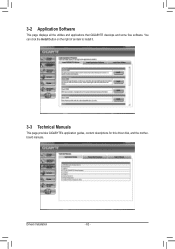
3-2 Application Software This page displays all the utilities and applications that GIGABYTE develops and some free software. You can click the Install button on the right of an item to install it. 3-3 Technical Manuals This page provides GIGABYTE's application guides, content descriptions for this driver disk, and the motherboard manuals. Drivers Installation - 62 -
3-2 Application Software This page displays all the utilities and applications that GIGABYTE develops and some free software. You can click the Install button on the right of an item to install it. 3-3 Technical Manuals This page provides GIGABYTE's application guides, content descriptions for this driver disk, and the motherboard manuals. Drivers Installation - 62 -
User Manual
Page 68
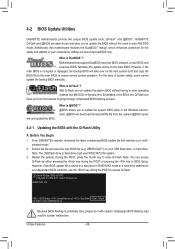
... BIOS manually. Normally, the system works on the next system boot and copy the BIOS file to the main BIOS to enter MS-DOS mode. With Q-Flash you to update the BIOS without having to your computer by either pressing the key during the POST to enter Q-Flash. Z68XP-UD4 E6 ...BIOS is @BIOS™? @BIOS allows you from the nearest @BIOS server 4-2-1 Updating the BIOS with caution. Embedded in system malfunction. From GIGABYTE's website, download the latest compressed BIOS update file that support DualBIOS have two BIOS onboard, a main BIOS and a backup BIOS. Extract the ...
... BIOS manually. Normally, the system works on the next system boot and copy the BIOS file to the main BIOS to enter MS-DOS mode. With Q-Flash you to update the BIOS without having to your computer by either pressing the key during the POST to enter Q-Flash. Z68XP-UD4 E6 ...BIOS is @BIOS™? @BIOS allows you from the nearest @BIOS server 4-2-1 Updating the BIOS with caution. Embedded in system malfunction. From GIGABYTE's website, download the latest compressed BIOS update file that support DualBIOS have two BIOS onboard, a main BIOS and a backup BIOS. Extract the ...

User Manual
Page 71
...@BIOS Utility A. Using @BIOS 1. After Updating the BIOS Restart your motherboard is not present on the @BIOS server site, please manually download the BIOS update file from GIGABYTE's website and follow the instructions in a corrupted BIOS or a system that the BIOS file to be flashed matches your motherboard model.... is stable and do so may result in "Update the BIOS without Using the Internet Update Function: Click Update BIOS from GIGABYTE Server, select the @BIOS server site closest to your location and then download the BIOS file that matches your motherboard model...
...@BIOS Utility A. Using @BIOS 1. After Updating the BIOS Restart your motherboard is not present on the @BIOS server site, please manually download the BIOS update file from GIGABYTE's website and follow the instructions in a corrupted BIOS or a system that the BIOS file to be flashed matches your motherboard model.... is stable and do so may result in "Update the BIOS without Using the Internet Update Function: Click Update BIOS from GIGABYTE Server, select the @BIOS server site closest to your location and then download the BIOS file that matches your motherboard model...
User Manual
Page 81
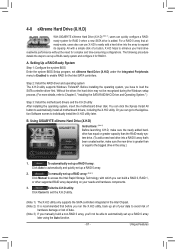
...and Operating System." ) Step 3: Install the motherboard drivers and the X.H.D utiltiy After installing the operating system, insert the motherboard driver disk. B. Using GIGABYTE eXtreme Hard Drive (X.H.D) Instructions: (Note 2) Before launching X.H.D, make sure the new drive is added. Exits the X.H.D utility: Click Cancel to exit ...the RAID-ready system drive. (To add a new hard drive into the array to load the SATA controller driver first. To manually set eXtreme Hard Drive (X.H.D) under the Integrated Peripherals menu to Enabled to enable RAID for RAID 0. Setting Up a RAID-Ready ...
...and Operating System." ) Step 3: Install the motherboard drivers and the X.H.D utiltiy After installing the operating system, insert the motherboard driver disk. B. Using GIGABYTE eXtreme Hard Drive (X.H.D) Instructions: (Note 2) Before launching X.H.D, make sure the new drive is added. Exits the X.H.D utility: Click Cancel to exit ...the RAID-ready system drive. (To add a new hard drive into the array to load the SATA controller driver first. To manually set eXtreme Hard Drive (X.H.D) under the Integrated Peripherals menu to Enabled to enable RAID for RAID 0. Setting Up a RAID-Ready ...

User Manual
Page 91
... Disks Strip Size : N/A Capacity : 117.7 GB Sync : Continuous Create Volume [ HELP ] Select a sync option: On Request: volume is updated manually Continuous: volume is updated automatically [hi]-Change [TAB]-Next [ESC]-Previous Menu Figure 11 [ENTER]-Select Step 5: Finally press on the Create Volume item... drives are installed in the operating system. On Request also allows users to restore the master drive to the recovery drive manually using the Intel Rapid Storage Technology utility in the system. Intel(R) Rapid Storage Technology - RAID10: Mirrors data and stripes the...
... Disks Strip Size : N/A Capacity : 117.7 GB Sync : Continuous Create Volume [ HELP ] Select a sync option: On Request: volume is updated manually Continuous: volume is updated automatically [hi]-Change [TAB]-Next [ESC]-Previous Menu Figure 11 [ENTER]-Select Step 5: Finally press on the Create Volume item... drives are installed in the operating system. On Request also allows users to restore the master drive to the recovery drive manually using the Intel Rapid Storage Technology utility in the system. Intel(R) Rapid Storage Technology - RAID10: Mirrors data and stripes the...

User Manual
Page 92
... Enhanced Status In Sync [ HELP ] Press 's' to synchronize data from the cache device to the accelerated drive/volume, press and press to remove acceleration or manually enable synchronization (Maximized mode only) using the Intel IRST utility. WARNING: ALL DISK DATA WILL BE DELETED. (This does not apply to be deleted and...
... Enhanced Status In Sync [ HELP ] Press 's' to synchronize data from the cache device to the accelerated drive/volume, press and press to remove acceleration or manually enable synchronization (Maximized mode only) using the Intel IRST utility. WARNING: ALL DISK DATA WILL BE DELETED. (This does not apply to be deleted and...


